


IOC控制反转
控制:意思就是创建对象
反转:把创建对象的权利转移给容器,由容器代替管理对象
正转:开发人员使用new关键字创建对象就是正转
DI依赖注入
DI是ioc的技术实现
DI:依赖注入,只需要在程序中提供要使用的对象名称就可以
第一个例子
(1)创建maven工程,使用普通java的模板
(2)在pom.xml配置文件中添加标签
// 在pom.xml中设置

<build>
    <resources>
      <resource>
        <directory>src/main/java</directory>
        <includes>
          <include>**/*.properties</include>
          <include>**/*.xml</include>
        </includes>
        <filtering>false</filtering>
      </resource>
    </resources>
  </build>
主要是用于编译的时候找到包下的所有配置文件(包括resources配置文件),一起打包到target下的classes目录里

(3)导入spring依赖
在pom.xml配置spring-context的依赖
<dependency>
    <groupId>org.springframework</groupId>
    <artifactId>spring-context</artifactId>
    <version>5.3.18</version>
</dependency>
(4)创建spirng配置文件,使用IDEA自带的spring模板来创建
*Spring配置文件名通常用:applicationContext.xml
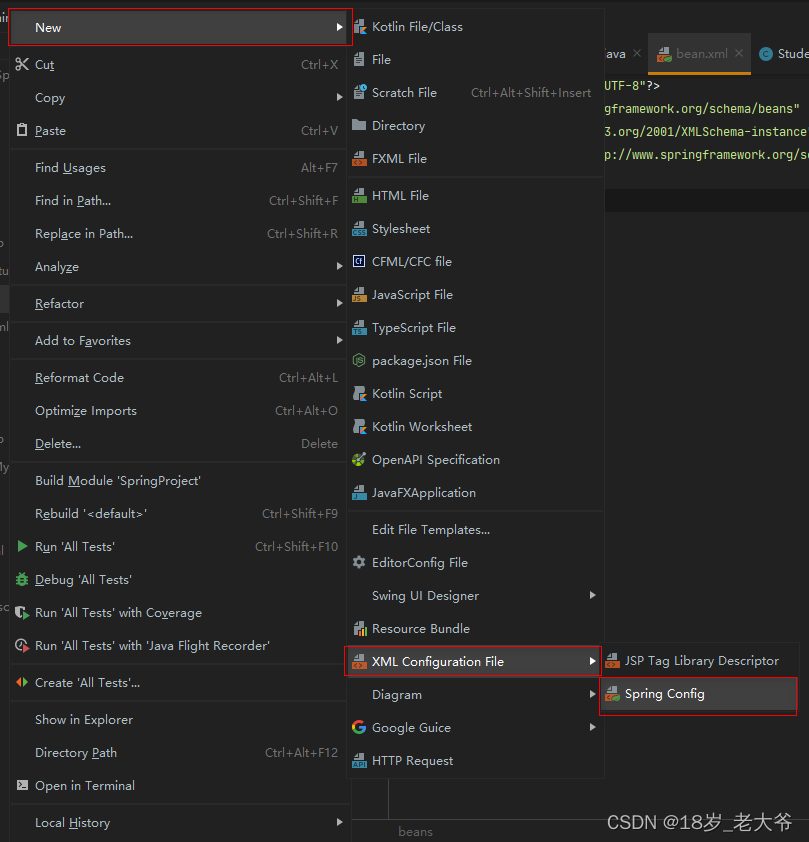
(5)配置spring的配置文件
配置文件中<beans>标签是根标签,在里面可以写<bean>标签,声明<bean>标签就是告诉spring要创建某个对象,其中<bean>标签中有id和class属性讲解,请看下方:
id:对象的自定义名称,必须是唯一值。spring是通过该名称找到对象
class:被创建的类的全限定名称(不能是接口,因为spring是通过反射创建对象)
*Spring框架中有一个Map对象用于存放创建好的对象,然后通过<bean>中的id属性用来添加或获取对象
(6)获取对象
通过创建Spring容器对象,调用getBean方法传入<bean>标签中id属性的值来获取对象
@Test
public void test() {
    // 配置文件的相对路径,相对于target下的classes目录(classes用于存放编译后的文件)
    String path = "bean.xml";

    // 创建Spring容器对象
    ApplicationContext temp = new ClassPathXmlApplicationContext(path);

    // 通过spring容器对象的getBean方法获取对象(传入的参数是spring配置文件中<bean>标签中id属性的值)
    Student student = (Student) temp.getBean("student");
}
Spring容器创建对象的时机
Spring创建对象时机是在创建ClassPathXmlApplicationContext对象时,spring容器会读取spring配置文件,通过<bean>中属性class里类的全限定名称来依次创建对象
实例如下:
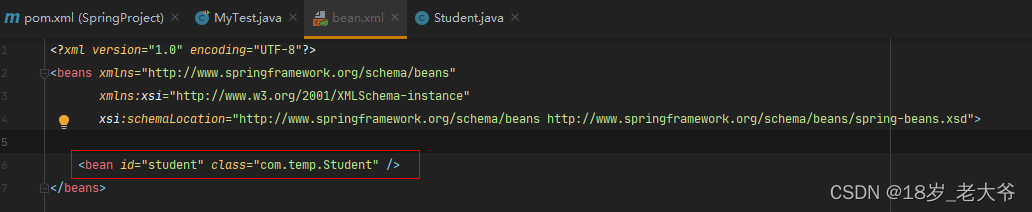
spring配置文件
<!-- Spring配置文件 -->
<?xml version="1.0" encoding="UTF-8"?>
<beans xmlns="http://www.springframework.org/schema/beans"
       xmlns:xsi="http://www.w3.org/2001/XMLSchema-instance"
       xsi:schemaLocation="http://www.springframework.org/schema/beans http://www.springframework.org/schema/beans/spring-beans.xsd">

    <bean id="student" class="com.temp.Student" />
</beans>
// 学生类
package com.temp;
public class Student {
// 姓名
private String name;
public Student() {
System.out.println("Spring容器创建Student成功!!!");
}
}
// 测试
@Test
public void test() {
String path = "bean.xml";
// 创建Spring容器对象
ApplicationContext temp = new ClassPathXmlApplicationContext(path);
}***************************************结果

Spring创建非自定义对象
之前创建的都是自己写的类(自定义对象),spring容器也可以创建非自定义的类(JDK自带的类)
注意:spring容器创建对象时默认调用空参构造
实例如下:
<!-- spring配置 -->
<?xml version="1.0" encoding="UTF-8"?>
<beans xmlns="http://www.springframework.org/schema/beans"
       xmlns:xsi="http://www.w3.org/2001/XMLSchema-instance"
       xsi:schemaLocation="http://www.springframework.org/schema/beans http://www.springframework.org/schema/beans/spring-beans.xsd">

    <bean id="student" class="com.temp.Student" />

    <!-- 日期类 -->
    <bean id="mydate" class="java.util.Date" />
</beans>
// 测试
@Test
public void test() {
String path = "bean.xml";
// 创建Spring容器对象
ApplicationContext sprint = new ClassPathXmlApplicationContext(path);
// 获取对象
Date mydate = (Date) sprint.getBean("mydate");
// 输出Date对象
System.out.println(mydate);
}***************************************结果

注入(DI)
“注入”的意思就是给对象属性赋值
注入(DI)的分类
set注入:通过调用对象的set方法来赋值(大部分使用set注入)
构造注入:通过调用对象的构造方法来赋值
基于Set方法的注入
通过Spring配置文件配置(XML配置),<bean>标签与<bean>之间没有先后之分,spring容器创建对象会进行二次扫描
<!-- Spring配置文件 -->
<?xml version="1.0" encoding="UTF-8"?>
<beans xmlns="http://www.springframework.org/schema/beans"
xmlns:xsi="http://www.w3.org/2001/XMLSchema-instance"
xsi:schemaLocation="http://www.springframework.org/schema/beans http://www.springframework.org/schema/beans/spring-beans.xsd">
<!-- <bean>与<bean>标签之间没有先后之分,spring容器创建对象会二次扫描 -->
<bean id="student" class="com.temp.Student" >
<property name="name" value="黄某人" />
<property name="dog" ref="Teddy" />
</bean>
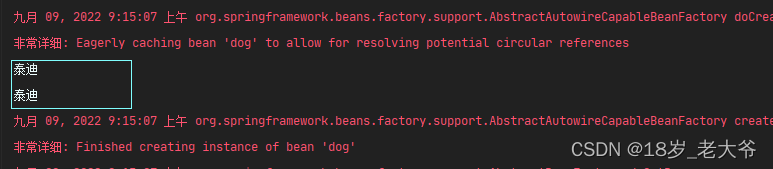
<bean id="Teddy" class="com.temp.Dog">
<property name="name" value="泰迪" />
</bean>
</beans>set注入
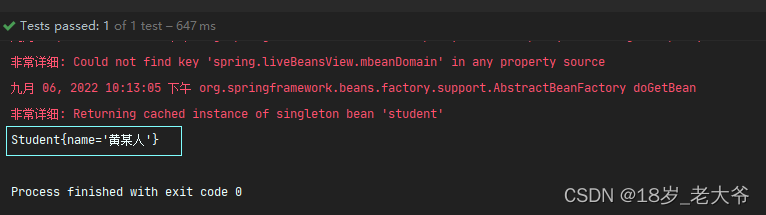
注入简单类型
<!-- Spring配置文件 -->
<?xml version="1.0" encoding="UTF-8"?>
<beans xmlns="http://www.springframework.org/schema/beans"
       xmlns:xsi="http://www.w3.org/2001/XMLSchema-instance"
       xsi:schemaLocation="http://www.springframework.org/schema/beans http://www.springframework.org/schema/beans/spring-beans.xsd">

    <bean id="student" class="com.temp.Student" >
        <!-- property标签,name表示参数名,value表示要注入简单类型的值 -->
        <property name="name" value="黄某人" /> <!-- 表示setName("黄某人") -->
    </bean>

</beans>
// 要被创建的类
public class Student {
// 姓名
private String name;
public void setName(String name) {
this.name = name;
}
@Override
public String toString() {
return "Student{" +
"name='" + name + '\'' +
'}';
}
}
// 测试
@Test
public void test() {
String path = "bean.xml";
// 创建Spring容器对象
ApplicationContext sprint = new ClassPathXmlApplicationContext(path);
// 获取Student对象
Student student = (Student) sprint.getBean("student");
// 输出对象
System.out.println(student);
}***************************************结果
注入引用类型
注入引用类型跟注入基本类型有点类似,不过基本类型<property>用value属性,引用类型<property>用ref属性
实例如下:
// 狗类
public class Dog {

    private String name;

    public void setName(String name) {
        this.name = name;
    }

    @Override
    public String toString() {
        return "Dog{" +
                "name='" + name + '\'' +
                '}';
    }
}


// 学生类
public class Student {
    // 姓名
    private String name;

    // 狗
    private Dog dog;

    public void setName(String name) {
        this.name = name;
    }

    public void setDog(Dog dog) {
        this.dog = dog;
    }

    @Override
    public String toString() {
        return "Student{" +
                "name='" + name + '\'' +
                ", dog=" + dog +
                '}';
    }
}


    // 测试
    @Test
    public void test() {

        String path = "bean.xml";

        // 创建Spring容器对象
        ApplicationContext sprint = new ClassPathXmlApplicationContext(path);

        // 获取Student对象
        Student student = (Student) sprint.getBean("student");

        System.out.println(student);

    }
<!-- spring配置文件 -->
<?xml version="1.0" encoding="UTF-8"?>
<beans xmlns="http://www.springframework.org/schema/beans"
xmlns:xsi="http://www.w3.org/2001/XMLSchema-instance"
xsi:schemaLocation="http://www.springframework.org/schema/beans http://www.springframework.org/schema/beans/spring-beans.xsd">
<bean id="student" class="com.temp.Student" >
<property name="name" value="黄某人" />
<property name="dog" ref="Teddy" /><!-- ref中填写的是<bean>的id属性值 -->
</bean>
<bean id="Teddy" class="com.temp.Dog">
<property name="name" value="泰迪" />
</bean>
</beans>
***************************************结果

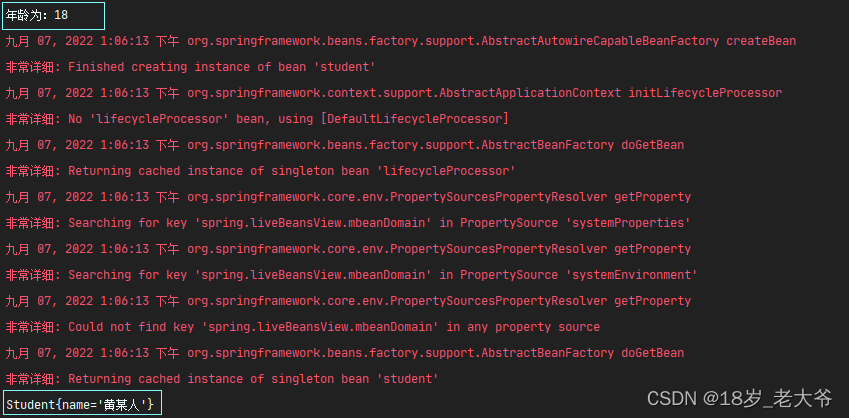
set注入“重点”
*set注入只关注方法名,不关注属性和方法中代码块的内容
实例如下:
// 学生类
public class Student {
    // 姓名
    private String name;

    public void setName(String name) {
        this.name = name;
    }

    // 注意,Student类没有age属性,而有age的set方法
    public void setAge(int age){
        System.out.println("年龄为:" + age);
    }


    @Override
    public String toString() {
        return "Student{" +
                "name='" + name + '\'' +
                '}';
    }
}


    // 测试
    @Test
    public void test() {

        String path = "bean.xml";

        // 创建Spring容器对象
        ApplicationContext sprint = new ClassPathXmlApplicationContext(path);

        // 获取Student对象
        Student student = (Student) sprint.getBean("student");

        System.out.println(student);

    }
<!-- spring配置文件 -->
<?xml version="1.0" encoding="UTF-8"?>
<beans xmlns="http://www.springframework.org/schema/beans"
xmlns:xsi="http://www.w3.org/2001/XMLSchema-instance"
xsi:schemaLocation="http://www.springframework.org/schema/beans http://www.springframework.org/schema/beans/spring-beans.xsd">
<bean id="student" class="com.temp.Student" >
<property name="name" value="黄某人" />
<property name="age" value="18" /><!-- 注意这 -->
</bean>
</beans>
***************************************结果
基于构造方法的注入
构造注入使用<constructor-arg>标签,该标签中有四个属性:name、index、value、ref。其中三个属性都很熟系了,就不说了。
index属性跟name属性功能和用法类似。不过index是跟数组下标一样,都是从0开始,0表示构造方法第一个参数,1表示第二个参数,以此类推。不过index可以省略,默认按0、1、2、3的顺序。
name属性、index属性和省略index三个可以混合使用,但不建议,特别是省略index
使用index
index之间没有顺序之分
<!-- Spring配置文件 -->
<?xml version="1.0" encoding="UTF-8"?>
<beans xmlns="http://www.springframework.org/schema/beans"
       xmlns:xsi="http://www.w3.org/2001/XMLSchema-instance"
       xsi:schemaLocation="http://www.springframework.org/schema/beans http://www.springframework.org/schema/beans/spring-beans.xsd">

    <bean id="student" class="com.temp.Student" >
        <constructor-arg index="0" value="黄某人" /><!-- 注 意 点 -->
        <constructor-arg index="1" value="18" /><!-- 注 意 点 -->
        <constructor-arg index="2" ref="Teddy" /><!-- 注 意 点 -->
    </bean>

    <bean id="Teddy" class="com.temp.Dog">
        <property name="name" value="泰迪" />
    </bean>

</beans>
使用name
<!-- Spring配置文件 -->
<?xml version="1.0" encoding="UTF-8"?>
<beans xmlns="http://www.springframework.org/schema/beans"
       xmlns:xsi="http://www.w3.org/2001/XMLSchema-instance"
       xsi:schemaLocation="http://www.springframework.org/schema/beans http://www.springframework.org/schema/beans/spring-beans.xsd">

    <bean id="student" class="com.temp.Student" >
        <constructor-arg name="name" value="黄某人" />
        <constructor-arg name="age" value="18" />
        <constructor-arg name="dog" ref="Teddy" />
    </bean>

    <bean id="Teddy" class="com.temp.Dog">
        <property name="name" value="泰迪" />
    </bean>

</beans>
省略index
<!-- Spring配置文件 -->
<?xml version="1.0" encoding="UTF-8"?>
<beans xmlns="http://www.springframework.org/schema/beans"
       xmlns:xsi="http://www.w3.org/2001/XMLSchema-instance"
       xsi:schemaLocation="http://www.springframework.org/schema/beans http://www.springframework.org/schema/beans/spring-beans.xsd">

    <bean id="student" class="com.temp.Student" >
        <constructor-arg  value="黄某人" />
        <constructor-arg  value="18" />
        <constructor-arg  ref="Teddy" />
    </bean>

    <bean id="Teddy" class="com.temp.Dog">
        <property name="name" value="泰迪" />
    </bean>

</beans>
省略index、name和index混合使用
<!-- Spring配置文件 -->
<?xml version="1.0" encoding="UTF-8"?>
<beans xmlns="http://www.springframework.org/schema/beans"
       xmlns:xsi="http://www.w3.org/2001/XMLSchema-instance"
       xsi:schemaLocation="http://www.springframework.org/schema/beans http://www.springframework.org/schema/beans/spring-beans.xsd">

    <bean id="student" class="com.temp.Student" >
        <constructor-arg name="name"  value="黄某人" /><!-- 使用name属性 -->
        <constructor-arg index="1" value="18" /><!-- 使用index属性 -->
        <constructor-arg ref="Teddy" /><!-- 使用省略index -->
    </bean>

    <bean id="Teddy" class="com.temp.Dog">
        <property name="name" value="泰迪" />
    </bean>

</beans>
***************************以下是上面使用到的类
// 狗类
public class Dog {

    private String name;

    public void setName(String name) {
        this.name = name;
    }

    @Override
    public String toString() {
        return "Dog{" +
                "name='" + name + '\'' +
                '}';
    }
}


// 学生类
public class Student {
    // 姓名
    private String name;

    private Integer age;

    // 狗
    private Dog dog;

    public Student(String name, Integer age, Dog dog) {
        this.name = name;
        this.age = age;
        this.dog = dog;
    }

    @Override
    public String toString() {
        return "Student{" +
                "name='" + name + '\'' +
                ", age=" + age +
                ", dog=" + dog +
                '}';
    }
}


    // 测试
    @Test
    public void test() {

        String path = "bean.xml";

        // 创建Spring容器对象
        ApplicationContext sprint = new ClassPathXmlApplicationContext(path);

        // 获取Student对象
        Student student = (Student) sprint.getBean("student");

        System.out.println(student);

    }
***************************************结果

引用类型的自动注入
自动注入分类
byName注入(按名字注入):类中引用类型的属性名必须跟<bean>中name属性的值相同,且引用类型必须是同源的(同源:类型一致、父子类、接口和实现类)
byTyep注入(按类型注入):类中引用类型的属性的类型必须跟<bean>中class属性的值是同源的,且匹配数量只能有一个,否则报错
*注意:自动注入是通过set注入,不能通过构造方法注入,所以类必须要有set方法
使用方法:在<bean>中的autowire属性中写入byName或byType
byName
实例如下:
<!-- spring配置文件 -->
<?xml version="1.0" encoding="UTF-8"?>
<beans xmlns="http://www.springframework.org/schema/beans"
       xmlns:xsi="http://www.w3.org/2001/XMLSchema-instance"
       xsi:schemaLocation="http://www.springframework.org/schema/beans http://www.springframework.org/schema/beans/spring-beans.xsd">

    <bean id="student" class="com.temp.Student" autowire="byName"><!-- 在autowire属性中添加byName -->
        <property name="name" value="黄某人" />
        <property name="age" value="18" />
    </bean>

    <bean id="dog" class="com.temp.Dog">
        <property name="name" value="泰迪" />
    </bean>

</beans>
// 狗类
public class Dog {
private String name;
public void setName(String name) {
this.name = name;
}
@Override
public String toString() {
return "Dog{" +
"name='" + name + '\'' +
'}';
}
}
// 学生类
public class Student {
// 姓名
private String name;
// 年龄
private Integer age;
// 狗
private Dog dog;
public void setName(String name) {
this.name = name;
}
public void setAge(Integer age) {
this.age = age;
}
public void setDog(Dog dog) {
this.dog = dog;
}
@Override
public String toString() {
return "Student{" +
"name='" + name + '\'' +
", age=" + age +
", dog=" + dog +
'}';
}
}
//测试
@Test
public void test() {
String path = "bean.xml";
// 创建Spring容器对象
ApplicationContext sprint = new ClassPathXmlApplicationContext(path);
// 获取Student对象
Student student = (Student) sprint.getBean("student");
System.out.println(student);
}
byType
匹配规则:类中引用类型的属性的类型必须跟<bean>中class属性的值是同源的
*注意:只能匹配一个,否则报错
实例如下:
// 狗类
public class Dog {

    private String name;

    public void setName(String name) {
        this.name = name;
    }

    @Override
    public String toString() {
        return "Dog{" +
                "name='" + name + '\'' +
                '}';
    }
}


// 学生类
public class Student {
    // 姓名
    private String name;

    // 年龄
    private Integer age;

    // 狗
    private Dog dog;

    public void setName(String name) {
        this.name = name;
    }

    public void setAge(Integer age) {
        this.age = age;
    }

    public void setDog(Dog dog) {
        this.dog = dog;
    }

    @Override
    public String toString() {
        return "Student{" +
                "name='" + name + '\'' +
                ", age=" + age +
                ", dog=" + dog +
                '}';
    }
}


// 测试
    @Test
    public void test() {

        String path = "bean.xml";

        // 创建Spring容器对象
        ApplicationContext sprint = new ClassPathXmlApplicationContext(path);

        // 获取Student对象
        Student student = (Student) sprint.getBean("student");

        System.out.println(student);

    }
<!-- spring配置文件 -->
<?xml version="1.0" encoding="UTF-8"?>
<beans xmlns="http://www.springframework.org/schema/beans"
xmlns:xsi="http://www.w3.org/2001/XMLSchema-instance"
xsi:schemaLocation="http://www.springframework.org/schema/beans http://www.springframework.org/schema/beans/spring-beans.xsd">
<bean id="student" class="com.temp.Student" autowire="byType">
<property name="name" value="黄某人" />
<property name="age" value="18" />
</bean>
<bean id="dog" class="com.temp.Dog">
<property name="name" value="泰迪" />
</bean>
</beans>***************************************结果

byType错误展示(多个匹配)
只修改xml配置文件,类使用上方的代码
<!-- spring配置文件 -->
<?xml version="1.0" encoding="UTF-8"?>
<beans xmlns="http://www.springframework.org/schema/beans"
       xmlns:xsi="http://www.w3.org/2001/XMLSchema-instance"
       xsi:schemaLocation="http://www.springframework.org/schema/beans http://www.springframework.org/schema/beans/spring-beans.xsd">

    <bean id="student" class="com.temp.Student" autowire="byType">
        <property name="name" value="黄某人" />
        <property name="age" value="18" />
    </bean>

    <!-- 有两个Dog类,能匹配到数量为2,所以会报错 -->
    <bean id="dog" class="com.temp.Dog">
        <property name="name" value="泰迪" />
    </bean>

    <bean id="dog2" class="com.temp.Dog">
        <property name="name" value="泰迪" />
    </bean>

</beans>
***************************************结果

多个配置文件
优势:
1、每个文件的大小比一个文件要小很多,效率高
2、避免多人竞争带来的冲突
如果在公司项目中只有一个配置文件,多个一起修改这个配置文件可能会带来冲突,而且文件一大,修改起来会很慢
语法:<import resource="classpath:文件路径" />
文件路径:是相对于target下的classes目录
实例如下:
<!-- 配置文件名:spring-temp01.xml -->
<?xml version="1.0" encoding="UTF-8"?>
<beans xmlns="http://www.springframework.org/schema/beans"
       xmlns:xsi="http://www.w3.org/2001/XMLSchema-instance"
       xsi:schemaLocation="http://www.springframework.org/schema/beans http://www.springframework.org/schema/beans/spring-beans.xsd">

    <bean id="student" class="com.temp.Student" autowire="byName">
        <property name="name" value="黄某人" />
        <property name="age" value="18" />
    </bean>

</beans>
<!-- 配置文件名:spring-temp02.xml -->
<?xml version="1.0" encoding="UTF-8"?>
<beans xmlns="http://www.springframework.org/schema/beans"
xmlns:xsi="http://www.w3.org/2001/XMLSchema-instance"
xsi:schemaLocation="http://www.springframework.org/schema/beans http://www.springframework.org/schema/beans/spring-beans.xsd">
<bean id="dog" class="com.temp.Dog">
<property name="name" value="泰迪" />
</bean>
</beans>聚合配置文件
聚合配置文件一般里面不添加<bean>,主要用于导入其他配置文件
<!-- 配置文件名:bean.xml -->
<?xml version="1.0" encoding="UTF-8"?>
<beans xmlns="http://www.springframework.org/schema/beans"
       xmlns:xsi="http://www.w3.org/2001/XMLSchema-instance"
       xsi:schemaLocation="http://www.springframework.org/schema/beans http://www.springframework.org/schema/beans/spring-beans.xsd">

    <!-- 导入两个配置文件文件 聚合 -->
    <import resource="classpath:sprint-temp01.xml" />
    <import resource="classpath:sprint-temp02.xml" />

    <!--
        下面是使用通配符方式
        <import resource="classpath:sprint-temp*.xml" />
     -->

</beans>
// 狗类
public class Dog {
private String name;
public void setName(String name) {
this.name = name;
}
@Override
public String toString() {
return "Dog{" +
"name='" + name + '\'' +
'}';
}
}
// 学生类
public class Student {
// 姓名
private String name;
// 年龄
private Integer age;
// 狗
private Dog dog;
public void setName(String name) {
this.name = name;
}
public void setAge(Integer age) {
this.age = age;
}
public void setDog(Dog dog) {
this.dog = dog;
}
@Override
public String toString() {
return "Student{" +
"name='" + name + '\'' +
", age=" + age +
", dog=" + dog +
'}';
}
}
// 测试
@Test
public void test() {
String path = "bean.xml";
// 创建Spring容器对象
ApplicationContext sprint = new ClassPathXmlApplicationContext(path);
// 获取Student对象
Student student = (Student) sprint.getBean("student");
System.out.println(student);
}***************************************结果

通配符
作用:一次导入多个配置文件
注意:多个配置文件名开头要一样,且聚合配置文件一定不能被通配符匹配到,否则会出错
错误做法:有三个文件sprint-temp01.xml、sprint-temp02.xml、sprint.xml(聚合配置文件),在聚合配置文件sprint.xml用通配符导入另外两个配置文件,配置如下:
<import resource="classpath:sprint*.xml" />
上面使用通配符匹配,匹配格式可以匹配到聚合配置文件,聚合配置文件会一直重复导入自己,所以会发生错误
正确做法:只要匹配不到聚合配置文件,怎么样都行
<import resource="classpath:sprint-temp*.xml" />
基于注解配置
7种注解
@Component
@Respotory
@Service
@Controller
@Value
@AutoWired
@Resource
@Component注解
作用:跟<bean>标签作用一样
注解中value属性等同于<bean>中id属性,属性值是唯一
实例如下:
(1) 添加注解
@Component中的参数中value可以省略,如:@Component("student")
// 学生类
// value参数可以省略如:  @Component("student")
@Component(value = "student") // @Component作用跟<bean>功能类似,value作用跟id功能类似
public class Student {
    // 姓名
    private String name;

    // 狗
    private Dog dog;

    public void setName(String name) {
        this.name = name;
    }


    public void setDog(Dog dog) {
        this.dog = dog;
    }

    @Override
    public String toString() {
        return "Student{" +
                "name='" + name + '\'' +
                ", dog=" + dog +
                '}';
    }
}
(2) 添加组件扫描器
<!-- spring配置文件 -->
<?xml version="1.0" encoding="UTF-8"?>
<beans xmlns="http://www.springframework.org/schema/beans"
       xmlns:xsi="http://www.w3.org/2001/XMLSchema-instance"
       xmlns:context="http://www.springframework.org/schema/context"
       xsi:schemaLocation="http://www.springframework.org/schema/beans http://www.springframework.org/schema/beans/spring-beans.xsd http://www.springframework.org/schema/context https://www.springframework.org/schema/context/spring-context.xsd">

<!--  组件(component)扫描器(scan)
      base-package: 指定使用注解的类的包名
      base-package工作方法: 会扫描指定包下的所有类,包括子包中的类,
                            根据注解的功能来创建对象或注入
  -->
    <context:component-scan base-package="com.temp" />

</beans>
(3)运行
    // 测试
    @Test
    public void test() {

        String path = "bean.xml";

        // 创建Spring容器对象
        ApplicationContext sprint = new ClassPathXmlApplicationContext(path);

        // 获取Student对象
        Student student = (Student) sprint.getBean("student");

        System.out.println(student);

    }
***************************************结果

@Component的value属性三种用法
一、填写value
@Component(value = "student")
二、省略value
@Component("student")
三、不写value
@Component

value值是被该注解修饰的类的首字母小写的名字,

如下中value值是student
@Component
public class Student {
}

如下中value值是dog
@Component
public class Dog {
}
@Respotory、@Service和@Controller
@repository(用在持久层类的上面):放在dao的实现类上面
@Service(用在业务层类的上面):放在serviec的实现类上面
@Controller(用在控制层的上面):放在控制层类的上面
以上三个注解的使用语法和@Component一样。都能创建对象,但三个注解还有额外的功能
这三个用于给项目对象分层的
@Value
@Value注解用于给基本类型属性赋值
两种用法
第一种 :用在属性的上方,通过反射注入属性,不是调用set方法或构造方法来注入(建议使用)
// 狗类
@Component(value = "dog")
public class Dog {

    @Value(value = "泰迪")   // <--- 注 意 点, 其中value属性可以被省略
    private String name;

    public void setName(String name) {
        this.name = name;
    }

    @Override
    public String toString() {
        return "Dog{" +
                "name='" + name + '\'' +
                '}';
    }
}
第二种 :用在set方法上方,通过调用set方法来赋值
// 狗类
@Component(value = "dog")
public class Dog {


    private String name;

    @Value("泰迪")        // <--- 注 意 点,value属性已省略
    public void setName(String name) {
        this.name = name;
    }

    @Override
    public String toString() {
        return "Dog{" +
                "name='" + name + '\'' +
                '}';
    }
}
注意:@Value放在方法下,不会注重方法的名字和代码块
// 狗类
@Component(value = "dog")
public class Dog {


    @Value("泰迪")                // <--- 注 意 点
    public void abc(String name,String abc) {    // <--- 注 意 点 ,方法名
        System.out.println(name);
        System.out.println(abc);
    }
}
***************************************结果
@Autowired(自动注入)
@Autowired的required属性(Boolean类型)作用:
如果为true:注入失败程序报错,终止执行
如果为false:注入失败程序继续执行,默认值为null
@Autowired注解:是通过自动注入给引用类型属性赋值(默认使用byType)
byName使用方法:在@AutoWired下面添加@Qualifier注解
@Qualifier中的value属性值是注入对象的id值
注意:
添加了@Qualifier注解就是根据byName自动注入
没有添加@Qualifier注解就是根据byType自动注入
两种用法
第一种: 用在引用类型的属性上方,通过反射注入属性,不是调用set方法或构造方法来注入(推荐使用)
// 狗类
@Component(value = "dog")
public class Dog {

    @Value("泰迪")
    private String name;

    @Override
    public String toString() {
        return "Dog{" +
                "name='" + name + '\'' +
                '}';
    }
}


// 学生类
@Component("student")
public class Student {
    // 姓名
    @Value("黄某人")
    private String name;

    // 狗
    @Autowired                    // <--- 注 意 点
    // @Qualifier("dog")             <--- 注 意 点
    private Dog dog;

    @Override
    public String toString() {
        return "Student{" +
                "name='" + name + '\'' +
                ", dog=" + dog +
                '}';
    }
}


// 测试
    @Test
    public void test() {

        String path = "bean.xml";

        // 创建Spring容器对象
        ApplicationContext sprint = new ClassPathXmlApplicationContext(path);

        // 获取Student对象
        Student student = (Student) sprint.getBean("student");

        System.out.println(student);

    }
***************************************结果

第二中:用在set方法上方
// 狗类
@Component(value = "dog")
public class Dog {

    @Value("泰迪")
    private String name;

    @Override
    public String toString() {
        return "Dog{" +
                "name='" + name + '\'' +
                '}';
    }
}


// 学生类
@Component("student")
public class Student {
    // 姓名
    @Value("黄某人")
    private String name;

    // 狗
    private Dog dog;

    @Autowired                      //  <--- 注 意 点
    // @Qualifier("dog")                <--- 注 意 点
    public void setDog(Dog dog) {
        this.dog = dog;
    }

    @Override
    public String toString() {
        return "Student{" +
                "name='" + name + '\'' +
                ", dog=" + dog +
                '}';
    }
}


// 测试
    @Test
    public void test() {

        String path = "bean.xml";

        // 创建Spring容器对象
        ApplicationContext sprint = new ClassPathXmlApplicationContext(path);

        // 获取Student对象
        Student student = (Student) sprint.getBean("student");

        System.out.println(student);

    }
***************************************结果
@Resource(自动注入)
@Resource注解是JDK提供的,跟@Resource用法一样,可以在属性上使用,也可以在set方法上使用
@Resource注解支持byName和byType,默认是byName方式
@Resource注解方式顺序:如果byName的方式注入失败,再使用byType的方式注入
如果只想的byName注入,不使用byType注入,需要给@Resource的name属性传入值,如果byName方式注入失败,不会使用byType的方法注入,而是直接报错
实例如下:
// 狗类
@Component(value = "dog")
public class Dog {

    @Value("泰迪")
    private String name;

    @Override
    public String toString() {
        return "Dog{" +
                "name='" + name + '\'' +
                '}';
    }
}


// 学生类
@Component("student")
public class Student {
    // 姓名
    @Value("黄某人")
    private String name;

    // 狗
    @Resource()                // <--- 注 意 点
    private Dog dog;


    @Override
    public String toString() {
        return "Student{" +
                "name='" + name + '\'' +
                ", dog=" + dog +
                '}';
    }
}


    // 测试
    @Test
    public void test() {

        String path = "bean.xml";

        // 创建Spring容器对象
        ApplicationContext sprint = new ClassPathXmlApplicationContext(path);

        // 获取Student对象
        Student student = (Student) sprint.getBean("student");

        System.out.println(student);

    }
***************************************结果
面向切面编程(AOP)
AOP就是动态代理的规范化,把动态代理的实现步骤和方式都定义好了,让开发人员使用一种统一的方法来使用动态代理
底层:AOP底层是动态代理
AOP采用两种动态代理:JDK动态代理、CGLIB动态代理
JDK动态代理:使用JDK中的Proxy、Method、InvocaitionHanderl创建对象。
JDK动态代理条件:必须有接口和接口的实现类
CGLIB动态代理:原理是通过继承,通过继承目标类(要被增强的类)来创建子类
CGLIB动态代理条件:目标类和目标方法不能被final关键字修饰
动态代理的作用:
1、在不改变目标类的源代码的情况下,来增加功能
2、减少代码的重复
3、专注业务逻辑代码
4、解耦合,功能分离度高
注意:在有接口的情况下可以使用JDK动态代理,也可以使用CGLIB动态代理
而且没有接口的情况下,只能使用CGLIB动态代理
spring术语
Aspect:切面,表示在原来的功能上,新增的功能代码(增强的功能)就是切面
JoinPoint:连接点,连接点就是原来的功能和新增的功能代码(切面)连接处就是连接点,(业务方法和切面的位置)
Pointcut:切入点,指的是多个连接点的集合
目标对象:给你个类的方法增加功能,这个类就是目标对象
Advice:通知,通知表示切面功能的执行时间
AOP的技术实现框架:
Spring框架:Spring在内部实现了AOP规范,能做AOP的工作
AspectJ框架::是一个开源的专门做AOP的框架。spring框架中集成了AspectJ框架,通过Spring就能使用AspectJ的功能。
AspectJ框架实现AOP有两种方式:
1、使用XML配置文件:配置全局事务
2、使用注解,在项目中要做aop功能,一般使用注解
AspectJ框架
切面的执行时间,这个执行时间在规范中叫做Advice(通知)
五种Advice通知注解
@Before 前置通知
@AfterReturning 后置通知
@Around 环绕通知
@AfterThrowing 异常通知
@After 最终通知
AspectJ的切入点表达式
切入点表达式的原型
execution(modifiers-pattern? ret-type-pattern
declaring-type-pattern?name-pattern(param-pattern)
throws-pattern?)
modifiers-pattern 访问权限类型(public,protected,private,默认)
ret-type-pattern 返回值类型 (void,简单类型,引用类型等)
declaring-type-pattern 包名类型
name-pattern(param-pattern) 方法名(参数类型和参数个数)
throws-pattern 抛出异常类型
? 表示可选的部分
以上表达式共四个部分.
execution(访问权限 方法返回值 包名.方法声明(参数) 异常类型)
方法返回值和方法声明(参数)不能省略
通配符
| 符号 | 意义 |
|---|---|
| * | 0至多个任意字符 |
| .. | |
| 用在方法参数中,表示任意多个参数 | |
| 用在包名后,表示当前包及其子包路径 | |
| + | |
| 用在类名后,表示当前类及其子类 | |
| 用在接口后面,表示当前接口及其实现类 |
实例如下:
//指定切入点为任意公共方法
execution(public * *(..))

//指定切入点为任意"set"开头的方法
ececution(* set*(..))

//指定切入点: Student包中的任意类的任意方法
execution(* com.temp.Student.*.*(..))

//指定切入点: 定义在Student包或者其子包中的任意类中的任意方法
execution(* com.temp.Student..*.*(..))

//指定切入点: 表示所有包在的Student子包中的所有类中的所有方法
execution(* *..Student.*.*(..))
第一个案例(@Before前置通知)
(1)、创建Maven项目
(2)、导入依赖
导入Spring和AspectJ框架的依赖
    <!-- Spring框架 -->
    <dependency>
      <groupId>org.springframework</groupId>
      <artifactId>spring-context</artifactId>
      <version>5.3.18</version>
    </dependency>

    <!-- AspectJ框架 -->
    <dependency>
      <groupId>org.springframework</groupId>
      <artifactId>spring-aspects</artifactId>
      <version>5.3.18</version>
    </dependency>
(3)、Spring配置XML文件
<?xml version="1.0" encoding="UTF-8"?>
<beans xmlns="http://www.springframework.org/schema/beans"
       xmlns:xsi="http://www.w3.org/2001/XMLSchema-instance"
       xmlns:context="http://www.springframework.org/schema/context"
       xmlns:aop="http://www.springframework.org/schema/aop"
       xsi:schemaLocation="http://www.springframework.org/schema/beans http://www.springframework.org/schema/beans/spring-beans.xsd http://www.springframework.org/schema/context https://www.springframework.org/schema/context/spring-context.xsd http://www.springframework.org/schema/aop https://www.springframework.org/schema/aop/spring-aop.xsd">

    <!--  组件扫描器  -->
    <context:component-scan base-package="com.temp.ba02" />

    <!--  自动代理生成器  -->
    <aop:aspectj-autoproxy />

</beans>(4)、类创建and测试(@Before前置通知)
*前置方法的定义要求:
1、公共方法
2、方法没有返回值
3、方法名自定义
4、方法可以有参数,也可以没有
如果有参数不能是自定义,可以有JoinPoint
// 人接口
public interface Person {
void speak(String name);
}
// 学生类,继承 人接口
@Component("student")
public class Student implements Person {
@Override
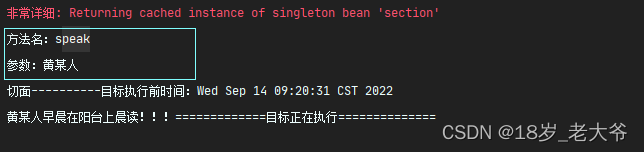
public void speak(String name) {
System.out.println(name + "早晨在阳台上晨读!!!=============目标正在执行==============");
}
}
/* @Aspect是aspectj框架的注解
* 作用:表示当前类是切面类
* 切面类:是用类给目标方法增加功能的类
*/
@Aspect
// 切面类
@Component("section")
public class Section {
// 前置通知
@Before(value = "execution(public void com.temp.ba02.Student.speak(String))")
public void temp() {
System.out.println("目标执行前时间:" + new Date());
}
/*
前置方法的定义要求:
1、公共方法
2、方法没有返回值
3、方法名自定义
4、方法可以有参数,也可以没有
如果有参数不能是自定义,可以有JoinPoint
*/
}
// 测试
@Test
public void test() {
String path = "bean.xml";
// 创建Spring容器对象
ApplicationContext sprint = new ClassPathXmlApplicationContext(path);
// 获取Student对象
Person student = (Person) sprint.getBean("student");
student.speak("黄某人");
}***************************************结果

JoinPoint对象
JoinPoint:业务方法
作用:可以在通知方法中获取目标方法执行的信息,例如方法名称,方法的实参。
如果你的切面功能中需要用到方法的信息,就加入JoinPoint
位置:在切面类中的切面方法参数位置,JoinPoint类型的形参必须是第一个位置
(后面的通知注解方法中都可以使用)
注意:环绕通知除外,因为环绕通知中的固定属性ProceedingJoinpoint类继承JoinPoint类
实例如下:
// 人接口
public interface Person {

    void speak(String name);
}


// 学生类,继承 人接口
@Component("student")
public class Student implements Person {

    @Override
    public void speak(String name) {
        System.out.println(name + "早晨在阳台上晨读!!!=============目标正在执行==============");
    }
}


@Aspect
// 切面类
@Component("section")
public class Section {

    // 前置通知
    @Before(value = "execution( void *..ba02.Student.speak(..))")
    public void temp(JoinPoint jp) {                            // <--- 注 意 点****
        System.out.println("目标方法名:"+jp.getSignature().getName());
        Object[] args = jp.getArgs();
        for (Object arg : args) {
            System.out.println("目标参数值:" + arg);
        }
        System.out.println("切面----------目标执行前时间:" + new Date());
    }
}


// 测试
    @Test
    public void test() {

        String path = "bean.xml";

        // 创建Spring容器对象
        ApplicationContext sprint = new ClassPathXmlApplicationContext(path);

        // 获取Student对象
        Person student = (Person) sprint.getBean("student");

        student.speak("黄某人");

    }
***************************************结果
@AfterReturning后置通知
@AfterReturning注解属性:
value:切入表达式
returning:自定义的变量,表示目标方法的返回值
自定义变量名(Objec类型的形参名)必须和通知方法的形成名一样
如果目标方法没有返回值,那么可以不用写该属性
*后置方法的定义要求:
1、公共方法
2、方法没有返回值
3、方法名自定义
4、方法可以有参数
有参数情况:目标方法有返回值,该参数作用是保存目标方法返回值,参数类型建议是Objec类型
没有参数情况:目标方法没有返回值,因为目标方法没有返回值,所以该参数也就没用了
如果需要JoinPoint对象,JoinPoint必须是第一位,Object类型第二位
Object参数表示的是:目标方法的返回值
实例如下:
// 人接口
public interface Person {

    String speak(String name);
}


// 学生类(目标类)
@Component("student")
public class Student implements Person {

    // 目标方法
    @Override
    public String speak(String name) {
        System.out.println(name + "早晨在阳台上晨读!!!=============目标正在执行==============");
        return name;
    }
}


// 切面类
@Component("section")
@Aspect
public class Section {

    // 后置通知
    @AfterReturning(value = "execution( String *..ba02.Student.speak(..))", returning = "ref")
    public void temp(Object ref) {
        System.out.println("目标方法的返回值:"+ref);
        System.out.println("切面----------目标执行后时间:" + new Date());
    }
}


// 测试
    @Test
    public void test() {

        String path = "bean.xml";

        // 创建Spring容器对象
        ApplicationContext sprint = new ClassPathXmlApplicationContext(path);

        // 获取Student对象
        Person student = (Person) sprint.getBean("student");

        student.speak("黄某人");

    }
***************************************结果

如果目标对象返回给Objec参数的是基本数据类型的值,修改Objec参数不会影响到结果的返回结果
如果是引用类型的是可以被影响到的
实例如下(基本类型):
// 人接口
public interface Person {
Integer speak(String name);
}
// 学生类 目标类
@Component("student")
public class Student implements Person {
// 目标方法
@Override
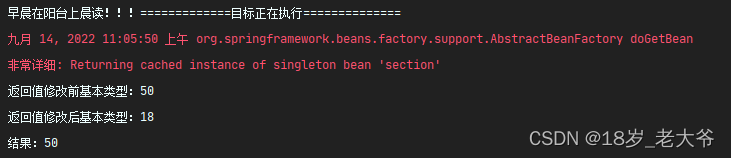
public Integer speak(String name) {
System.out.println("早晨在阳台上晨读!!!=============目标正在执行==============");
return 50;
}
}
// 切面类
@Component("section")
@Aspect
public class Section {
// 切面方法
@AfterReturning(value = "execution( Integer *..ba02.Student.speak(..))", returning = "ref")
public void temp(Object ref) {
System.out.println("返回值修改前基本类型:"+ref);
ref = 18;
System.out.println("返回值修改后基本类型:"+ref);
}
}
// 测试
@Test
public void test() {
String path = "bean.xml";
// 创建Spring容器对象
ApplicationContext sprint = new ClassPathXmlApplicationContext(path);
// 获取Student对象
Person student = (Person) sprint.getBean("student");
Integer temp = student.speak("黄某人");
System.out.println("结果:"+temp);
}***************************************结果
实例如下(引用类型):
// 人接口
public interface Person {
Student speak(String name);
}
// 学生类 目标类
@Component("student")
public class Student implements Person {
private String name;
public void setName(String name) {
this.name = name;
}
// 目标方法
@Override
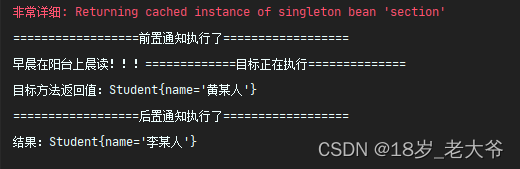
public Student speak(String name) {
System.out.println("早晨在阳台上晨读!!!=============目标正在执行==============");
Student student = new Student();
student.setName(name);
return student;
}
@Override
public String toString() {
return "Student{" +
"name='" + name + '\'' +
'}';
}
}
// 切面类
@Component("section")
@Aspect
public class Section {
// 切面方法
@AfterReturning(value = "execution( Student *..ba02.Student.speak(..))", returning = "ref")
public void temp(Object ref) {
System.out.println("返回值修改 前 引用类型: "+ref);
Student temp = (Student) ref;
temp.setName("李某人");
System.out.println("返回值修改 后 引用类型: "+temp);
}
}
// 测试
@Test
public void test() {
String path = "bean.xml";
// 创建Spring容器对象
ApplicationContext sprint = new ClassPathXmlApplicationContext(path);
// 获取Student对象
Person student = (Person) sprint.getBean("student");
Student temp = student.speak("黄某人");
System.out.println("结果:"+temp);
}***************************************结果

@Around环绕通知
*环绕方法的定义要求:
1、公共方法
2、方法可以有返回值 返回值类型推荐Objec
是否有返回值是根据目标方法有无返回值来定
3、方法名自定义
4、方法有固定的参数:ProceedingJoinPoint类型
注意:
(1)、 包含了前置通知和后置通知的功能
(2)、可以控制目标方法是否被调用执行
(3)、可以修改目标方法返回值的结果
实例如下:
// 人类
public interface Person {

    Student speak(String name);
}


// 学生类        目标类
@Component("student")
public class Student implements Person {

    private String name;

    public void setName(String name) {
        this.name = name;
    }

    // 目标方法
    @Override
    public Student speak(String name) {
        System.out.println("早晨在阳台上晨读!!!=============目标正在执行==============");
        Student student = new Student();
        student.setName(name);
        return student;
    }

    @Override
    public String toString() {
        return "Student{" +
                "name='" + name + '\'' +
                '}';
    }
}


// 切面类
@Component("section")
@Aspect
public class Section {

    @Around(value = "execution( Student *..ba02.Student.speak(..))")
    public Object temp(ProceedingJoinPoint pj) throws Throwable {
        Object temp;
        System.out.println("==================前置通知执行了==================");
        temp = pj.proceed();                            // 调用proceed方法,相当于执行目标方法,得到返回结果
        System.out.println("目标方法返回值:" + temp);
        System.out.println("==================后置通知执行了==================");
        Student student = (Student) temp;
        student.setName("李某人");                       // 修改返回值
        return temp;                          // 此处的return返回的就是结果的值
    }
}


// 测试
    @Test
    public void test() {

        String path = "bean.xml";

        // 创建Spring容器对象
        ApplicationContext sprint = new ClassPathXmlApplicationContext(path);

        // 获取Student对象
        Person student = (Person) sprint.getBean("student");

        Student temp = student.speak("黄某人");
        System.out.println("结果:"+temp);
    }
***************************************结果
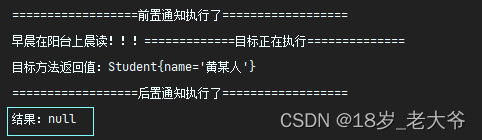
实例如下(修改目标方法返回值的结果):
// 切面类
@Component("section")
@Aspect
public class Section {

    // 切面方法
    @Around(value = "execution( Student *..ba02.Student.speak(..))")
    public Object temp(ProceedingJoinPoint pj) throws Throwable {
        Object temp;
        System.out.println("==================前置通知执行了==================");
        temp = pj.proceed();                            // 调用proceed方法,相当于执行目标方法,得到返回结果
        System.out.println("目标方法返回值:" + temp);
        System.out.println("==================后置通知执行了==================");
        return null;            // <--- 注 重 点
    }
}
***************************************结果
ProceedingJoinpoint和JoinPoint关系
ProceedingJoinpoint继承JoinPoint,所以环绕通知不用加入JoinPoint
@AfterThrowing异常通知
@AfterThrowing属性:
value:切入表达式
throwing:自定义的变量,表示目标方法抛出的异常对象,变量名必须和方法的参数名(Exception类型)一致
*异常通知方法的定义要求:
1、公共方法
2、方法没有返回值
3、方法名自定义
4、方法有参数:Exception类型(必须有)、JoinPoint类型(可以有,但必须是第一个)
*作用:当目标方法发生异常后,才会执行异常通知方法,如果没有发生异常就不会执行异常通知
@AfterThrowing注解作用相当于catch
try {
        代码
} catch (Exception e) {
        代码
} finally {
        代码
}
实例如下:
// 人接口
public interface Person {

    void speak() throws Exception;
}


// 学生类        目标类
@Component("student")
public class Student implements Person {

    // 目标方法
    @Override
    public void speak() throws Exception {
        System.out.println("早晨在阳台上晨读!!!=============目标正在执行==============");
        throw new Exception();    // 抛出异常
    }

}


// 切面类
@Component("section")
@Aspect
public class Section {

    // 切面方法     异常通知
    @AfterThrowing(value = "execution( void *..ba02.Student.speak(..))", throwing = "e")
    public void temp(Exception e) {                                    // 形成名和上方的值必须一致
        System.out.println("目标方法发生了异常!!!!"+e.getMessage());
    }
}


// 测试
    @Test
    public void test() throws Exception {

        String path = "bean.xml";

        // 创建Spring容器对象
        ApplicationContext sprint = new ClassPathXmlApplicationContext(path);

        // 获取Student对象
        Person student = (Person) sprint.getBean("student");

        student.speak();
    }
***************************************结果

@After最终通知
@After注解作用相当于finally,所以该注解用于释放资源
try {
        代码
} catch (Exception e) {
        代码
} finally {
        代码
}
实例如下:
// 人接口
public interface Person {
void speak() throws Exception;
}
// 学生类
@Component("student")
public class Student implements Person {
@Override
public void speak() throws Exception {
System.out.println("早晨在阳台上晨读!!!=============目标正在执行==============");
throw new Exception();
}
}
// 切面类
@Component("section")
@Aspect
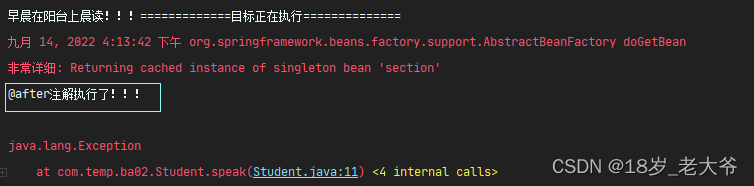
public class Section {
// 切面方法
@After(value = "execution( void *..ba02.Student.speak(..))")
public void temp() {
System.out.println("@after注解执行了!!!");
}
}
// 测试
@Test
public void test() throws Exception {
String path = "bean.xml";
// 创建Spring容器对象
ApplicationContext sprint = new ClassPathXmlApplicationContext(path);
// 获取Student对象
Person student = (Person) sprint.getBean("student");
student.speak();
}***************************************结果
@Pointcut注解
该注解不是通知,而且是用于辅助切入表达式的
实例如下:
// 人接口
public interface Person {

    void speak() throws Exception;
}


// 学生类
@Component("student")
public class Student implements Person {

    @Override
    public void speak() {
        System.out.println("早晨在阳台上晨读!!!=============目标正在执行==============");
    }

}


// 切面类
@Component("section")
@Aspect
public class Section {

    // 前置通知
    @Before(value = "temp3()")    // 被@Pointcut注解修饰的方法名
    public void temp() {
        System.out.println("前置通知@Before注解执行了!!!");
    }
    // 后置通知
    @AfterReturning(value = "temp3()")  // 被@Pointcut注解修饰的方法名
    public void temp2() {
        System.out.println("后置通知@AfterReturning注解执行了!!!");
    }

    // Pointcut注解        <--- 注 重 点
    @Pointcut(value = "execution( void *..ba02.Student.speak(..))")
    public void temp3() {
    }
}


// 测试
    @Test
    public void test() throws Exception {

        String path = "bean.xml";

        // 创建Spring容器对象
        ApplicationContext sprint = new ClassPathXmlApplicationContext(path);

        // 获取Student对象
        Person student = (Person) sprint.getBean("student");

        student.speak();
    }
***************************************结果

Spring集成MyBatis
1、创建项目
2、添加maven依赖
  <dependencies>

<!--  单元测试  -->
    <dependency>
      <groupId>junit</groupId>
      <artifactId>junit</artifactId>
      <version>4.11</version>
      <scope>test</scope>
    </dependency>


<!-- spring依赖 -->
   <dependency>
      <groupId>org.springframework</groupId>
      <artifactId>spring-context</artifactId>
      <version>5.2.5.RELEASE</version>
   </dependency>

<!--  下面两个用于做事务  -->
    <dependency>
      <groupId>org.springframework</groupId>
      <artifactId>spring-tx</artifactId>
      <version>5.2.5.RELEASE</version>
    </dependency>

    <dependency>
      <groupId>org.springframework</groupId>
      <artifactId>spring-jdbc</artifactId>
      <version>5.2.5.RELEASE</version>
    </dependency>

<!--  mybatis和Spring整合的依赖  -->
    <dependency>
      <groupId>org.mybatis</groupId>
      <artifactId>mybatis-spring</artifactId>
      <version>1.3.2</version>
    </dependency>

<!--  数据库依赖  -->
    <dependency>
      <groupId>mysql</groupId>
      <artifactId>mysql-connector-java</artifactId>
      <version>8.0.28</version>
    </dependency>

<!--  mybatis依赖  -->
    <dependency>
      <groupId>org.mybatis</groupId>
      <artifactId>mybatis</artifactId>
      <version>3.5.6</version>
    </dependency>

<!--  德鲁伊数据库连接池  -->
    <dependency>
      <groupId>com.alibaba</groupId>
      <artifactId>druid</artifactId>
      <version>1.1.12</version>
    </dependency>

  </dependencies>
3、实体类
public class Author {
    private Integer author_id;
    public String author_name;
    private String author_discription;

    // 此处省略set、get和toString方法

}
4、dao接口和Mapper映射文件
// 接口
public interface AuthorDao {

    ArrayList<Author> selectAll();

    void insertAuthor(Author author);

    void deleteAuthorById(Integer id);

    void modifyAuthor(Author author);

}
<?xml version="1.0" encoding="UTF-8" ?>
<!DOCTYPE mapper
PUBLIC "-//mybatis.org//DTD Mapper 3.0//EN"
"https://mybatis.org/dtd/mybatis-3-mapper.dtd">
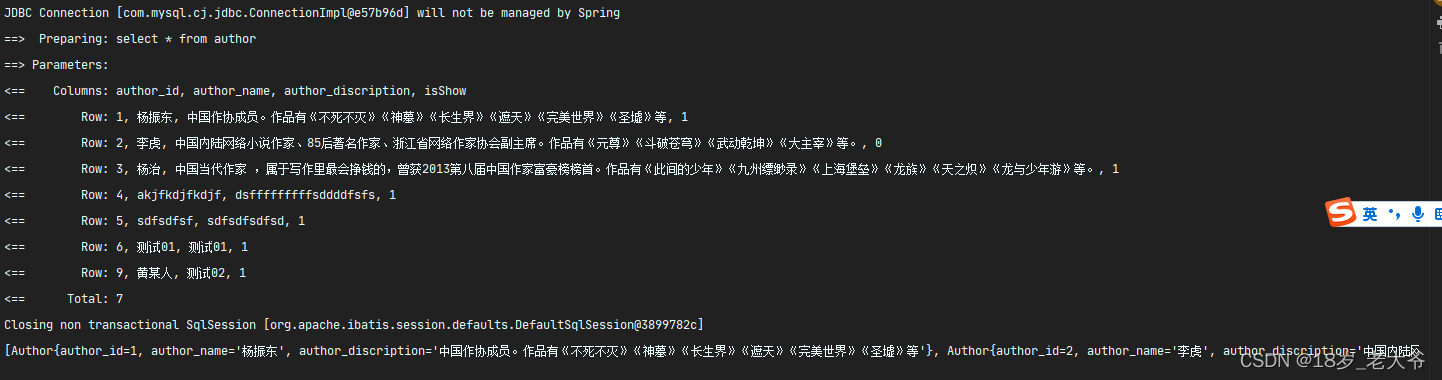
<mapper namespace="org.example.dao.AuthorDao">
<select id="selectAll" resultType="org.example.entity.Author">
select * from author
</select>
<update id="modifyAuthor">
update author set author_name = #{author_name}, author_discription = #{author_discription} where author_id = #{author_id}
</update>
<insert id="insertAuthor" >
insert into author values(default,#{author_name},#{author_discription},1);
</insert>
<delete id="deleteAuthorById">
delete from author where author_id = #{id}
</delete>
</mapper>5、mybatis主配置文件
<?xml version="1.0" encoding="UTF-8" ?>
<!DOCTYPE configuration
        PUBLIC "-//mybatis.org//DTD Config 3.0//EN"
        "https://mybatis.org/dtd/mybatis-3-config.dtd">
<configuration>

    <settings>
<!--    设置日志    -->
        <setting name="logImpl" value="STDOUT_LOGGING"/>
    </settings>

<!-- 我们不使用mybatis的数据源,所以不用写数据源,我们使用Druid数据源 -->


<!--  映射文件配置  -->
    <mappers>
        <mapper resource="org/example/dao/AuthorDao.xml"/>
    </mappers>
</configuration>
6、service类
// 实体接口
public interface AuthorService {

    ArrayList<Author> selectAll();

    void insertAuthor(Author author);

    void deleteAuthorById(Integer id);

    void modifyAuthor(Author author);

}


// 实体类
public class AuthorServiceImpl implements AuthorService {

    private AuthorDao authorDao;

    public void setAuthorDao(AuthorDao authorDao) {
        this.authorDao = authorDao;
    }

    @Override
    public ArrayList<Author> selectAll() {
        ArrayList<Author> authors = authorDao.selectAll();
        return authors;
    }

    @Override
    public void insertAuthor(Author author) {
        authorDao.insertAuthor(author);
    }

    @Override
    public void deleteAuthorById(Integer id) {
        authorDao.deleteAuthorById(id);
    }

    @Override
    public void modifyAuthor(Author author) {
        authorDao.modifyAuthor(author);
    }
}
7、Spring配置文件
<?xml version="1.0" encoding="UTF-8"?>
<beans xmlns="http://www.springframework.org/schema/beans"
       xmlns:xsi="http://www.w3.org/2001/XMLSchema-instance" xmlns:util="http://www.springframework.org/schema/util"
       xmlns:context="http://www.springframework.org/schema/context"
       xsi:schemaLocation="http://www.springframework.org/schema/beans http://www.springframework.org/schema/beans/spring-beans.xsd http://www.springframework.org/schema/util https://www.springframework.org/schema/util/spring-util.xsd http://www.springframework.org/schema/context https://www.springframework.org/schema/context/spring-context.xsd">

<!--
    导入配置文件
-->
    <context:property-placeholder location="classpath:jdbc.properties" />

<!--
  bean标签中有两个属性:init-method="方法名" destroy-method="方法名"
  init-method="方法名"属性表示:Druid连接池对象创建时调用该方法
  destroy-method="方法名"属性表示:Druid连接池对象销毁时调用该方法
  -->

    <!--  Druid德鲁伊数据库连接池  -->
    <bean id="dataSource" class="com.alibaba.druid.pool.DruidDataSource" init-method="init" destroy-method="close">
        <property name="url" value="${url}" />
        <property name="username" value="${name}" />
        <property name="password" value="${pass}" />

        <!--  设置最大连接数  -->
        <property name="maxActive" value="${maxActive}" />
        <!--  设置初始连接数量  -->
        <property name="initialSize" value="${initialSize}" />
        <!--
            设置连接数据库的等待时间,以毫秒为单位,
            如一下配置,如果60秒后还是没有连接成功,会抛出异常
        -->
        <property name="maxWait" value="${maxWait}" />
    </bean>


    <!--
        创建SqlSessionFactoryBean类,该类是spirng和mybatis整合包中的类
        该类内部创建了SqlSessionFactory对象
      -->
    <bean id="sqlSessionFactory" class="org.mybatis.spring.SqlSessionFactoryBean">
        <!--  通过set方法设置数据库的连接池,代替mybatis主配置文件中的数据库连接池  -->
        <property name="dataSource" ref="dataSource" />

        <!--
            通过set方法设置mybatis主配置文件的路径
            spirng配置文件中要映入其他配置文件,必须在路径前面加上classpath:
          -->
        <property name="configLocation" value="classpath:MyBatis-config.xml" />
    </bean>


    <!--
      创建dao对象,使用sqlSession的getMapper(AuthorDao.class)
      MapperScannerConfiguer:在内部调用getMapper()生成每一个dao接口的代理对象
    -->
    <bean class="org.mybatis.spring.mapper.MapperScannerConfigurer">
        <!--  指定sqlSessionFactory对象的id值, 注意点,是使用value属性  -->
        <property name="sqlSessionFactoryBeanName" value="sqlSessionFactory" />
        <!--
            指定包名:包名是dao接口所在的包名
            MapperScannerConfiguer会扫描这个包中所有接口
            把所有接口都执行一次getMapper()方法,把每个得到的dao对象放入到spring容器中
            dao对象在spirng容器中的名称是接口名(首字母小写)

            指定包,如果有多个包,可以在后面加逗号分隔
            如:value="org.example.dao01,org.example.dao02"
        -->
        <property name="basePackage" value="org.example.dao" />
    </bean>

    <!-- 创建AuthorServiceImpl对象,调用setAuthorDao方法,给AuthorDao赋值 -->
    <bean id="authorService" class="org.example.service.impl.AuthorServiceImpl">
        <property name="authorDao" ref="authorDao" />
    </bean>
</beans>
下面是jdbc.properties配置文件
url=jdbc:mysql://localhost:3306/test?useUnicode=true&characterEncoding=utf-8
name=root
pass=123456
maxActive=20
initialSize=1
maxWait=6000
9、测试
@Test
    public void test() {
        String temp = "ApplicationContext.xml";
        ApplicationContext ac = new ClassPathXmlApplicationContext(temp);
        AuthorService authorService = (AuthorService) ac.getBean("authorService");
        ArrayList<Author> authors = authorService.selectAll();
        System.out.println(authors);
    }
事务
什么是事务?
事务是指一组sql语句的集合,集合中有多条sql语句,可能是insert、update、select、delete。事务可以保证多个sql语句都能成功或者都失败,保证sql语句的执行是一致的
什么时候使用事务?
当我们的操作涉及到多个表,或执行多个sql语句的时候,且需要保证多条sql的一致性的时候
事务用在哪里?
用在service类上,因为业务方法会调用多个dao的方法,执行多个sql语句
事务中的问题
1、不同的数据库处理事务的对象和方法不同,需要了解不同的数据库事务的使用原理
2、掌握多种数据库中事务的处理逻辑,如什么时候提交事务,什么时候回滚
3、处理事务的多种方法
解决事务中的问题
spirng提供一种事务的统一模型,能使用统一步骤,方式完成不同数据库访问技术的事务处理
处理事务
spring处理事务的模型,使用的步骤是固定的。把事务使用的信息提供给spring就可以了;
事务的提交和回滚,是事务管理器来代替你完成的,是事务管理器内部调用的commit方法和rollback方法;(底层就是用环绕通知给方法加事务功能)
管理器的接口:PlatformTransactionManager
管理器的实现类:spring把每一种数据库访问技术对应的处理类都写好了。
mybatis访问数据库-----------------spirng创建好的DataSourceTransactionManager
hibernate访问数据库---------------spirng创建好的HibernateTransactionManager
如何告诉spring我们使用的是哪种数据库访问技术:在spring的配置文件中使用<bean>声明数据库对应的管理器类就可以了,如使用mybatis访问数据库,应该在配置文件中设置:
<bean id="自定义" class="包名.DataSourceTransactionManager">
事务类型
1、事务的隔离级别:有5个
default(默认):mysql默认使用 可重复读,oracle默认使用读已提交
Read uncommitted(读未提交数据): 会出现脏读、不可重复读、幻读
Read committed(读已提交数据): 会出现不可重复读、幻读
Repeatable read(可重复读): 会出现幻读
Serializable(串行化): 什么都不会出现,不过效率低
2、事务的超时时间:表示一个事务的最长的执行时间,如果执行的事务超过了时间,
事务就回滚。单位是秒,整数值,默认是-1,-1的意思就是没有超时时间
3、事务的传播行为:控制义务方法是不是有事务,是什么样的事务。
7种传播行为:(加粗的必须掌握)
PROPAGATION_REQUIRED
PROPAGATION_SUPPORTS
PROPAGATION_REQUIRES_NEW
PROPAGATION_MANDATORY
PROPAGATION_NOT_SUPPORTED
PROPAGATION_NEVER
PROPAGATION_NESTEDPROPAGATION_REQUIRED表示是,如果当前有事务,就在该事务中执行,
如果没有事务,就重新开启一个事务
PROPAGATION_SUPPORTS表示是,如果当前有事务,就在该事务中执行,
如果没有事务,就非事务执行,不会开启一个事务
PROPAGATION_REQUIRES_NEW表示是,不管当前有没有事务,都会开启一
个新事物,如果当前有事务,当前事务会先挂起,等新创建的事务结束
后,该事务才会恢复
提交事务和回滚事务的时机
1、当业务方法没有异常抛出、执行完毕且成功后事务管理器才提交事务,
2、当业务方法抛出运行时异常或ERROR(错误),事务管理器会调用回滚
3、当业务抛出非运行时异常,主要是受查异常是会提交事务
受查异常:在我们写的代码中,必须要处理的异常
使用@Transactional注解完成事务(中小项目使用)
@Transactional可以放在类和方法上面(方法必须是public的)
放在类上面表示该类的所有方法都具有事务功能
放在方法上面表示该方法具有事务功能
@Transactional的属性:
- propagation:用于设置传播级别,默认值是:Propagation.Required
- isolation:用于设置隔离级别,默认值是:isolation.default
- readOnly:用于设置该方法对数据库的操作是否只读,默认值是false
- timeout:设置连接数据库的超时时间,单位为秒,int类型。默认值是-1,没有时间限制
- rollbackFor:指定需要回滚的异常类。类型为Class[],默认空数组,若只有一个异常类时,可以不用数组
- rollbackForClassName:指定需要回滚的异常类的类名。类型为String[],默认空数组,若只有一个异常类时,可以不用数组
- noRollbackFor:指定不需要回滚的异常类。类型为Class[],默认空数组,若只有一个异常类时,可以不用数组
- noRollbackForClassName:指定不需要回滚的异常类的类名。类型为String[],默认空数组,若只有一个异常类时,可以不用数组
语法:
@Transactional(
        propagation = Propagation.REQUIRED,         // 传递类型
        isolation = Isolation.DEFAULT,              // 事务隔离级别
        timeout = -1,                               // 超时时间
        readOnly = false,                           // 是否只读
        rollbackFor = {MyException.class},          //  指定回滚异常类的类型
        rollbackForClassName = {"MyException"},     // 指定回滚异常类的类名
        noRollbackFor = {},                         // 指定不回滚异常类的类型
        noRollbackForClassName = {}                 // 指定不回滚异常类的类名
)
public void transferAccounts(Account remitter, Account recipient){
        代码
}
案例
演示的案例是:两个人互相转账的功能
数据库


注入依赖
<dependencies>

<!--  单元测试  -->
    <dependency>
      <groupId>junit</groupId>
      <artifactId>junit</artifactId>
      <version>4.11</version>
      <scope>test</scope>
    </dependency>

      <!-- spring依赖 -->
      <dependency>
          <groupId>org.springframework</groupId>
          <artifactId>spring-context</artifactId>
          <version>5.2.5.RELEASE</version>
      </dependency>

      <!--  下面两个用于做事务  -->
    <dependency>
      <groupId>org.springframework</groupId>
      <artifactId>spring-tx</artifactId>
      <version>5.2.5.RELEASE</version>
    </dependency>

    <dependency>
      <groupId>org.springframework</groupId>
      <artifactId>spring-jdbc</artifactId>
      <version>5.2.5.RELEASE</version>
    </dependency>

<!--  mybatis和Spring桥接的依赖  -->
    <dependency>
      <groupId>org.mybatis</groupId>
      <artifactId>mybatis-spring</artifactId>
      <version>1.3.2</version>
    </dependency>

<!--  数据库依赖  -->
    <dependency>
      <groupId>mysql</groupId>
      <artifactId>mysql-connector-java</artifactId>
      <version>8.0.28</version>
    </dependency>

<!--  mybatis依赖  -->
    <dependency>
      <groupId>org.mybatis</groupId>
      <artifactId>mybatis</artifactId>
      <version>3.5.6</version>
    </dependency>

<!--  德鲁伊数据库连接池  -->
    <dependency>
      <groupId>com.alibaba</groupId>
      <artifactId>druid</artifactId>
      <version>1.1.12</version>
    </dependency>

  </dependencies>

  <build>
    <resources>
      <resource>
        <directory>src/main/java</directory>
        <includes>
          <include>**/*.xml</include>
        </includes>
      </resource>
    </resources>
  </build>
实体类
public class Account {

    private Integer id;

    private String name;

    private Integer balance;

    // 此处省略get、set和toString方法
}
自定义异常类
public class MyException extends Exception {
    public MyException(String message) {
        super(message);
    }
}
dao接口和Mapper文件
public interface AccountDao {

    /**
     *
     * @param recipientId   收款人
     * @param balance   增加的余额
     */
    void addBalance(@Param("id") Integer recipientId,@Param("balance") Integer balance);

    /**
     * 减少余额
     * @param remitterId    汇款人
     * @param balance   减少的余额
     */
    void reduceBalance(@Param("id") Integer remitterId,@Param("balance")  Integer balance);

    /**
     * 查询余额
     * @param id    要查询的用户id
     * @return  返回查询的用户余额
     */
    int selectBalance(Integer id);

}
<?xml version="1.0" encoding="UTF-8" ?>
<!DOCTYPE mapper
PUBLIC "-//mybatis.org//DTD Mapper 3.0//EN"
"http://mybatis.org/dtd/mybatis-3-mapper.dtd">
<mapper namespace="org.example.dao.AccountDao">
<update id="addBalance">
update account set balance = balance + #{balance} where id = #{id}
</update>
<update id="reduceBalance">
update account set balance = balance - #{balance} where id = #{id}
</update>
<select id="selectBalance" parameterType="int" resultType="int">
select balance from account where id = #{id}
</select>
</mapper>service层
/**
 * 接口
 */
public interface AccountService {

    /**
     * 转账功能
     * @param remitter  汇款人
     * @param recipient 收款人
     */
    void transferAccounts(Account remitter, Account recipient) throws MyException;
}


/**
 * 实现类
 */
public class AccountServiceImpl implements AccountService {


    private AccountDao accountDao;

    /**
     *  通过Spring注入给dao对象赋值
     * @param accountDao
     */
    public void setAccountDao(AccountDao accountDao) {
        this.accountDao = accountDao;
    }

    /**
     * 转账方法
     * @param remitter  汇款人
     * @param recipient 收款人
     * @throws MyException  余额不足异常
     */
    @Transactional(
            propagation = Propagation.REQUIRED,    // 事务传播类型
            isolation = Isolation.DEFAULT,         // 事务隔离级别
            timeout = -1,                          // 超时时间
            readOnly = false,                      // 是否只读
            rollbackFor = MyException.class        // 设置哪些异常类要回滚
            /*
                检查机制:spirng会检查列表中是否跟抛出的异常类一致,一致就执行回滚,
                        如果不一致,就会判断是否是运行时异常,是就回滚,不是就提交
            */
    )
    @Override
    public void transferAccounts(Account remitter, Account recipient) throws MyException {

        // 汇款人属性
        Integer remitterId = remitter.getId();
        Integer remitterBalance = remitter.getBalance();

        // 收款人信息
        Integer recipientId = recipient.getId();

        accountDao.addBalance(recipientId,remitterBalance);

        int i = accountDao.selectBalance(remitterId);
        if (i < remitterBalance) {
            throw new MyException("余额不足!!!");
        }
        accountDao.reduceBalance(remitterId,remitterBalance);

    }
}
mybatis配置文件
<?xml version="1.0" encoding="UTF-8" ?>
<!DOCTYPE configuration
        PUBLIC "-//mybatis.org//DTD Config 3.0//EN"
        "https://mybatis.org/dtd/mybatis-3-config.dtd">
<configuration>

    <mappers>
        <mapper resource="org/example/dao/AccountDao.xml"/>
    </mappers>
</configuration>
Spring配置文件
<?xml version="1.0" encoding="UTF-8"?>
<beans xmlns="http://www.springframework.org/schema/beans"
xmlns:xsi="http://www.w3.org/2001/XMLSchema-instance"
xmlns:context="http://www.springframework.org/schema/context" xmlns:tx="http://www.springframework.org/schema/tx"
xsi:schemaLocation="http://www.springframework.org/schema/beans http://www.springframework.org/schema/beans/spring-beans.xsd http://www.springframework.org/schema/context https://www.springframework.org/schema/context/spring-context.xsd http://www.springframework.org/schema/tx http://www.springframework.org/schema/tx/spring-tx.xsd">
<!-- 德鲁伊数据库连接池 -->
<bean id="dataSource" class="com.alibaba.druid.pool.DruidDataSource" init-method="init" destroy-method="close">
<property name="url" value="jdbc:mysql://localhost:3306/test?useUnicode=true&characterEncoding=utf-8" />
<property name="username" value="root" />
<property name="password" value="123456" />
<property name="initialSize" value="1" />
<property name="maxActive" value="20" />
<property name="maxWait" value="60000" />
</bean>
<!-- SqlSessionFactory工厂 -->
<bean id="sqlSessionFactory" class="org.mybatis.spring.SqlSessionFactoryBean">
<!-- 德鲁伊连接池对象 -->
<property name="dataSource" ref="dataSource" />
<!-- mybatis主配置文件路径 -->
<property name="configLocation" value="classpath:mybatis.xml" />
</bean>
<!-- 给所有Dao接口创建代理对象,并且放入spring容器中 -->
<bean class="org.mybatis.spring.mapper.MapperScannerConfigurer" >
<!-- 设置SqlSessionFactory工厂对象,注意用的是value属性 --> <!-- 注重点 -->
<property name="sqlSessionFactoryBeanName" value="sqlSessionFactory" />
<!-- 所有dao接口的包 -->
<property name="basePackage" value="org.example.dao" />
</bean>
<!-- 创建AccountServiceImpl对象 -->
<bean id="accountService" class="org.example.service.impl.AccountServiceImpl">
<!-- 把dao接口的代理对象set注入给对象属性,该对象是通过上面的bean中自动加入到spring容器中的 -->
<property name="accountDao" ref="accountDao" />
</bean>
<!-- 创建Mybatis对应的事务管理器 -->
<bean id="transactionManager" class="org.springframework.jdbc.datasource.DataSourceTransactionManager">
<!-- 传入德鲁伊数据库对象,用于告诉管理器我们用的什么数据库 -->
<property name="dataSource" ref="dataSource" />
</bean>
<!-- 表示开启事务,transaction-manager="事务管理器对象" -->
<tx:annotation-driven transaction-manager="transactionManager" />
</beans>测试
    @Test
    public void test() throws MyException {
        ApplicationContext ac = new ClassPathXmlApplicationContext("spring.xml");
        AccountService accountService = (AccountService) ac.getBean("accountService");
        // 汇款人
        Account account = new Account();
        account.setId(1);
        // 转账余额
        account.setBalance(1000);
        // 收款人
        Account account1 = new Account();
        account1.setId(2);
        // 转账
        accountService.transferAccounts(account,account1);
    }
结果
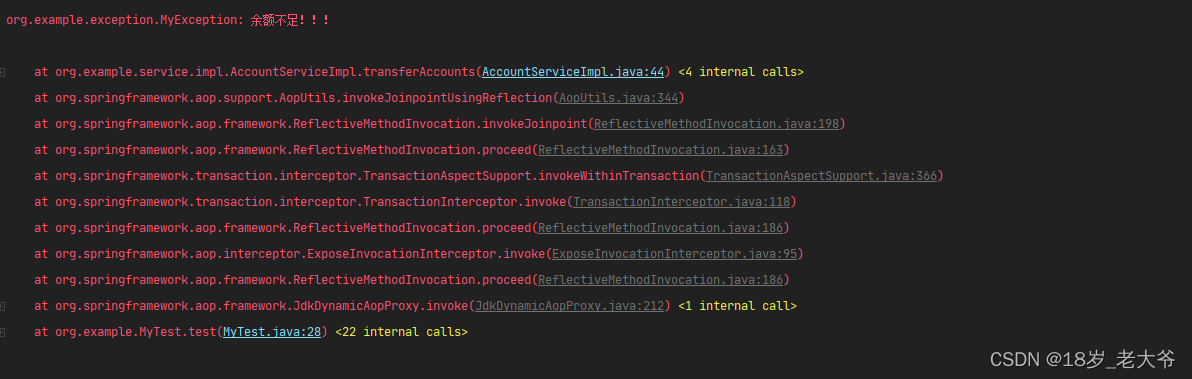
因为id为1的用户余额只有500块,而要转出1000块,所以会报异常,且回滚

使用AspectJ完成事务(适用大型项目)
注意:记得要导入AspectJ依赖
<!-- 配置业务方法的事务属性(传播行为、隔离级别...) -->
<tx:advice id="自定义名称" transaction-manager="事务管理器id">
        <!-- 配置事务属性 -->
        <tx:attributes>
            <!--
            tx:method用于给具体方法配置事务属性,tx:method可以有多个,分别给不同方法设置不同属性
            name:方法名:1、完整的方法名,不带包名和类名
                         2、使用通配符,通配符:*,表示任意字符
            -->
            <tx:method name="方法名" propagation="传播行为" isolation="隔离级别" read-only="是否只读" rollback-for="指定回滚" no-rollback-for="指定不回滚" timeout="超时时间"/>
        </tx:attributes>
</tx:advice>


<aop:config>
    <!--
        切入点表达式:指定哪些包中的类要使用事务
        id:切入点表达式的名称
        expression:切入点表达式,用于指定哪些类使用事务,aspectJ会创建代理对象
        aop:pointcut标签可以有多个
     -->
    <aop:pointcut id="servicePointcut" expression="execution(* *..service.*.*(..))"/>


    <!--
        配置增强器:关联adivce和pointcut
        advice-ref:上面tx:advice的id值
        pointcut-ref:上面tx:aop:pointcut标签的id值
        aop:advisor标签可以有多个
    -->
    <aop:advisor advice-ref="myAdvice" pointcut-ref="servicePointcut" />
</aop:config>
案例
依旧是两个人互相转账的功能
添加依赖
  <dependencies>

<!--  单元测试  -->
    <dependency>
      <groupId>junit</groupId>
      <artifactId>junit</artifactId>
      <version>4.11</version>
      <scope>test</scope>
    </dependency>

      <!-- spring依赖 -->
      <dependency>
          <groupId>org.springframework</groupId>
          <artifactId>spring-context</artifactId>
          <version>5.2.5.RELEASE</version>
      </dependency>


      <!--  下面两个用于做事务  -->
    <dependency>
      <groupId>org.springframework</groupId>
      <artifactId>spring-tx</artifactId>
      <version>5.2.5.RELEASE</version>
    </dependency>

    <dependency>
      <groupId>org.springframework</groupId>
      <artifactId>spring-jdbc</artifactId>
      <version>5.2.5.RELEASE</version>
    </dependency>

<!--  mybatis和Spring桥接的依赖  -->
    <dependency>
      <groupId>org.mybatis</groupId>
      <artifactId>mybatis-spring</artifactId>
      <version>1.3.2</version>
    </dependency>

<!--  数据库依赖  -->
    <dependency>
      <groupId>mysql</groupId>
      <artifactId>mysql-connector-java</artifactId>
      <version>8.0.28</version>
    </dependency>

<!--  mybatis依赖  -->
    <dependency>
      <groupId>org.mybatis</groupId>
      <artifactId>mybatis</artifactId>
      <version>3.5.6</version>
    </dependency>

<!--  德鲁伊数据库连接池  -->
    <dependency>
      <groupId>com.alibaba</groupId>
      <artifactId>druid</artifactId>
      <version>1.1.12</version>
    </dependency>
<!--  AspectJ依赖  -->
      <dependency>
          <groupId>org.springframework</groupId>
          <artifactId>spring-aspects</artifactId>
          <version>5.3.18</version>
      </dependency>

  </dependencies>

  <build>
    <resources>
      <resource>
        <directory>src/main/java</directory>
        <includes>
          <include>**/*.xml</include>
        </includes>
      </resource>
    </resources>
  </build>
实体类
public class Account {

    private Integer id;

    private String name;

    private Integer balance;

    // 此处省略get、set和toString方法
}
自定义异常类
public class MyException extends Exception {
    public MyException(String message) {
        super(message);
    }
}
dao类和Mapper文件
public interface AccountDao {

    /**
     *
     * @param recipientId   收款人
     * @param balance   增加的余额
     */
    void addBalance(@Param("id") Integer recipientId,@Param("balance") Integer balance);

    /**
     * 减少余额
     * @param remitterId    汇款人
     * @param balance   减少的余额
     */
    void reduceBalance(@Param("id") Integer remitterId,@Param("balance")  Integer balance);

    /**
     * 查询余额
     * @param id    要查询的用户id
     * @return  返回查询的用户余额
     */
    int selectBalance(Integer id);

}
<?xml version="1.0" encoding="UTF-8" ?>
<!DOCTYPE mapper
PUBLIC "-//mybatis.org//DTD Mapper 3.0//EN"
"http://mybatis.org/dtd/mybatis-3-mapper.dtd">
<mapper namespace="org.example.dao.AccountDao">
<update id="addBalance">
update account set balance = balance + #{balance} where id = #{id}
</update>
<update id="reduceBalance">
update account set balance = balance - #{balance} where id = #{id}
</update>
<select id="selectBalance" parameterType="int" resultType="int">
select balance from account where id = #{id}
</select>
</mapper>service层
/**
 * 接口
 */
public interface AccountService {

    /**
     * 转账功能
     * @param remitter  汇款人
     * @param recipient 收款人
     */
    void transferAccounts(Account remitter, Account recipient) throws MyException;
}


/**
 * 实现类
 */
public class AccountServiceImpl implements AccountService {


    private AccountDao accountDao;

    /**
     *  通过Spring注入给dao对象赋值
     * @param accountDao
     */
    public void setAccountDao(AccountDao accountDao) {
        this.accountDao = accountDao;
    }

    /**
     * 转账方法
     * @param remitter  汇款人
     * @param recipient 收款人
     * @throws MyException  余额不足异常
     */
    @Override
    public void transferAccounts(Account remitter, Account recipient) throws MyException {

        // 汇款人属性
        Integer remitterId = remitter.getId();
        Integer remitterBalance = remitter.getBalance();

        // 收款人信息
        Integer recipientId = recipient.getId();

        accountDao.addBalance(recipientId,remitterBalance);

        int i = accountDao.selectBalance(remitterId);
        if (i < remitterBalance) {
            throw new MyException("余额不足!!!");
        }
        accountDao.reduceBalance(remitterId,remitterBalance);

    }
}
mybatis配置文件
<?xml version="1.0" encoding="UTF-8" ?>
<!DOCTYPE configuration
        PUBLIC "-//mybatis.org//DTD Config 3.0//EN"
        "https://mybatis.org/dtd/mybatis-3-config.dtd">
<configuration>

    <mappers>
        <mapper resource="org/example/dao/AccountDao.xml"/>
    </mappers>
</configuration>
Spring配置文件
<?xml version="1.0" encoding="UTF-8"?>
<beans xmlns="http://www.springframework.org/schema/beans"
xmlns:xsi="http://www.w3.org/2001/XMLSchema-instance"
xmlns:context="http://www.springframework.org/schema/context" xmlns:tx="http://www.springframework.org/schema/tx"
xmlns:aop="http://www.springframework.org/schema/aop"
xsi:schemaLocation="http://www.springframework.org/schema/beans http://www.springframework.org/schema/beans/spring-beans.xsd http://www.springframework.org/schema/context https://www.springframework.org/schema/context/spring-context.xsd http://www.springframework.org/schema/tx http://www.springframework.org/schema/tx/spring-tx.xsd http://www.springframework.org/schema/aop https://www.springframework.org/schema/aop/spring-aop.xsd">
<context:property-placeholder location="classpath:jdbc.properties" />
<!-- 德鲁伊数据库连接池 -->
<bean id="dataSource" class="com.alibaba.druid.pool.DruidDataSource" init-method="init" destroy-method="close">
<property name="url" value="jdbc:mysql://localhost:3306/test?useUnicode=true&characterEncoding=utf-8" />
<property name="username" value="root" />
<property name="password" value="123456" />
<property name="initialSize" value="${initsize}" />
<property name="maxActive" value="20" />
<property name="maxWait" value="60000" />
</bean>
<!-- SqlSessionFactory工厂 -->
<bean id="sqlSessionFactory" class="org.mybatis.spring.SqlSessionFactoryBean">
<!-- 德鲁伊连接池对象 -->
<property name="dataSource" ref="dataSource" />
<!-- mybatis主配置文件路径 -->
<property name="configLocation" value="classpath:mybatis.xml" />
</bean>
<!-- 给所有Dao接口创建代理对象,并且放入spring容器中 -->
<bean class="org.mybatis.spring.mapper.MapperScannerConfigurer" >
<!-- 设置SqlSessionFactory工厂对象,注意用的是value属性 --> <!-- 注重点 -->
<property name="sqlSessionFactoryBeanName" value="sqlSessionFactory" />
<!-- 所有dao接口的包 -->
<property name="basePackage" value="org.example.dao" />
</bean>
<!-- 创建AccountServiceImpl对象 -->
<bean id="accountService" class="org.example.service.impl.AccountServiceImpl">
<!-- 把dao接口的代理对象set注入给对象属性,该对象是通过上面的bean中自动加入到spring容器中的 -->
<property name="accountDao" ref="accountDao" />
</bean>
<!-- 创建Mybatis对应的事务管理器 -->
<bean id="transactionManager" class="org.springframework.jdbc.datasource.DataSourceTransactionManager">
<!-- 传入德鲁伊数据库对象,用于告诉管理器我们用的什么数据库 -->
<property name="dataSource" ref="dataSource" />
</bean>
<tx:advice id="myAdvice" transaction-manager="transactionManager">
<tx:attributes>
<tx:method name="transferAccounts" propagation="REQUIRED" isolation="DEFAULT" read-only="false" rollback-for="org.example.exception.MyException" timeout="-1"/>
</tx:attributes>
</tx:advice>
<!--
就可以不用下面该标签
<tx:annotation-driven transaction-manager="transactionManager" /> 开启事务的标签
-->
<aop:config>
<!--
切入点表达式:指定哪些包中的类要使用事务
id:切入点表达式的名称
expression:切入点表达式,用于指定哪些类使用事务,aspectJ会创建代理对象
-->
<aop:pointcut id="servicePointcut" expression="execution(void *..service.*.transferAccounts(..))"/>
<!--
配置增强器:关联adivce和pointcut
advice-ref:上面tx:advice的id值
pointcut-ref:上面tx:aop:pointcut标签的id值
-->
<aop:advisor advice-ref="myAdvice" pointcut-ref="servicePointcut" />
</aop:config>
</beans>测试
    @Test
    public void test() throws MyException {
        ApplicationContext ac = new ClassPathXmlApplicationContext("spring.xml");
        AccountService accountService = (AccountService) ac.getBean("accountService");
        // 汇款人
        Account account = new Account();
        account.setId(1);
        // 转账余额
        account.setBalance(2000);
        // 收款人
        Account account1 = new Account();
        account1.setId(2);
        // 转账
        accountService.transferAccounts(account,account1);
    }
结果
因为id为1的用户余额只有500块,而要转出2000块,所以会报异常,且回滚


 226
226


 被折叠的 条评论
为什么被折叠?
被折叠的 条评论
为什么被折叠?
 到【灌水乐园】发言


