


目录
1、<if>标签
MyBatis
MyBatis 是一款优秀的持久层框架,它支持定制化 SQL、存储过程以及高级映射。MyBatis 避免了几乎所有的 JDBC 代码和手动设置参数以及获取结果集。MyBatis 可以使用简单的 XML 或注解来配置和映射原生信息,将接口和 Java 的 POJOs(Plain Ordinary Java Object,普通的 Java对象)映射成数据库中的记录。
功能架构
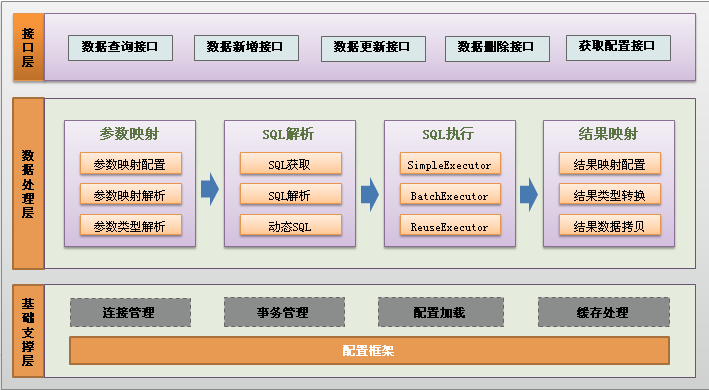
Mybatis的功能架构分为三层:
(1)API接口层:提供给外部使用的接口API,开发人员通过这些本地API来操纵数据库。接口层一接收到调用请求就会调用数据处理层来完成具体的数据处理。
(2)数据处理层:负责具体的SQL查找、SQL解析、SQL执行和执行结果映射处理等。它主要的目的是根据调用的请求完成一次数据库操作。
(3)基础支撑层:负责最基础的功能支撑,包括连接管理、事务管理、配置加载和缓存处理,这些都是共用的东西,将他们抽取出来作为最基础的组件。为上层的数据处理层提供最基础的支撑。
学习MyBatis
1、配置MyBatis开发环境
2、使用MyBatis模式和语法操作数据库
第一个MyBatis查询
1、创建数据库和表
-- 创建数据库
drop database if exists mycnblog;
create database mycnblog DEFAULT CHARACTER SET utf8mb4;

-- 使用数据数据
use mycnblog;

-- 创建表[用户表]
drop table if exists  userinfo;
create table userinfo(
    id int primary key auto_increment,
    username varchar(100) not null,
    password varchar(32) not null,
    photo varchar(500) default '',
    createtime datetime,
    updatetime datetime,
    `state` int default 1
) default charset 'utf8mb4';

-- 创建文章表
drop table if exists  articleinfo;
create table articleinfo(
    id int primary key auto_increment,
    title varchar(100) not null,
    content text not null,
    createtime datetime,
    updatetime datetime,
    uid int not null,
    rcount int not null default 1,
    `state` int default 1
)default charset 'utf8mb4';

-- 创建视频表
drop table if exists videoinfo;
create table videoinfo(
  	vid int primary key,
  	`title` varchar(250),
  	`url` varchar(1000),
		createtime datetime,
		updatetime datetime,
  	uid int
)default charset 'utf8mb4';

-- 添加一个用户信息
INSERT INTO `mycnblog`.`userinfo` (`id`, `username`, `password`, `photo`, `createtime`, `updatetime`, `state`) VALUES
(1, 'admin', 'admin', '', '2021-12-06 17:10:48', '2021-12-06 17:10:48', 1);

-- 文章添加测试数据
insert into articleinfo(title,content,uid)
    values('Java','Java正文',1);

-- 添加视频
insert into videoinfo(vid,title,url,uid) values(1,'java title','http://www.baidu.com',1);
2、搭建MyBatis开发环境
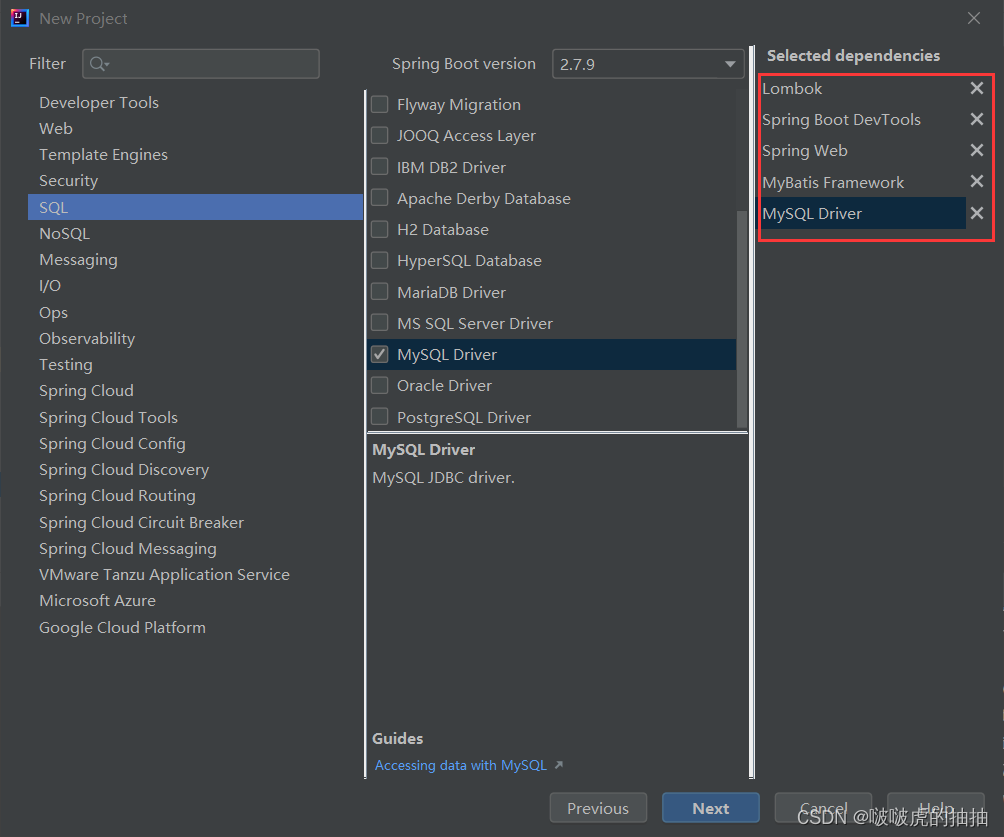
2.1、在项目中添加MyBatis框架
老项目中添加MyBatis

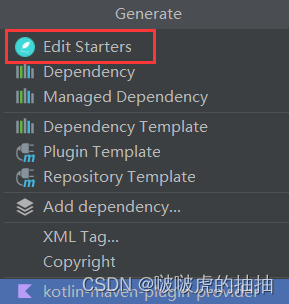

新项目中添加MyBatis框架
2.2、配置数据库连接信息
spring.datasource.url=jdbc:mysql://localhost:3306/mycnblog?characterEncoding=utf8&useSSL=false
spring.datasource.username=root
spring.datasource..password=19930112
spring.datasource.driver-class-name=com.mysql.cj.jdbc.Driver
2.3、配置MyBatis中xml的保存路径(规则)

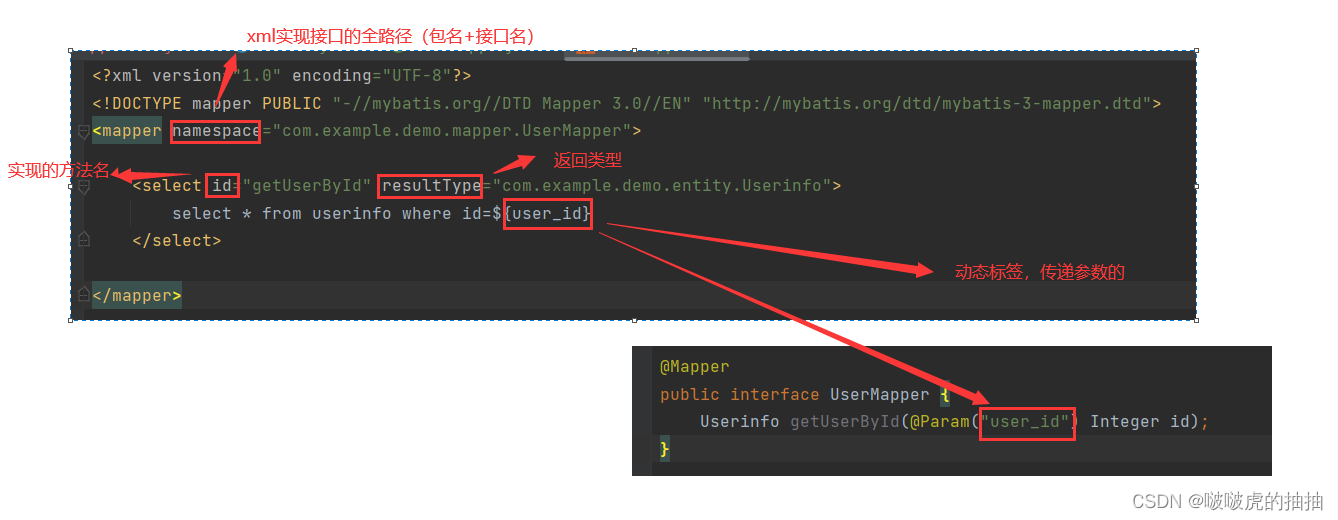
MyBatis组成:
1、接口(表的所有操作方法)->给程序其他类的调用
2、XML实现接口->写具体SQL语句
3、添加业务代码
实现MyBatis查询所有用户的功能

3.1、创建实体类
@Data
public class Userinfo {
    private int id;
    private String username;
    private String password;
    private String photo;
    private LocalDateTime createtime;
    private LocalDateTime updatetime;
    private int state;
}
3.2、构建Mapper层的代码实现(接口+XML)
先创建接口
@Mapper
public interface UserMapper {

    /*
    根据用户id查询
     */
    Userinfo getUserById(Integer id);

}
创建xml实现
实现服务层
@Service
public class UserService {

    @Autowired
    private UserMapper userMapper;

    public Userinfo getUserById(Integer id){
        return userMapper.getUserById(id);
    }
}
实现控制器
@RestController
@RequestMapping("/user")
public class UserController {

    @Autowired
    private UserService userService;

    @RequestMapping("/getUserById")
    public Userinfo getUserById(Integer id){
        if (id==null) return null;
        return userService.getUserById(id);
    }
}
SpringBoot单元测试
1、优点
1、方便、快捷测试一个功能模块;
2、在打包时会运行所有的单元测试,只有所有的单元测试都通过之后才能正常的打包,这个过程可以减少问题发生的概率;
3、使用单元测试可以在不污染数据库数据的情况下,来测试某个功能的正确性
2、执行单元测试
2.1、生成单元测试
单击右键


2.2、添加单元测试的代码
后端实现
@SpringBootTest  //表明当前单元测试是运行在Spring Boot环境中的
class UserMapperTest {

    //注入测试对象(属性注入)
    @Autowired
    private UserMapper userMapper;

    @Test
    void getUserById() {
        //添加单元测试的运行代码
        Userinfo userinfo=userMapper.getUserById(1);
        System.out.println(userinfo);
        Assertions.assertEquals("admin",userinfo.getUsername());
    }
}
前端实现

MyBatis增删改查操作
@Transactional在不污染数据库的前提下进行测试功能是否正确
1、添加用户
1.1、在接口中声明方法
    /*
    添加用户信息
     */
    int add(Userinfo userinfo);
1.2、在xml中提供实现
    <insert id="add">
        insert into userinfo(username,password,createtime,updatetime)
        values(#{username},#{password},#{createtime},#{updatetime})
    </insert>
1.3、后端实现
    @Test
    void add() {
        //构造对象并设置相应的值
        Userinfo userinfo=new Userinfo();
        userinfo.setUsername("边伯贤");
        userinfo.setPassword("1992");
        userinfo.setCreatetime(LocalDateTime.now());
        userinfo.setUpdatetime(LocalDateTime.now());
        //调用MyBatis添加方法执行添加操作
        int result=userMapper.add(userinfo);
        System.out.println("添加:"+result);
        Assertions.assertEquals(1,result);
    }
1.4、测试

2、添加并返回用户的自增ID
2.1、在接口中声明方法
    /*
    添加并返回用户的自增ID
     */
    int addGetId(Userinfo userinfo);
2.2、在xml中提供实现
    <insert id="addGetId" useGeneratedKeys="true" keyProperty="id">
        insert into userinfo(username,password,createtime,updatetime)
        values(#{username},#{password},#{createtime},#{updatetime})
    </insert>
2.3、后端实现
    @Test
    void addGetId() {
        //构造对象并设置相应的值
        Userinfo userinfo=new Userinfo();
        userinfo.setUsername("郑秀晶");
        userinfo.setPassword("1994");
        userinfo.setCreatetime(LocalDateTime.now());
        userinfo.setUpdatetime(LocalDateTime.now());
        //调用MyBatis添加方法执行添加操作
        int result=userMapper.addGetId(userinfo);
        System.out.println("添加:"+result);
        int uid=userinfo.getId();
        System.out.println("用户id:"+uid);
        Assertions.assertEquals(1,result);
    }
2.4、测试

3、修改用户信息(姓名)
3.1、在接口中声明方法
    /*
    修改
     */
    int upUserName(Userinfo userinfo);
3.2、在xml中提供实现
    <update id="upUserName">
        update userinfo set username=#{username} where id=#{id}
    </update>
3.3、后端实现
    @Test
    void upUserName() {
        //构造对象并设置相应的值
        Userinfo userinfo=new Userinfo();
        userinfo.setId(3);
        userinfo.setUsername("嘟嘟");
        int result=userMapper.upUserName(userinfo);
        System.out.println("修改:"+userinfo);
    }
3.4、测试

4、删除用户信息
4.1、在接口中声明方法
    /*
    删除
     */
    int delById(@Param("id") Integer id);
4.2、在xml中提供实现
    <delete id="delById">
        delete from userinfo where id=#{id}
    </delete>
4.3、后端实现
    @Test
    void delById() {
        Integer id=4;
        int result=userMapper.delById(id);
        System.out.println("删除:"+result);
    }
4.4、测试

5、查询所有用户信息
5.1、在接口中声明方法
    /*
    查询全部
     */
    List<Userinfo> getAll();
5.2、在xml中提供实现
    <select id="getAll" resultType="com.example.demo.entity.Userinfo">
        select * from userinfo
    </select>
5.3、后端实现
    @Test
    void getAll() {
        List<Userinfo> list=userMapper.getAll();
        Assertions.assertEquals(1,list.size());
    }
查询操作
1、单表查询
1.1、参数占位符#{}和{}
#{}:预编译处理
${}:字符直接替换
预编译处理是指: MyBatis 在处理#()时,会将SQL中的#0}替换为?号,使用PreparedStatement的set方法来赋值。
直接替换:是MyBatis 在处理${0}时,就是把${}替换成变量的值。
区别:
1、${}存在SQL注入问题,而#{}不存在;
2、${}直接替换,#{}是预处理
1.2、${}的优点
它会把其内部变量解析为字符串值拼接到一条语句上,不会做其余的处理,例如加''
1.3、SQL注入

1.4、like查询
like查询要使用concat()连接
List<Userinfo> getListByName(@Param("username") String username); <select id="getListByName" resultType="com.example.demo.entity.Userinfo">
select * from userinfo where username like concat('%',#{username},'%')
</select> @Test
void getListByName() {
String username="伯";
List<Userinfo> list=userMapper.getListByName(username);
System.out.println("list:"+list);
}
2、多表查询
2.1、返回类型:resultType
数据库表中的字段名和实体类中的属性完全一致时,才能使用,否则会出现数据不显示的情况
2.2、返回字典映射:resultMap
使用场景:实现程序中属性和表中字段的映射功能(当程序中的属性和表的字段不一致时,可以强行的映射到一起)

当程序中的属性和数据库的字段名不一致时的解决方案:
1、使用resultMap标签;
2、使用数据库别名as重命名
    <select id="getAll" resultType="com.example.demo.entity.Userinfo">
        select id,username as name,password,photo,createtime,updatetime,state from userinfo
    </select>
2.3、一对一的表映射
使用<association>标签
联表查询
@Data
public class Articleinfo {
    private int id;
    private String title;
    private String content;
    private String createtime;
    private String updatetime;
    private int uid;
    private int rcount;
    private int state;
}
@Data
public class ArticleinfoVO extends Articleinfo{
private String username;
}@Mapper
public interface ArticleMapper {
ArticleinfoVO getById(@Param("id") Integer id);
} <select id="getById" resultType="com.example.demo.entity.vo.ArticleinfoVO">
select a.*,u.username from articleinfo a
left join userinfo u on u.id=a.uid
where a.id=#{id}
</select>@SpringBootTest
class ArticleMapperTest {
@Autowired
private ArticleMapper articleMapper;
@Test
void getById() {
ArticleinfoVO articleinfoVO=articleMapper.getById(1);
System.out.println(":"+articleinfoVO);
}
}问题:扩展类 继承了基类,但是在查询时,只展示出了扩展类的字段,而没有展示基础类的字段
在扩展类页面单击右键


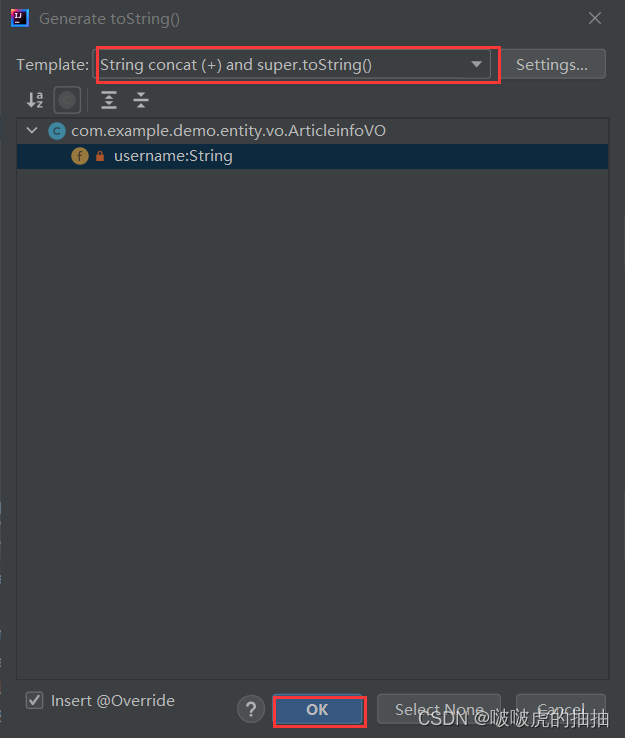
@Data
public class ArticleinfoVO extends Articleinfo implements Serializable{
    private String username;

    @Override
    public String toString() {
        return "ArticleinfoVO{" +
                "username='" + username + '\'' +
                "} " + super.toString();
    }
}
2.4、一对多
使用<collection>标签
联表查询语句(left.join/inner join)+XXXVO
动态SQL使用
能够满足复杂条件的sql连接
1、<if>标签
语法:
<if test=“参数名!=null”>
...
</if>
test会产生一个boolean类型的结果,如果是true,那么执行if标签里边的内容,如果是false,那么就不执行if标签里边的内容
int add2(Userinfo userinfo);
    <insert id="add2">
        insert into userinfo(username,
        <if test="photo!=null">
            photo;
        </if>
        password)
        values(#{username},
        <if test="photo!=null">
            #{photo},
        </if>
        #{password})
    </insert>
@Test
void add2() {
Userinfo userinfo=new Userinfo();
userinfo.setUsername("krystal");
userinfo.setPhoto(null);
userinfo.setPassword("1994");
int result=userMapper.add2(userinfo);
System.out.println("结果是"+result);
}2、<trim>标签
一般用于去除 SQL 语句中多余的 AND 关键字、逗号,或者给 SQL 语句前拼接 where、set 等后缀,可用于选择性插入、更新、删除或者条件查询等操作。
语法:
<trim prefix="(" suffix=")" suffixOverrides=",">
    <if test="username!=null">
        username,
    </if>
    <if test="password!=null">
        password,
    </if>
    <if test="photo!=null">
        photo,
    </if>
</trim>
prefix是指在最前边加上某个内容
suffix是指在最后边加上某个内容
suffixoverrides 是指如果做后边是某个值时就去掉
int add3(Userinfo userinfo); <insert id="add3">
insert into userinfo
<trim prefix="(" suffix=")" suffixOverrides=",">
<if test="username!=null">
username,
</if>
<if test="password!=null">
password,
</if>
<if test="photo!=null">
photo,
</if>
</trim>
values
<trim prefix="(" suffix=")" suffixOverrides=",">
<if test="username!=null">
#{username},
</if>
<if test="password!=null">
#{password},
</if>
<if test="photo!=null">
#{photo},
</if>
</trim>
</insert> @Test
void add3() {
Userinfo userinfo=new Userinfo();
userinfo.setUsername("sehun");
userinfo.setPassword("1994");
userinfo.setPhoto("exo.jpg");
int result=userMapper.add3(userinfo);
System.out.println("添加:"+result);
}3、<where>标签
语法:
<where>
    <if test="username!=null">
        username=#{username}
    </if>
    <if test="password!=null">
        and password=#{password}
    </if>
</where>
特征:
1、where标签通常要配合if标签一起使用;
2、where标签会删除最前边的and关键字(不会删除最后边的);
3、where标签中如果没有内容,那么也不会生成where sql关键字
List<Userinfo> getListByParam(String username,String password); <select id="getListByParam" resultType="com.example.demo.entity.Userinfo">
select * from userinfo
<where>
<if test="username!=null">
username=#{username}
</if>
<if test="password!=null">
and password=#{password}
</if>
</where>
</select>或者
        <trim prefix="where" prefixOverrides="and">
            <if test="username!=null">
                username=#{username}
            </if>
            <if test="password!=null">
                and password=#{password}
            </if>
        </trim>
@Test
void getListByParam() {
List<Userinfo> list=userMapper.getListByParam("krystal","1994");
System.out.println("list:"+list);
}4、<set>标签
根据传入的用户对象属性来更新用户数据,使用<set>标签来指定动态内容
语法:
<set>
    <if test="username!=null">
        username=#{username},
    </if>
    <if test="password!=null">
        password=#{password},
    </if>
    <if test="photo!=null">
        photo=#{photo}
    </if>
</set>
特征:
1、set标签通常要配合if标签一起使用;
2、set标签会自动去除最后一个英文逗号
int update2(Userinfo userinfo); <update id="update2">
update userinfo
<set>
<if test="username!=null">
username=#{username},
</if>
<if test="password!=null">
password=#{password},
</if>
<if test="photo!=null">
photo=#{photo}
</if>
</set>
where id=#{id}
</update> @Test
void update2() {
Userinfo userinfo=new Userinfo();
userinfo.setId(2);
userinfo.setUsername("啵啵虎");
userinfo.setPassword("1992");
userinfo.setPhoto("exo.jpg");
int result=userMapper.update2(userinfo);
System.out.println("修改:"+result);
}5、<foreach>标签
对集合进行遍历时可以使用该标签
<foreach> 标签有如下属性: .
collection: 绑定方法参数中的集合,如List, Set, Map或数组对象
item:遍历时的每一个对象
open: 语句块开头的字符串
close: 语句块结束的字符串
separator: 每次遍历之间间隔的字符串
int dels(List<Integer> ids); <delete id="dels">
delete from userinfo where id in
<foreach collection="ids" open="(" close=")" item="id" separator=",">
#{id}
</foreach>
</delete> @Test
void dels() {
List<Integer> ids=new ArrayList<>();
ids.add(4);
ids.add(5);
int result=userMapper.dels(ids);
System.out.println("删除:"+result);
}


 366
366


 被折叠的 条评论
为什么被折叠?
被折叠的 条评论
为什么被折叠?
 到【灌水乐园】发言


