


商品服务-api-三级分类-递归查询树形数据结构获取
1、导入数据
向数据库gulimall_pms中的表pms_category导入数据,脚本如下:
DROP TABLE IF EXISTS `pms_category`;

CREATE TABLE `pms_category` (
  `cat_id` bigint(20) NOT NULL AUTO_INCREMENT COMMENT '分类id',
  `name` char(50) DEFAULT NULL COMMENT '分类名称',
  `parent_cid` bigint(20) DEFAULT NULL COMMENT '父分类id',
  `cat_level` int(11) DEFAULT NULL COMMENT '层级',
  `show_status` tinyint(4) DEFAULT NULL COMMENT '是否显示[0-不显示,1显示]',
  `sort` int(11) DEFAULT NULL COMMENT '排序',
  `icon` char(255) DEFAULT NULL COMMENT '图标地址',
  `product_unit` char(50) DEFAULT NULL COMMENT '计量单位',
  `product_count` int(11) DEFAULT NULL COMMENT '商品数量',
  PRIMARY KEY (`cat_id`)
) ENGINE=InnoDB AUTO_INCREMENT=1433 DEFAULT CHARSET=utf8mb4 COMMENT='商品三级分类';


## 2、后端的代码实现

编辑我们product 模块

### 2.1 CategoryController

```java
	  @Autowired
    private CategoryService categoryService;
    /**
     * 查出所有分类以及子分类,以树形结构组装起来
     */
    @RequestMapping("/list/tree")
    public R list(){
        List<CategoryEntity> entities = categoryService.listWithTree();
        return R.ok().put("data", entities);
    }
2.2 service
/**
 * 商品三级分类
 *
 * @author fangsheng
 * @email fangsheng@gmail.com
 * @date 2022-04-10 22:48:10
 */
public interface CategoryService extends IService<CategoryEntity> {

    PageUtils queryPage(Map<String, Object> params);

    List<CategoryEntity> listWithTree();
}
给CategoryEntity 加入属性
	@JsonInclude(JsonInclude.Include.NON_EMPTY)
	@TableField(exist=false)
	private List<CategoryEntity> children;
完整的代码
package com.atguigu.gulimall.product.entity;
import com.baomidou.mybatisplus.annotation.TableField;
import com.baomidou.mybatisplus.annotation.TableId;
import com.baomidou.mybatisplus.annotation.TableName;
import com.fasterxml.jackson.annotation.JsonInclude;
import lombok.Data;
import java.io.Serializable;
import java.util.List;

/**
 * 商品三级分类
 *
 * @author fangsheng
 * @email fangsheng@gmail.com
 * @date 2022-04-10 22:48:10
 */
@Data
@TableName("pms_category")
public class CategoryEntity implements Serializable {
	private static final long serialVersionUID = 1L;

	/**
	 * 分类id
	 */
	@TableId
	private Long catId;
	/**
	 * 分类名称
	 */
	private String name;
	/**
	 * 父分类id
	 */
	private Long parentCid;
	/**
	 * 层级
	 */
	private Integer catLevel;
	/**
	 * 是否显示[0-不显示,1显示]
	 */
	private Integer showStatus;
	/**
	 * 排序
	 */
	private Integer sort;
	/**
	 * 图标地址
	 */
	private String icon;
	/**
	 * 计量单位
	 */
	private String productUnit;
	/**
	 * 商品数量
	 */
	private Integer productCount;

	@JsonInclude(JsonInclude.Include.NON_EMPTY)
	@TableField(exist=false)
	private List<CategoryEntity> children;

}
2.3 servceImpl
package com.atguigu.gulimall.product.service.impl;
import com.atguigu.common.utils.PageUtils;
import com.atguigu.common.utils.Query;
import com.atguigu.gulimall.product.dao.CategoryDao;
import com.atguigu.gulimall.product.entity.CategoryEntity;
import com.atguigu.gulimall.product.service.CategoryService;
import com.baomidou.mybatisplus.core.conditions.query.QueryWrapper;
import com.baomidou.mybatisplus.core.metadata.IPage;
import com.baomidou.mybatisplus.extension.service.impl.ServiceImpl;
import org.springframework.stereotype.Service;
import java.util.List;
import java.util.Map;
import java.util.stream.Collectors;

@Service("categoryService")
public class CategoryServiceImpl extends ServiceImpl<CategoryDao, CategoryEntity> implements CategoryService {

    @Override
    public PageUtils queryPage(Map<String, Object> params) {
        IPage<CategoryEntity> page = this.page(
                new Query<CategoryEntity>().getPage(params),
                new QueryWrapper<CategoryEntity>()
        );

        return new PageUtils(page);
    }

    @Override
    public List<CategoryEntity> listWithTree() {
        //1、查出所有分类
        List<CategoryEntity> entities = baseMapper.selectList(null);
        //2、组装成父子的树形结构
        //2.1)、找到所有的一级分类
        List<CategoryEntity> level1Menus = entities.stream().filter(categoryEntity ->
                categoryEntity.getParentCid() == 0
        ).map((menu) -> {
            menu.setChildren(getChildrens(menu, entities));
            return menu;
        }).sorted((menu1, menu2) -> {
            return (menu1.getSort() == null ? 0 : menu1.getSort()) - (menu2.getSort() == null ? 0 : menu2.getSort());
        }).collect(Collectors.toList());
        return level1Menus;
    }

    //递归查找所有菜单的子菜单
    private List<CategoryEntity> getChildrens(CategoryEntity root, List<CategoryEntity> all) {

        List<CategoryEntity> children = all.stream().filter(categoryEntity -> {
            return categoryEntity.getParentCid() == root.getCatId();
        }).map(categoryEntity -> {
            //1、找到子菜单
            categoryEntity.setChildren(getChildrens(categoryEntity, all));
            return categoryEntity;
        }).sorted((menu1, menu2) -> {
            //2、菜单的排序
            return (menu1.getSort() == null ? 0 : menu1.getSort()) - (menu2.getSort() == null ? 0 : menu2.getSort());
        }).collect(Collectors.toList());

        return children;
    }

}
2.4 测试
运行主启动可能会报nacos 连接的错误,因为我之前在common中引入了配置中心,但是yml 文件没有配置
新建一个bootstrap.properties文件
spring.cloud.nacos.config.server-addr=119.3.105.108:8848
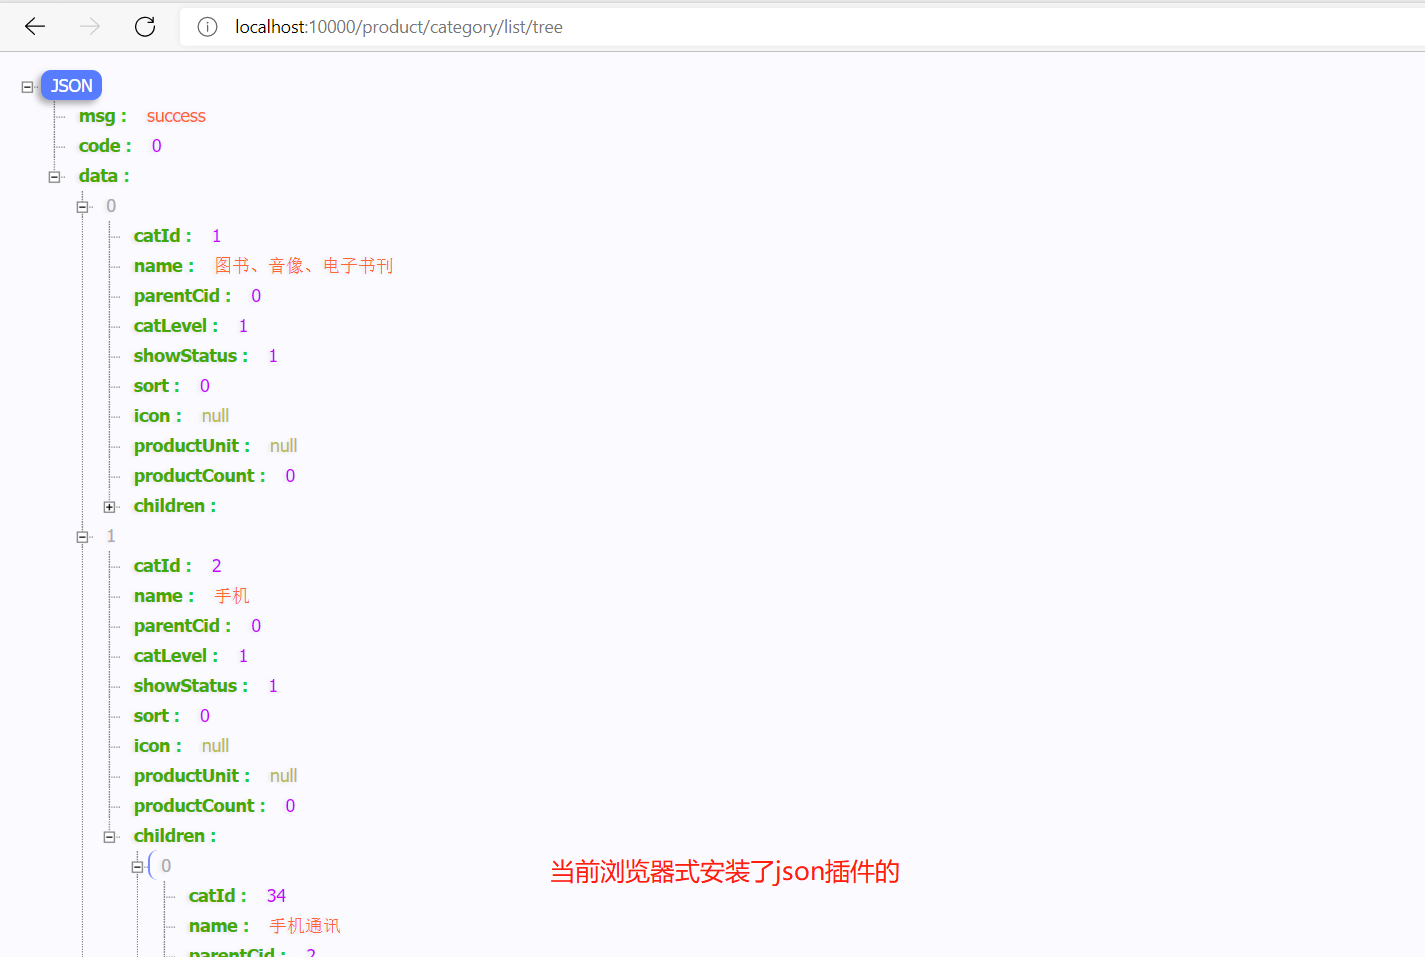
然后在启动 localhost:10000/product/category/list/tree
商品服务-api-三级分类-配置网关路由与路径重写
1、启动程序
启动renren-fast后端系统在启动renren-fast-vue (npm run dev)的前端系统
2、新增目录
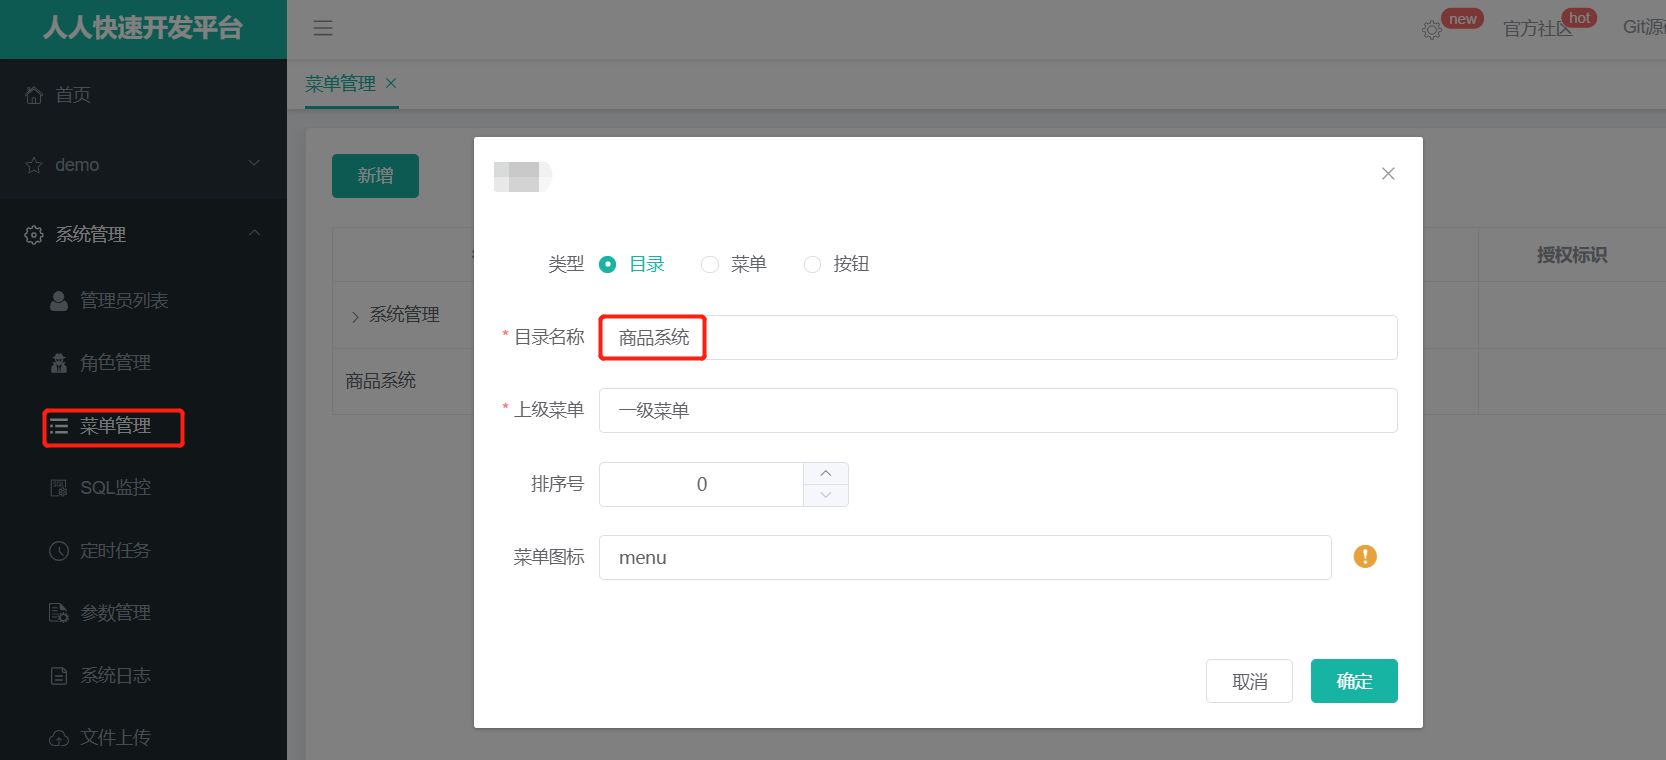
给商品系统添加菜单
3、将renren-fast加入nacos
renren-fast引入common并且配置对应的配置中心和注册中心的地址
	 <dependency>
			<groupId>com.atguigu.gulimall</groupId>
			<artifactId>gulimall-common</artifactId>
			<version>1.0-SNAPSHOT</version>
		</dependency>
	 <dependency>
			<groupId>com.google.code.gson</groupId>
			<artifactId>gson</artifactId>
			<version>2.8.5</version>
		</dependency>
application.yml 和 application-dev.yml 都写上吧
  spring:
    cloud:
      nacos:
        config:
          server-addr: 119.3.105.108:8848
        discovery:
          server-addr: 119.3.105.108:8848

    application:
      name: renren-fast
主启动
@EnableDiscoveryClient  //添加开启注解
@SpringBootApplication
public class RenrenApplication {

	public static void main(String[] args) {
		SpringApplication.run(RenrenApplication.class, args);
	}

}
如果启动报错,无法来连接上配置中心,新建一个bootstrap.properties文件将配置中心的配置放入进去
如果报错spring boot和spring cloud的版本不兼容就升级spring boot的版本
4、修改gateway服务的配置文件
spring:
  cloud:
    gateway:
      routes:
        #        - id: test_route
        #          uri: https://www.baidu.com
        #          predicates:
        #            - Query=url,baidu
        #
        #        - id: qq_route
        #          uri: https://www.qq.com
        #          predicates:
        #            - Query=url,qq

        - id: admin_route
          uri: lb://renren-fast
          predicates:
            - Path=/api/**
          filters:
            - RewritePath=/api/(?<segment>.*),/renren-fast/$\{segment}


## 默认前端项目我们都加,/api 为前缀
#        - id: admin_route 随意起的一个id,区别其他路由就可以
#          uri: lb://renren-fast lb:表示loadBanlence负载均衡 后面跟的是服务名
#          predicates:
#            - Path=/api/**  断言以api开头的路径都转到renren-fast的服务去
#          filters:
#            - RewritePath=/api/(?<segment>.*),/renren-fast/$\{segment}
#            路径重写 会将/api/(?<segment>.*) 重写成/renren-fast/$\{segment}
#             其实只是将/api替换成/renren-fast 后面的片段(?<segment>.*)不变
## http://localhost:88/api/captcha.jpg   http://localhost:8080/renren-fast/captcha.jpg
## http://localhost:88/api/product/category/list/tree http://localhost:10000/product/category/list/tree
5、修改前端服务的请求路径
让其通过网关转发到renren-fast服务
将前端static/config/index.js 修改如下
/**
 * 开发环境
 */
;(function () {
  window.SITE_CONFIG = {};

  // api接口请求地址 修改此处
  window.SITE_CONFIG['baseUrl'] = 'http://localhost:88/api';

  // cdn地址 = 域名 + 版本号
  window.SITE_CONFIG['domain']  = './'; // 域名
  window.SITE_CONFIG['version'] = '';   // 版本号(年月日时分)
  window.SITE_CONFIG['cdnUrl']  = window.SITE_CONFIG.domain + window.SITE_CONFIG.version;
})();
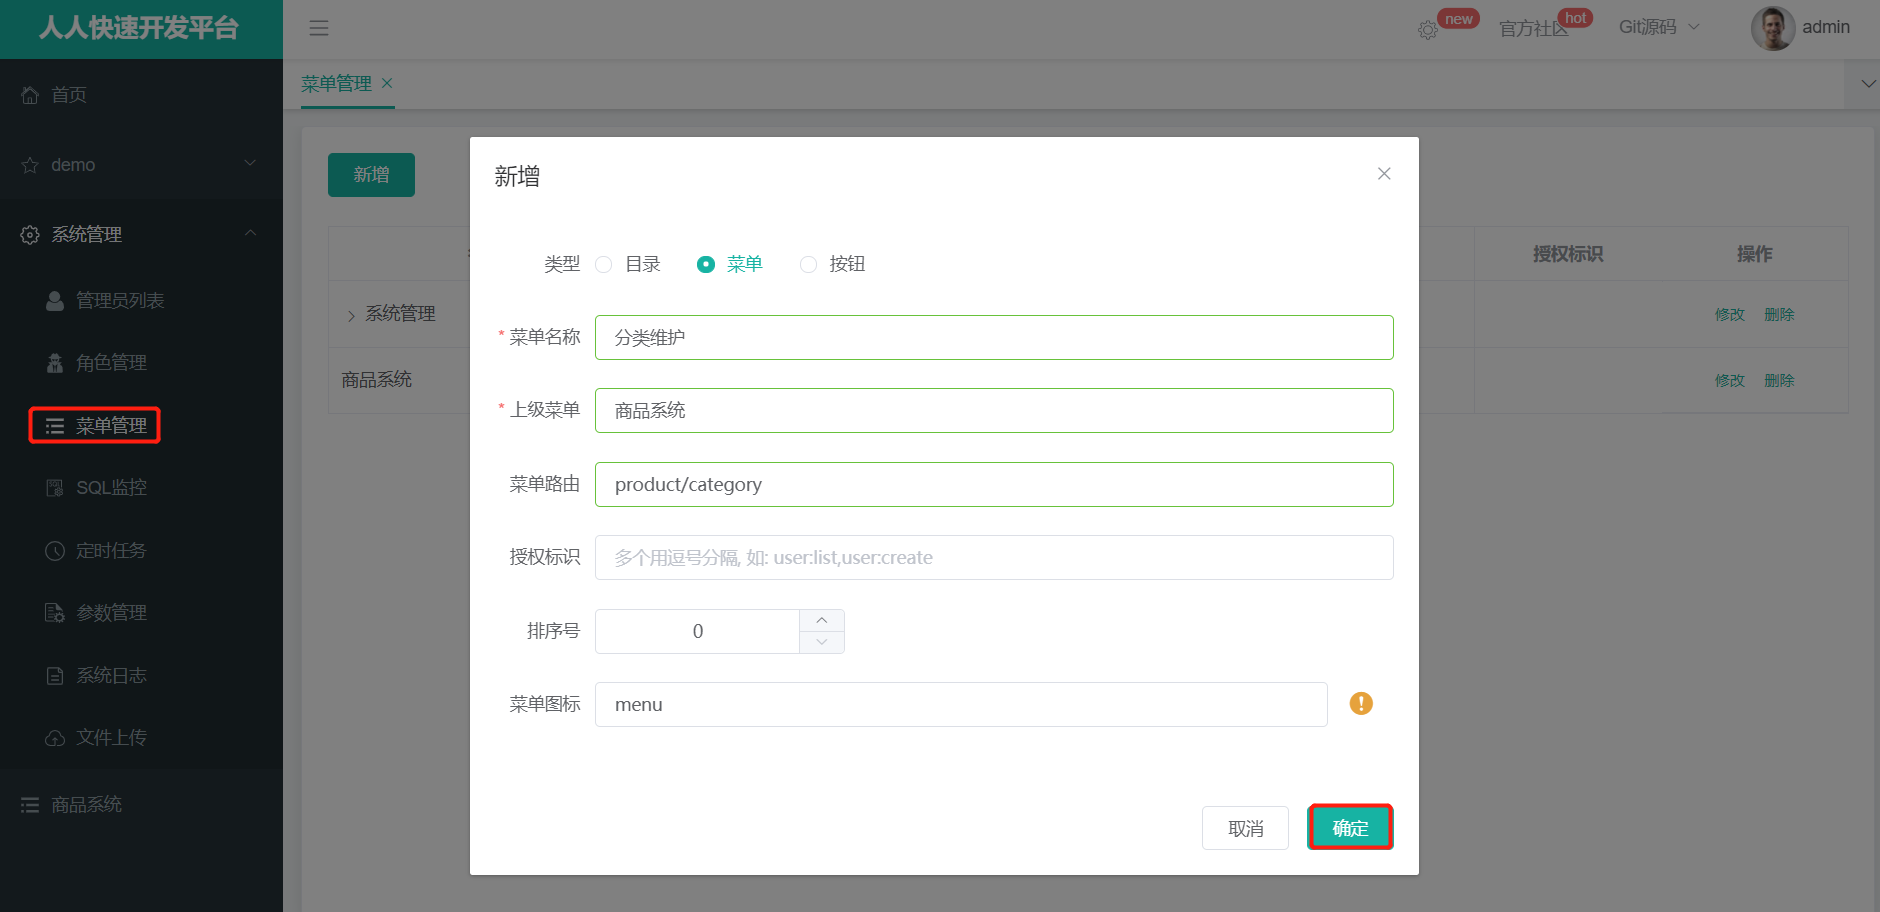
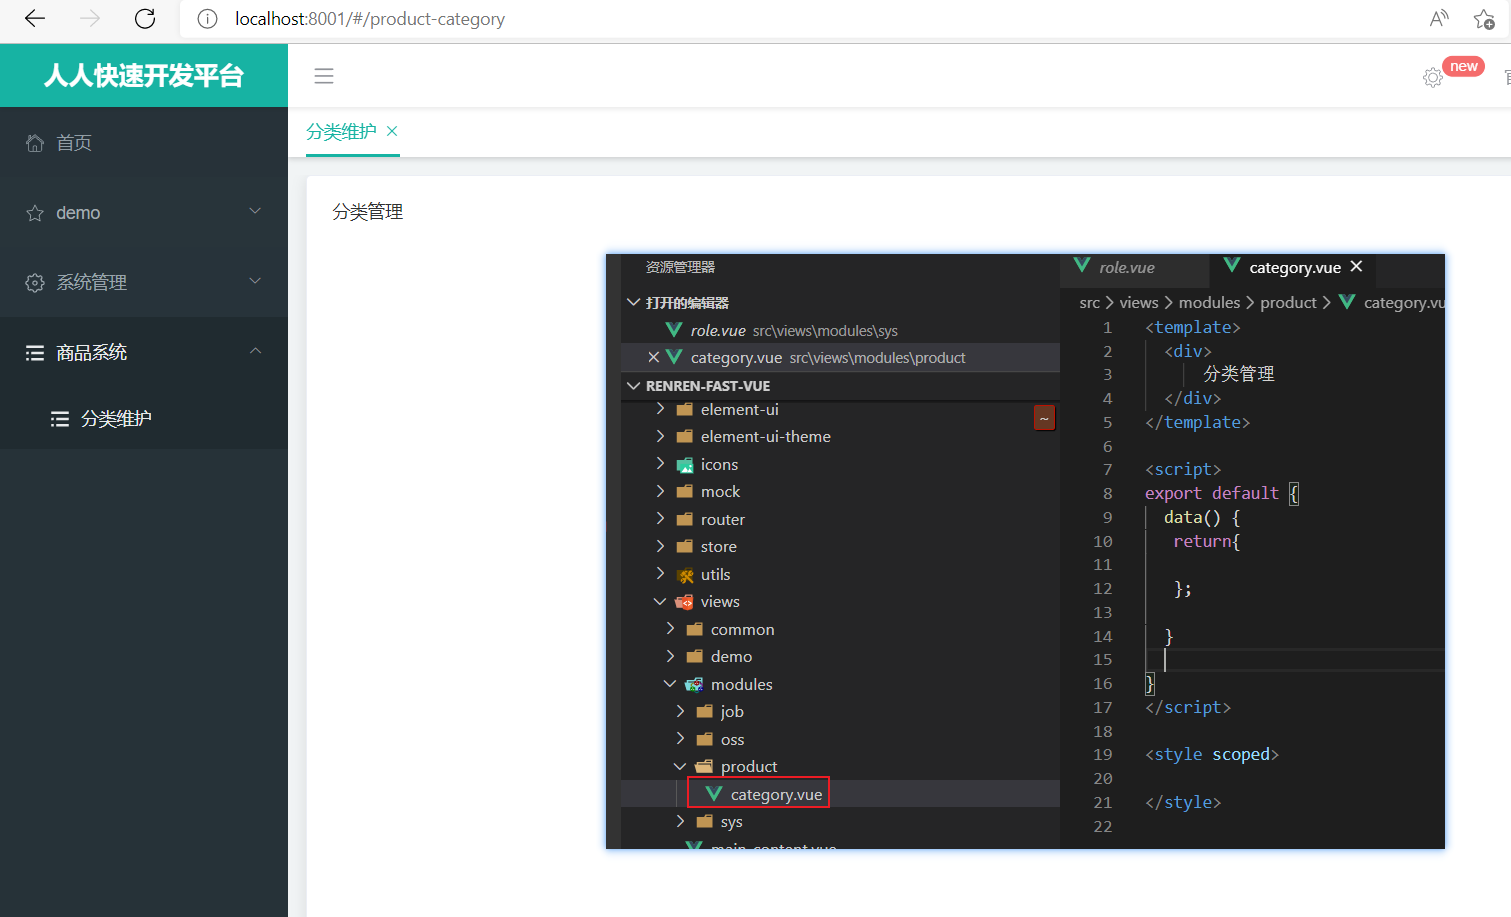
6、category.vue
<template>
  <div>分类管理</div>
</template>

<script>
//这里可以导入其他文件(比如:组件,工具js,第三方插件js,json文件,图片文件等等)
//例如:import 《组件名称》 from '《组件路径》';
export default {
  //import引入的组件需要注入到对象中才能使用
  components: {},
  props: {},
  data() {
    return {

    };
  },

  //计算属性 类似于data概念
  computed: {},
  //监控data中的数据变化
  watch: {},
  //方法集合
  methods: {
    getMenus() {
      this.$http({
        url: this.$http.adornUrl("/product/category/list/tree"),
        method: "get"
      }).then(({ data }) => {
        console.log("成功获取到菜单数据...", data.data);
        this.menus = data.data;
      });
    },
  },
  //生命周期 - 创建完成(可以访问当前this实例)
  created() {
    this.getMenus();
  },
  //生命周期 - 挂载完成(可以访问DOM元素)
  mounted() {},
  beforeCreate() {}, //生命周期 - 创建之前
  beforeMount() {}, //生命周期 - 挂载之前
  beforeUpdate() {}, //生命周期 - 更新之前
  updated() {}, //生命周期 - 更新之后
  beforeDestroy() {}, //生命周期 - 销毁之前
  destroyed() {}, //生命周期 - 销毁完成
  activated() {} //如果页面有keep-alive缓存功能,这个函数会触发
};
</script>

<style scoped>

</style>
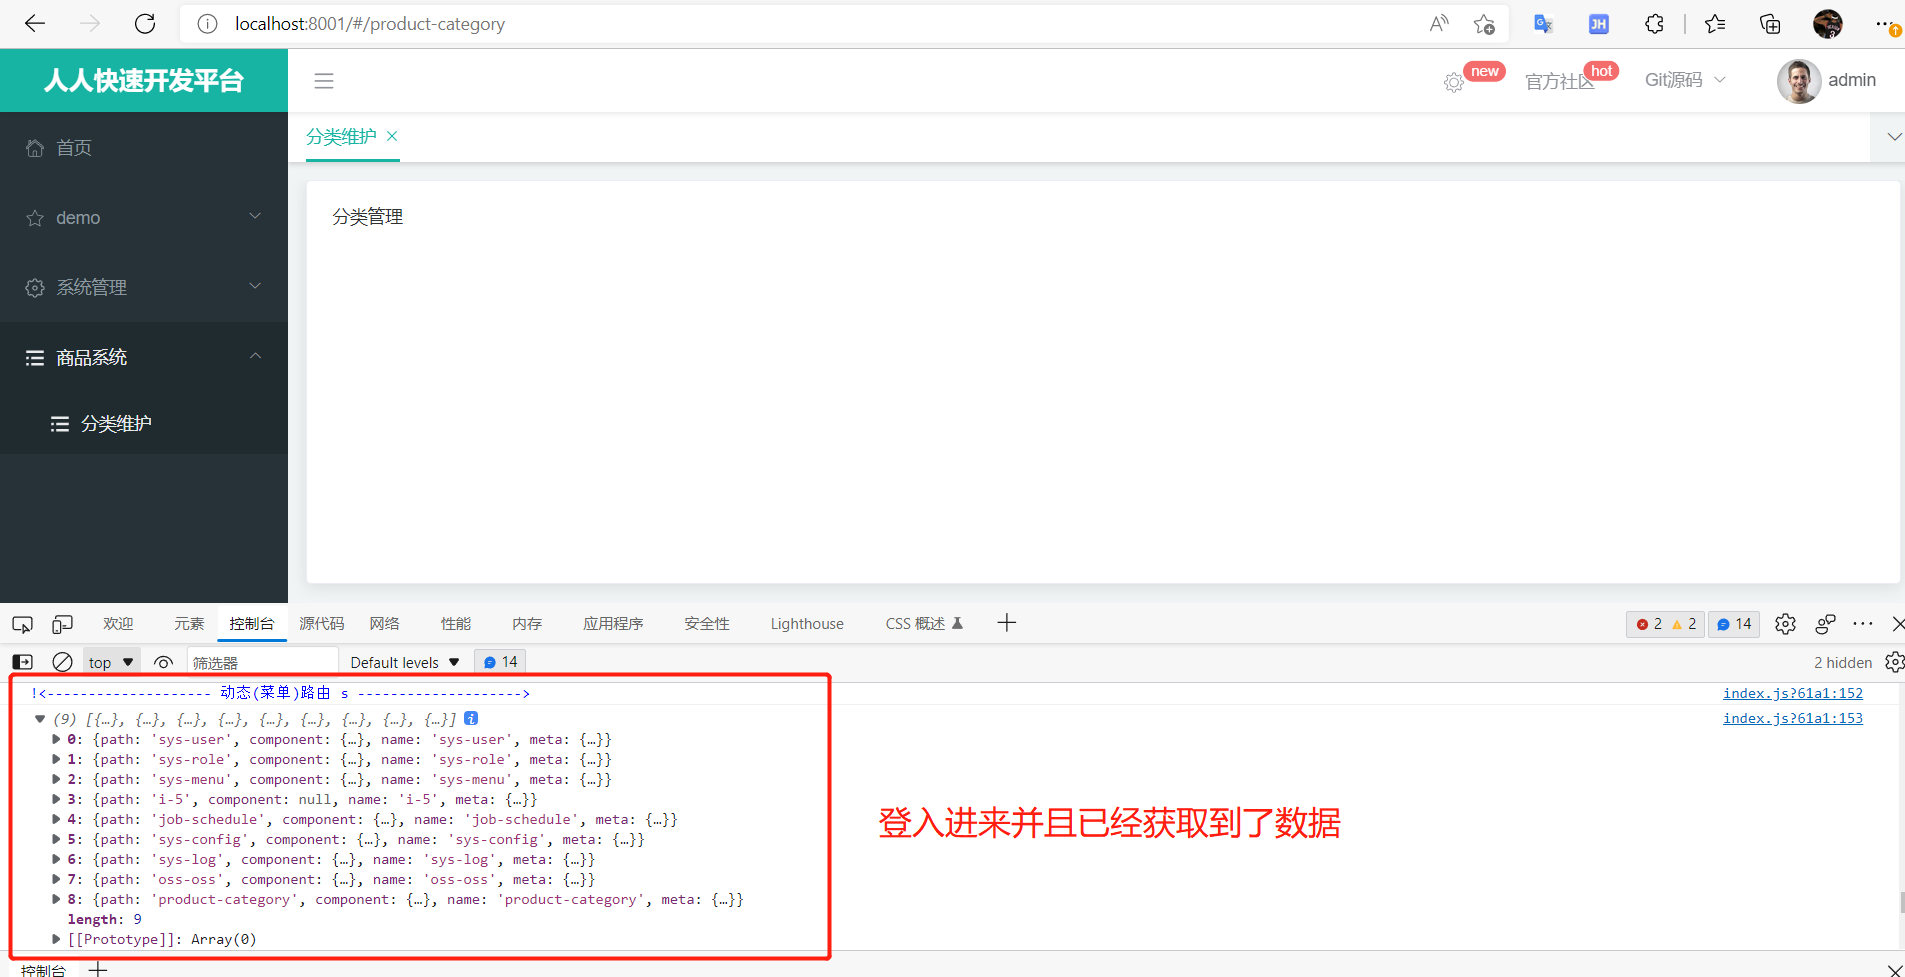
7、测试
先启动gateway
在启动renren-fast
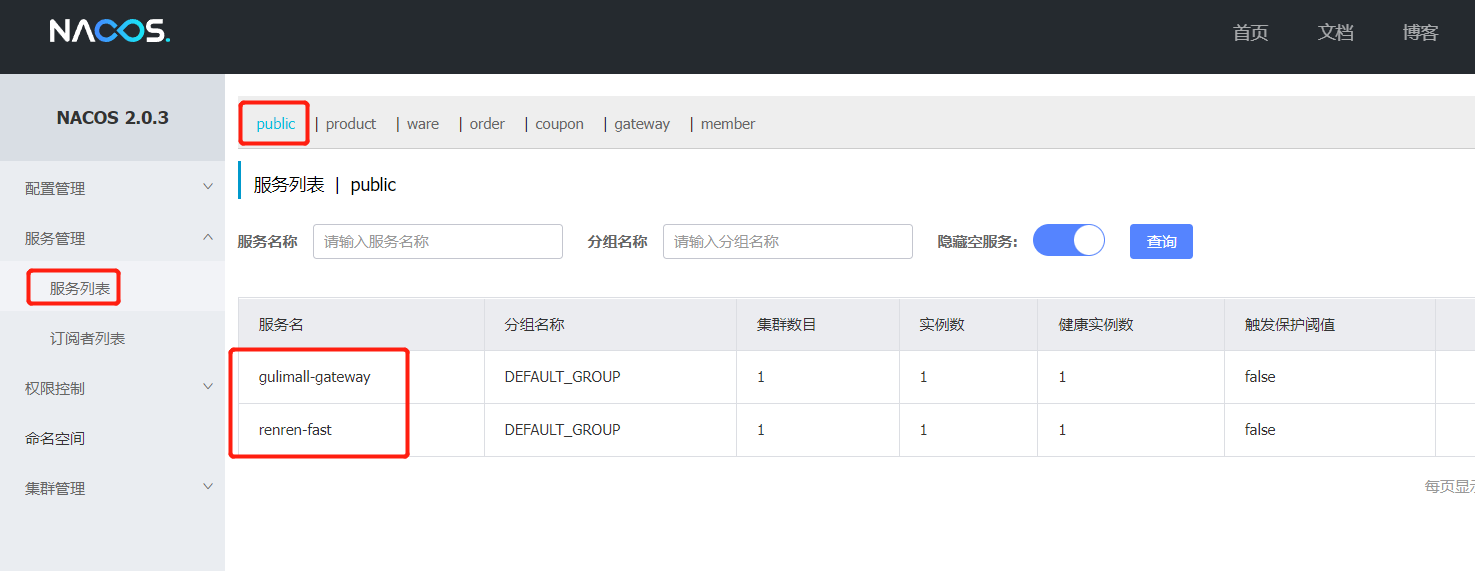
最后启动前端
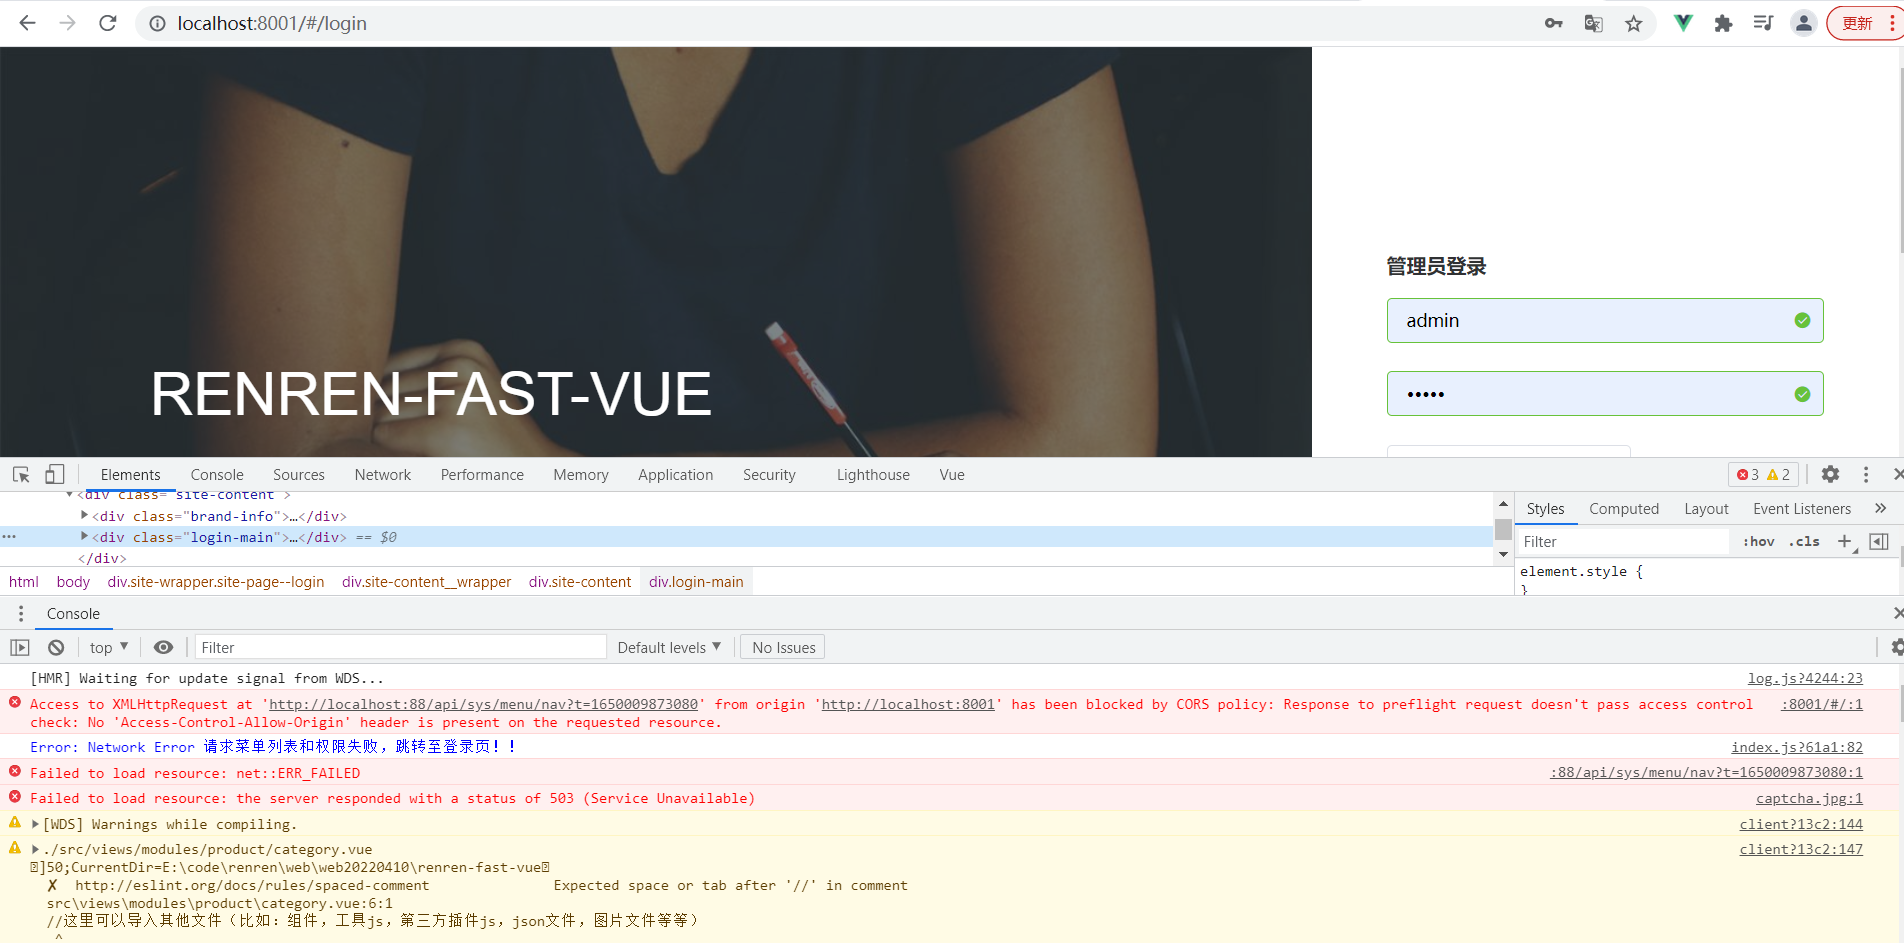
如果报错 503 则需要在gateway的服务中添加以下的依赖
   		<dependency>
            <groupId>org.springframework.cloud</groupId>
            <artifactId>spring-cloud-starter-loadbalancer</artifactId>
        </dependency>
我的版本:springboot2.6.6 springcloud2021.0.1 nacos1.2.1 springcloud-alibaba 2.2.1
第一、首先解释下503错误的原因:
Spring Cloud 2020.0.0版本之前会自动引入Netflix Ribbon依赖,Netflix Ribbon功能跟loadbalancer一样,因Netflix公司停止维护Ribbon后, 在Spring Cloud 2020.0.0版本之后Spring使用loadbalancer替代了Ribbon, 但是loadbalancer依赖需要手动引入. 所以如果你使用的Spring Cloud版本是2020.0.0或更高的版本, 添加loadbalancer依赖即可解决503的问题;
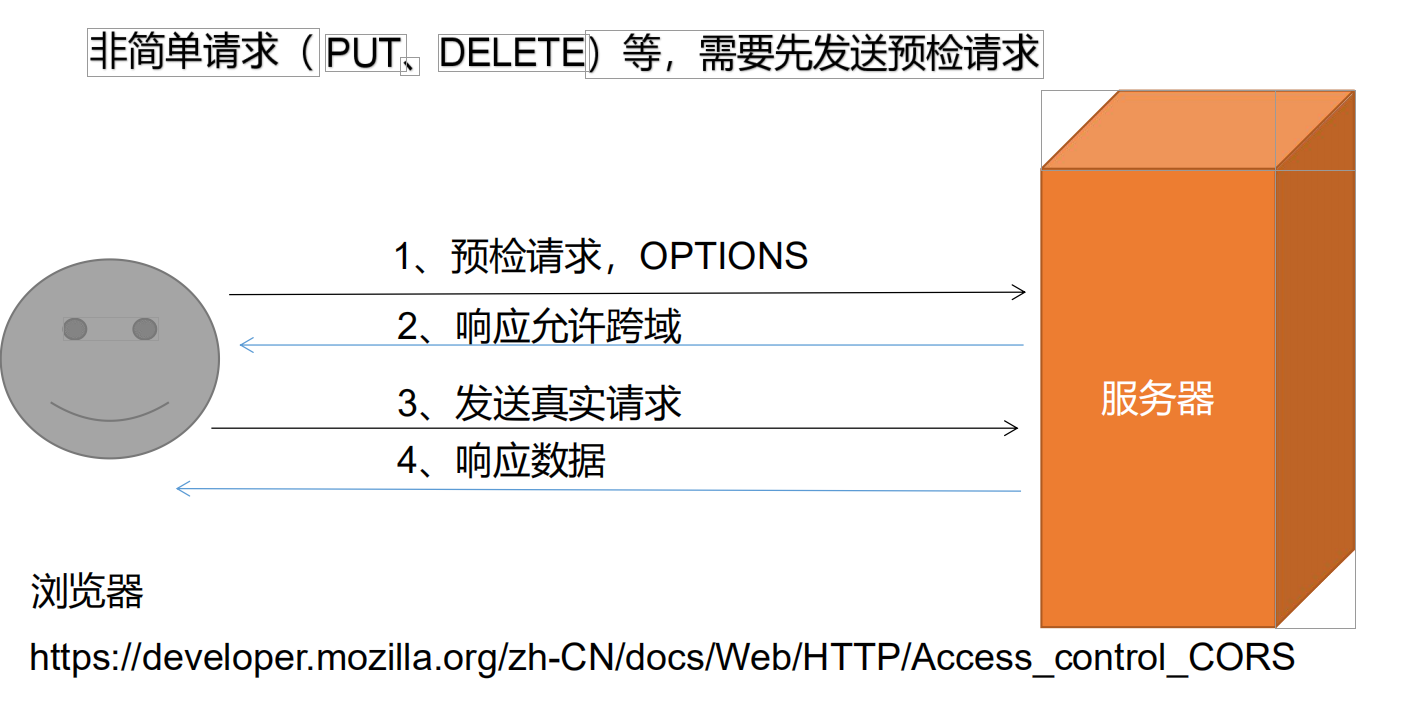
商品服务-api-三级分类-网关统一配置跨域
1、概述
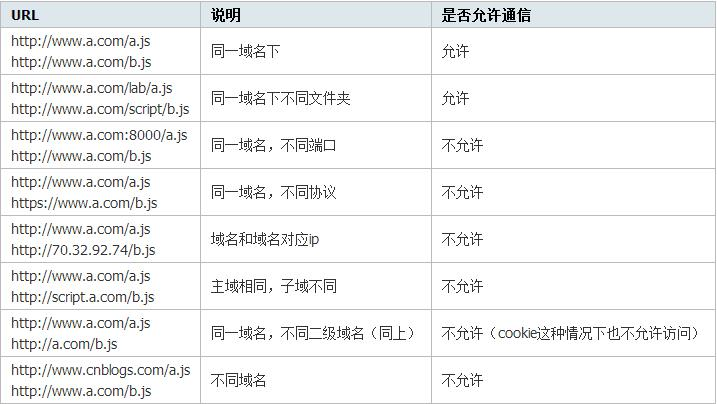
**跨域:**指的是浏览器不能执行其他网站的脚本。它是由浏览器的同源策略造成的,是
浏览器对 javascript 施加的安全限制。
• 同源策略:是指协议,域名,端口都要相同,其中有一个不同都会产生跨域;
2、跨域流程
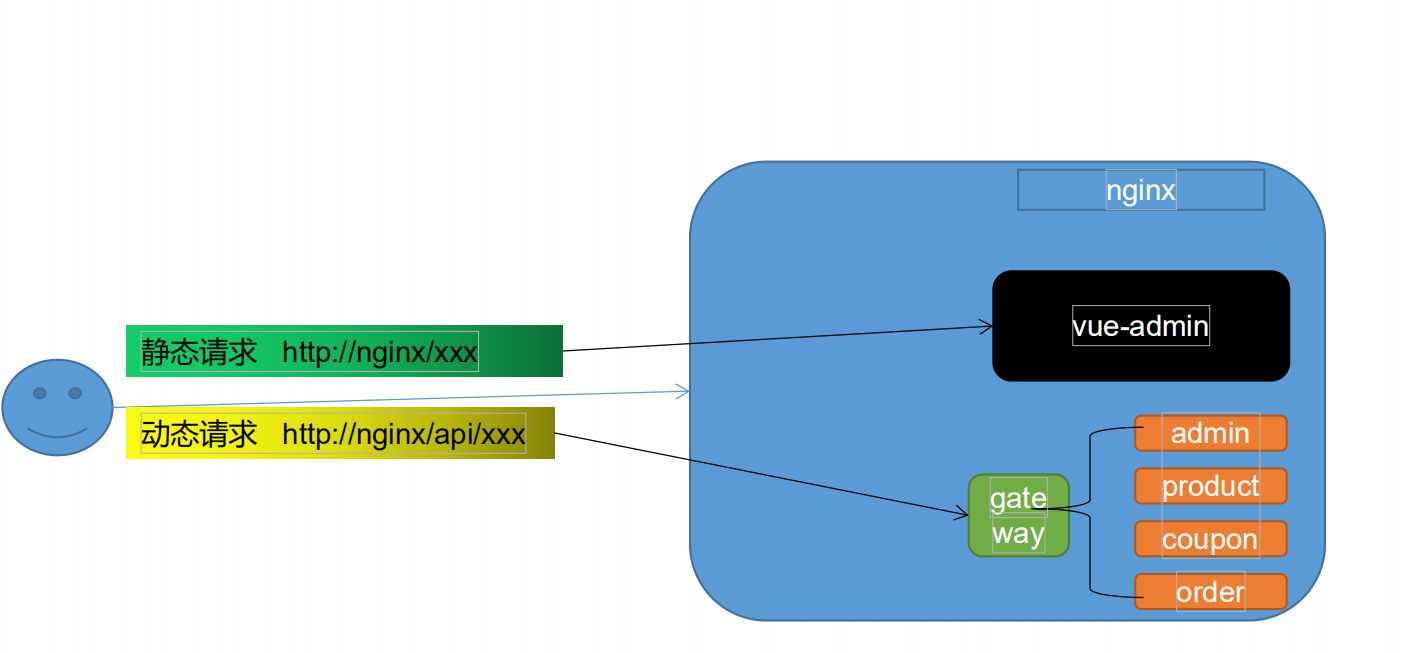
3、解决跨域-(一)使用nginx部署为同一域
4、解决跨域-(二)配置当次请求允许跨域
1、添加响应头
• Access-Control-Allow-Origin:支持哪些来源的请求跨域
• Access-Control-Allow-Methods:支持哪些方法跨域
• Access-Control-Allow-Credentials:跨域请求默认不包含cookie,设置为true可以包含 cookie
• Access-Control-Expose-Headers:跨域请求暴露的字段
• CORS请求时,XMLHttpRequest对象的getResponseHeader()方法只能拿到6个基本字段:
Cache-Control、Content-Language、Content-Type、Expires、Last-Modified、Pragma。如
果想拿到其他字段,就必须在Access-Control-Expose-Headers里面指定。
• Access-Control-Max-Age:表明该响应的有效时间为多少秒。在有效时间内,浏览器无 须为同一请求再次发起预检请求。请注意,浏览器自身维护了一个最大有效时间,如果 该首部字段的值超过了最大有效时间,将不会生效。
5、编码实现
5.1 在gateway服务新建包config 并编写配置类
package com.atguigu.gulimall.gateway.config;

import org.springframework.context.annotation.Bean;
import org.springframework.context.annotation.Configuration;
import org.springframework.web.cors.CorsConfiguration;
import org.springframework.web.cors.reactive.CorsWebFilter;
import org.springframework.web.cors.reactive.UrlBasedCorsConfigurationSource;

/**
 * @创建人: 放生
 * @创建时间: 2022/4/15
 * @描述:
 */
@Configuration
public class GulimallCorsConfiguration {
    @Bean
    public CorsWebFilter corsWebFilter(){
        UrlBasedCorsConfigurationSource source = new UrlBasedCorsConfigurationSource();

        CorsConfiguration corsConfiguration = new CorsConfiguration();

        //1、配置跨域
        corsConfiguration.addAllowedHeader("*");
        corsConfiguration.addAllowedMethod("*");
        corsConfiguration.addAllowedOrigin("*");
        corsConfiguration.setAllowCredentials(true);

        source.registerCorsConfiguration("/**",corsConfiguration);
        return new CorsWebFilter(source);
    }
}
注视掉renren-fast原有的跨域配置类
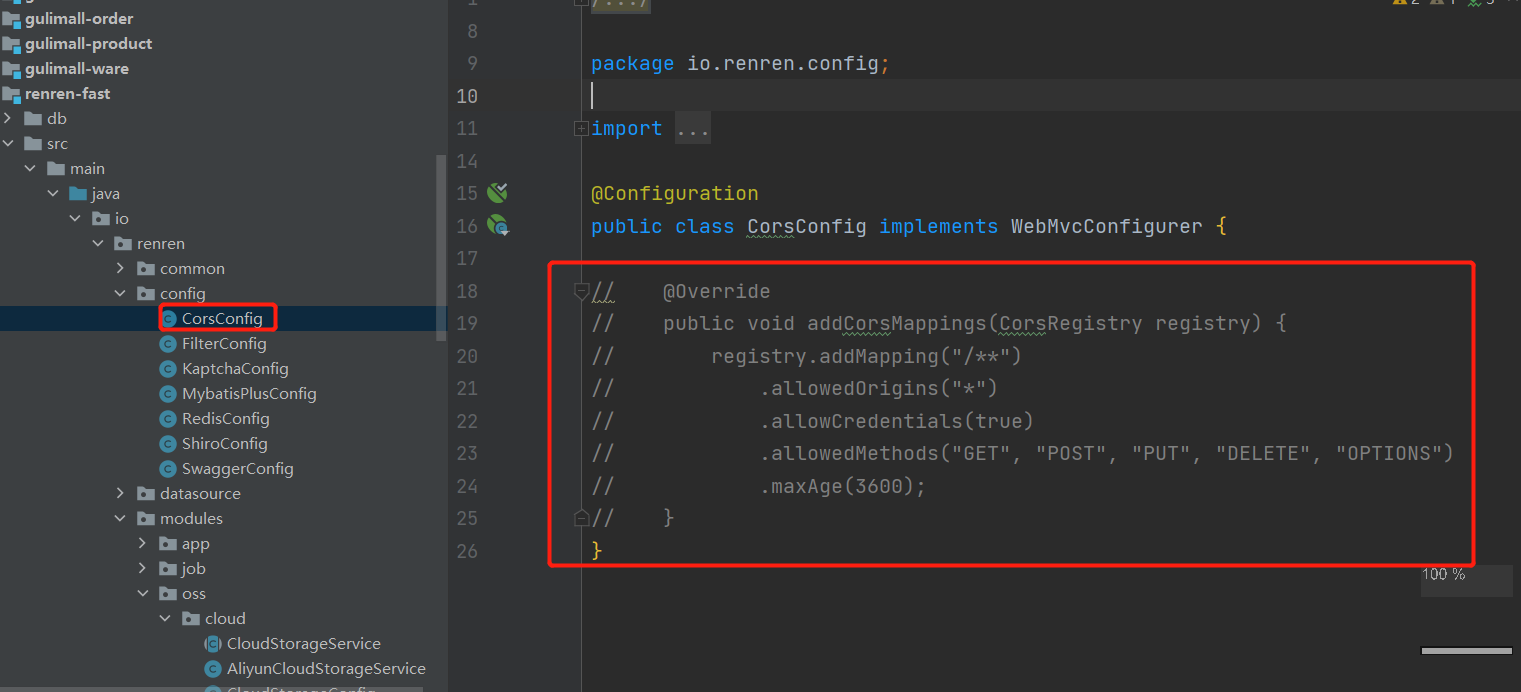
5.3 重新启动gateway renren-fast 服务
商品服务-api-三级分类-查询显示三级树形数据
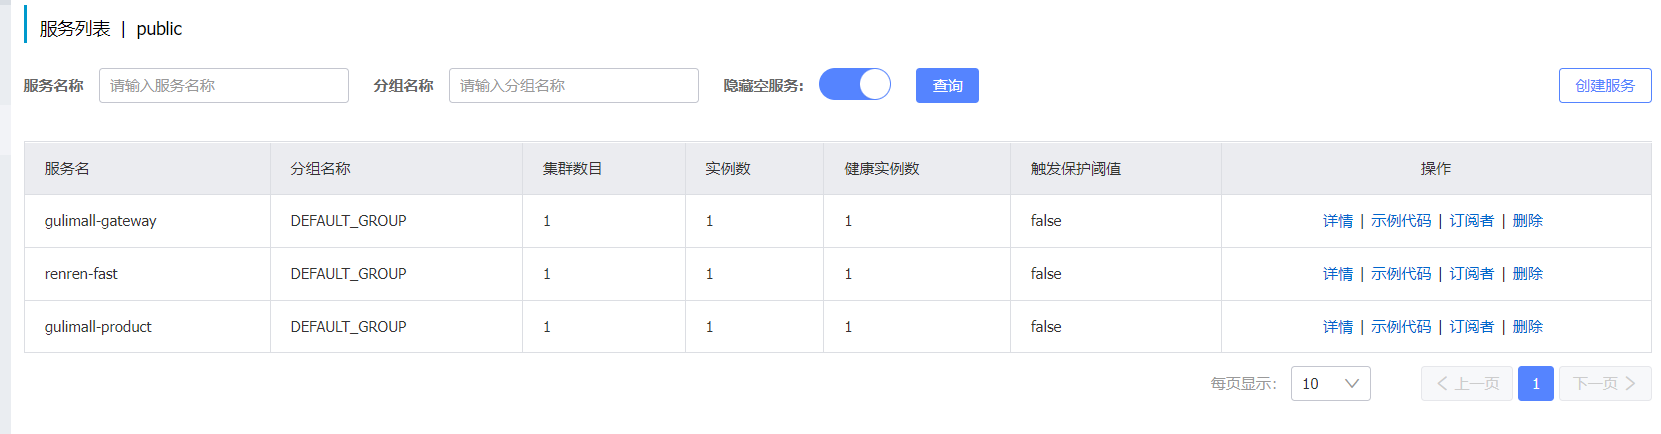
获取商品的数据是请求的product的服务,那么接下来配置商品服务到网关
1、把商品product 服务注册到注册中心,和配置配置中心
1.1 确保之前已经在product服务引入了common模块,而common 模块的pom 引入了注册中心和配置中心
2.2 product 服务新建bootstrap.properties文件配置配置中心,并写服务名,然后在ymal 文件配置注册中心
bootstrap.properties:
# bootstrap.properties (暂时当前的命名空间下没有任何yaml文件)
spring.cloud.nacos.config.server-addr=119.3.105.108:8848
spring.cloud.nacos.config.namespace=0eb0bc69-abfa-4d55-92b9-786f5092036e
application.yml
spring:
  datasource:
    username: root
    password: 123456
    url: jdbc:mysql://119.3.105.108:3306/gulimall_pms?useUnicode=true&useSSL=false&characterEncoding=utf-8&serverTimezone=Asia/Shanghai&useAffectedRows=true&allowMultiQueries=true
    driver-class-name: com.mysql.jdbc.Driver
  cloud:
    nacos:
      discovery:
        server-addr: 119.3.105.108:8848

  application:
    name: gulimall-product
mybatis-plus:
  mapper-locations: classpath:/mapper/**/*.xml
  global-config:
    db-config:
      id-type: auto
      logic-delete-value: 1
      logic-not-delete-value: 0
server:
  port: 10000

logging:
  level:
    com.atguigu.gulimall: info
2、gateway服务加入product服务的路由
        - id: product_route
            uri: lb://gulimall-product
            predicates:
              - Path=/api/product/**,/hello
            filters:
              - RewritePath=/api/(?<segment>.*),/$\{segment}

        - id: admin_route
          uri: lb://renren-fast
          predicates:
            - Path=/api/**
          filters:
            - RewritePath=/api/(?<segment>.*),/renren-fast/$\{segment}

            # 注意product 的路由放在上面,网关的路由是从上往下匹配的,如果匹配成功就不会在往下配置了,所以越是精准的路由
            # 越是要放在最上面。
3、分别先后启动 gateway renren-fast product 服务
4、category.vue
前端代码基本上都是Element-UI的组件代码
<template>
      <el-tree
      :data="menus"
      :props="defaultProps"
      :expand-on-click-node="false"
      show-checkbox
      node-key="catId"
      :default-expanded-keys="expandedKey"
      ref="menuTree"
    >
      <span class="custom-tree-node" slot-scope="{ node, data }">
        <span>{{ node.label }}</span>
        <span>
          <el-button
            v-if="node.level <=2"
            type="text"
            size="mini"
            @click="() => append(data)"
          >Append</el-button>
          <el-button type="text" size="mini" @click="edit(data)">edit</el-button>
          <el-button
            v-if="node.childNodes.length==0"
            type="text"
            size="mini"
            @click="() => remove(node, data)"
          >Delete</el-button>
        </span>
      </span>
    </el-tree>
</template>

<script>
//这里可以导入其他文件(比如:组件,工具js,第三方插件js,json文件,图片文件等等)
//例如:import 《组件名称》 from '《组件路径》';
export default {
  //import引入的组件需要注入到对象中才能使用
  components: {},
  props: {},
  data() {
    return {
      pCid: [],
      draggable: false,
      updateNodes: [],
      maxLevel: 0,
      title: "",
      dialogType: "", //edit,add
      category: {
        name: "",
        parentCid: 0,
        catLevel: 0,
        showStatus: 1,
        sort: 0,
        productUnit: "",
        icon: "",
        catId: null
      },
      dialogVisible: false,
      menus: [],
      expandedKey: [],
      defaultProps: {
        children: "children",
        label: "name"
      }
    };
  },

  //计算属性 类似于data概念
  computed: {},
  //监控data中的数据变化
  watch: {},
  //方法集合
  methods: {
    getMenus() {
      this.$http({
        url: this.$http.adornUrl("/product/category/list/tree"),
        method: "get"
      }).then(({ data }) => {
        console.log("成功获取到菜单数据...", data.data);
         console.log(data.data);
        this.menus = data.data;
      });
    },
  },
  //生命周期 - 创建完成(可以访问当前this实例)
  created() {
    this.getMenus();
  },
  //生命周期 - 挂载完成(可以访问DOM元素)
  mounted() {},
  beforeCreate() {}, //生命周期 - 创建之前
  beforeMount() {}, //生命周期 - 挂载之前
  beforeUpdate() {}, //生命周期 - 更新之前
  updated() {}, //生命周期 - 更新之后
  beforeDestroy() {}, //生命周期 - 销毁之前
  destroyed() {}, //生命周期 - 销毁完成
  activated() {} //如果页面有keep-alive缓存功能,这个函数会触发
};
</script>

<style scoped>

</style>
测试
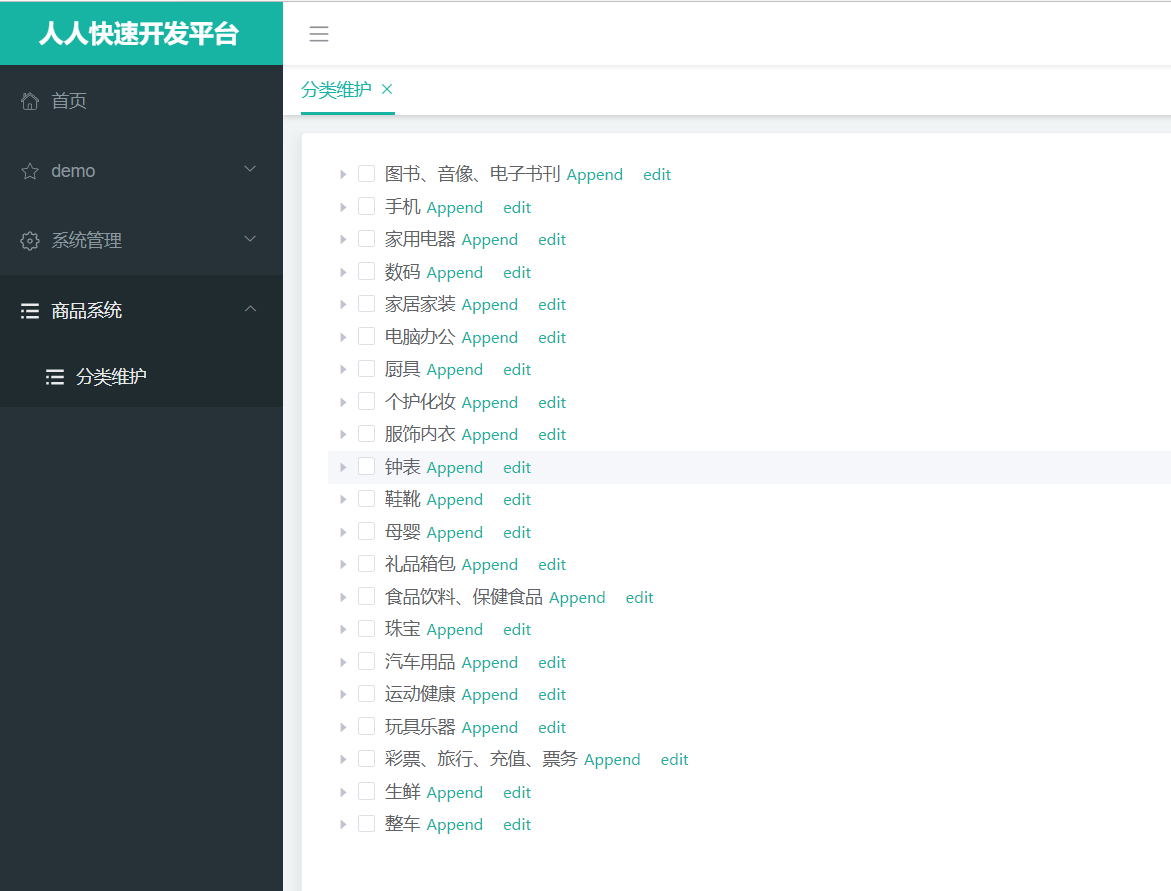
商品服务-api-三级分类-删除-页面效果
商品的分类中 我们的逻辑是,叶子菜单我们不显示Append ,并且添加对应的添加和删除的方法
<template>
      <el-tree
      :data="menus"
      :props="defaultProps"
      :expand-on-click-node="false"
      show-checkbox
      node-key="catId"
      :default-expanded-keys="expandedKey"
      ref="menuTree"
    >
      <span class="custom-tree-node" slot-scope="{ node, data }">
        <span>{{ node.label }}</span>
        <span>
          <el-button
            v-if="node.level <=2"
            type="text"
            size="mini"
            @click="() => append(data)"
          >Append</el-button>
          <el-button type="text" size="mini" @click="edit(data)">edit</el-button>
          <el-button
            v-if="node.childNodes.length==0"
            type="text"
            size="mini"
            @click="() => remove(node, data)"
          >Delete</el-button>
        </span>
      </span>
    </el-tree>
</template>

<script>
//这里可以导入其他文件(比如:组件,工具js,第三方插件js,json文件,图片文件等等)
//例如:import 《组件名称》 from '《组件路径》';
export default {
  //import引入的组件需要注入到对象中才能使用
  components: {},
  props: {},
  data() {
    return {
      pCid: [],
      draggable: false,
      updateNodes: [],
      maxLevel: 0,
      title: "",
      dialogType: "", //edit,add
      category: {
        name: "",
        parentCid: 0,
        catLevel: 0,
        showStatus: 1,
        sort: 0,
        productUnit: "",
        icon: "",
        catId: null
      },
      dialogVisible: false,
      menus: [],
      expandedKey: [],
      defaultProps: {
        children: "children",
        label: "name"
      }
    };
  },

  //计算属性 类似于data概念
  computed: {},
  //监控data中的数据变化
  watch: {},
  //方法集合
  methods: {
    getMenus() {
      this.$http({
        url: this.$http.adornUrl("/product/category/list/tree"),
        method: "get"
      }).then(({ data }) => {
        console.log("成功获取到菜单数据...", data.data);
         console.log(data.data);
        this.menus = data.data;
      });
    },


    append(data) {
      console.log("append", data);
      this.dialogType = "add";
      this.title = "添加分类";
      this.dialogVisible = true;
      this.category.parentCid = data.catId;
      this.category.catLevel = data.catLevel * 1 + 1;
      this.category.catId = null;
      this.category.name = "";
      this.category.icon = "";
      this.category.productUnit = "";
      this.category.sort = 0;
      this.category.showStatus = 1;
    },


    remove(node, data) {
    var ids = [data.catId];
    this.$confirm(`是否删除【${data.name}】菜单?`, "提示", {
    confirmButtonText: "确定",
    cancelButtonText: "取消",
    type: "warning"
    })
    .then(() => {
        this.$http({
        url: this.$http.adornUrl("/product/category/delete"),
        method: "post",
        data: this.$http.adornData(ids, false)
        }).then(({ data }) => {
        this.$message({
            message: "菜单删除成功",
            type: "success"
        });
        //刷新出新的菜单
        this.getMenus();
        //设置需要默认展开的菜单
        this.expandedKey = [node.parent.data.catId];
        });
    })
    .catch(() => {});
    console.log("remove", node, data);
   },


  },


  //生命周期 - 创建完成(可以访问当前this实例)
  created() {
    this.getMenus();
  },
  //生命周期 - 挂载完成(可以访问DOM元素)
  mounted() {},
  beforeCreate() {}, //生命周期 - 创建之前
  beforeMount() {}, //生命周期 - 挂载之前
  beforeUpdate() {}, //生命周期 - 更新之前
  updated() {}, //生命周期 - 更新之后
  beforeDestroy() {}, //生命周期 - 销毁之前
  destroyed() {}, //生命周期 - 销毁完成
  activated() {} //如果页面有keep-alive缓存功能,这个函数会触发
};
</script>

<style scoped>

</style>
商品服务-api-三级分类-删除-逻辑删除
我们利用的是 mybatis-plus 的逻辑删除功能,就是将一个状态的字段通过0 和 1 来标识是否删除
可以参考mybatis-plus的官网
1、product的 yml添加以下配置
mybatis-plus:
  mapper-locations: classpath:/mapper/**/*.xml
  global-config:
    db-config:
      id-type: auto
      logic-delete-value: 1
      logic-not-delete-value: 0
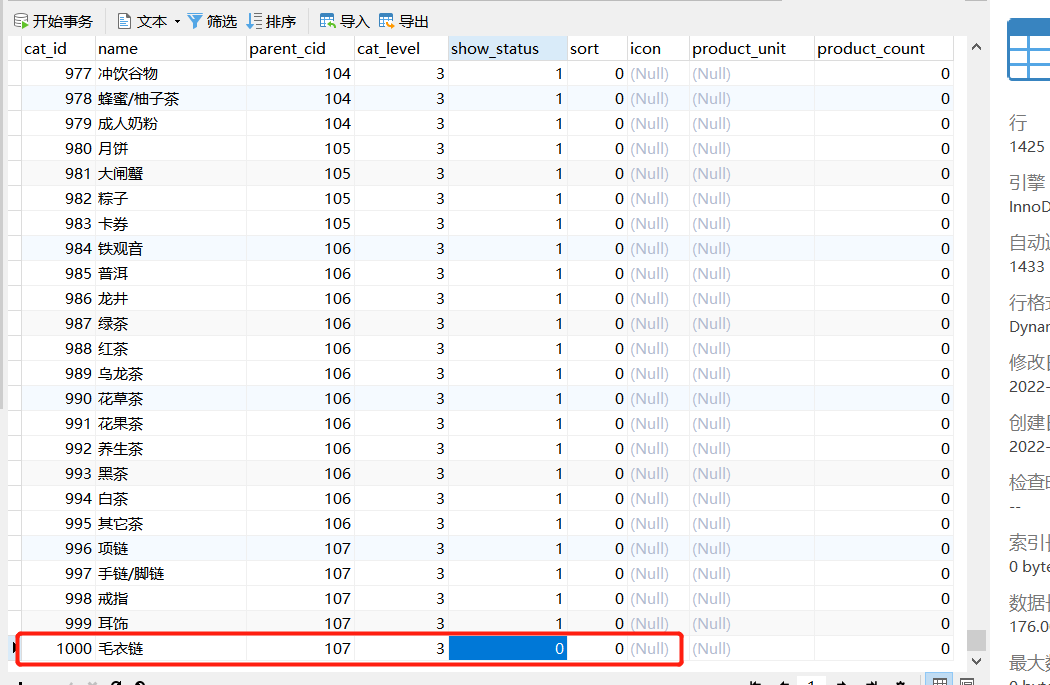
2、实体类CategoryEntity添加注解
	/**
	 * 是否显示[0-不显示,1显示]
	 */
	@TableLogic(value = "1",delval = "0")
	private Integer showStatus;
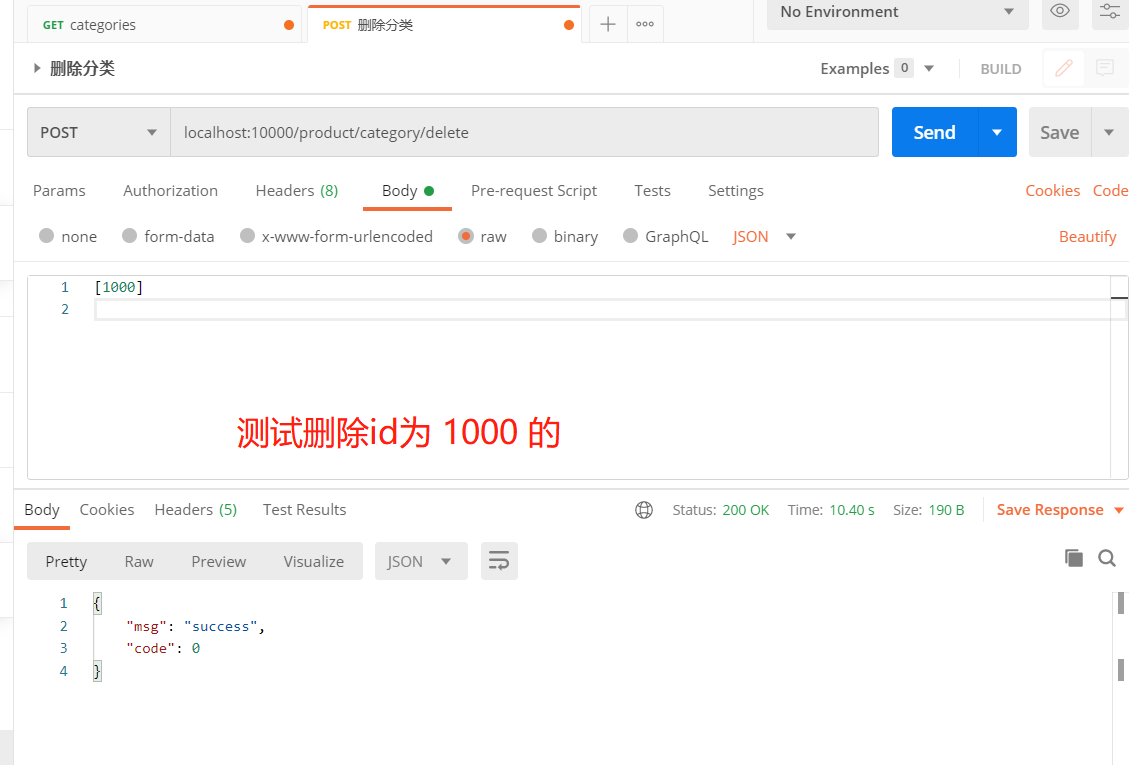
3、请求的接口是之前代码生成器生成的暂时不改
    /**
     * 删除
     */
    @RequestMapping("/delete")
    public R delete(@RequestBody Long[] catIds){
		categoryService.removeByIds(Arrays.asList(catIds));

        return R.ok();
    }
4、测试
商品服务-api-三级分类-删除-删除效果细化
删除细化,主要考虑以下几点,删除是提示确认按钮,删除后提示删除成功或则失败,然后删除后对应的父节点要展开
后端代码不东,前端代码如下
<template>
      <el-tree
      :data="menus"
      :props="defaultProps"
      :expand-on-click-node="false"
      show-checkbox
      node-key="catId"
      :default-expanded-keys="expandedKey"
      ref="menuTree"
    >
      <span class="custom-tree-node" slot-scope="{ node, data }">
        <span>{{ node.label }}</span>
        <span>
          <el-button
            v-if="node.level <=2"
            type="text"
            size="mini"
            @click="() => append(data)"
          >Append</el-button>
          <el-button type="text" size="mini" @click="edit(data)">edit</el-button>
          <el-button
            v-if="node.childNodes.length==0"
            type="text"
            size="mini"
            @click="() => remove(node, data)"
          >Delete</el-button>
        </span>
      </span>
    </el-tree>
</template>

<script>
//这里可以导入其他文件(比如:组件,工具js,第三方插件js,json文件,图片文件等等)
//例如:import 《组件名称》 from '《组件路径》';
export default {
  //import引入的组件需要注入到对象中才能使用
  components: {},
  props: {},
  data() {
    return {
      pCid: [],
      draggable: false,
      updateNodes: [],
      maxLevel: 0,
      title: "",
      dialogType: "", //edit,add
      category: {
        name: "",
        parentCid: 0,
        catLevel: 0,
        showStatus: 1,
        sort: 0,
        productUnit: "",
        icon: "",
        catId: null
      },
      dialogVisible: false,
      menus: [],
      expandedKey: [],
      defaultProps: {
        children: "children",
        label: "name"
      }
    };
  },

  //计算属性 类似于data概念
  computed: {},
  //监控data中的数据变化
  watch: {},
  //方法集合
  methods: {
    getMenus() {
      this.$http({
        url: this.$http.adornUrl("/product/category/list/tree"),
        method: "get"
      }).then(({ data }) => {
        console.log("成功获取到菜单数据...", data.data);
         console.log(data.data);
        this.menus = data.data;
      });
    },


    append(data) {
      console.log("append", data);
      this.dialogType = "add";
      this.title = "添加分类";
      this.dialogVisible = true;
      this.category.parentCid = data.catId;
      this.category.catLevel = data.catLevel * 1 + 1;
      this.category.catId = null;
      this.category.name = "";
      this.category.icon = "";
      this.category.productUnit = "";
      this.category.sort = 0;
      this.category.showStatus = 1;
    },


    remove(node, data) {
    var ids = [data.catId];
    this.$confirm(`是否删除【${data.name}】菜单?`, "提示", {
    confirmButtonText: "确定",
    cancelButtonText: "取消",
    type: "warning"
    })
    .then(() => {
        this.$http({
        url: this.$http.adornUrl("/product/category/delete"),
        method: "post",
        data: this.$http.adornData(ids, false)
        }).then(({ data }) => {
        this.$message({
            message: "菜单删除成功",
            type: "success"
        });
        //刷新出新的菜单
        this.getMenus();
        //设置需要默认展开的菜单
        this.expandedKey = [node.parent.data.catId];
        });
    })
    .catch(() => {});
    console.log("remove", node, data);
   },


  },


  //生命周期 - 创建完成(可以访问当前this实例)
  created() {
    this.getMenus();
  },
  //生命周期 - 挂载完成(可以访问DOM元素)
  mounted() {},
  beforeCreate() {}, //生命周期 - 创建之前
  beforeMount() {}, //生命周期 - 挂载之前
  beforeUpdate() {}, //生命周期 - 更新之前
  updated() {}, //生命周期 - 更新之后
  beforeDestroy() {}, //生命周期 - 销毁之前
  destroyed() {}, //生命周期 - 销毁完成
  activated() {} //如果页面有keep-alive缓存功能,这个函数会触发
};
</script>

<style scoped>

</style>
商品服务-api-三级分类-新增效果完成
新增这块啊的我们仍然暂时只需要修改前端的代码就行 后端的代码暂时不用动
细节实现,点击append 弹框录入数据,提交后端保存后默认展开显示其刚添加的数据
1、新增的修改
<template>
<div>
      <el-tree
      :data="menus"
      :props="defaultProps"
      :expand-on-click-node="false"
      show-checkbox
      node-key="catId"
      :default-expanded-keys="expandedKey"
      ref="menuTree"
    >
      <span class="custom-tree-node" slot-scope="{ node, data }">
        <span>{{ node.label }}</span>
        <span>
          <el-button
            v-if="node.level <=2"
            type="text"
            size="mini"
            @click="() => append(data)"
          >Append</el-button>
          <el-button type="text" size="mini" @click="edit(data)">edit</el-button>
          <el-button
            v-if="node.childNodes.length==0"
            type="text"
            size="mini"
            @click="() => remove(node, data)"
          >Delete</el-button>
        </span>
      </span>
    </el-tree>


 <el-dialog
      :title="title"
      :visible.sync="dialogVisible"
      width="30%"
      :close-on-click-modal="false"
    >
      <el-form :model="category">
        <el-form-item label="分类名称">
          <el-input v-model="category.name" autocomplete="off"></el-input>
        </el-form-item>
        <el-form-item label="图标">
          <el-input v-model="category.icon" autocomplete="off"></el-input>
        </el-form-item>
        <el-form-item label="计量单位">
          <el-input v-model="category.productUnit" autocomplete="off"></el-input>
        </el-form-item>
      </el-form>
      <span slot="footer" class="dialog-footer">
        <el-button @click="dialogVisible = false">取 消</el-button>
        <el-button type="primary" @click="submitData">确 定</el-button>
      </span>
    </el-dialog>

</div>
</template>

<script>
//这里可以导入其他文件(比如:组件,工具js,第三方插件js,json文件,图片文件等等)
//例如:import 《组件名称》 from '《组件路径》';
export default {
  //import引入的组件需要注入到对象中才能使用
  components: {},
  props: {},
  data() {
    return {
      pCid: [],
      draggable: false,
      updateNodes: [],
      maxLevel: 0,
      title: "",
      dialogType: "", //edit,add
      category: {
        name: "",
        parentCid: 0,
        catLevel: 0,
        showStatus: 1,
        sort: 0,
        productUnit: "",
        icon: "",
        catId: null
      },
      dialogVisible: false,
      menus: [],
      expandedKey: [],
      defaultProps: {
        children: "children",
        label: "name"
      }
    };
  },

  //计算属性 类似于data概念
  computed: {},
  //监控data中的数据变化
  watch: {},
  //方法集合
  methods: {
    getMenus() {
      this.$http({
        url: this.$http.adornUrl("/product/category/list/tree"),
        method: "get"
      }).then(({ data }) => {
        console.log("成功获取到菜单数据...", data.data);
         console.log(data.data);
        this.menus = data.data;
      });
    },


        submitData() {
      if (this.dialogType == "add") {
        this.addCategory();
      }
      if (this.dialogType == "edit") {
        this.editCategory();
      }
    },
    //修改三级分类数据
    editCategory() {
      var { catId, name, icon, productUnit } = this.category;
      this.$http({
        url: this.$http.adornUrl("/product/category/update"),
        method: "post",
        data: this.$http.adornData({ catId, name, icon, productUnit }, false)
      }).then(({ data }) => {
        this.$message({
          message: "菜单修改成功",
          type: "success"
        });
        //关闭对话框
        this.dialogVisible = false;
        //刷新出新的菜单
        this.getMenus();
        //设置需要默认展开的菜单
        this.expandedKey = [this.category.parentCid];
      });
    },

    //添加三级分类
    addCategory() {
      console.log("提交的三级分类数据", this.category);
      this.$http({
        url: this.$http.adornUrl("/product/category/save"),
        method: "post",
        data: this.$http.adornData(this.category, false)
      }).then(({ data }) => {
        this.$message({
          message: "菜单保存成功",
          type: "success"
        });
        //关闭对话框
        this.dialogVisible = false;
        //刷新出新的菜单
        this.getMenus();
        //设置需要默认展开的菜单
        this.expandedKey = [this.category.parentCid];
      });
    },


    append(data) {
      console.log("append", data);
      this.dialogType = "add";
      this.title = "添加分类";
      this.dialogVisible = true;
      this.category.parentCid = data.catId;
      this.category.catLevel = data.catLevel * 1 + 1;
      this.category.catId = null;
      this.category.name = "";
      this.category.icon = "";
      this.category.productUnit = "";
      this.category.sort = 0;
      this.category.showStatus = 1;
    },


    remove(node, data) {
    var ids = [data.catId];
    this.$confirm(`是否删除【${data.name}】菜单?`, "提示", {
    confirmButtonText: "确定",
    cancelButtonText: "取消",
    type: "warning"
    })
    .then(() => {
        this.$http({
        url: this.$http.adornUrl("/product/category/delete"),
        method: "post",
        data: this.$http.adornData(ids, false)
        }).then(({ data }) => {
        this.$message({
            message: "菜单删除成功",
            type: "success"
        });
        //刷新出新的菜单
        this.getMenus();
        //设置需要默认展开的菜单
        this.expandedKey = [node.parent.data.catId];
        });
    })
    .catch(() => {});
    console.log("remove", node, data);
   },
  },

  //生命周期 - 创建完成(可以访问当前this实例)
  created() {
    this.getMenus();
  },
  //生命周期 - 挂载完成(可以访问DOM元素)
  mounted() {},
  beforeCreate() {}, //生命周期 - 创建之前
  beforeMount() {}, //生命周期 - 挂载之前
  beforeUpdate() {}, //生命周期 - 更新之前
  updated() {}, //生命周期 - 更新之后
  beforeDestroy() {}, //生命周期 - 销毁之前
  destroyed() {}, //生命周期 - 销毁完成
  activated() {} //如果页面有keep-alive缓存功能,这个函数会触发
};
</script>

<style scoped>

</style>
因为新增和修改是公用组件的,接下来写修改的
2、后端代码
后端代码还是用之前代码生成器生成的代码,只需要把结果的key 改成data
   /**
     * 信息
     */
    @RequestMapping("/info/{catId}")
    //@RequiresPermissions("product:category:info")
    public R info(@PathVariable("catId") Long catId){
		CategoryEntity category = categoryService.getById(catId);

        return R.ok().put("data", category);
    }
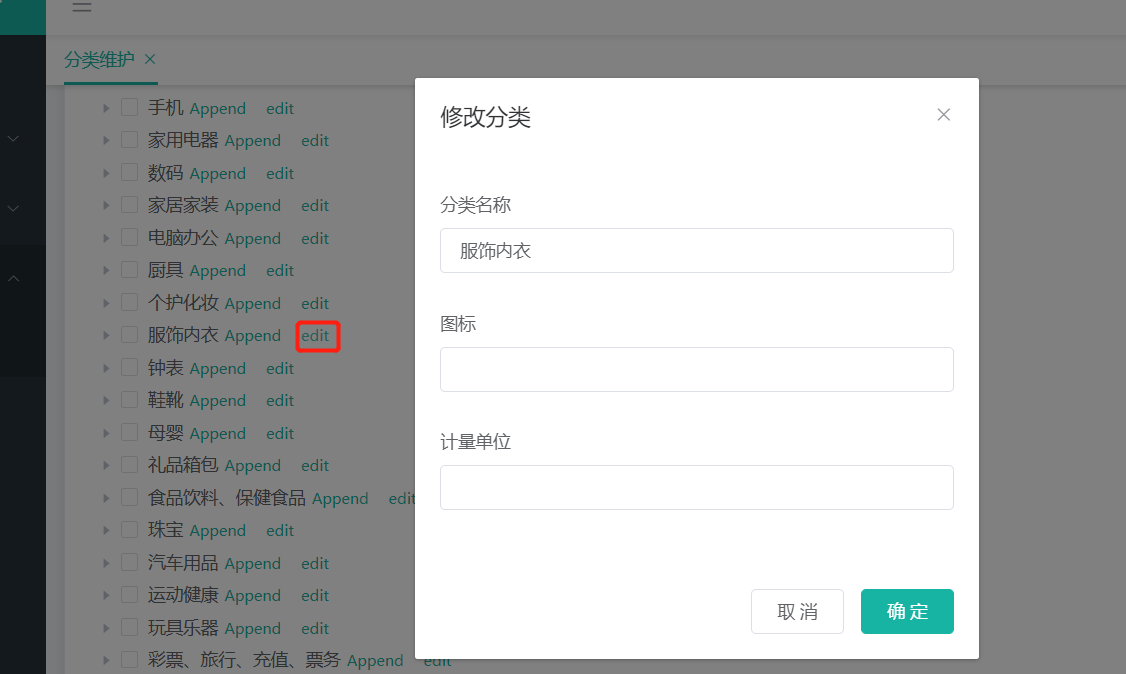
3、前端添加编辑方法
<template>
<div>
      <el-tree
      :data="menus"
      :props="defaultProps"
      :expand-on-click-node="false"
      show-checkbox
      node-key="catId"
      :default-expanded-keys="expandedKey"
      ref="menuTree"
    >
      <span class="custom-tree-node" slot-scope="{ node, data }">
        <span>{{ node.label }}</span>
        <span>
          <el-button
            v-if="node.level <=2"
            type="text"
            size="mini"
            @click="() => append(data)"
          >Append</el-button>
          <el-button type="text" size="mini" @click="edit(data)">edit</el-button>
          <el-button
            v-if="node.childNodes.length==0"
            type="text"
            size="mini"
            @click="() => remove(node, data)"
          >Delete</el-button>
        </span>
      </span>
    </el-tree>


 <el-dialog
      :title="title"
      :visible.sync="dialogVisible"
      width="30%"
      :close-on-click-modal="false"
    >
      <el-form :model="category">
        <el-form-item label="分类名称">
          <el-input v-model="category.name" autocomplete="off"></el-input>
        </el-form-item>
        <el-form-item label="图标">
          <el-input v-model="category.icon" autocomplete="off"></el-input>
        </el-form-item>
        <el-form-item label="计量单位">
          <el-input v-model="category.productUnit" autocomplete="off"></el-input>
        </el-form-item>
      </el-form>
      <span slot="footer" class="dialog-footer">
        <el-button @click="dialogVisible = false">取 消</el-button>
        <el-button type="primary" @click="submitData">确 定</el-button>
      </span>
    </el-dialog>

</div>
</template>

<script>
//这里可以导入其他文件(比如:组件,工具js,第三方插件js,json文件,图片文件等等)
//例如:import 《组件名称》 from '《组件路径》';
export default {
  //import引入的组件需要注入到对象中才能使用
  components: {},
  props: {},
  data() {
    return {
      pCid: [],
      draggable: false,
      updateNodes: [],
      maxLevel: 0,
      title: "",
      dialogType: "", //edit,add
      category: {
        name: "",
        parentCid: 0,
        catLevel: 0,
        showStatus: 1,
        sort: 0,
        productUnit: "",
        icon: "",
        catId: null
      },
      dialogVisible: false,
      menus: [],
      expandedKey: [],
      defaultProps: {
        children: "children",
        label: "name"
      }
    };
  },

  //计算属性 类似于data概念
  computed: {},
  //监控data中的数据变化
  watch: {},
  //方法集合
  methods: {
    getMenus() {
      this.$http({
        url: this.$http.adornUrl("/product/category/list/tree"),
        method: "get"
      }).then(({ data }) => {
        console.log("成功获取到菜单数据...", data.data);
         console.log(data.data);
        this.menus = data.data;
      });
    },


        submitData() {
      if (this.dialogType == "add") {
        this.addCategory();
      }
      if (this.dialogType == "edit") {
        this.editCategory();
      }
    },

    //修改三级分类数据
    editCategory() {
      var { catId, name, icon, productUnit } = this.category;
      this.$http({
        url: this.$http.adornUrl("/product/category/update"),
        method: "post",
        data: this.$http.adornData({ catId, name, icon, productUnit }, false)
      }).then(({ data }) => {
        this.$message({
          message: "菜单修改成功",
          type: "success"
        });
        //关闭对话框
        this.dialogVisible = false;
        //刷新出新的菜单
        this.getMenus();
        //设置需要默认展开的菜单
        this.expandedKey = [this.category.parentCid];
      });
    },

    //添加三级分类
    addCategory() {
      console.log("提交的三级分类数据", this.category);
      this.$http({
        url: this.$http.adornUrl("/product/category/save"),
        method: "post",
        data: this.$http.adornData(this.category, false)
      }).then(({ data }) => {
        this.$message({
          message: "菜单保存成功",
          type: "success"
        });
        //关闭对话框
        this.dialogVisible = false;
        //刷新出新的菜单
        this.getMenus();
        //设置需要默认展开的菜单
        this.expandedKey = [this.category.parentCid];
      });
    },


    append(data) {
      console.log("append", data);
      this.dialogType = "add";
      this.title = "添加分类";
      this.dialogVisible = true;
      this.category.parentCid = data.catId;
      this.category.catLevel = data.catLevel * 1 + 1;
      this.category.catId = null;
      this.category.name = "";
      this.category.icon = "";
      this.category.productUnit = "";
      this.category.sort = 0;
      this.category.showStatus = 1;
    },

 edit(data) {
      console.log("要修改的数据", data);
      this.dialogType = "edit";
      this.title = "修改分类";
      this.dialogVisible = true;

      //发送请求获取当前节点最新的数据
      this.$http({
        url: this.$http.adornUrl(`/product/category/info/${data.catId}`),
        method: "get"
      }).then(({ data }) => {
        //请求成功
        console.log("要回显的数据", data);
        this.category.name = data.data.name;
        this.category.catId = data.data.catId;
        this.category.icon = data.data.icon;
        this.category.productUnit = data.data.productUnit;
        this.category.parentCid = data.data.parentCid;
        this.category.catLevel = data.data.catLevel;
        this.category.sort = data.data.sort;
        this.category.showStatus = data.data.showStatus;
        /**
         *         parentCid: 0,
        catLevel: 0,
        showStatus: 1,
        sort: 0,
         */
      });
    },

    remove(node, data) {
    var ids = [data.catId];
    this.$confirm(`是否删除【${data.name}】菜单?`, "提示", {
    confirmButtonText: "确定",
    cancelButtonText: "取消",
    type: "warning"
    })
    .then(() => {
        this.$http({
        url: this.$http.adornUrl("/product/category/delete"),
        method: "post",
        data: this.$http.adornData(ids, false)
        }).then(({ data }) => {
        this.$message({
            message: "菜单删除成功",
            type: "success"
        });
        //刷新出新的菜单
        this.getMenus();
        //设置需要默认展开的菜单
        this.expandedKey = [node.parent.data.catId];
        });
    })
    .catch(() => {});
    console.log("remove", node, data);
   },

  },

  //生命周期 - 创建完成(可以访问当前this实例)
  created() {
    this.getMenus();
  },
  //生命周期 - 挂载完成(可以访问DOM元素)
  mounted() {},
  beforeCreate() {}, //生命周期 - 创建之前
  beforeMount() {}, //生命周期 - 挂载之前
  beforeUpdate() {}, //生命周期 - 更新之前
  updated() {}, //生命周期 - 更新之后
  beforeDestroy() {}, //生命周期 - 销毁之前
  destroyed() {}, //生命周期 - 销毁完成
  activated() {} //如果页面有keep-alive缓存功能,这个函数会触发
};
</script>

<style scoped>

</style>
商品服务-api-三级分类-修改-拖拽效果
1、拖拽功能也是Element-ui 组件提供的的,只需要配置draggable的相关属性以及定义对应的方法即可
draggable: true 表示开启拖拽功能 默认是关闭的,allowDrop()方法是做是否允许拖拽到指定位置的方法
 <el-tree
      :data="menus"
      :props="defaultProps"
      :expand-on-click-node="false"
      show-checkbox
      node-key="catId"
      :default-expanded-keys="expandedKey"
      :draggable="draggable"
      :allow-drop="allowDrop"
      ref="menuTree"
    >
    allowDrop(draggingNode, dropNode, type) {
      //1、被拖动的当前节点以及所在的父节点总层数不能大于3

      //1)、被拖动的当前节点总层数
      console.log("allowDrop:", draggingNode, dropNode, type);
      //
      this.countNodeLevel(draggingNode);
      //当前正在拖动的节点+父节点所在的深度不大于3即可
      let deep = Math.abs(this.maxLevel - draggingNode.level) + 1;
      console.log("深度:", deep);

      //   this.maxLevel
      if (type == "inner") {
        // console.log(
        //   `this.maxLevel:${this.maxLevel};draggingNode.data.catLevel:${draggingNode.data.catLevel};dropNode.level:${dropNode.level}`
        // );
        return deep + dropNode.level <= 3;
      } else {
        return deep + dropNode.parent.level <= 3;
      }
    },
    countNodeLevel(node) {
      //找到所有子节点,求出最大深度
      if (node.childNodes != null && node.childNodes.length > 0) {
        for (let i = 0; i < node.childNodes.length; i++) {
          if (node.childNodes[i].level > this.maxLevel) {
            this.maxLevel = node.childNodes[i].level;
          }
          this.countNodeLevel(node.childNodes[i]);
        }
      }
    },
商品服务-api-三级分类-修改-拖拽数据收集
要获取我们拖拽后的数据,也利用组件提供的方法@node-drop获取结果,并需要自己去做相关的业务逻辑,因为拖拽后循序发生了变化我们需要重新排序,然后把整个结果集合传给后端(但是不可能没拖动一次就向后端提交一次,这样太频繁了,我们最终是点击按钮开启拖拽,在给个按钮提交才向后端提交数据)
@node-drop=handleDrop
handleDrop(draggingNode, dropNode, dropType, ev) {
      console.log("handleDrop: ", draggingNode, dropNode, dropType);
      //1、当前节点最新的父节点id
      let pCid = 0;
      let siblings = null;
      if (dropType == "before" || dropType == "after") {
        pCid =
          dropNode.parent.data.catId == undefined
            ? 0
            : dropNode.parent.data.catId;
        siblings = dropNode.parent.childNodes;
      } else {
        pCid = dropNode.data.catId;
        siblings = dropNode.childNodes;
      }
      this.pCid.push(pCid);

      //2、当前拖拽节点的最新顺序,
      for (let i = 0; i < siblings.length; i++) {
        if (siblings[i].data.catId == draggingNode.data.catId) {
          //如果遍历的是当前正在拖拽的节点
          let catLevel = draggingNode.level;
          if (siblings[i].level != draggingNode.level) {
            //当前节点的层级发生变化
            catLevel = siblings[i].level;
            //修改他子节点的层级
            this.updateChildNodeLevel(siblings[i]);
          }
          this.updateNodes.push({
            catId: siblings[i].data.catId,
            sort: i,
            parentCid: pCid,
            catLevel: catLevel
          });
        } else {
          this.updateNodes.push({ catId: siblings[i].data.catId, sort: i });
        }
      }
    //3、当前拖拽节点的最新层级
      console.log("updateNodes", this.updateNodes);
    },

       updateChildNodeLevel(node) {
      if (node.childNodes.length > 0) {
        for (let i = 0; i < node.childNodes.length; i++) {
          var cNode = node.childNodes[i].data;
          this.updateNodes.push({
            catId: cNode.catId,
            catLevel: node.childNodes[i].level
          });
          this.updateChildNodeLevel(node.childNodes[i]);
        }
      }
    },
商品服务-api-三级分类-修改-拖拽功能完成
1、编辑后端的保存方法
只需要在product模块的categoryController的类中新增以下方法即可
    @RequestMapping("/update/sort")
    //@RequiresPermissions("product:category:update")
    public R updateSort(@RequestBody CategoryEntity[] category){
        categoryService.updateBatchById(Arrays.asList(category));
        return R.ok();
    }
下一章节统一写前端保存的方法,向后端提交数据
商品服务-api-三级分类-修改-批量拖拽效果
1、添加拖拽功能开启按钮和批量修改按钮
<el-switch v-model="draggable" active-text="开启拖拽" inactive-text="关闭拖拽"></el-switch>
 <el-button v-if="draggable" @click="batchSave">批量保存</el-button>
2、批量提交
   batchSave() {
      this.$http({
        url: this.$http.adornUrl("/product/category/update/sort"),
        method: "post",
        data: this.$http.adornData(this.updateNodes, false)
      }).then(({ data }) => {
        this.$message({
          message: "菜单顺序等修改成功",
          type: "success"
        });
        //刷新出新的菜单
        this.getMenus();
        //设置需要默认展开的菜单
        this.expandedKey = this.pCid;
        this.updateNodes = [];
        this.maxLevel = 0;
        // this.pCid = 0;
      });
    },
商品服务-api-三级分类-删除-批量删除&小结
1、添加批量删除按钮
<el-button type="danger" @click="batchDelete">批量删除</el-button>
2、前端批量删除方法
要获取主键中所有选中的数据,然后提交给后端
  batchDelete() {
      let catIds = [];
      let checkedNodes = this.$refs.menuTree.getCheckedNodes();
      console.log("被选中的元素", checkedNodes);
      for (let i = 0; i < checkedNodes.length; i++) {
        catIds.push(checkedNodes[i].catId);
      }
      this.$confirm(`是否批量删除【${catIds}】菜单?`, "提示", {
        confirmButtonText: "确定",
        cancelButtonText: "取消",
        type: "warning"
      })
        .then(() => {
          this.$http({
            url: this.$http.adornUrl("/product/category/delete"),
            method: "post",
            data: this.$http.adornData(catIds, false)
          }).then(({ data }) => {
            this.$message({
              message: "菜单批量删除成功",
              type: "success"
            });
            this.getMenus();
          });
        })
        .catch(() => {});
    },
3、完整的前端代码 category.vue
<template>
<div>
     <el-switch v-model="draggable" active-text="开启拖拽" inactive-text="关闭拖拽"></el-switch>
    <el-button v-if="draggable" @click="batchSave">批量保存</el-button>
    <el-button type="danger" @click="batchDelete">批量删除</el-button>
      <el-tree
      :data="menus"
      :props="defaultProps"
      :expand-on-click-node="false"
      show-checkbox
      node-key="catId"
      :default-expanded-keys="expandedKey"
      :draggable="draggable"
      :allow-drop="allowDrop"
      @node-drop="handleDrop"
      ref="menuTree"
    >
      <span class="custom-tree-node" slot-scope="{ node, data }">
        <span>{{ node.label }}</span>
        <span>
          <el-button
            v-if="node.level <=2"
            type="text"
            size="mini"
            @click="() => append(data)"
          >Append</el-button>
          <el-button type="text" size="mini" @click="edit(data)">edit</el-button>
          <el-button
            v-if="node.childNodes.length==0"
            type="text"
            size="mini"
            @click="() => remove(node, data)"
          >Delete</el-button>
        </span>
      </span>
    </el-tree>


 <el-dialog
      :title="title"
      :visible.sync="dialogVisible"
      width="30%"
      :close-on-click-modal="false"
    >
      <el-form :model="category">
        <el-form-item label="分类名称">
          <el-input v-model="category.name" autocomplete="off"></el-input>
        </el-form-item>
        <el-form-item label="图标">
          <el-input v-model="category.icon" autocomplete="off"></el-input>
        </el-form-item>
        <el-form-item label="计量单位">
          <el-input v-model="category.productUnit" autocomplete="off"></el-input>
        </el-form-item>
      </el-form>
      <span slot="footer" class="dialog-footer">
        <el-button @click="dialogVisible = false">取 消</el-button>
        <el-button type="primary" @click="submitData">确 定</el-button>
      </span>
    </el-dialog>

</div>
</template>

<script>
//这里可以导入其他文件(比如:组件,工具js,第三方插件js,json文件,图片文件等等)
//例如:import 《组件名称》 from '《组件路径》';
export default {
  //import引入的组件需要注入到对象中才能使用
  components: {},
  props: {},
  data() {
    return {
      pCid: [],
      draggable: false,
      updateNodes: [],
      maxLevel: 0,
      title: "",
      dialogType: "", //edit,add
      category: {
        name: "",
        parentCid: 0,
        catLevel: 0,
        showStatus: 1,
        sort: 0,
        productUnit: "",
        icon: "",
        catId: null
      },
      dialogVisible: false,
      menus: [],
      expandedKey: [],
      defaultProps: {
        children: "children",
        label: "name"
      }
    };
  },

  //计算属性 类似于data概念
  computed: {},
  //监控data中的数据变化
  watch: {},
  //方法集合
  methods: {
    getMenus() {
      this.$http({
        url: this.$http.adornUrl("/product/category/list/tree"),
        method: "get"
      }).then(({ data }) => {
        console.log("成功获取到菜单数据...", data.data);
         console.log(data.data);
        this.menus = data.data;
      });
    },

    handleDrop(draggingNode, dropNode, dropType, ev) {
      console.log("handleDrop: ", draggingNode, dropNode, dropType);
      //1、当前节点最新的父节点id
      let pCid = 0;
      let siblings = null;
      if (dropType == "before" || dropType == "after") {
        pCid =
          dropNode.parent.data.catId == undefined
            ? 0
            : dropNode.parent.data.catId;
        siblings = dropNode.parent.childNodes;
      } else {
        pCid = dropNode.data.catId;
        siblings = dropNode.childNodes;
      }
      this.pCid.push(pCid);

      //2、当前拖拽节点的最新顺序,
      for (let i = 0; i < siblings.length; i++) {
        if (siblings[i].data.catId == draggingNode.data.catId) {
          //如果遍历的是当前正在拖拽的节点
          let catLevel = draggingNode.level;
          if (siblings[i].level != draggingNode.level) {
            //当前节点的层级发生变化
            catLevel = siblings[i].level;
            //修改他子节点的层级
            this.updateChildNodeLevel(siblings[i]);
          }
          this.updateNodes.push({
            catId: siblings[i].data.catId,
            sort: i,
            parentCid: pCid,
            catLevel: catLevel
          });
        } else {
          this.updateNodes.push({ catId: siblings[i].data.catId, sort: i });
        }
      }

      //3、当前拖拽节点的最新层级
      console.log("updateNodes", this.updateNodes);
    },
       batchSave() {
      this.$http({
        url: this.$http.adornUrl("/product/category/update/sort"),
        method: "post",
        data: this.$http.adornData(this.updateNodes, false)
      }).then(({ data }) => {
        this.$message({
          message: "菜单顺序等修改成功",
          type: "success"
        });
        //刷新出新的菜单
        this.getMenus();
        //设置需要默认展开的菜单
        this.expandedKey = this.pCid;
        this.updateNodes = [];
        this.maxLevel = 0;
        // this.pCid = 0;
      });
    },

 batchDelete() {
      let catIds = [];
      let checkedNodes = this.$refs.menuTree.getCheckedNodes();
      console.log("被选中的元素", checkedNodes);
      for (let i = 0; i < checkedNodes.length; i++) {
        catIds.push(checkedNodes[i].catId);
      }
      this.$confirm(`是否批量删除【${catIds}】菜单?`, "提示", {
        confirmButtonText: "确定",
        cancelButtonText: "取消",
        type: "warning"
      })
        .then(() => {
          this.$http({
            url: this.$http.adornUrl("/product/category/delete"),
            method: "post",
            data: this.$http.adornData(catIds, false)
          }).then(({ data }) => {
            this.$message({
              message: "菜单批量删除成功",
              type: "success"
            });
            this.getMenus();
          });
        })
        .catch(() => {});
    },

     updateChildNodeLevel(node) {
      if (node.childNodes.length > 0) {
        for (let i = 0; i < node.childNodes.length; i++) {
          var cNode = node.childNodes[i].data;
          this.updateNodes.push({
            catId: cNode.catId,
            catLevel: node.childNodes[i].level
          });
          this.updateChildNodeLevel(node.childNodes[i]);
        }
      }
    },

     allowDrop(draggingNode, dropNode, type) {
      //1、被拖动的当前节点以及所在的父节点总层数不能大于3

      //1)、被拖动的当前节点总层数
      console.log("allowDrop:", draggingNode, dropNode, type);
      //
      this.countNodeLevel(draggingNode);
      //当前正在拖动的节点+父节点所在的深度不大于3即可
      let deep = Math.abs(this.maxLevel - draggingNode.level) + 1;
      console.log("深度:", deep);

      //   this.maxLevel
      if (type == "inner") {
        // console.log(
        //   `this.maxLevel:${this.maxLevel};draggingNode.data.catLevel:${draggingNode.data.catLevel};dropNode.level:${dropNode.level}`
        // );
        return deep + dropNode.level <= 3;
      } else {
        return deep + dropNode.parent.level <= 3;
      }
    },
    countNodeLevel(node) {
      //找到所有子节点,求出最大深度
      if (node.childNodes != null && node.childNodes.length > 0) {
        for (let i = 0; i < node.childNodes.length; i++) {
          if (node.childNodes[i].level > this.maxLevel) {
            this.maxLevel = node.childNodes[i].level;
          }
          this.countNodeLevel(node.childNodes[i]);
        }
      }
    },


        submitData() {
      if (this.dialogType == "add") {
        this.addCategory();
      }
      if (this.dialogType == "edit") {
        this.editCategory();
      }
    },

    //修改三级分类数据
    editCategory() {
      var { catId, name, icon, productUnit } = this.category;
      this.$http({
        url: this.$http.adornUrl("/product/category/update"),
        method: "post",
        data: this.$http.adornData({ catId, name, icon, productUnit }, false)
      }).then(({ data }) => {
        this.$message({
          message: "菜单修改成功",
          type: "success"
        });
        //关闭对话框
        this.dialogVisible = false;
        //刷新出新的菜单
        this.getMenus();
        //设置需要默认展开的菜单
        this.expandedKey = [this.category.parentCid];
      });
    },

    //添加三级分类
    addCategory() {
      console.log("提交的三级分类数据", this.category);
      this.$http({
        url: this.$http.adornUrl("/product/category/save"),
        method: "post",
        data: this.$http.adornData(this.category, false)
      }).then(({ data }) => {
        this.$message({
          message: "菜单保存成功",
          type: "success"
        });
        //关闭对话框
        this.dialogVisible = false;
        //刷新出新的菜单
        this.getMenus();
        //设置需要默认展开的菜单
        this.expandedKey = [this.category.parentCid];
      });
    },


    append(data) {
      console.log("append", data);
      this.dialogType = "add";
      this.title = "添加分类";
      this.dialogVisible = true;
      this.category.parentCid = data.catId;
      this.category.catLevel = data.catLevel * 1 + 1;
      this.category.catId = null;
      this.category.name = "";
      this.category.icon = "";
      this.category.productUnit = "";
      this.category.sort = 0;
      this.category.showStatus = 1;
    },

 edit(data) {
      console.log("要修改的数据", data);
      this.dialogType = "edit";
      this.title = "修改分类";
      this.dialogVisible = true;

      //发送请求获取当前节点最新的数据
      this.$http({
        url: this.$http.adornUrl(`/product/category/info/${data.catId}`),
        method: "get"
      }).then(({ data }) => {
        //请求成功
        console.log("要回显的数据", data);
        this.category.name = data.data.name;
        this.category.catId = data.data.catId;
        this.category.icon = data.data.icon;
        this.category.productUnit = data.data.productUnit;
        this.category.parentCid = data.data.parentCid;
        this.category.catLevel = data.data.catLevel;
        this.category.sort = data.data.sort;
        this.category.showStatus = data.data.showStatus;
        /**
         *         parentCid: 0,
        catLevel: 0,
        showStatus: 1,
        sort: 0,
         */
      });
    },

    remove(node, data) {
    var ids = [data.catId];
    this.$confirm(`是否删除【${data.name}】菜单?`, "提示", {
    confirmButtonText: "确定",
    cancelButtonText: "取消",
    type: "warning"
    })
    .then(() => {
        this.$http({
        url: this.$http.adornUrl("/product/category/delete"),
        method: "post",
        data: this.$http.adornData(ids, false)
        }).then(({ data }) => {
        this.$message({
            message: "菜单删除成功",
            type: "success"
        });
        //刷新出新的菜单
        this.getMenus();
        //设置需要默认展开的菜单
        this.expandedKey = [node.parent.data.catId];
        });
    })
    .catch(() => {});
    console.log("remove", node, data);
   },

  },

  //生命周期 - 创建完成(可以访问当前this实例)
  created() {
    this.getMenus();
  },
  //生命周期 - 挂载完成(可以访问DOM元素)
  mounted() {},
  beforeCreate() {}, //生命周期 - 创建之前
  beforeMount() {}, //生命周期 - 挂载之前
  beforeUpdate() {}, //生命周期 - 更新之前
  updated() {}, //生命周期 - 更新之后
  beforeDestroy() {}, //生命周期 - 销毁之前
  destroyed() {}, //生命周期 - 销毁完成
  activated() {} //如果页面有keep-alive缓存功能,这个函数会触发
};
</script>

<style scoped>

</style>
商品服务-api-品牌管理-逆向工程前后端代码
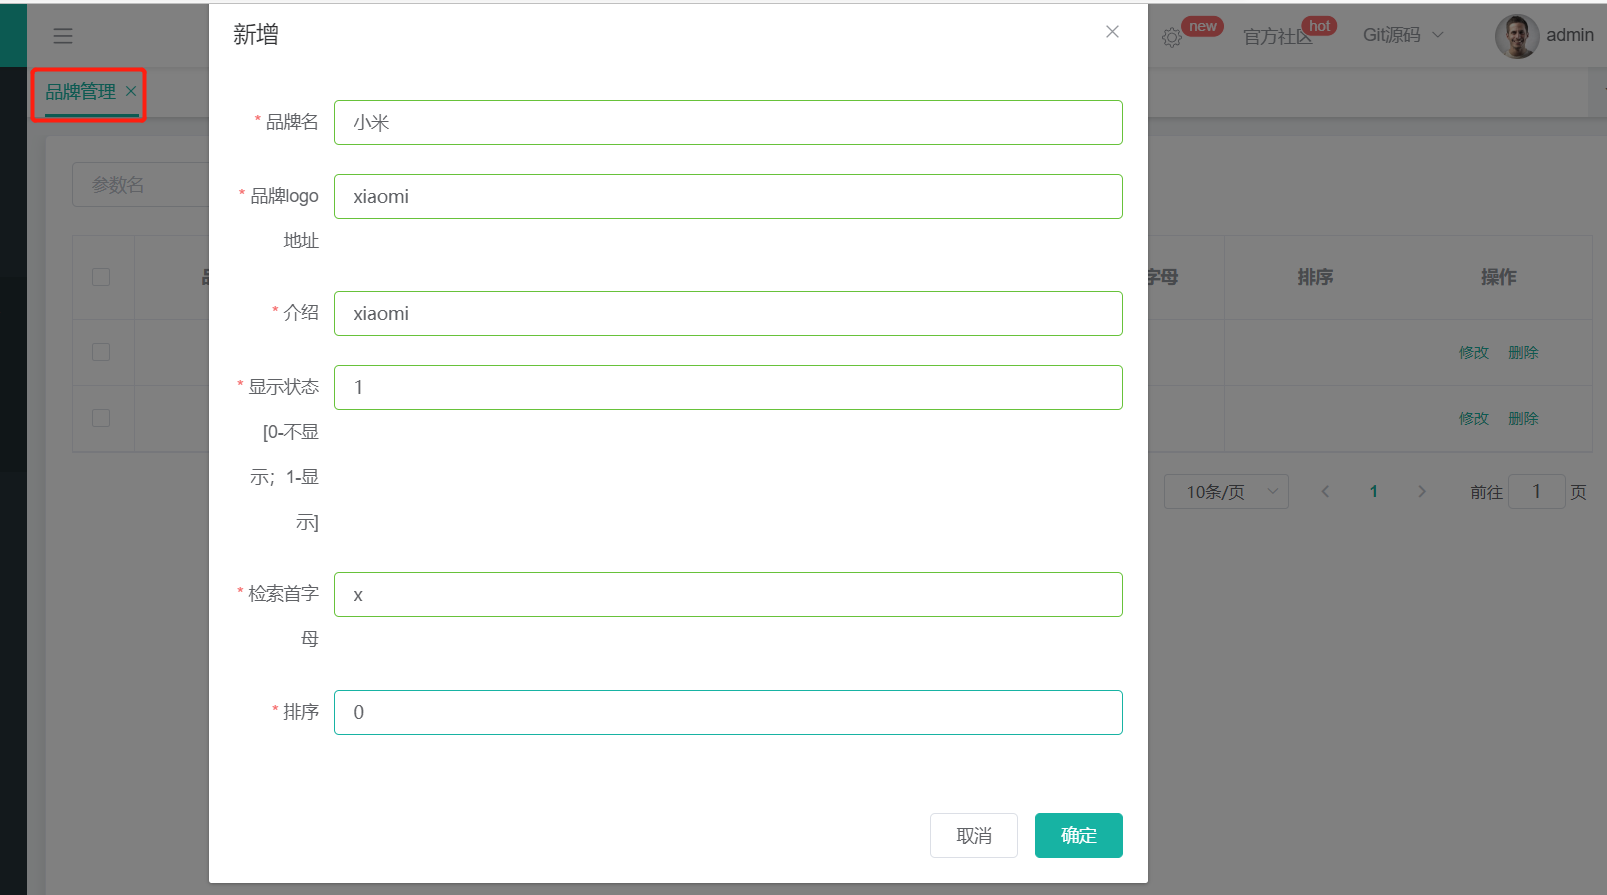
其实代码生成器不仅仅只生成了后端代码,简单的curd的前端代码也是有生成的,也可以用
1、新建菜单
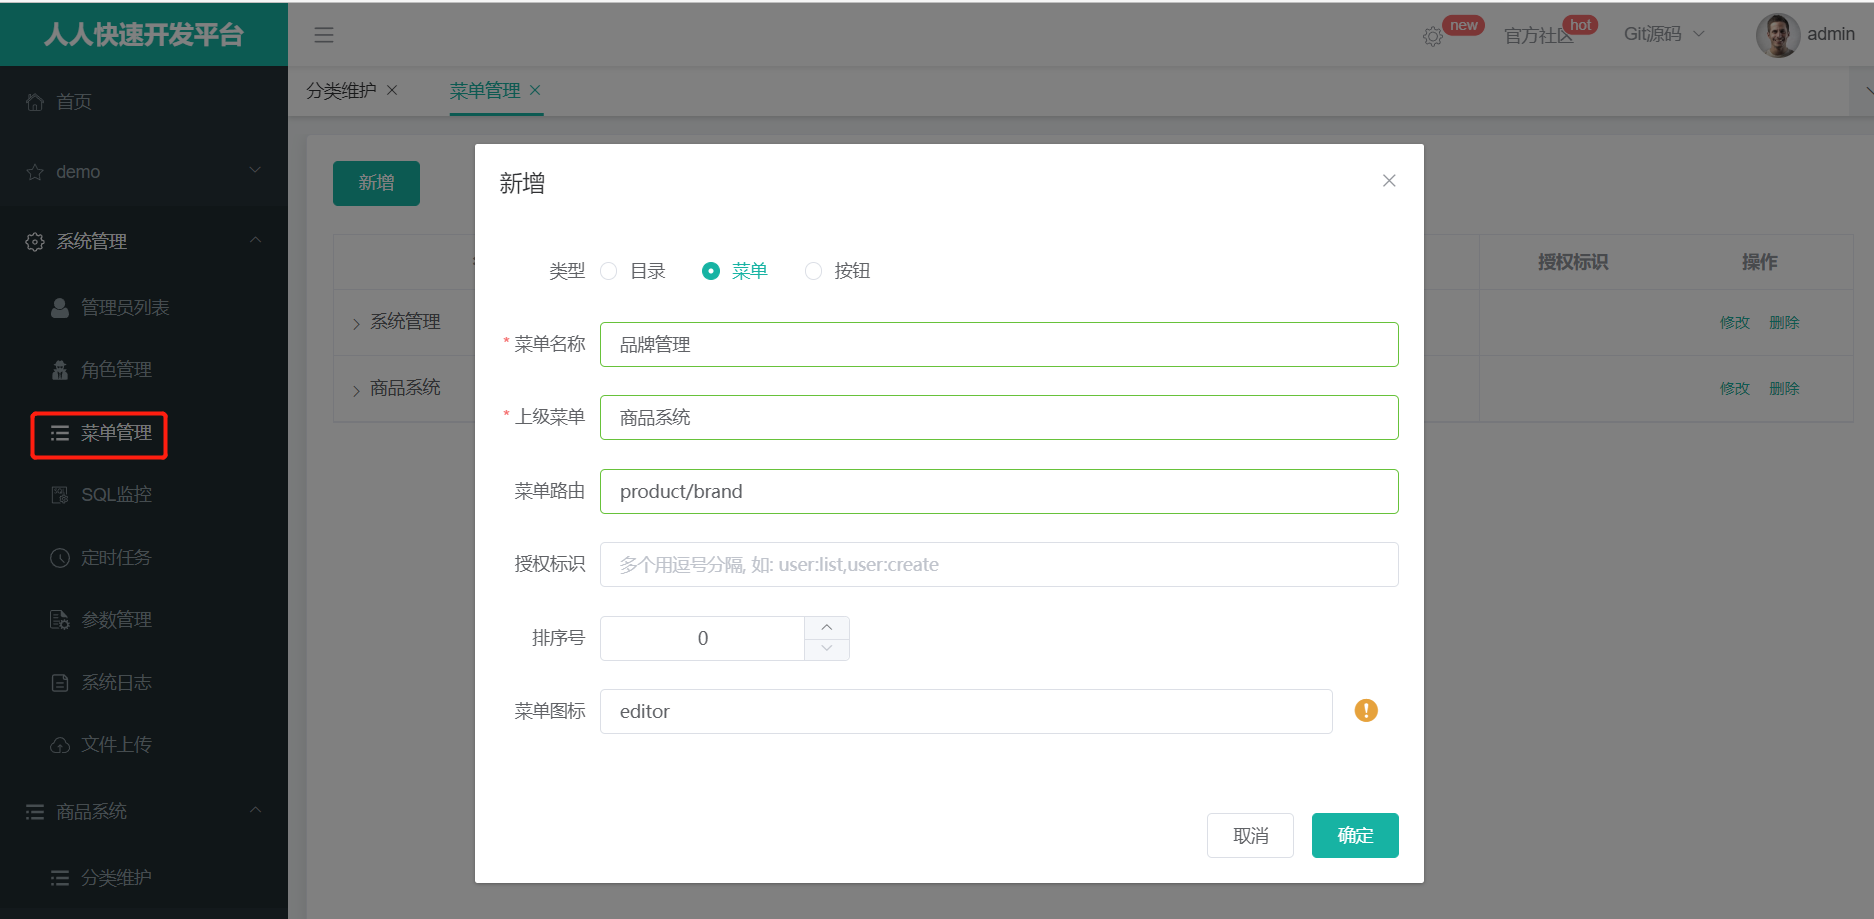
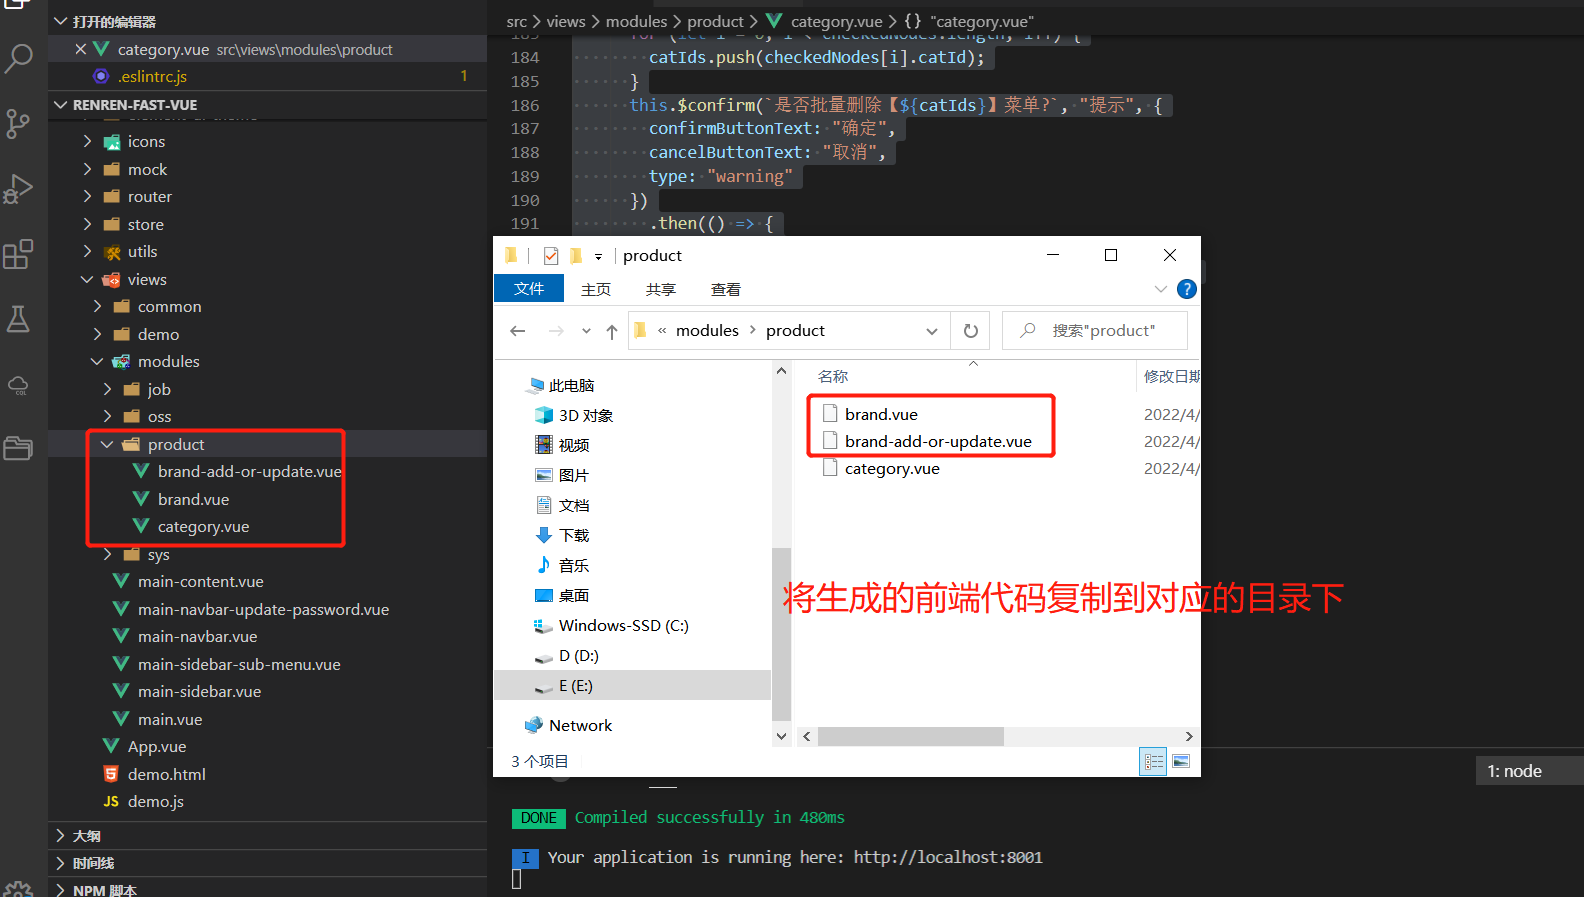
2、导入生成的前端代码到对应的目录
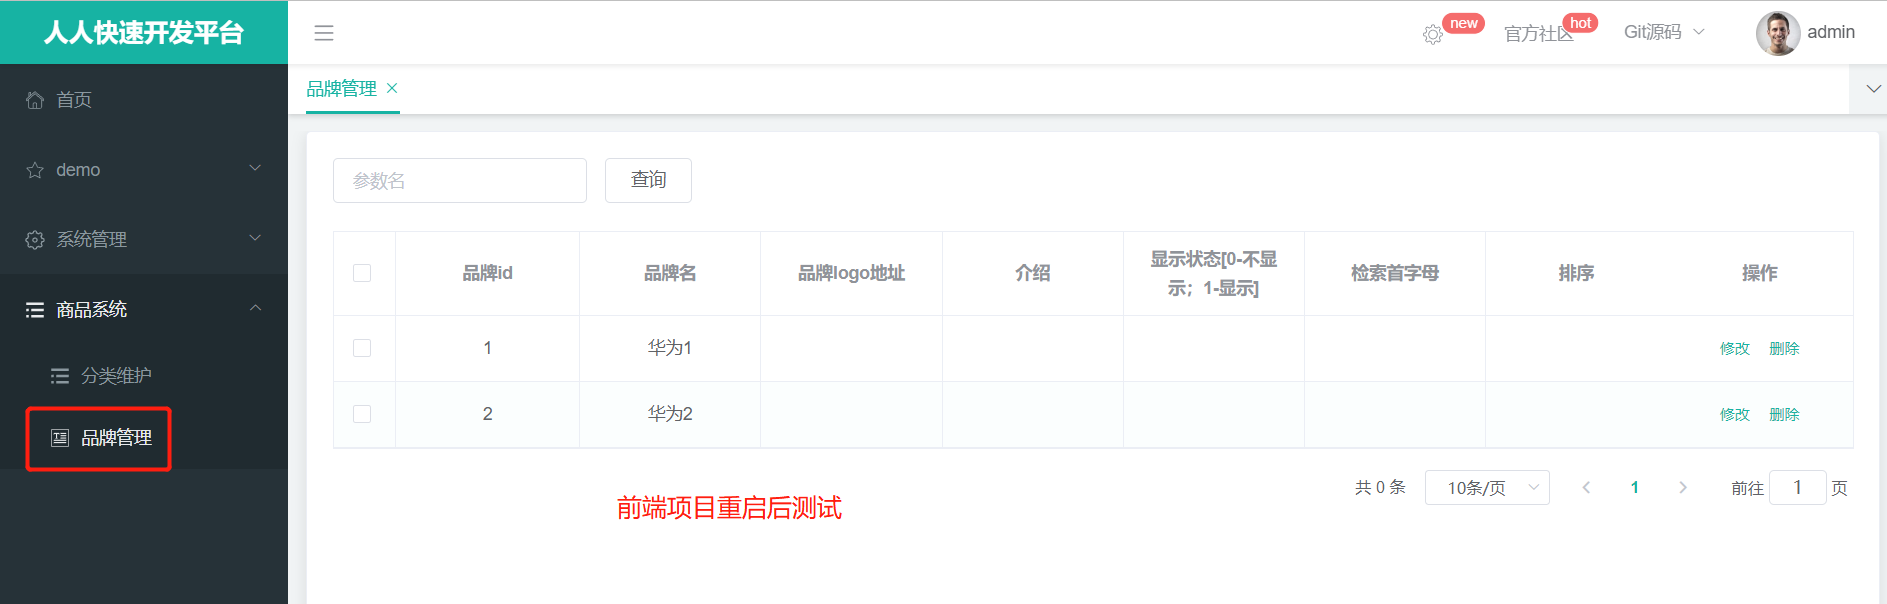
3、重启查看
4、注解前端src > utils > index.js 的权限权限代码
/**
 * 是否有权限
 * @param {*} key
 */
export function isAuth (key) {
  // return JSON.parse(sessionStorage.getItem('permissions') || '[]').indexOf(key) !== -1 || false
  // 让它固定返回为 true
  return true
}
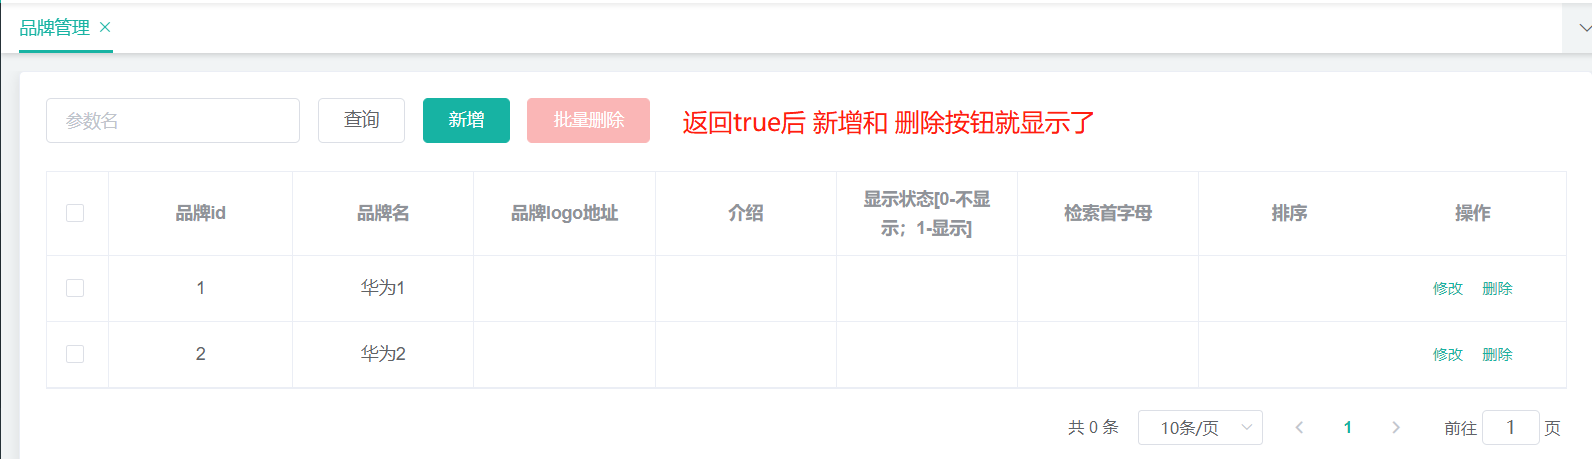
基本的增删改查是ok 的
商品服务-api-品牌管理-效果优化快速显示开关
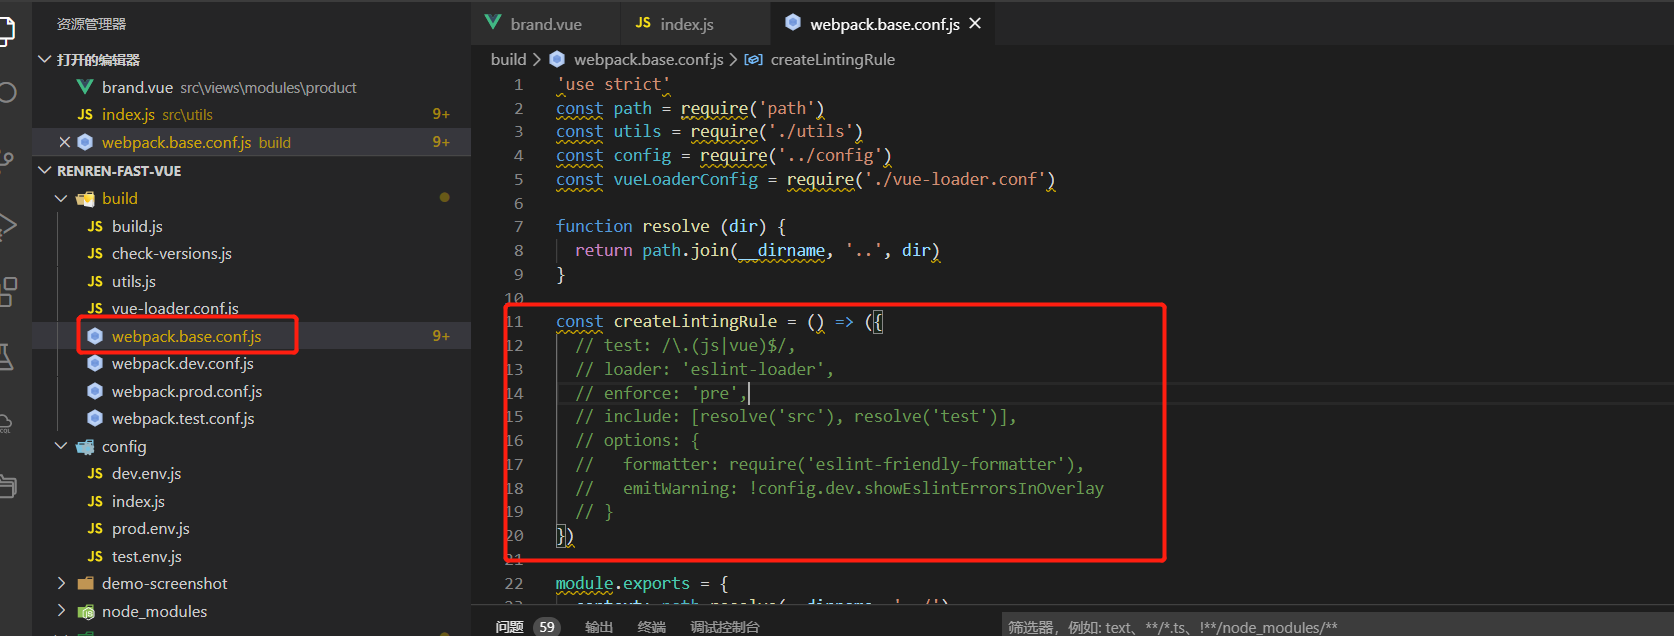
1、注释掉eslint 语法检查
build > webpack.base.conf.js 中的createLintingRule 的方法内容注释掉
2、优化显示与不显示的表格处
 <el-table-column
        prop="showStatus"
        header-align="center"
        align="center"
        label="显示状态">

        <template slot-scope="scope">
          <el-switch
            v-model="scope.row.showStatus"
            active-color="#13ce66"
            inactive-color="#ff4949"
            :active-value="1"
            :inactive-value="0"
            @change="updateBrandStatus(scope.row)"
          ></el-switch>
        </template>

      </el-table-column>
方法编写, 后端的代码不用写路径上加一个update,自动已经生成BrandController,写一个前端的方法updateBrandStatus(scope.row)
/**
     * 修改
     */
    @RequestMapping("/update/status")
    //@RequiresPermissions("product:brand:update")
    public R update(@RequestBody BrandEntity brand){
		brandService.updateById(brand);

        return R.ok();
    }
 updateBrandStatus(data) {
      console.log("最新信息", data);
      let { brandId, showStatus } = data;
      //发送请求修改状态
      this.$http({
        url: this.$http.adornUrl("/product/brand/update/status"),
        method: "post",
        data: this.$http.adornData({ brandId, showStatus }, false)
      }).then(({ data }) => {
        this.$message({
          type: "success",
          message: "状态更新成功"
        });
      });
    },
3、优化 brand-add-or-update.vue 的显示不显示的代码
 <el-form-item label="显示状态" prop="showStatus">
      <el-switch
          v-model="dataForm.showStatus"
          active-color="#13ce66"
          inactive-color="#ff4949"
          :active-value="1"
          :inactive-value="0"
        ></el-switch>
    </el-form-item>
的前端代码到对应的目录
[外链图片转存中…(img-Kt1USHFx-1652233966141)]
3、重启查看
[外链图片转存中…(img-gjUSg53q-1652233966141)]
4、注解前端src > utils > index.js 的权限权限代码
/**
 * 是否有权限
 * @param {*} key
 */
export function isAuth (key) {
  // return JSON.parse(sessionStorage.getItem('permissions') || '[]').indexOf(key) !== -1 || false
  // 让它固定返回为 true
  return true
}
[外链图片转存中…(img-1T0LoXHI-1652233966141)]
[外链图片转存中…(img-6XvgbaTd-1652233966142)]
基本的增删改查是ok 的
商品服务-api-品牌管理-效果优化快速显示开关
1、注释掉eslint 语法检查
build > webpack.base.conf.js 中的createLintingRule 的方法内容注释掉
[外链图片转存中…(img-EKZVSMrq-1652233966142)]
2、优化显示与不显示的表格处
 <el-table-column
        prop="showStatus"
        header-align="center"
        align="center"
        label="显示状态">

        <template slot-scope="scope">
          <el-switch
            v-model="scope.row.showStatus"
            active-color="#13ce66"
            inactive-color="#ff4949"
            :active-value="1"
            :inactive-value="0"
            @change="updateBrandStatus(scope.row)"
          ></el-switch>
        </template>

      </el-table-column>
方法编写, 后端的代码不用写路径上加一个update,自动已经生成BrandController,写一个前端的方法updateBrandStatus(scope.row)
/**
     * 修改
     */
    @RequestMapping("/update/status")
    //@RequiresPermissions("product:brand:update")
    public R update(@RequestBody BrandEntity brand){
		brandService.updateById(brand);

        return R.ok();
    }
 updateBrandStatus(data) {
      console.log("最新信息", data);
      let { brandId, showStatus } = data;
      //发送请求修改状态
      this.$http({
        url: this.$http.adornUrl("/product/brand/update/status"),
        method: "post",
        data: this.$http.adornData({ brandId, showStatus }, false)
      }).then(({ data }) => {
        this.$message({
          type: "success",
          message: "状态更新成功"
        });
      });
    },
3、优化 brand-add-or-update.vue 的显示不显示的代码
 <el-form-item label="显示状态" prop="showStatus">
      <el-switch
          v-model="dataForm.showStatus"
          active-color="#13ce66"
          inactive-color="#ff4949"
          :active-value="1"
          :inactive-value="0"
        ></el-switch>
    </el-form-item>


 5560
5560


 被折叠的 条评论
为什么被折叠?
被折叠的 条评论
为什么被折叠?
 到【灌水乐园】发言


