


在前一篇写到了用QML做一个简易的计算器界面,界面做出了来了,还需要修改优化,这一篇写具体的优化过程。
前文创建的界面如图所示:
目前对于按钮的布局和按钮按下的响应过程都需要优化一下,不然看上去就是太简陋了,下面将从这几个方面来着手布局,首先使用按钮的控件是button,如果每一个按钮都用一个button来显示和控制,这样会显得qml的代码特别的多,且重复的部分太多,很影响代码后期的修改和阅读体验。
使用GridView来进行布局,使用rectangle来自定义按钮控件,不使用qml提供的Button按钮组件。使用GridView先规划好各个的大小和每一排放置的按钮数,对于GridView的使用方法这里不做过多说明,可以看QT提供的例子来学习,为了避免在使用过程中对生存的程序进行拉伸来打乱了布局,对窗口的大小进行了写死,用户不能自行缩放窗口,具体完成代码如下:(没有贴c++部分的代码,c++部分的代码和上一篇文章一样,没做改动)
import QtQuick 2.7
import QtQuick.Window 2.2
import QtQuick.Controls 2.2
import C2Qml 1.0

Window {
    visible: true
    width: 400
    height: 640
    title: qsTr("计算器")
    /*设置最大,最小尺寸,避免界面拉动变形*/
    maximumHeight: height;
    maximumWidth: width;
    minimumHeight: height;
    minimumWidth: width;

    property string txtString: ""

    Calc {
        id:calc;
    }

    Rectangle {
        anchors.fill: parent;
        color: "lightgrey";
        z:-1;
    }

    //用于显示输入的键值和得出的运行结果
    Rectangle {
        id:textDisp;

        width:parent.width;
        height:0.4*parent.height;
        anchors.top:parent.top;
        anchors.left: parent.left;
        color: "#fcfcd5";
        radius: 10;
        border.color: "grey";
        border.width: 2;

        Text {
            anchors.top:parent.top;
            anchors.topMargin: 10;
            anchors.left: parent.left;
            anchors.leftMargin: 10;
            text: txtString;
            font.pixelSize: 25;
            wrapMode: Text.WrapAnywhere;
        }
    }

    //放置按钮区域
    Rectangle{
        id:btnArea;
        width:parent.width;
        height:parent.height - textDisp.height - 10;
        anchors.top:textDisp.bottom;
        anchors.topMargin: 5;
        anchors.left: parent.left;
        border.width: 2;
        border.color: "grey"
        color: "grey";
        radius: 10;

        property int heightTmp: height / 4;
        property int fontSize: 20;
        property var modelArray: [1,2,3,"-",4,5,6,"+",7,8,9,"x","÷",0,"=","清除"];

        GridView {
            id:gridView;
            model: 16;
            width:0.95*parent.width;
            height:0.95*parent.height;
            cellHeight: height/4;
            cellWidth: width/4
            anchors.fill: parent;
            clip:true;
            interactive: false; //禁止拖动

            delegate: Item {
                width: gridView.cellWidth;
                height:gridView.cellHeight;
                Rectangle {
                    id:button;
                    width: 0.8*parent.height;
                    height:0.8*parent.width;
                    anchors.centerIn: parent;
                    color: "lightblue";
                    radius: 10;
                    Text {
                        id:btnText;
                        text: btnArea.modelArray[index];
                        anchors.centerIn: parent;
                        font.pixelSize: 30;
                        font.bold: true;
                    }

                    MouseArea {
                        id:mouseArea;
                        anchors.fill: parent;
                        //接收点击按钮事件
                        onClicked: {
                            console.log(btnText.text);
                            if(index == 15)
                                txtString = "";
                            else if(index === 14)
                            {
                                if(txtString !== "")
                                    txtString = calc.getValue(txtString);
                            }
                            else if(index === 12)
                            {
                                txtString += "/";
                            }
                            else if(index === 11)
                            {
                                txtString += "*";
                            }
                            else
                            {
                                txtString += btnText.text;
                            }
                        }
                    }
                    //设置按钮按下按钮大小改变
                    states:State {
                        name: "pressed"
                        when:mouseArea.pressed;
                        PropertyChanges {
                            target: button;
                            scale:1.2
                        }
                    }
                }
            }
        }
    }
}
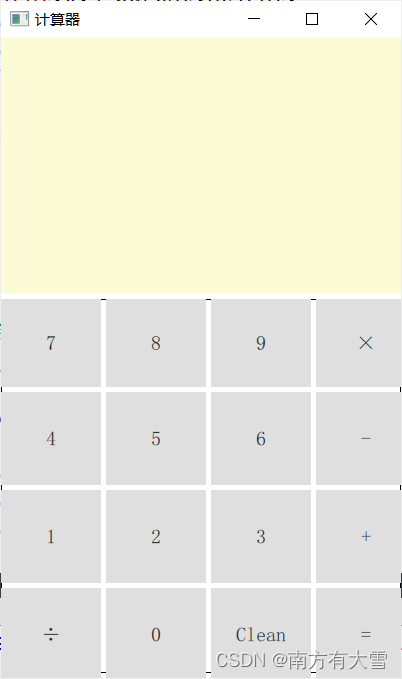
运行后的程序效果如下:

对一些按钮的布局做了些改动,设置了按钮按下放大的效果,看上去比上一篇的界面有了明显的美化,但是在功能方面依旧没有拓展,同时对一些非法表达式组合还没有添加判断,留在下一篇来改进,先这样吧。


 1294
1294


 被折叠的 条评论
为什么被折叠?
被折叠的 条评论
为什么被折叠?
 到【灌水乐园】发言


