


jOOQ,是一个ORM框架,利用其生成的Java代码和流畅的API,可以快速构建有类型约束的安全的SQL语句
jOOQ使我们的重心可以放在业务逻辑上,而Java与SQL的基础交互部分,都可以交给jOOQ去处理。
https://jooq.diamondfsd.com/learn/section-1-how-to-start.html
gradle的配置文件(build.gradle.kts)
import org.jetbrains.kotlin.gradle.tasks.KotlinCompile
import org.jooq.codegen.GenerationTool
import org.jooq.meta.jaxb.*

plugins {
    id("org.springframework.boot") version "2.6.0"
    id("io.spring.dependency-management") version "1.0.11.RELEASE"
    kotlin("jvm") version "1.6.0"
    kotlin("plugin.spring") version "1.6.0"
}
group = "rin"
version = "0.0.1-SNAPSHOT"
java.sourceCompatibility = JavaVersion.VERSION_1_8

repositories {     //repositories闭包
    mavenLocal()   //配置先从本地仓库寻找jar包,优先寻找上一个配置,找到不执行下面的配置
    mavenCentral() //配置从中央仓库寻找
    google()       //第三方仓库
    jcenter()      //代码托管库:设置之后可以在项目中轻松引用jcenter上的开源项目
}


buildscript {
    repositories {
        mavenLocal()
        mavenCentral()
    }
    dependencies {
        classpath("org.jooq:jooq-codegen:3.14.15")
        classpath("mysql:mysql-connector-java:8.0.27")
    }
}

dependencies {

    implementation("org.springframework.boot:spring-boot-starter-jooq")
    implementation("org.springframework.boot:spring-boot-starter-web")
    implementation("com.fasterxml.jackson.module:jackson-module-kotlin")
    implementation("org.jetbrains.kotlin:kotlin-reflect")
    implementation("org.jetbrains.kotlin:kotlin-stdlib-jdk8")
    runtimeOnly("mysql:mysql-connector-java:8.0.27")
    testImplementation("org.springframework.boot:spring-boot-starter-test")
    implementation("org.jooq:jooq:3.14.15")
    implementation("org.jooq:jooq-codegen:3.14.15")
    implementation("org.jooq:jooq-meta:3.14.15")
    implementation("com.xiaoleilu:hutool-core:3.3.2")
    implementation ("org.projectlombok:lombok:1.18.24")
}

tasks.register("JOOQ_Code_Generate") {
    doLast {
        val config: org.jooq.meta.jaxb.Configuration = Configuration()
                .withJdbc(Jdbc()
                        .withDriver("com.mysql.cj.jdbc.Driver")
                        .withUrl("jdbc:mysql://localhost:3306/school?characterEncoding=utf-8&serverTimezone=Asia/Shanghai")
                        .withUsername("root")
                        .withPassword("123456"))
                .withGenerator(Generator()
                        .withGenerate(Generate()
                                .withComments(true) // 注释 √
                                .withCommentsOnCatalogs(true)
                                .withRelations(true)
                                .withImmutablePojos(false) // if true, cannot use 'into()' method
                                .withInterfaces(true)
                                .withDaos(true))
                        .withDatabase(Database()
                                .withName("org.jooq.meta.mysql.MySQLDatabase")
                                .withIncludes(".*")
                                .withExcludes("")
                                .withInputSchema("school")
                        )
                        .withTarget(org.jooq.meta.jaxb.Target()
                                .withPackageName("")
                                .withDirectory("src/main/java"))
                )
        GenerationTool.generate(config)
    }
}

tasks.withType<KotlinCompile> {
    kotlinOptions {
        freeCompilerArgs = listOf("-Xjsr305=strict")
        jvmTarget = "1.8"
    }
}

tasks.withType<Test> {
    useJUnitPlatform()
}
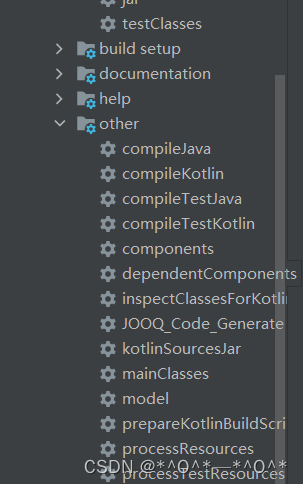
上面的需要的依赖,下面的tasks.register(“JOOQ_Code_Generate”) 是jooq根据表自动生成Java代码的文件,在kts文件中运行后,会出现如下图这样的,然后点击JOOQ_Code_Generate就会自动生成代码
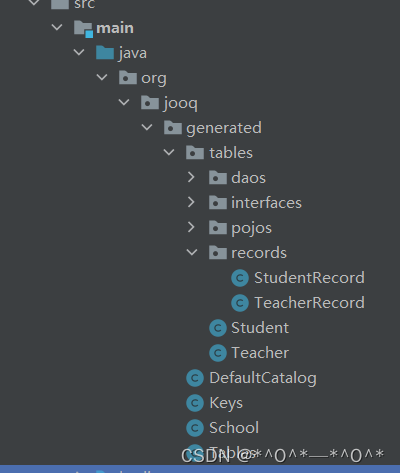
如图就是自动生成代码之后的目录结构
application.yml文件
server:
  port: 8080

spring:
  datasource:
    driver-class-name: com.mysql.cj.jdbc.Driver
    url: jdbc:mysql://localhost:3306/school?serverTimezone=GMT%2B8
    username: root
    password: 123456
这里只需要配置最简单的数据库连接就可以了
controller
package com.demo.controller

import com.demo.service.StudentService
import com.demo.util.R
import org.jooq.generated.tables.pojos.Student
import org.springframework.beans.factory.annotation.Autowired
import org.springframework.web.bind.annotation.*


@ResponseBody
@RestController
@RequestMapping("/student")
class StudentController {

    @Autowired
    lateinit var studentService: StudentService

    @GetMapping
    fun getOne(id:Int): R<*> {
        return studentService.getOne(id)
    }

    @DeleteMapping
    fun deleteOne(@RequestBody student: Student):R<*>{
        return studentService.deleteOne(student)
    }

    @PostMapping
    fun insertOne(@RequestBody student: Student):R<*>{
        return studentService.insertOne(student)
    }

    @PutMapping
    fun updateOne(@RequestBody student: Student):R<*> {
        return studentService.updateOne(student)
    }

    @GetMapping("/all")
    fun getAll():R<*>{
        return studentService.getAll()
    }
}
自封装的返回类
package com.demo.util;

import java.io.Serializable


/**
 * 全局统一返回结果类
 */


class R<T> : Serializable {
    private var code = 0
    private var msg: String? = null
    private var data: T? = null
    override fun toString(): String {
        val var10000 = getCode()
        return "R(code=" + var10000 + ", msg=" + getMsg() + ", data=" + getData() + ")"
    }

    constructor() {}
    constructor(code: Int, msg: String?, data: T) {
        this.code = code
        this.msg = msg
        this.data = data
    }

    fun getCode(): Int {
        return this.code
    }

    fun setCode(code: Int): R<T> {
        this.code = code
        return this
    }

    fun getMsg(): String? {
        return msg
    }

    fun setMsg(msg: String?): R<T> {
        this.msg = msg
        return this
    }

    fun getData(): T? {
        return data
    }

    fun setData(data: T): R<T> {
        this.data = data
        return this
    }

    companion object {
        private const val serialVersionUID = 1L

        fun <T> ok(data: T): R<T?> {
            return restResult(data, 200, null as String?)
        }

        fun <T> ok(data: T, msg: String?): R<T?> {
            return restResult(data, 200, msg)
        }

        fun <T> failed(data: T): R<T?> {
            return restResult(data, 400, null as String?)
        }

        fun <T> failed(data: T, msg: String?): R<T?> {
            return restResult(data, 400, msg)
        }


        private fun <T> restResult(data: T, code: Int, msg: String?): R<T?> {
            val apiResult: R<T?> = R<T?>()
            apiResult.setCode(code)
            apiResult.setData(data)
            apiResult.setMsg(msg)
            return apiResult
        }
    }
}
dao层,简单的CRUD操作
import com.demo.service.StudentService
import com.demo.util.R
import org.jooq.DSLContext
import org.jooq.generated.Tables.STUDENT
import org.jooq.generated.tables.pojos.Student
import org.springframework.beans.factory.annotation.Autowired
import org.springframework.stereotype.Service


@Service
class StudentServiceImpl : StudentService {

    @Autowired
    lateinit var dslContext: DSLContext

    override fun getOne(id: Int): R<*> {
        println("开始查询")
        val student = dslContext!!
                .select()
                .from(STUDENT)
                .where(STUDENT.ID.eq(id))
                .fetchOne()?.into(Student::class.java)
        return R.ok(student,"成功")
    }

    override fun deleteOne(student: Student): R<*> {
        println("开始删除")
        var line = dslContext
                .delete(STUDENT)
                .where(STUDENT.ID.eq(student.id))
                .execute()
        return R.ok(line,"删除成功")
    }

    override fun insertOne(student: Student): R<*> {
        println("开始添加")
        var line = dslContext
                .insertInto(STUDENT)
                .set(STUDENT.ID,student.id)
                .set(STUDENT.NAME,student.name)
                .set(STUDENT.AGE,student.age)
                .execute()
        return R.ok(line,"插入成功")
    }

    override fun updateOne(student: Student): R<*> {
        println("开始更新")
        var line = dslContext
                .update(STUDENT)
                .set(STUDENT.NAME,student.name)
                .set(STUDENT.AGE,student.age)
                .where(STUDENT.ID.eq(student.id))
                .execute()
        return R.ok(line,"更新成功")
    }

    override fun getAll(): R<*> {
        println("查询所有")
        val studentMap: Map<Int, Student> = dslContext.select().from(STUDENT)
                .fetchMap(STUDENT.ID, Student::class.java)
        return R.ok(studentMap,"返回所有")
    }
}


 6969
6969


 被折叠的 条评论
为什么被折叠?
被折叠的 条评论
为什么被折叠?
 到【灌水乐园】发言


