


1.什么是MVC?
	MVC是模型(Model) 视图(View) 控制器(Controller) 的简写,是一种软件设计规范
	是将业务逻辑,数据。显示分离的方法来组织代码。
	作用:mvc降低了视图和业务逻辑间的双向耦合
		mvc不是一种设计模式,mvc是一种架构模式,不同的mvc存在不同的差异
Model模型:业务逻辑和保存数据的状态
View视图:主要进行模型展示,显示页面
Controller控制层:获取表单数据,调用业务逻辑,转向指定的页面
最经典的mvc就是jsp+servlet+javabean的模型
2.什么是springMVC?
特点:轻量级,高效,给予请求响应的mvc框架,与Spring兼容好,约定优于配置
Spring的web框架围绕DispatcherServlet设计,中心控制器,DispatecherServlet的作用是将请求分发到不同的处理器。
SpringMvc框架像许多其他的MVC架构,以**请求为驱动**,围绕着一个中心Servlet 分派请求及提供其他功能,它继承自Servlet类
3.第一个SpringMvc使用注解开发
1.创建一个meavn项目添加web依赖
2.导入依赖 pom.xml
<dependencies>
        <dependency>
            <groupId>org.springframework</groupId>
            <artifactId>spring-webmvc</artifactId>
            <version>5.2.0.RELEASE</version>
        </dependency>
        <dependency>
            <groupId>javax.servlet.jsp</groupId>
            <artifactId>jsp-api</artifactId>
            <version>2.1</version>
        </dependency>
        <dependency>
            <groupId>javax.servlet</groupId>
            <artifactId>javax.servlet-api</artifactId>
            <version>3.1.0</version>
        </dependency>
        <dependency>
            <groupId>jstl</groupId>
            <artifactId>jstl</artifactId>
            <version>1.2</version>
        </dependency>
        <dependency>
            <groupId>org.projectlombok</groupId>
            <artifactId>lombok</artifactId>
            <version>1.18.10</version>
        </dependency>


        <dependency>
            <groupId>com.fasterxml.jackson.core</groupId>
            <artifactId>jackson-databind</artifactId>
            <version>2.10.1</version>
        </dependency>

        <!-- https://mvnrepository.com/artifact/com.alibaba/fastjson -->
        <dependency>
            <groupId>com.alibaba</groupId>
            <artifactId>fastjson</artifactId>
            <version>1.2.62</version>
        </dependency>

    </dependencies>


    <!--由于Maven可能存在资源过滤的问题,我们将配置完善-->
    <build>
        <resources>
            <resource>
                <directory>src/main/java</directory>
                <includes>
                    <include>**/*.properties</include>
                    <include>**/*.xml</include>
                </includes>
                <filtering>false</filtering>
            </resource>
            <resource>
                <directory>src/main/resources</directory>
                <includes>
                    <include>**/*.properties</include>
                    <include>**/*.xml</include>
                </includes>
                <filtering>false</filtering>
            </resource>
        </resources>
    </build>
3.编写web.xml配置文件
<?xml version="1.0" encoding="UTF-8"?>
<web-app xmlns="http://xmlns.jcp.org/xml/ns/javaee"
         xmlns:xsi="http://www.w3.org/2001/XMLSchema-instance"
         xsi:schemaLocation="http://xmlns.jcp.org/xml/ns/javaee http://xmlns.jcp.org/xml/ns/javaee/web-app_4_0.xsd"
         version="4.0">

    <!--配置DispatcherServlet  这个是Spring的核心,请求分发器,前端控制时间 -->
    <servlet>
        <servlet-name>DispatcherServlet</servlet-name>
        <servlet-class>org.springframework.web.servlet.DispatcherServlet</servlet-class>
        <!--关联SpringMVC的配置文件-->
        <!--init-param 初始化参数-->
        <init-param>
            <!--参数名  上下文配置的位置      -->
            <param-name>contextConfigLocation</param-name>
            <param-value>classpath:SpringMVC-Servlet.xml</param-value>
        </init-param>
        <!--服务启动的时候就启动-->
        <load-on-startup>1</load-on-startup>
    </servlet>

    <!--
    /   注册Servlet的映射
    /   匹配所有的请求布包扣。jsp
    /*  匹配所有的请求,包括。jsp
    -->
    <servlet-mapping>
        <servlet-name>DispatcherServlet</servlet-name>
        <url-pattern>/</url-pattern>
    </servlet-mapping>


    <!--SpringMVC提供的乱码过滤器-->
    <filter>
        <filter-name>CharacterEncodingFilter</filter-name>
        <filter-class>org.springframework.web.filter.CharacterEncodingFilter</filter-class>
        <init-param>
            <param-name>encoding</param-name>
            <param-value>utf-8</param-value>
        </init-param>
        <!--
        /  代表过滤所有的请求不包括jsp
        /*  代表过滤所有的请求包括jsp
        -->
    </filter>
    <filter-mapping>
        <filter-name>CharacterEncodingFilter</filter-name>
        <url-pattern>/*</url-pattern>
    </filter-mapping>
</web-app>
4.编写SpringMVC-servlet.xml配置文件
<?xml version="1.0" encoding="UTF-8"?>
<beans xmlns="http://www.springframework.org/schema/beans"
       xmlns:context="http://www.springframework.org/schema/context"
       xmlns:mvc="http://www.springframework.org/schema/mvc"
       xmlns:xsi="http://www.w3.org/2001/XMLSchema-instance"
       xsi:schemaLocation="http://www.springframework.org/schema/beans
        https://www.springframework.org/schema/beans/spring-beans.xsd
        http://www.springframework.org/schema/context
        https://www.springframework.org/schema/context/spring-context.xsd
        http://www.springframework.org/schema/mvc
        https://www.springframework.org/schema/mvc/spring-mvc.xsd">
                    <!--固定配置-->
    <!--开启注解-->
    <mvc:annotation-driven/>

    <!--扫描包-->
    <context:component-scan base-package="com.heng.controller"/>
    <context:component-scan base-package="com.heng.filter"/>

    <!--在web开发中,我们一般存在静态资源css,js, img。。。不希望被直接访问   所有开启静态资源过滤器-->
    <mvc:default-servlet-handler/>

    <!--视图解析器  默认id="internalResourceViewResolver" (不要随意更改)-->
    <bean id="internalResourceViewResolver" class="org.springframework.web.servlet.view.InternalResourceViewResolver">
        <!--前缀-->
        <property name="prefix" value="/WEB-INF/views/"/>
        <!--后缀-->
        <property name="suffix" value=".jsp"/>

    </bean>
</beans>
到此为止springMvc配置完成,现在可以安心的去写业务逻辑
5.业务逻辑controller
@Controller   //是为了让Spring IOC容器初始化时自动扫描到
//@RestController
@RequestMapping("user") //是为了映射请求路径,这里因为类与方法上都有映射所以访问时应该是 user/hello
public class HelloCOntroller {
    @RequestMapping("/hello") //请求映射
    //方法中声明Model类型的参数是为了把Action中的数据带到视图中
    public String hello(Model model){
        //我们要传的参数
        model.addAttribute("msg","Hello,SpringMVC");
        //后台输出
        System.out.println("15613");
        return "hello";
    }
    @RequestMapping("/hello1")
    public String hello1(Model model){
        //我们要传的参数
        model.addAttribute("msg","Hello,SpringMVC1");
        System.out.println("15613");
//        重定向
        return "redirect:/index.jsp";
    }
    @RequestMapping("/hello2")
    public String hello2(Model model){
        //我们要传的参数
        model.addAttribute("msg","Hello,SpringMVC2");
        System.out.println("15613");
        return "hello";
    }
    @RequestMapping("/hello3")
    public String hello3(Model model){
        //我们要传的参数
        model.addAttribute("msg","Hello,SpringMVC3");
        System.out.println("15613");
        return "hello";
    }

    //处理前段请求的数据
    //普通字符串  http://localhost:8080/user/love?name=旺财&password=156313
    @RequestMapping("/love")
    public String love( String name, String password , Model model){
        System.out.println("接收到了name"+name+ "密码0"+password);
        String str="name"+name+"pwd"+password;
        model.addAttribute("msg" ,str);
        return "hello";
    }
}
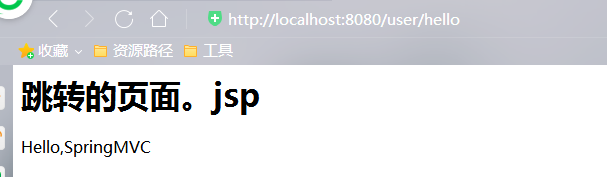
测试结果
http://localhost:8080/user/hello
http://localhost:8080/user/hello1 重定向跳转url会改变

http://localhost:8080/user/hello2

http://localhost:8080/user/hello3

http://localhost:8080/user/love?name=旺财&password=156313 普通携带参数传入


6.编写jsp页面index.jsp
<%@ page contentType="text/html;charset=UTF-8" language="java" %>
<html>
  <head>
    <title>$Title$</title>
  </head>
  <body>
  <form action="/login" method="post">
    <p>用户名:<input type="text" name="name"> </p>
    <p>密码:<input type="password" name="password"> </p>
    <input type="submit">
  </form>
  </body>
</html>
hello.jsp
<%@ page contentType="text/html;charset=UTF-8" language="java" %>
<html>
<head>
    <title>Hello</title>
</head>
<body>
<h1>跳转的页面。jsp</h1>
${msg}
</body>
</html>
7.编写实体类,(前端传入的是一个对象)
@Data
@AllArgsConstructor
@NoArgsConstructor
public class User {
    private int id;
    private String name;
    private String pwd;
}
8.业务逻辑 通过表单提交数据
@Controller
public class LoginController {
    @RequestMapping("/login")
    public String login(String name, String password, Model model) {
        System.out.println("接收到了name" + name + "密码0" + password);
        String str = "name" + name + "pwd" + password;
        model.addAttribute("msg", str);
        return "hello";

    }


    //@RequestParam 接收前端的参数名 如果加了@RequestParam必须传对应参数否着400
    @RequestMapping("/login3")
    public String login3(@RequestParam("username") String name, String password, Model model) {
        System.out.println("接收到了name" + name + "密码0" + password);
        String str = "name" + name + "pwd" + password;
        model.addAttribute("msg", str);
        return "hello";}

    //比如说我们接受一个user对象
    //我们只要保证,前端传递非参数名和我们对象的属性一致
    //locahost:8080/login2?id=1&name=网擦爱&pwd=1635
    //如果参数比较多,通常会封装一些对象
    @RequestMapping("/login2")
    public String login2(User user, Model model){
        System.out.println(user.getName());
        System.out.println(user.getPwd());
        model.addAttribute("msg",user.getId());
        return "hello";

    }

    }
初始加载页面为index。xml表单提交

提交结果后台接收并输出

全端数据类型和业务数据类型不一致必须加@RequestParam(“name”)


user对象传参


 1300
1300


 被折叠的 条评论
为什么被折叠?
被折叠的 条评论
为什么被折叠?
 到【灌水乐园】发言


