


1.什么是SpringBoot?
在spring的基础上,简化spring的的配置文件,以前spring需要配置很多东西,现在springboot出来以后,会自动配置,spring+jsp 是原生开发,springboot是升级版。
2.第一个SpringBoot程序
使用idea创建一路回车走默认项,创建完毕

勾选启动器(spring web),相当于自动配置好了Spring和springmvc 包括tomcat

创建完毕直接运行完成结果

新建一个controller包,编写测试类
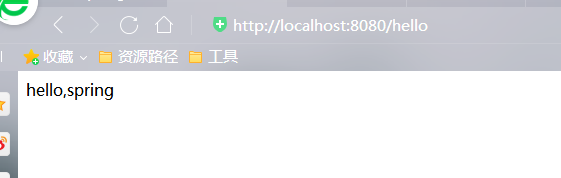
@RestController
public class hellocontroller {
    @RequestMapping("/hello")
    public String hello(){
        return "hello,spring";
    }
}

http://localhost:8080/hello 请求
3.自定义logo 只需要编写一个banner.txt文件把logo放进去就好了,个性化
可以在线网站自动生成 https://www.bootschool.net/ascii

4.SpringBoot的原理
新建一个springboot的项目中都会有一个主启动类
类里只有一个注解:@SpringBootApplication
一个方法:SpringApplication
@SpringBootApplication//标注了它就代表是springbootd 应用
public class DemoSpringBootApplication {

    //开启了一个服务,只需要启动一个主启动类
    public static void main(String[] args) {
        //spring 的启动类,通过run方法集体执行
        SpringApplication.run(DemoSpringBootApplication.class, args);
    }

}
5.编写一个启动类,可以把一个自己的类变成主启动类
1.在类上面增加一个注解@SpringBootApplication
2.使用SpringApplication的run方法启动,参数为当前类的自身
@SpringBootApplication//标注了它就代表是springbootd 应用
public class hengApplication {
    //开启了一个服务,只需要启动一个主启动类
    public static void main(String[] args) {
        //spring 的启动类,通过run方法集体执行
        SpringApplication.run(hengApplication.class,args);
    }
}
在编写主启动类是可遇到的问题,清理一下缓存重试

6.依赖自动管理
导入依赖是不在需要版本号只要在伏以来有
    <!--父依赖 spring-boot-starter-xxx 启动类
    spring-boot-starter-parent父依赖做了什么事
    				1.自动管理所有的依赖,需要的依赖不再需要手动配置
                    2. 插件和资源过滤自动管理
                     -->
    <parent>
        <groupId>org.springframework.boot</groupId>
        <artifactId>spring-boot-starter-parent</artifactId>
        <version>2.2.5.RELEASE</version>
        <relativePath/> <!-- lookup parent from repository -->
    </parent>
7.SpringBoot配置文件
所有的配置都可以在配置文件中
application.properties 是我们传统的配置文件 key=value
.yaml 是springBoot推荐度配置文件,功能更加强大
yaml所有的语法(空格严格要求,缩进严格要求):
  #  注释普通键值对
	key: value
	name: 衡
  # map/ 对象
  key:
   k1:
   k2:
  #例子
  person:
  name: wangcai
  age: 3
  # 行类写法
  person: {name: wangcai,age: 3}
  #list/数值
  pets:
   - dog
   - pig
   - cat
  #行内写法
  pets:{dog,pig,cat}
8.SpringBoot整合MyBatis
- 导入mybatis依赖,mybatis所有的的包都是自己的:数据访问层
   <!--这是自定义的包mybatis-->
        <dependency>
            <groupId>org.mybatis.spring.boot</groupId>
            <artifactId>mybatis-spring-boot-starter</artifactId>
            <version>2.1.1</version>
        </dependency>
        <!--mysql 驱动-->
        <dependency>
            <groupId>mysql</groupId>
            <artifactId>mysql-connector-java</artifactId>
        </dependency>
        <!--这里编写依赖不需要版本号-->
        <dependency>
            <groupId>org.projectlombok</groupId>
            <artifactId>lombok</artifactId>
        </dependency>
           <!-- 如果发现配置文件没有导出,只需要配置资源过滤即可 -->
        <resources>
            <resource>
                <filtering>true</filtering>
                <directory>src/main/java</directory>
                <includes>
                    <include>**/*.xml</include>
                </includes>
            </resource>
        </resources>
    </build>
- 编写配置文件 .yaml(springboot推荐使用) 或者 .porperties(过去使用的) 文件格式都可以 二者可以共存配置不能重复
# 在这里也可以编写一些SpringBoot的配置  这是过去时常用的
# 更改tomcat 端口号
server.port=9090
# 集成mbtis也可以在这路配置

spring.datasource.username=root
spring.datasource.password=123456
spring.datasource.url=jdbc:mysql://localhost:3306/mybatis?serverTimezone=UTC&userUnicode=true&characterEncoding=utf8
spring.datasource.driver-class-name=com.mysql.jdbc.Driver

# mysql 5 com.mysql.jdbc.Driver
# mysql 8 com.mysql.cj.jdbc.Driver 必须要在url连接中编写时区serverTimezone
spring:
  datasource:
  username: root
  password: 123456
  url: jdbc:mysql://localhost:3306/mybatis?serverTimezone=UTC&userUnicode=true&characterEncoding=utf8
  driver-class-name: com.mysql.jdbc.Driver
- 测试数据源有没有,配置成功,在测试类中测试即可 springboot目前默认使用hikari数据源
@SpringBootTest
class DemoSpringBootApplicationTests {
    @Autowired //自动导入
    private DataSource dataSource;//DataSource数据源
    //springboot 默认的数据源hikari
    @Test
    void contextLoads() throws SQLException {
        //查看默认数据源 class com.zaxxer.hikari.HikariDataSource
        System.out.println(dataSource.getClass());
        //获取连接connection
        Connection connection = dataSource.getConnection();
        //查看连接HikariProxyConnection@400385823 wrapping com.mysql.cj.jdbc.ConnectionImpl@3bbf6abe
        System.out.println(connection);
        //关闭连接
        connection.close();
    }
}
9.测试连接数据库查询数据库中的信息
1.编写实体类pojo
@Data
public class User {
    private int id;
    private String name;
    private String pwd;
}
2.编写接口
@Mapper //可以被mapper识别
@Repository //代表持久层被spring接管
public interface UserMapper {
//@Select("select * from mybatis.user")
List<User> getUserLists();
}
3.编写接口的xml文件
<?xml version="1.0" encoding="UTF-8" ?>
<!DOCTYPE mapper
        PUBLIC "-//mybatis.org//DTD Mapper 3.0//EN"
        "http://mybatis.org/dtd/mybatis-3-mapper.dtd">

<mapper namespace="com.hen.mapper.UserMapper">
    <select id="getUserLists" resultType="User">
       select * from user;
   </select>
</mapper>
4.配置文件注册到yaml文件中
    # 配置别名
mybatis:
  type-aliases-package: com.hen.pojo
  mapper-locations: classpath:com/hen/mapper/*.xml
5.controller测试
@RestController
public class MybatisController {
    @Autowired
    private UserMapper userMapper;

    @RequestMapping("/list")
    public List<User> getUserList(){
        List<User> userLists = userMapper.getUserLists();
        return userLists;
    }
}
测试结果:

10.Spring开发web应用
1.新建一个SpringBoot项目
2.首页定制
在我们的静态资源目录下,新建一个index.xml文件
在存放资源resources目录下查看原码得知,可以在这个目录下建立4个包
static 静态资源
templates 页面 temliates只能通过controller进行访问跳转
reources 也可以存放资源文件
public SpringBoot原码中找到的,静态资源公共的可以放在这里
3.Thymeleaf(模板引擎)只有tenplates的目录下的前端页面需要模板引擎
 <!--thymeleaf 依赖 如果编写页面一定需要导入这个依赖-->
        <!-- https://mvnrepository.com/artifact/org.springframework.boot/spring-boot-starter-thymeleaf -->
        <dependency>
            <groupId>org.springframework.boot</groupId>
            <artifactId>spring-boot-starter-thymeleaf</artifactId>
        </dependency>
编写页面,导入模板引擎进行测试
@Controller  //添加注解让这个类可以被视图器解析
public class indexController {
    //访问了/ 就会跳转到templates目录下的index页面
    //springboot 要是用默认的模板引擎thymeleaf 一定需要导入其对应依赖
    @RequestMapping("/")
    public  String index(){
        return "index";
    }
    @RequestMapping("/hello")
    public  String index2(){
        return "/user/hello";
    }
    @RequestMapping("/list")
    public  String index3(){
        return "/user/list";
    }
}

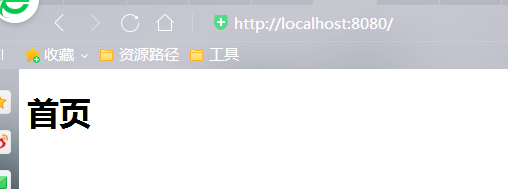
编写的首页index.html放入tenplates
<!DOCTYPE html>
<html lang="en">
<head>
    <meta charset="UTF-8">
    <title>Title</title>
</head>
<body>
<h1>首页</h1>
</body>
</html>
url进行访问
4.页面传值
**方式一:**普通传值
1.在后端方法中使用Model传递值(普通取值)
   @RequestMapping("/")
    public  String index(Model model){
        model.addAttribute("msg","hellospringboot");
        return "index";
    }
2.在前端使用th:xxx去接收后端传递进来的值,注意一定要导入头文件()
<!DOCTYPE html>
<html lang="en" xmlns:th="http://www.thymeleaf.org">
<head>
    <meta charset="UTF-8">
    <title>Title</title>
</head>
<body>

<h1>首页</h1>
<p th:text="${msg}"></p>
</body>
</html>
thymeleaf 语法值的传递使用:

测试结果:

可以传递复杂的值,集合或者数组
方式二:数组和集合可以传递中文
1.在后端方法中使用Model传递值
    @RequestMapping("/")
    public  String index(Model model){
        //普通传值
        model.addAttribute("msg","hellospringboot");
        //传一个数据
        model.addAttribute("users", Arrays.asList("wangcai","laifu","wangwwang"));
        return "index";
    }
2.在前端使用th:xxx去接收后端传递进来的值,注意一定要导入头文件()
<!DOCTYPE html>
<html lang="en" xmlns:th="http://www.thymeleaf.org">
<head>
    <meta charset="UTF-8">
    <title>Title</title>
</head>
<body>
<h1>首页</h1>
<!--普通取值-->
<p th:text="${msg}"></p>

<!--循环遍历 接收后端传递的users,遍历每个的结果就是user,可以在这个标签内使用
th:each="item:${items}"
-->
<h1 th:each="user:${users}" th:text="${user}"></h1>

<!--行内写法-->
<h1 th:each="user:${users}">[[ ${user}]]</h1>

<div th:each="user:${users}">
    <p th:text="${user}"></p>
</div>
</body>
</html>
测试结果:


 1242
1242


 被折叠的 条评论
为什么被折叠?
被折叠的 条评论
为什么被折叠?
 到【灌水乐园】发言


