


一、背景
2022-09-20,JDK 19 发布了 GA 版本,备受瞩目的协程功能也算尘埃落地,不过,此次 GA 版本并不没有以协程来命名,而是使用了 VirtualThread(虚拟线程),并且还是 preview 预览版本。小编最早关注到协程功能是在 2020 年,那时孵化项目叫做 Java project Loom,使用的是 Fiber(直译为:纤维,意译为:轻量级线程,即协程),但是 GA 版本为何最终被定义为 Virtual Thread(虚拟线程),原因不得而知。
GA: General Availability,正式发布的版本,在国外通常用 GA 来指代 release 版本;
二、为什么需要虚拟线程
既然 Java 官方推出一个和线程这么相近的概念,必定是要解决线程的某些问题,因此,我们先回顾下线程的一些特点:
- Java 中的线程是对操作系统线程的一个简单包装,线程的创建,调度和销毁等都是由操作系统完成;
- Java线程和系统线程是一一对应的关系;
- 线程切换需要消耗 CPU 时间,这部分时间是与业务无关的;
- 线程的性能直接受操作系统处理能力的影响;
因此,通过线程的特点可以发现线程是一种重量级的资源,作为 Java 程序员应该深有体会。所以,为了更好的管理线程,Java 采用了池化(线程池)的方式进行管理线程,避免线程频繁创建和销毁带来的开销。尽管线程池避免了线程大部分创建和销毁的开销,但是线程的调度还是直接受操作系统的影响,那么有没有更好的方式来打破这种限制呢?因此,虚拟线程就孕育而生。
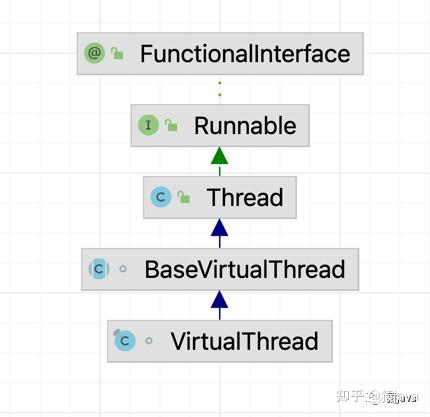
在 JDK 19 源码中,官方直接在 java.lang 包下新增一个 VirtualThread 类来表示虚拟线程,和现有的 Thread类并驾齐驱,为了更好的区分虚拟线程和原有Thread 线程,官方又给 Thread 类赋予了一个高大上的名字:平台线程。
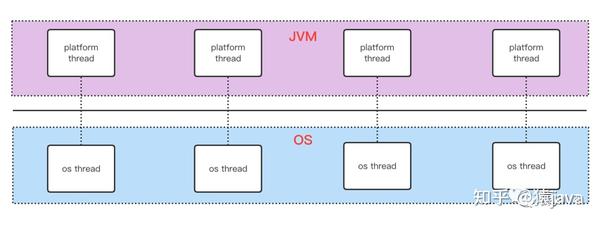
下面给出了 JDK 19 中虚拟线程的 Diagram 截图以及平台线程和系统线程的关系图:


三、如何创建虚拟线程
对于虚拟线程的创建,官方给出了4种常见的方式,依次如下:
3.1、通过Thread.startVirtualThread()创建
通过 Thread.startVirtualThread()可以创建一个新的并且已启动的虚拟线程,该方法等价于 Thread.ofVirtual().start(task),示例代码如下:
public class VirtualThreadTest {

  public static void main(String[] args) {
    CustomThread customThread = new CustomThread();
    // 创建并且启动虚拟线程
    Thread.startVirtualThread(customThread);
  }
}

class CustomThread implements Runnable {
  @Override
  public void run() {
    System.out.println("CustomThread run");
  }
}
3.2、通过Thread.ofVirtual()创建
通过 Thread.ofVirtual().unstarted()方式可以创建一个新的未启动的虚拟线程,然后通过 Thread.start()来启动线程,也可以通过 Thread.ofVirtual().start()直接创建一个新的并已启动的虚拟线程,示例代码如下:
public class VirtualThreadTest {
  public static void main(String[] args) {
    CustomThread customThread = new CustomThread();
    // 创建并且不启动虚拟线程,然后 unStarted.start()方法启动虚拟线程
    Thread unStarted = Thread.ofVirtual().unstarted(customThread);
    unStarted.start();
    // 等同于
    Thread.ofVirtual().start(customThread);
  }
}
class CustomThread implements Runnable {
  @Override
  public void run() {
    System.out.println("CustomThread run");
  }
}
3.3、通过ThreadFactory创建
通过 ThreadFactory.newThread()方式就能创建一个虚拟线程,然后通过 Thread.start()来启动线程,示例代码如下:
public class VirtualThreadTest {
  public static void main(String[] args) {
    CustomThread customThread = new CustomThread();
    // 获取线程工厂类
    ThreadFactory factory = Thread.ofVirtual().factory();
    // 创建虚拟线程
    Thread thread = factory.newThread(customThread);
    // 启动线程
    thread.start();
  }
}

class CustomThread implements Runnable {
  @Override
  public void run() {
    System.out.println("CustomThread run");
  }
}
3.4、通过Executors.newVirtualThreadPerTaskExecutor()创建
通过 JDK 自带的 Executors 工具类方式创建一个虚拟线程,然后通过 executor.submit()来启动线程,示例代码如下:
public class VirtualThreadTest {
  public static void main(String[] args) {
    CustomThread customThread = new CustomThread();
    ExecutorService executor = Executors.newVirtualThreadPerTaskExecutor();
    executor.submit(customThread);
  }
}
class CustomThread implements Runnable {
  @Override
  public void run() {
    System.out.println("CustomThread run");
  }
}
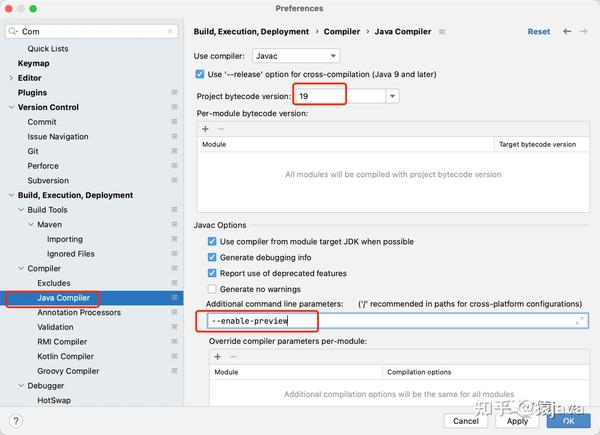
通过上述列举的 4 种创建虚拟线程的方式可以看出,官方为了降低虚拟线程的门槛,尽力复用原有的 Thread 线程类,这样可以平滑的过渡到虚拟线程的使用。不过,在 Java 19 中,虚拟线程还是一个预览功能,默认是关闭,需要使用参数 --enable-preview 来启用该功能,启动指令如下:
# 开启虚拟线程功能
java --source 19 --enable-preview XXX.java
同时,我们也可以通过源码来佐证该功能是关闭状态以及何如开启:
// Thread 源码,通过 @PreviewFeature 注解来标注 虚拟线程为 预览功能
public class Thread implements Runnable {
  /**
   * Creates a virtual thread to execute a task and schedules it to execute.
   This method is equivalent to: Thread.ofVirtual().start(task);
   Params: task – the object to run when the thread executes
   Returns: a new, and started, virtual thread
   Throws: UnsupportedOperationException – if preview features are not enabled
   Since: 19 See Also: Inheritance when creating threads
   * @param task
   * @return
   */
  @PreviewFeature(feature = PreviewFeature.Feature.VIRTUAL_THREADS)
  public static Thread startVirtualThread(Runnable task) {
    Objects.requireNonNull(task);
    // 判断是否开启虚拟线程功能
    PreviewFeatures.ensureEnabled();
    var thread = ThreadBuilders.newVirtualThread(null, null, 0, task);
    thread.start();
    return thread;
  }

  // 如果未开启 可以通过 --enable-preview 开启虚拟线程功能
  public static void ensureEnabled() {
    if (!isEnabled()) {
      throw new UnsupportedOperationException(
        "Preview Features not enabled, need to run with --enable-preview");
    }
  }
}
IDEA 工具中可视化配置 --enable-preview ,如下图:
为了更好的感受虚拟线程的性能,我们模拟一个对比测试用例:分别使用虚拟线程和线程池执行 10w 个任务,每个线程任务睡眠 10ms(模拟业务处理时间为10ms),然后,统计各自的总耗时以及创建的最大平台线程总数,示例代码如下:
// 虚拟线程
public class VirtualThreadTest {
static List<Integer> list = new ArrayList<>();
public static void main(String[] args) {
  // 开启一个线程来监控当前的平台线程(系统线程)总数
  ScheduledExecutorService scheduledExecutorService = Executors.newScheduledThreadPool(1);
  scheduledExecutorService.scheduleAtFixedRate(() -> {
    ThreadMXBean threadBean = ManagementFactory.getThreadMXBean();
    ThreadInfo[] threadInfo = threadBean.dumpAllThreads(false, false);
    saveMaxThreadNum(threadInfo.length);
  }, 10, 10, TimeUnit.MILLISECONDS);

  long start = System.currentTimeMillis();
  ExecutorService executor = Executors.newVirtualThreadPerTaskExecutor();
  for (int i = 0; i < 10000; i++) {
    executor.submit(() -> {
      // 线程睡眠 10ms,可以等同于模拟业务耗时10ms
      try {
        TimeUnit.MILLISECONDS.sleep(10);
      } catch (InterruptedException e) {
      }
    });
  }
  executor.close();
  System.out.println("max:" + list.get(0) + " platform thread/os thread");
  System.out.printf("totalMillis:%dms\n", System.currentTimeMillis() - start);
}
}

public class ThreadTest {
  static List<Integer> list = new ArrayList<>();
  public static void main(String[] args) {
    // 开启一个线程来监控当前的平台线程(系统线程)总数
      ScheduledExecutorService scheduledExecutorService = Executors.newScheduledThreadPool(1);
      scheduledExecutorService.scheduleAtFixedRate(() -> {
          ThreadMXBean threadBean = ManagementFactory.getThreadMXBean();
          ThreadInfo[] threadInfo = threadBean.dumpAllThreads(false, false);
          saveMaxThreadNum(threadInfo.length);
      }, 1, 1, TimeUnit.SECONDS);

      long start = System.currentTimeMillis();
      ExecutorService executor = Executors.newFixedThreadPool(200);
      for (int i = 0; i < 100000; i++) {
          executor.submit(() -> {
              try {
                  // 线程睡眠 10ms,可以等同于模拟业务耗时10ms
                  TimeUnit.MILLISECONDS.sleep(10);
              } catch (InterruptedException e) {
              }
          });
      }
      executor.close();
      System.out.println("max:" + list.get(0) + " platform thread/os thread");
      System.out.printf("totalMillis:%dms\n", System.currentTimeMillis() - start);
  }
}

// 保存平台线程的创建的最大总数
public static List<Integer> saveMaxThreadNum(int num) {
  if (list.isEmpty()) {
    list.add(num);
  } else {
    Integer integer = list.get(0);
    if (num > integer) {
      list.add(0, num);
    }
  }
  return list;
}
两个示例代码的运行结果如下图:
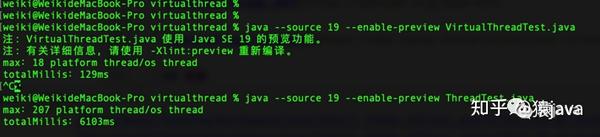
通过运行结果可以发现:
- 使用虚拟线程执行 10w 个任务总耗时为:129ms,最大创建了 18 个平台线程;
- 使用线程池执行 10w 个任务总耗时为:6103 ms,最大创建了 207 个平台线程;
- 两种方式总耗时差 50 倍,最大创建的平台线程总数差 10 倍,因此虚拟线程的性能确实提升不少;
四、核心源码解析
首先,从今天的主角 VirtualThread 类开始,其部分源码如下:
/**
 * A thread that is scheduled by the Java virtual machine rather than the operating system.
 */
final class VirtualThread extends BaseVirtualThread {
  /**
   * Creates a new {@code VirtualThread} to run the given task with the given
   * scheduler. If the given scheduler is {@code null} and the current thread
   * is a platform thread then the newly created virtual thread will use the
   * default scheduler. If given scheduler is {@code null} and the current
   * thread is a virtual thread then the current thread's scheduler is used.
   *
   * @param scheduler the scheduler or null
   * @param name thread name
   * @param characteristics characteristics
   * @param task the task to execute
   */
  VirtualThread(Executor scheduler, String name, int characteristics, Runnable task) {
    super(name, characteristics, /*bound*/ false);
    Objects.requireNonNull(task);
    // choose scheduler if not specified
    if (scheduler == null) {
      Thread parent = Thread.currentThread();
      if (parent instanceof VirtualThread vparent) {
        scheduler = vparent.scheduler;
      } else {
        scheduler = DEFAULT_SCHEDULER;
      }
    }
    this.scheduler = scheduler;
    this.cont = new VThreadContinuation(this, task);
    this.runContinuation = this::runContinuation;
  }

  /**
   * 创建默认的调度器
   * Creates the default scheduler.
   */
  @SuppressWarnings("removal")
  private static ForkJoinPool createDefaultScheduler() {
    ForkJoinWorkerThreadFactory factory = pool -> {
      PrivilegedAction<ForkJoinWorkerThread> pa = () -> new CarrierThread(pool);
      return AccessController.doPrivileged(pa);
    };
    PrivilegedAction<ForkJoinPool> pa = () -> {
      int parallelism, maxPoolSize, minRunnable;
      String parallelismValue = System.getProperty("jdk.virtualThreadScheduler.parallelism");
      String maxPoolSizeValue = System.getProperty("jdk.virtualThreadScheduler.maxPoolSize");
      String minRunnableValue = System.getProperty("jdk.virtualThreadScheduler.minRunnable");
      if (parallelismValue != null) {
        parallelism = Integer.parseInt(parallelismValue);
      } else {
        parallelism = Runtime.getRuntime().availableProcessors();
      }
      if (maxPoolSizeValue != null) {
        maxPoolSize = Integer.parseInt(maxPoolSizeValue);
        parallelism = Integer.min(parallelism, maxPoolSize);
      } else {
        maxPoolSize = Integer.max(parallelism, 256);
      }
      if (minRunnableValue != null) {
        minRunnable = Integer.parseInt(minRunnableValue);
      } else {
        minRunnable = Integer.max(parallelism / 2, 1);
      }
      Thread.UncaughtExceptionHandler handler = (t, e) -> { };
      boolean asyncMode = true; // FIFO
      return new ForkJoinPool(parallelism, factory, handler, asyncMode,
        0, maxPoolSize, minRunnable, pool -> true, 30, SECONDS);
    };
    return AccessController.doPrivileged(pa);
  }
}
通过 VirtualThread 类的源码可以总结出:
- VirtualThread 继承 BaseVirtualThread 类,BaseVirtualThread 类继承 Thread 类;
- 虚拟线程是 JVM 进行调度的,而不是操作系统;
- VirtualThread 类是一个终态类,因此该类无法被继承,无法被扩展;
在VirtualThread 类,只提供了一个构造器,接收 4 个参数,参数说明如下:
- Executor scheduler:线程调度器,如果给定的调度器为空并且当前线程是平台线程,那么新创建的虚拟线程将使用默认调度程序(底层采用 ForkJoinPool),如果给定的调度器为空并且当前线程是虚拟线程,则使用当前线程的调度程序
- String name:自定义线程名
- int characteristics:线程特征值
- Runnable task:需要执行的任务
接着我们分析 JDK 中创建虚拟线程的源码:
public class Thread implements Runnable {
  /**
   * Creates a virtual thread to execute a task and schedules it to execute.
   This method is equivalent to: Thread.ofVirtual().start(task);
   Params: task – the object to run when the thread executes
   Returns: a new, and started, virtual thread
   Throws: UnsupportedOperationException – if preview features are not enabled
   Since: 19
   See Also: Inheritance when creating threads
   * @param task
   * @return
   */
  @PreviewFeature(feature = PreviewFeature.Feature.VIRTUAL_THREADS)
  public static Thread startVirtualThread(Runnable task) {
    Objects.requireNonNull(task);
    // 判断是否开启虚拟线程功能
    PreviewFeatures.ensureEnabled();
    var thread = ThreadBuilders.newVirtualThread(null, null, 0, task);
    thread.start();
    return thread;
  }

  // 异常信息提醒 可以通过 --enable-preview 开启虚拟线程功能
  public static void ensureEnabled() {
    if (!isEnabled()) {
      throw new UnsupportedOperationException(
        "Preview Features not enabled, need to run with --enable-preview");
    }
  }
}

class ThreadBuilders {
    static Thread newVirtualThread(Executor scheduler,
                                   String name,
                                   int characteristics,
                                   Runnable task) {
        if (ContinuationSupport.isSupported()) {
            return new VirtualThread(scheduler, name, characteristics, task);
        } else {
            if (scheduler != null)
                throw new UnsupportedOperationException();
            return new BoundVirtualThread(name, characteristics, task);
        }
    }

  /**
   * Returns a builder for creating a virtual {@code Thread} or {@code ThreadFactory}
   * that creates virtual threads.
   *
   * @apiNote The following are examples using the builder:
   * {@snippet :
   *   // Start a virtual thread to run a task.
   *   Thread thread = Thread.ofVirtual().start(runnable);
   *
   *   // A ThreadFactory that creates virtual threads
   *   ThreadFactory factory = Thread.ofVirtual().factory();
   * }
   *
   * @return A builder for creating {@code Thread} or {@code ThreadFactory} objects.
   * @throws UnsupportedOperationException if preview features are not enabled
   * @since 19
   */
  @PreviewFeature(feature = PreviewFeature.Feature.VIRTUAL_THREADS)
  public static Builder.OfVirtual ofVirtual() {
    PreviewFeatures.ensureEnabled();
    return new ThreadBuilders.VirtualThreadBuilder();
  }
}
Thread.startVirtualThread()创建虚拟线程,会调用 ThreadBuilders.newVirtualThread(),最终调用 new VirtualThread()构造器来创建虚拟线程。
从上文我们介绍虚拟线程创建的 4 种方式也可以看出,虚拟线程创建的入口在 Thread 或者 Executors 类中,和以前使用线程或者线程池的习惯保持一致。
final class VirtualThread extends BaseVirtualThread {
    /**
     * Mounts this virtual thread onto the current platform thread. On
     * return, the current thread is the virtual thread.
     */
    @ChangesCurrentThread
    private void mount() {
        // sets the carrier thread
        Thread carrier = Thread.currentCarrierThread();
        setCarrierThread(carrier);

        // sync up carrier thread interrupt status if needed
        if (interrupted) {
            carrier.setInterrupt();
        } else if (carrier.isInterrupted()) {
            synchronized (interruptLock) {
                // need to recheck interrupt status
                if (!interrupted) {
                    carrier.clearInterrupt();
                }
            }
        }
        // set Thread.currentThread() to return this virtual thread
        carrier.setCurrentThread(this);
    }

  /**
   * Unmounts this virtual thread from the carrier. On return, the
   * current thread is the current platform thread.
   */
  @ChangesCurrentThread
  private void unmount() {
    // set Thread.currentThread() to return the platform thread
    Thread carrier = this.carrierThread;
    carrier.setCurrentThread(carrier);
    // break connection to carrier thread, synchronized with interrupt
    synchronized (interruptLock) {
      setCarrierThread(null);
    }
    carrier.clearInterrupt();
  }
}
mount() 和 unmount() 是虚拟线程两个核心方法:
- mount(),可以将此虚拟线程挂载到当前平台线程上,返回时,当前线程是虚拟线程;
- unmount(),从载体线程卸载此虚拟线程,返回时,当前线程是平台线程;
通过这两个方式可以看出虚拟线程是搭载在平台线程上运行,运行结束后,从平台线程上卸载。
五、虚拟线程的状态和转换
下表总结了虚拟线程中的所有线程状态以及状态之间转化的条件:
| 状态 | 转换条件 |
|---|---|
| NEW -> STARTED | Thread.start |
| STARTED -> TERMINATED | failed to start |
| STARTED -> RUNNING | first run |
| RUNNING -> PARKING | Thread attempts to park |
| PARKING -> PARKED | cont.yield successful, thread is parked |
| PARKING -> PINNED | cont.yield failed, thread is pinned |
| PARKED -> RUNNABLE | unpark or interrupted |
| PINNED -> RUNNABLE | unpark or interrupted |
| RUNNABLE -> RUNNING | continue execution |
| RUNNING -> YIELDING | Thread.yield |
| YIELDING -> RUNNABLE | yield successful |
| YIELDING -> RUNNING | yield failed |
| RUNNING -> TERMINATED | done |
六、3种线程的关系
VirtualThread,Platform Thread,OS Thread 三者的关系如下图:

说明:在现有的线程模型下,一个 Java 线程相当于一个操作系统线程,多个虚拟线程需要挂载在一个平台线程(载体线程)上,每个平台线程和系统线程一一对应。因此,VirtualThread 是属于 JVM 级别的线程,由 JVM 调度,它是非常轻量级的资源,使用完后立即被销毁,因此就不需要像平台线程一样使用池化(线程池)。虚拟线程在执行到 IO 操作或 Blocking 操作时,会自动切换到其他虚拟线程执行,从而避免当前线程等待,可以高效通过少数线程去调度大量虚拟线程,最大化提升线程的执行效率。
七、总结
- Virtual Thread 将会在性能上带来的巨大提高,不过,目前业界 80~90%的代码还跑在 Java 8 上,等 JDK19 投入实际生产环境,可能需要一个漫长的过程;
- 虚拟线程高度复用了现有的 Thread 线程的功能,方便现有方式平滑迁移到虚拟线程;
- 虚拟线程是将 Thread 作为载体线程,它并没有改变原来的线程模型;
- 虚拟线程是 JVM 调度的,而不是操作系统调度;
- 使用虚拟线程可以显著提高程序吞吐量;
- 虚拟线程适合 并发任务数量很高 或者 IO 密集型的场景,对于 计算密集型任务还需通过过增加 CPU 核心解决,或者利用分布式计算资源来来解决;
- 虚拟线程目前只是一个预览功能,只能从源码和简单的测试来分析,并无真实生产环境的验证;
曾一段时间内,JDK 一直致力于 Reactor 响应式编程,试图从这条路子来提升 Java 的性能,但是最终发现:响应式编程难理解,难调试,难使用,因此又把焦点转向了同步编程,为了改善性能,虚拟线程诞生了。或许虚拟线程很难在短时间内运用到实际生产中,但是通过官方的 JDK 版本发布,我们可以看到:尽管是 Oracle 这样的科技型巨头也会走弯路,了解 JDK 的动态,可以帮助我们更好的把握学习 Java 的重心以及后面的发展趋势。


 366
366

 被折叠的 条评论
为什么被折叠?
被折叠的 条评论
为什么被折叠?
 到【灌水乐园】发言


