


我希望有个如你一般的人。
如山间清爽的风,如古城温暖的光。
从清晨到夜晚,由山野到书房。
只要最后是你,就好。

一、组件通信方式
1. 组件内的状态管理流程
组件化开发优点: 更快的开发效率、更好的可维护性
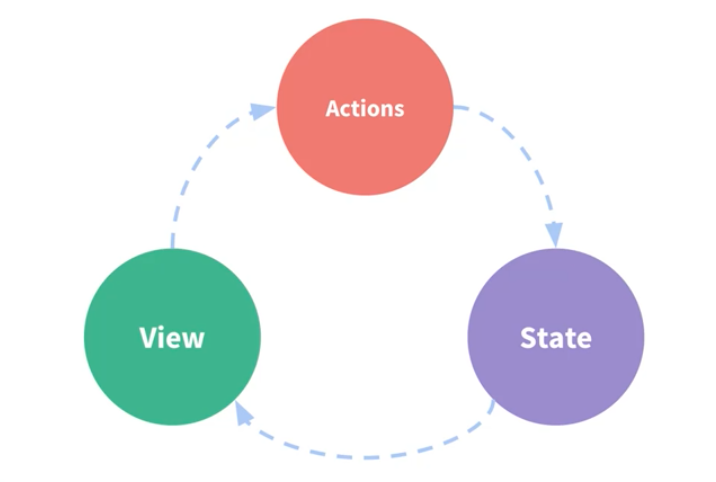
此处数据的流向是单向的,State状态就是我们所说的数据,数据绑定到视图展示给用户,当用户和视图交互,通过Actions更改数据之后,更改后的数据重新绑定到视图。
状态管理包含以下几部分:
- state(状态): 驱动应用的数据源
- view(视图): 以声明方式将 state 映射到视图
- actions(行为): 响应在 view 上的用户输入导致的状态变化
2. 组件间传值方式
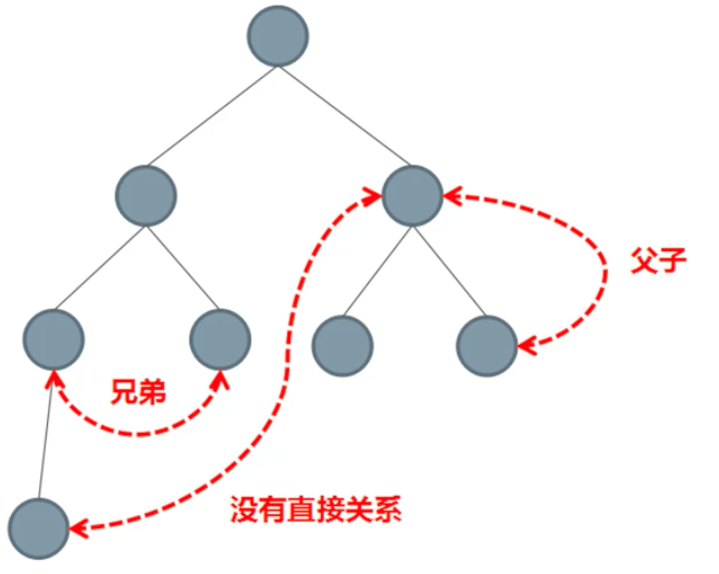
在 Vue 中为不同的组件关系提供了不同的通信规则,组件间传值可分为:父传子、子传父、不相关组件之间
3. 父向子传值
- 父组件使用子组件时,使用属性传值
- 子组件通过 props 来接收
父组件:
<template>
  <div>
    <h1>Props Down Parent</h1>
    <child title="My journey with Vue"></child>
  </div>
</template>

<script>
import child from './01-Child'
export default {
  components: {
    child
  }
}
</script>
子组件:
<template>
  <div>
    <h1>Props Down Child</h1>
    <h2>{{ title }}</h2>
  </div>
</template>

<script>
export default {
  // props: ['title'],
  props: {
    title: String
  }
}
</script>
4. 子向父传值
- 父组件使用子组件时,绑定子组件的自定义事件
- 父组件设置自定义处理函数
- 子组件设置自定义函数传递数据
父组件:
<template>
  <div>
    <h1 :style="{ fontSize: hFontSize + 'em'}">Event Up Parent</h1>
	<child :fontSize="hFontSize" v-on:enlargeText="enlargeText"></child>
  </div>
</template>

<script>
import child from './02-Child'
export default {
  components: {
    child
  },
  data () {
    return {
      hFontSize: 1
    }
  },
  methods: {
    enlargeText (size) {
      this.hFontSize += size
    }
  }
}
</script>
子组件:
<template>
  <div>
    <h1 :style="{ fontSize: fontSize + 'em' }">Props Down Child</h1>
    <button @click="handler">文字增大</button>
  </div>
</template>

<script>
export default {
  props: {
    fontSize: Number
  },
  methods: {
    handler () {
      this.$emit('enlargeText', 0.1)
    }
  }
}
</script>
5. 不相关组件传值(Event Bus)
- Event Bus: 创建一个公共的Vue实例作为事件总线/事件中心
- 组件A中通过
bus.$emit(’自定义事件名’,要发送的值)发送数据 - 组件B中通过
bus.$on(‘自定义事件名‘,function(v) { //v即为要接收的值 })来监听自定义的事件,并获取数据
// evenrbus.js
import Vue from 'vue'
export default new Vue()
组件 A:
<template>
<div>
<h1>Event Bus Sibling01</h1>
<div class="number" @click="sub">-</div>
<input type="text" style="width: 30px; text-align: center" :value="value">
<div class="number" @click="add">+</div>
</div>
</template>
<script>
import bus from './eventbus'
export default {
props: {
// 文本框默认显示的商品个数
num: Number
},
// 因为props的值不建议直接修改,将props数据存储到value中
created () {
this.value = this.num
},
data () {
return {
value: -1
}
},
methods: {
sub () {
if (this.value > 1) {
this.value--
bus.$emit('numchange', this.value)
}
},
add () {
this.value++
bus.$emit('numchange', this.value)
}
}
}
</script>
组件 B:
<template>
<div>
<h1>Event Bus Sibling02</h1>
<div>{{ msg }}</div>
</div>
</template>
<script>
import bus from './eventbus'
export default {
data () {
return {
msg: ''
}
},
created () {
bus.$on('numchange', (value) => {
this.msg = `您选择了${value}件商品`
})
}
}
</script>
6. 其他组件传值方法(ref)
其他组件传值方式: $root、$parent、$children、$ref …
ref 的作用:
- 把它作用到普通 HTML 标签上,则获取到的是 DOM 对象
- 如果你把它作用到组件标签上,则获取到的是组件实例对象
$refs 只会在组件渲染完成之后生效,并且它们不是响应式的。
这仅作为一个用于直接操作子组件的一种捷径,尽量避免在模板或计算属性中访问 $refs。
滥用会导致数据管理的混乱。
子组件:
<template>
<div>
<h1>ref Child</h1>
<input ref="input" type="text" v-model="value"> // 在HTML标签上使用
</div>
</template>
<script>
export default {
data () {
return {
value: ''
}
},
methods: {
// 用来从父级组件聚焦输入框
focus () {
this.$refs.input.focus()
}
}
}
</script>
父组件:
<template>
  <div>
    <h1>ref Parent</h1>

    <child ref="c"></child>  // 在组件上使用ref
  </div>
</template>

<script>
import child from './04-Child'
export default {
  components: {
    child
  },
  mounted () {
    this.$refs.c.focus()
    this.$refs.c.value = 'hello input'
  }
}
</script>
7. 简易的状态管理方案
⑴. 状态管理遇到的问题:
- 多个视图依赖同一状态
- 来自不同视图的行为需要变更同一状态
因此,需要把组件的的共享状态抽取出来(将来使用时保证其为响应式的),不管树在哪个位置,任何组件都能获取状态或者触发行为。
⑵. 实现一个简易的状态集中管理:
1. 创建:
首先创建一个共享的仓库 store 对象,这是集中式的状态管理,所有状态都在 store 中进行管理,且它为全局唯一的对象,任意的组件都可以导入 store 模块使用其中的状态,更改状态也是在该模块中实现的:
// store.js

export default {
  debug: true,
  state: {
    user: {
      name: 'xiaomao',
      age: 18,
      sex: '男'
    }
  },
  setUserNameAction (name) {
    if (this.debug) {
      console.log('setUserNameAction triggered:', name)
    }
    this.state.user.name = name
  }
}
2. 储存:
把共享的仓库 store 对象,存储到需要共享状态的组件 data 中
// componentA.vue

<template>
  <div>
    <h1>componentA</h1>
    user name: {{ sharedState.user.name }}
    <button @click="change">Change Info</button>
  </div>
</template>

<script>
import store from './store'
export default {
  methods: {
    // 点击按钮的时候通过 action 修改状态
    change () {
      store.setUserNameAction('componentA')
    }
  },
  data () {
    return {
      // 当前组件特有的自己的状态,存储到privateState
      privateState: {},
      // 把store中的state(共享的状态)存储到sharedState
      sharedState: store.state
    }
  }
}
</script>
3. 修改:
componentA 和 componentB 两个组件共享了 store 中的状态,并且和用户交互的时候还会更改状态中的 name 属性
// componentB.vue

<template>
  <div>
    <h1>componentB</h1>
    user name: {{ sharedState.user.name }}
    <button @click="change">Change Info</button>
  </div>
</template>

<script>
import store from './store'
export default {
  methods: {
    change () {
      store.setUserNameAction('componentB')
    }
  },
  data () {
    return {
      privateState: {},
      sharedState: store.state
    }
  }
}
</script>
采用集中式的状态管理,使用了全局唯一的对象 store 来存储状态,并且有一个共同点约定:
组件不允许直接变更属于 store 对象的 State,而应执行 Action 来分发(dispatch)事件通知 store 去改变,这样最终的样子跟 Vuex 的结构就类似了。
这样好处是,能够记录所有 store 中发生的 State 变更,同时实现能做到记录变更、保存状态快照、历史回滚 / 时光旅行的调试工具。
二、Vuex 核心概念
1. 概述
官方文档:Vuex 是一个专为 Vue.js 应用程序开发的状态管理模式。它采用集中式存储管理应用的所有组件 的状态,并以相应的规则保证状态以一种可预测的方式发生变化。Vuex 也集成到 Vue 的官方调 试工具 devtools extension,提供了诸如零配置的 time-travel 调试、状态快照导入导出等高级调 试功能。
- Vuex 是专门为 Vue.js 设计的状态管理库
- Vuex 采用集中式的方式存储需要共享的数据
- 从使用角度,Vuex 就是一个 JavaScript 库
- Vuex 的作用是进行状态管理,解决复杂组件通信,数据共享
- Vuex 集成到了 devtools 中,提供了 time-travel 时光旅行和历史回滚的功能
什么情况下使用 Vuex ?
- 非必要不使用 Vuex: Vuex 可以帮助我们管理共享状态,并附带了更多的概念和框架。这需要对短期和长期效益进行权衡。
- 大型的单页应用程序: 多个视图依赖同一状态(如购物车)
- 注意: Vuex 不要滥用,不符合以上需求的业务不要使用,反而会让你的应用变得更麻烦。
2. 工作流程
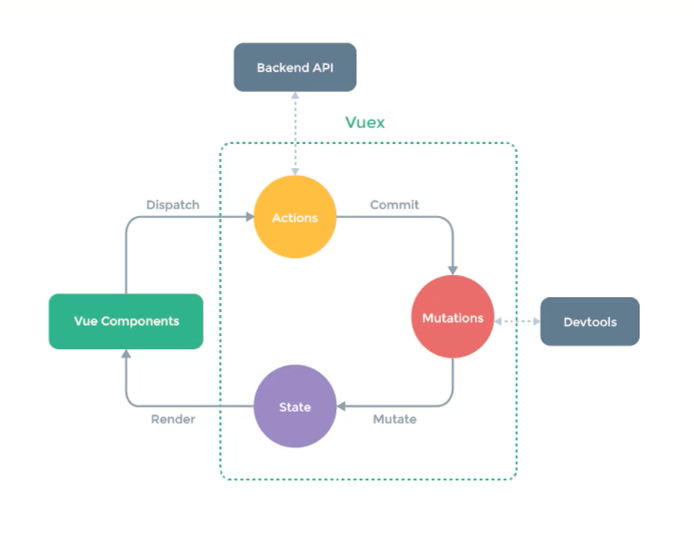
- Store: 仓库,是使用Vuex应用程序的核心,每一个应用仅有一个
Store。Store是一个容器,包含应用中的大部分状态,不能直接改变Store中的状态,要通过提交Mutation的方式 - State: 状态保存至
Store中,因为Store是唯一的,因此状态也是唯一的,称为单一状态树。但是如果所有的状态都保存在State中,程序则难以维护,可以通过后续的模块来解决该问题。注意,这里的状态时响应式的 - Getter: 像是
Vue中的计算属性,对state中的数据进行加工,方便从一个属性派生出其他的值。它内部可以对计算的结果进行缓存,只有当依赖的状态发生改变时才会重新计算 - Mutation: 状态的变化必须通过提交
Mutation来完成 (同步) - Action: 和
Mutation类似,不同的是Action可以进行异步操作,内部改变状态的时候都需要提交Mutation - Module: 模块,由于使用单一状态树,应用的所有状态会集中到一个比较大的对象上来,当应用变得非常复杂时,
Store对象就有可能变得非常臃肿。为了解决这个问题,Vuex允许我们将Store分割成模块每个模块拥有自己的State、Mutation、Action、Getter甚至是嵌套的子模块
三、Vuex 基本使用
1. 基本结构
// store/index.js

import Vue from 'vue'
import Vuex from 'vuex'

Vue.use(Vuex)

export default new Vuex.Store({
  state: {
  },
  // 注意单词复数!!mutations和actions都得加s!!!
  mutations: {
  },
  actions: {
  },
  modules: {
  }
})
创建 Vue 实例的时候传入 store 选项,这个 store 选项会被注入到 Vue 实例中,在组件中使用到的 this.$store 就是在这个位置注入的。
// main.js

import store from './store'

new Vue({
  router,
  store,
  render: h => h(App)
}).$mount('#app')
2. State
Vuex 是单一状态树,并且是响应式的,用一个对象就包含了全部的应用层级状态
⑴. 定义状态
// store/index.js

import Vue from 'vue'
import Vuex from 'vuex'

Vue.use(Vuex)

export default new Vuex.Store({
  state: {
        count: 0,
  	    msg: 'Hello Vuex'
  },
  mutations: {
  },
  actions: {
  },
  getters: {
  },
  modules: {
  }
})
⑵. 常规使用
<template>
	<div>
        <h1>test</h1>
        count: {{$store.state.count}}
        msg: {{$store.state.msg}}
    </div>
</template>
⑶. 使用mapState转化为计算属性来使用
<template>
	<div>
        <h1>test</h1>
        count: {{count}}
        msg: {{msg}}
    </div>
</template>
<script>
	import { mapState } from 'vuex'
    export default {
        computed: {
            // 以数组的形式来接收参数
            // ...mapState(['count', 'msg'])

            // 这里也可以使用对象的形式来接收数据并进行重命名,防止和组件中原有的数据冲突
            ...mapState({num:'count', message: 'msg'})


            // mapState 会返回一个对象,其包含两个计算属性对应的方法
            // count : state => state.count
            // msg : state => state.msg
            // 计算属性使用时,内部本来就是接收属性名对应的带有返回值的方法的键值对的形式
        }
    }
</script>
3. Getter
Getter 就是 store 中的计算属性,使用 mapGetter 简化视图中的使用
⑴. 定义Getter
// store/index.js

import Vue from 'vue'
import Vuex from 'vuex'

Vue.use(Vuex)

export default new Vuex.Store({
  state: {
  },
  mutations: {
  },
  actions: {
  },
  getters: {
    // 接收state数据,将处理结果返回
    reverseMsg (state) {
      return state.msg.split('').reverse().join('')
  	}
  },
  modules: {
  }
})
⑵. 使用 mapGetter 简化视图中的使用
<template>
	<div>
        <h1>test</h1>
	    <!-- 直接使用:{{$store.getters.reverseMsg}} -->
        reverseMsg的值是{{reverse}}
    </div>
</template>
<script>
	import { mapGetter } from 'vuex'
    export default {
        computed: {
           // 同样也有两种接收方式,一种是数组,一种是对象
           // ...mapGetter(['reverseMsg']),
           // 重命名,可以在模板中使用 reverse来使用数据
           ...mapGetter({
             reverse: 'reverseMsg'
          })
        }
    }
</script>
4. Mutation
更改 Vuex 的 store 中的状态的唯一方法是提交 mutation
⑴. 定义
// store/index.js

import Vue from 'vue'
import Vuex from 'vuex'

Vue.use(Vuex)

export default new Vuex.Store({
  state: {
    count: 0
  },
  mutations: {
    increate (state, payload) {  // 参数含义:payload表示传递的参数
    	state.count += payload
  },
  actions: {
  },
  getters: {
  },
  modules: {
  }
})
⑵. 使用
<template>
	<div>
        <!--如果不使用mapMutation的话需要借助commit来触发mutation-->
		<!-- <button @click="$store.commit('increate', 2)">Mutation</button> -->
		<button @click="increateMut(3)">Mutation</button>
    </div>
</template>
<script>
	import { mapMutations } from 'vuex'
    export default {
        // mutation本质上是方法,所以可以映射到方法中
        methods: {
        // 以数组方式传参
	   // ...mapMutations(['increate']),返回的是个映射的方法,但是不再是计算属性而是对应的函数
       // 以对象形式传参来解决重名的问题
          ...mapMutations({
            increateMut: 'increate'
          })
        }
    }
</script>
5. Action
Action 类似于 mutation,不同在于:
- Action 提交的是 mutation,而不是直接变更状态
- Action 可以包含任意异步操作
⑴. 定义
// store/index.js

import Vue from 'vue'
import Vuex from 'vuex'

Vue.use(Vuex)

export default new Vuex.Store({
  state: {
        count: 0
  },
  mutations: {
    increate (state, payload) {  // 参数含义:payload表示传递的参数
    state.count += payload
  },
  actions: {
    increateAsync (context, payload) {
    setTimeout(() => {
        context.commit('increate', payload)
      }, 2000)
    }
  },
  getters: {
  },
  modules: {
  }
})
⑵. 使用
<template>
	<div>
        <!--如果不使用mapAction的话需要借助dispatch来触发action-->
        <!-- <button @click="$store.dispatch('increateAsync', 5)">Action</button> -->
        <button @click="increateA(5)">Action</button>
    </div>
</template>
<script>
	import { mapAction } from 'vuex'
    export default {
        methods: {
        // 以数组方式传参
	   // ...mapActions(['increateAsync']),返回的是个映射的方法,但是不再是计算属性而是对应的函数
       // 以对象形式传参来解决重名的问题
          ...mapMutations({
            increateA: 'increateAsync'
          })
        }
    }
</script>
6. Module
- 由于使用单一状态树,应用的所有状态会集中到一个比较大的对象。当应用变得非常复杂时,store 对象就有可能变得相当臃肿。
- 为了解决以上问题,Vuex 允许我们将 store 分割成模块(module)。每个模块拥有自己的 state、mutation、action、getter、甚至是嵌套子模块。
- 将单一状态树划分成多个模块方便管理状态
⑴. 模块文件定义
1. 模块 一
// store/moudules/cart.js

const state = {}
const getters = {}
const mutations = {}
const actions = {}

export default {
  namespaced: true, // 开启命名空间,防止多个模块文件之间的命名冲突
  state,
  getters,
  mutations,
  actions
}
2. 模块 二
// store/moudules/products.js

const state = {
	products: [
		{ id: 1, title: 'iPhone 11', price: 8000 },
		{ id: 2, title: 'iPhone 12', price: 10000 }
	]
}
const getters = {}
const mutations = {
	setProducts (state, payload) {
		state.products = payload
	}
}
const actions = {}

export default {
  namespaced: true, // 开启命名空间,防止多个模块文件之间的命名冲突
  state,
  getters,
  mutations,
  actions
}
3. 模块入口文件
// store/index.js

import Vue from 'vue'
import Vuex from 'vuex'
import cart from './moudules/cart.js'
import products form './moudules/products.js'

Vue.use(Vuex)

export default new Vuex.Store({
  state: {
	  products: [
	    { id: 1, title: 'iPhone 11', price: 8000 },
	    { id: 2, title: 'iPhone 12', price: 10000 }
	  ]
  },
  mutations: {
  },
  actions: {
  },
  getters: {
  },
  modules: {
    products,  // 模块化后的文件
    cart
  }
})
⑵. 使用
<template>
	<div>
	   <!-- 将模块的状态在入口文件的state中进行分块管理,通过$store.state.模块文件的名称.模块中的数据名即可访问 -->
       <!--  products为:{{$store.state.products.products}}
        <button @click="$store.commit('setProducts', [])">Mutation</button>-->
        products为:{{products}}
        <button @click="setProducts([])">Mutation</button>
    </div>
</template>
<script>
	import { mapAction } from 'vuex'
    export default {
        methods: {
          ...mapMutations('products', ['setProducts'])  // 第一个参数是模块名,第二个参数是mutation名
        },
        computed: {
            ...mapState('products',['products'])  // 第一个参数是模块名,第二个参数是模块中state中的成员
        }
    }
</script>
7. Vuex 严格模式
- 开启严格模式后,在组件中直接修改
state状态,会抛出错误 - 组件中获取到
$store.state.msg对它进行修改,从语法层面这是没有问题的,但这破坏了Vuex的约定。如果在组件中直接修改state,devtools会无法跟踪到这次状态的修改 - 所有的状态变更必须通过提交Mutation
开启严格模式:
// store/index.js

export default new Vuex.Store({
  strict: true
  ...
})
开启严格模式后直接在组件中修改state时会报错(但数据仍然改变成功),如果不开启就不会报错
注意:
- 不要在生产环境下开启严格模式因为严格模式会深度检查状态树,来检查不合规的状态改变,会影响性能。
- 在开发环境中启用严格模式,在生产中关闭。
所以Vuex实例时进行如下配置进行改良:
// store/index.js

export default new Vuex.Store({
  strict: process.env.NODE_ENV !== 'production'  // 在开发环境中启用严格模式,在生产中关闭
  ...
})
四、购物车案例
GitHub 项目地址
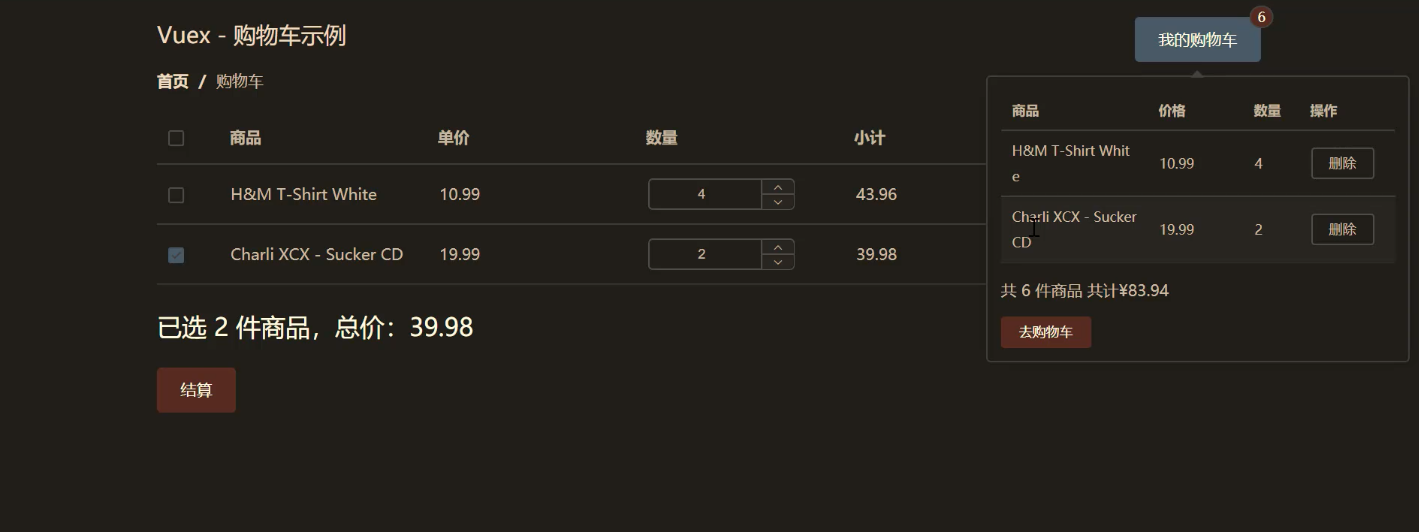
1. 目的
- 数据共享: 购物车内的数据为公共数据,能够被所有组件调用
- 组件: 商品列表、购物车列表、购物车(鼠标悬停弹窗)
- 数据:
- 数据的存储 -> 使用Vuex模块化,存储在Vuex的state中
- 数据的来源 -> 使用action发送异步请求,请求回数据后再提交mutation
- 数据的流向 -> 对应的组件从对应的vuex模块中去拿数据
- 数据的操作 -> 都在vuex中的mutation中进行,并且通过map
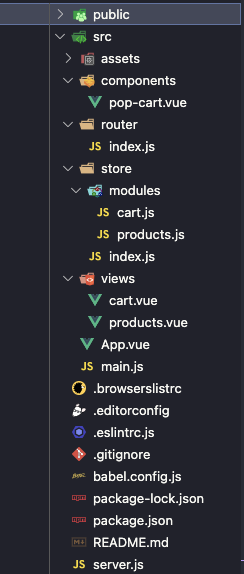
2. 项目基础结构
3. 路由配置
// src/router/index.js

import Vue from 'vue'
import VueRouter from 'vue-router'
import Products from '../views/products.vue'

Vue.use(VueRouter)

const routes = [
  {
    path: '/',
    name: 'products',
    component: Products
  },
  {
    path: '/cart',
    name: 'cart',
    // route level code-splitting
    // this generates a separate chunk (about.[hash].js) for this route
    // which is lazy-loaded when the route is visited.
    component: () => import(/* webpackChunkName: "about" */ '../views/cart.vue')
  }
]

const router = new VueRouter({
  routes
})

export default router
4. 后端接口
// server.js

const express = require('express')
const cors = require('cors')
const app = express()

app.use(cors())

const hostname = '127.0.0.1'
const port = 3000

const _products = [
  { id: 1, title: 'iPad Pro', price: 500.01 },
  { id: 2, title: 'H&M T-Shirt White', price: 10.99 },
  { id: 3, title: 'Charli XCX - Sucker CD', price: 19.99 }
]

app.use(express.json())

app.get('/products', (req, res) => {
  res.status(200).json(_products)
})

app.post('/checkout', (req, res) => {
  res.status(200).json({
    success: Math.random() > 0.5
  })
})

app.listen(port, hostname, () => {
  console.log(`Server is running at http://${hostname}:${port}/`)
})
5. Vuex
⑴. 入口文件
// src/store/index.js

import Vue from 'vue'
import Vuex from 'vuex'
import products from './modules/products'
import cart from './modules/cart'

Vue.use(Vuex)

// 插件需要在store前进行定义
// 使用vuex插件,让这个插件在mutation执行结束后再执行
const myPlugin = store => {
  // subscribe方法监听mutation的执行
  store.subscribe((mutation, state) => {
    // 这里的mutation格式为:{ type:'命名空间模块名/mutation名', paylod:{参数} }
    // 判断当前执行的mutation是否是cart模块下的
    if (mutation.type.startsWith('cart/')) {
      // !!! 当cart模块下的mutation中触发时将数据存到本地(防止页面刷新,导致 vuex 数据重置)
      window.localStorage.setItem('cart-products', JSON.stringify(state.cart.cartProducts))
    }
  })
}

export default new Vuex.Store({
  state: {
  },
  mutations: {
  },
  actions: {
  },
  modules: {
    products,
    cart
  },
  plugins: [myPlugin]
})
⑵. 商品列表
// src/store/modules/products.js

import axios from 'axios'
// 记录所有的商品数据
const state = {
  products: []
}
const getters = {}

// 在mutation中定义方法,修改商品数据
const mutations = {
  setProducts (state, payload) {
    state.products = payload
  }
}

// 在action中添加方法,异步请求商品数据
const actions = {
  async getProducts ({ commit }) {  // 解构出context中的commit方法,否则后续得使用context.commit书写比较麻烦
    const { data } = await axios({
      method: 'GET',
      url: 'http://127.0.0.1:3000/products'
    })

    // 服务端返回的数据结果结构:有id,title,price这三个属性
    // const _products = [
    //   { id: 1, title: 'iPad Pro', price: 500.01 },
    //   { id: 2, title: 'H&M T-Shirt White', price: 10.99 },
    //   { id: 3, title: 'Charli XCX - Sucker CD', price: 19.99 }
    // ]

    commit('setProducts', data)   // 当数据请求成功后修提交mutation修改state中的数据
  }
}

export default {
  namespaced: true,
  state,
  getters,
  mutations,
  actions
}
⑶. 购物车
// src/store/modules/cart.js

const state = {
  // cartProducts :[]   这种形式的数组时写在vuex中的,怕刷新
  // 改成从本地中拿去数据
  cartProducts: JSON.parse(window.localStorage.getItem('cart-products')) || []
}

// 类似于计算属性,这里将购物车中商品的属性进行了一些操作再进行输出,在组件中使用mapGetter进行映射后可直接使用,并且当数组发生变化时会重新进行计算getter中的操作
const getters = {
  // 统计商品总数,放到购物车右上角徽章圆点显示那块
  totalCount (state) {
    return state.cartProducts.reduce((sum, prod) => sum + prod.count, 0)
  },

  // 统计商品总价格,将购物车中的商品价格全部加一起(商品数量是在加入购物车处进行的处理,
  // 所以这里不是采用数量*单价的形式进行计算的,而是遍历所有商品进行累加计算,这样处理的原因是在添加购物车时已经将同样的商品进行了求总价计算拿到totalPrice了)
  totalPrice (state) {
    return state.cartProducts.reduce((sum, prod) => sum + prod.totalPrice, 0)
  },


  checkedCount (state) {
    return state.cartProducts.reduce((sum, prod) => {
      if (prod.isChecked) {
        sum += prod.count
      }
      return sum
    }, 0)
  },
  checkedPrice (state) {
    return state.cartProducts.reduce((sum, prod) => {  // reduce语法,reduce中的回调函数第一个参数sum是求和变量,会不断累加。
                                                       // 而prod是cartProducts数组的每一项,会被不断遍历加到sum上,sum会记录上次的返回结果不断进行累加
      if (prod.isChecked) {
        sum += prod.totalPrice
      }
      return sum
    }, 0)   // 这个0是sum的初始值,如果不指定则会去数组的第一元素,第二个参数会从数组的第二项开始
  }
}

// 添加购物车,向购物车cartProducts数组中添加商品
const mutations = {

  // 将商品加入购物车的方法
  addToCart (state, product) {
    // 分为两种情况
    // 1. cartProducts 中还没有该商品,把该商品添加到数组,并增加 count,isChecked,totalPrice
    // 2. cartProducts 有该商品,让商品的数量加1,选中,并重新计算小计
    const prod = state.cartProducts.find(item => item.id === product.id)  // 使用数组的find方法来找当前购物车里面是否存在这个商品
                                                                          // 如果存在返回该商品,如果不存在返回undefined
    if (prod) {
      prod.count++
      prod.isChecked = true
      prod.totalPrice = prod.count * prod.price
    } else {  // 购物车一开始肯定是空的,里面没有商品,所以每件商品都会先经过else里面的操作进行处理,也就是在原有的三个属性基础上进行拓展,新增了count、isChecked、totalPrice属性
      state.cartProducts.push({
        ...product,
        count: 1,
        isChecked: true,
        totalPrice: product.price
      })
    }
  },

  // 删除购物车中的商品的方法
  deleteFromCart (state, prodId) {
    // findIndex 是找到当前项在数组中的索引位置
    const index = state.cartProducts.findIndex(item => item.id === prodId)
    index !== -1 && state.cartProducts.splice(index, 1)
  },

  // 更新(改变)所有商品的选中状态,调用时传入参数checked,将checked(具体是啥调用时候出入)参数赋值给每一个商品的isChecked
  updateAllProductChecked (state, checked) {
    state.cartProducts.forEach(prod => {
      prod.isChecked = checked
    })
  },

  // 更新(改变)某一商品的选中状态,调用时需要传入一个对象作为参数(这个对象成员一般用插槽scope.row来获取当前操作的项目),这里将商品对象中的属性进行了解构
  updateProductChecked (state, {
    checked,
    prodId
  }) {
    const prod = state.cartProducts.find(prod => prod.id === prodId)
    prod && (prod.isChecked = checked)
  },

  // 通过文本框更新购物车中某个商品的数量以及商品的总价小计
  updateProduct (state, {
    prodId,
    count
  }) {
    const prod = state.cartProducts.find(prod => prod.id === prodId)  // 找到对应的商品
    if (prod) {
      prod.count = count  // 这个count是文本框中的值传递过来的
      prod.totalPrice = count * prod.price
    }
  }
}
const actions = {}

export default {
  namespaced: true,
  state,
  getters,
  mutations,
  actions
}
6. 商品列表
// src/views/products.vue

<template>
  <div>
    <el-breadcrumb separator="/">
      <el-breadcrumb-item><a href="#/">首页</a></el-breadcrumb-item>
      <el-breadcrumb-item><a href="#/">商品列表</a></el-breadcrumb-item>
    </el-breadcrumb>
    <el-table :data="products" style="width: 100%">
      <el-table-column prop="title" label="商品"></el-table-column>
      <el-table-column prop="price" label="价格"></el-table-column>
      <el-table-column prop="address" label="操作">
        <!-- <template slot-scope="scope"> -->
        <template v-slot="scope">
          <el-button @click="addToCart(scope.row)">加入购物车</el-button>
        </template>
      </el-table-column>
    </el-table>
  </div>
</template>

<script>
import { mapState, mapActions, mapMutations } from 'vuex'
export default {
  name: 'ProductList',
  computed: {
    ...mapState('products', ['products'])  // 从对应的vuex模块中拿数据
  },
  methods: {
    ...mapActions('products', ['getProducts']),   // 异步获取商品数据,触发mutation
    ...mapMutations('cart', ['addToCart'])
  },
  created () {
    this.getProducts()
  }
}
</script>
7. 购物车列表
<template>
  <div>
    <el-breadcrumb separator="/">
      <el-breadcrumb-item :to="{ path: '/' }">首页</el-breadcrumb-item>
      <el-breadcrumb-item>购物车</el-breadcrumb-item>
    </el-breadcrumb>
    <el-table :data="cartProducts" style="width: 100%" >
      <el-table-column width="55">
        <template v-slot:header>
          <!-- checkedAll是个计算属性,并对表单控件checkbox的值进行了双向数据绑定,由于只在当前组件中使用,所以不再定义到vuex中 -->
          <el-checkbox v-model="checkedAll" size="mini"></el-checkbox>
        </template>
        <!--
          @change="updateProductChecked"  默认参数:更新后的值
          @change="updateProductChecked(productId, $event)"  123, 原来那个默认参数
            当你传递了自定义参数,也就是下面的这个对象的时候,如果还想得到原来那个默认参数(change触发时会默认传递改变后的checkbox的value值),就手动传递一个 $event,这个$event就是true或者false用来表示点击checkbox状态改变后的value值
         -->
        <template v-slot="scope">
          <el-checkbox
            size="mini"
            :value="scope.row.isChecked"
            @change="updateProductChecked({
              prodId: scope.row.id,
              checked: $event
            })"
          >
          </el-checkbox>
        </template>
      </el-table-column>
      <el-table-column prop="title" label="商品"></el-table-column>
      <el-table-column prop="price" label="单价"></el-table-column>
      <el-table-column prop="count" label="数量">
        <template v-slot="scope">
          <el-input-number :value="scope.row.count" @change="updateProduct({
            prodId: scope.row.id,
            count: $event
          })" size="mini"></el-input-number>
          <!-- $event就是文本框中的值 -->
        </template>
      </el-table-column>
      <el-table-column prop="totalPrice" label="小计"></el-table-column>
      <el-table-column label="操作">
        <template><el-button size="mini">删除</el-button></template>
      </el-table-column>
    </el-table>
    <div>
      <p>已选 <span>{{ checkedCount }}</span> 件商品,总价:<span>{{ checkedPrice }}</span></p>
      <el-button type="danger">结算</el-button>
    </div>
  </div>
</template>

<script>
import { mapState, mapMutations, mapGetters } from 'vuex'
export default {
  name: 'Cart',
  computed: {
    ...mapState('cart', ['cartProducts']),
    ...mapGetters('cart', ['checkedCount', 'checkedPrice']),

    // 计算属性中可以定义get和set
    checkedAll: {
      get () {
        return this.cartProducts.every(prod => prod.isChecked)  // 有一个没选中就是false,全选中了才是true
      },
      set (value) {
        this.updateAllProductChecked(value)  // 将全选box设置为value,value是用户调用时传入的
      }
    }
  },
  methods: {
    ...mapMutations('cart', [
      'updateAllProductChecked',   // 改变所有商品的checkebox状态属性
      'updateProductChecked',   // 改变某个商品的checkebox状态属性
      'updateProduct'
    ])
  }
}
</script>
8. 购物车弹窗
// src/components/pop-carts.vue

<template>
  <el-popover width="350" trigger="hover" >
    <el-table :data="cartProducts" size="mini">
      <el-table-column property="title" width="130" label="商品"></el-table-column>
      <el-table-column property="price" label="价格"></el-table-column>
      <el-table-column property="count" width="50" label="数量"></el-table-column>
      <el-table-column label="操作">
        <template v-slot="scope">
          <el-button @click="deleteFromCart(scope.row.id)" size="mini">删除</el-button>
        </template>
      </el-table-column>
    </el-table>
    <div>
      <p>共 {{ totalCount }} 件商品 共计¥{{ totalPrice }}</p>
      <el-button size="mini" type="danger" @click="$router.push({ name: 'cart' })">去购物车</el-button>
    </div>
    <el-badge :value="totalCount" class="item" slot="reference">
      <el-button type="primary">我的购物车</el-button>
    </el-badge>
  </el-popover>
</template>

<script>
import { mapState, mapGetters, mapMutations } from 'vuex'
export default {
  name: 'PopCart',
  computed: {
    ...mapState('cart', ['cartProducts']),
    ...mapGetters('cart', ['totalCount', 'totalPrice'])
  },
  methods: {
    ...mapMutations('cart', ['deleteFromCart'])
  }
}
</script>
五、模拟 Vuex 实现
替换 vuex 为 myvuex:
// src/store/index.js

import Vuex from '../myvuex'
模拟 Vuex:
// src/myvuex/index.js

let _Vue = null

class Store {
  constructor (options) {
    const {
      state = {},
      getters = {},
      mutations = {},
      actions = {}
    } = options
    this.state = _Vue.observable(state)
    this.getters = Object.create(null)
    Object.keys(getters).forEach(key => {
      Object.defineProperty(this.getters, key, {
        get: () => getters[key](state)
      })
    })
    this._mutaions = mutations
    this._actions = actions
  }

  commit (type, payload) {
    this._mutaions[type](this.state, payload)
  }

  dispatch (type, payload) {
    this._actions[type](this, payload)
  }
}

function install (Vue) {
  _Vue = Vue
  _Vue.mixin({
    beforeCreate () {
      if (this.$options.store) {
        _Vue.prototype.$store = this.$options.store
      }
    }
  })
}

export default {
  Store,
  install
}


 1485
1485


 被折叠的 条评论
为什么被折叠?
被折叠的 条评论
为什么被折叠?
 到【灌水乐园】发言


