1、引入pom依赖
		<dependency>
            <groupId>cn.afterturn</groupId>
            <artifactId>easypoi-spring-boot-starter</artifactId>
            <version>4.4.0</version>
        </dependency>
2、导出功能代码
@ApiOperation("导出excel")
@GetMapping("/exportToExcel")
public void exportToExcel(HttpServletResponse response){
try {
Workbook wb = getExcelData();
String fileName = "excel文件名.xlsx";
fileName = URLEncoder.encode(fileName, "UTF-8");
response.setContentType("application/vnd.ms-excel");
response.setHeader("Content-disposition", "attachment;filename=" + fileName + ";" + "filename*=utf-8''" + fileName);
response.setHeader("Access-Control-Expose-Headers", "Content-Disposition");
OutputStream output = response.getOutputStream();
wb.write(output);
output.flush();
output.close();
wb.close();
} catch (Exception e) {
e.printStackTrace();
}
}
public Workbook getExcelData() {
List<String> headerList = new ArrayList();
headerList.add("序号");
headerList.add("日期");
headerList.add("机构名称(部门/分中心)");
headerList.add("姓名");
headerList.add("工号");
String[] arr = headerList.toArray(new String[headerList.size()]);
List totalList = new ArrayList();
totalList.add("1");
totalList.add("2022-10-10");
totalList.add("研发部");
totalList.add("张三");
totalList.add("12345678");
dataList.add(totalList);
return writeToExcelByList(arr, dataList);
}
public Workbook writeToExcelByList(String[] array, List<List> list) {
Workbook wb = new XSSFWorkbook();
CellStyle titleStyle = wb.createCellStyle();
titleStyle.setAlignment(HorizontalAlignment.CENTER);
titleStyle.setVerticalAlignment(VerticalAlignment.CENTER);
titleStyle.setFillForegroundColor(IndexedColors.AQUA.getIndex());
titleStyle.setFillPattern(FillPatternType.SOLID_FOREGROUND);
titleStyle.setBorderBottom(BorderStyle.THIN);
titleStyle.setBorderLeft(BorderStyle.THIN);
titleStyle.setBorderRight(BorderStyle.THIN);
titleStyle.setBorderTop(BorderStyle.THIN);
Font titleFont = wb.createFont();
titleFont.setFontHeightInPoints((short) 15);
titleFont.setFontName("黑体");
titleStyle.setFont(titleFont);
CellStyle headerStyle = wb.createCellStyle();
headerStyle.setAlignment(HorizontalAlignment.CENTER);
Font headerFont = wb.createFont();
headerFont.setFontHeightInPoints((short) 12);
headerFont.setFontName("黑体");
headerStyle.setBorderBottom(BorderStyle.THIN);
headerStyle.setBorderLeft(BorderStyle.THIN);
headerStyle.setBorderRight(BorderStyle.THIN);
headerStyle.setBorderTop(BorderStyle.THIN);
headerStyle.setFont(headerFont);
Sheet sheet = wb.createSheet("sheet名");
sheet.setColumnWidth(1,15*256);
sheet.setColumnWidth(2,25*256);
CellRangeAddress rangeAddress = new CellRangeAddress(0, 0, 0, array.length-1);
sheet.addMergedRegion(rangeAddress);
Row row0 = sheet.createRow((int) 0);
row0.setHeightInPoints(40);
Cell cell0 = row0.createCell(0);
cell0.setCellValue("标题名");
cell0.setCellStyle(titleStyle);
Row row = sheet.createRow((int) 1);
for (int i = 0; i < array.length; i++) {
Cell cell = row.createCell(i);
cell.setCellValue(array[i]);
cell.setCellStyle(headerStyle);
}
CellStyle dataStyle = wb.createCellStyle();
dataStyle.setAlignment(HorizontalAlignment.CENTER);
dataStyle.setBorderBottom(BorderStyle.THIN);
dataStyle.setBorderLeft(BorderStyle.THIN);
dataStyle.setBorderRight(BorderStyle.THIN);
dataStyle.setBorderTop(BorderStyle.THIN);
try {
int index = 2;
for (int i = 0; i < list.size(); i++) {
row = sheet.createRow(index);
index++;
List data = list.get(i);
for (int j = 0; j < data.size(); j++) {
row.setHeightInPoints(30);
Cell cell = row.createCell(j);
cell.setCellValue(data.get(j).toString());
cell.setCellStyle(finalStyle);
}
}
} catch (Exception e) {
e.printStackTrace();
}
return wb;
}
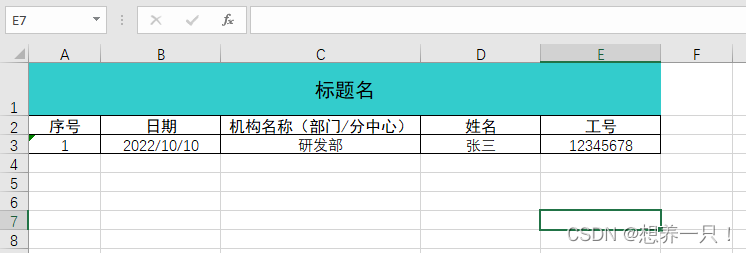
3、效果


 6567
6567

 被折叠的 条评论
为什么被折叠?
被折叠的 条评论
为什么被折叠?
 到【灌水乐园】发言


