


SpringBoot整合MQ
需要创建两个springboot项目,一个springboot_rabbitmq_producer生产者,一个springboot_rabbitmq_consumer消费者
fanout模式(配置文件方式)
定义生产者
-
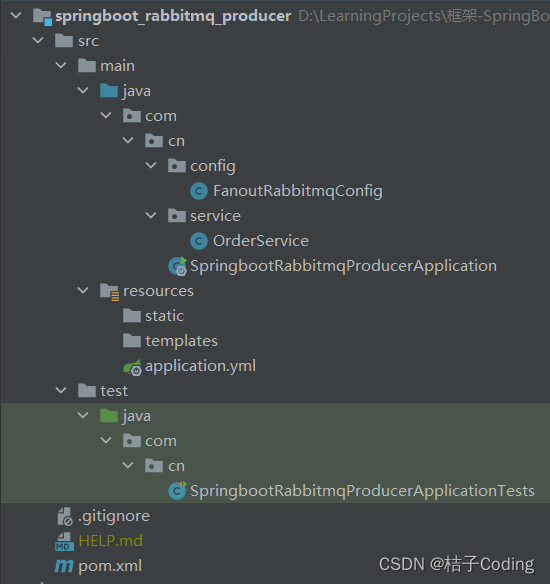
创建生产者工程 springboot_rabbitmq_producer
-
pom.xml文件中添加依赖
<dependencies> <dependency> <groupId>org.springframework.boot</groupId> <artifactId>spring-boot-starter-amqp</artifactId> </dependency> <dependency> <groupId>org.springframework.boot</groupId> <artifactId>spring-boot-starter-web</artifactId> </dependency> <dependency> <groupId>org.springframework.boot</groupId> <artifactId>spring-boot-starter-test</artifactId> <scope>test</scope> </dependency> <dependency> <groupId>org.springframework.amqp</groupId> <artifactId>spring-rabbit-test</artifactId> <scope>test</scope> </dependency> </dependencies> -
application.yml文件配置
# 服务端口 server: port: 8080 # 配置rabbitmq服务 spring: rabbitmq: username: admin password: admin virtual-host: / host: 请填写自己的IP地址 port: 5672 -
生产者代码
package com.cn.service; import org.springframework.amqp.rabbit.core.RabbitTemplate; import org.springframework.beans.factory.annotation.Autowired; import org.springframework.stereotype.Service; import java.util.UUID; @Service public class OrderService { @Autowired /** * RabbitTemplate * 提供了编辑消息、发送消息、发送消息前的监听、发送消息后的监听等消息制造和消息监听功能, * 可以让我们像操作原生 RabbitMQ API 那样在 Spring 中通过 RabbitTemplate 来操作消息并发送和监听消息 */ private RabbitTemplate rabbitTemplate; public void createOrderFanout(String userId, String productId, int num){ //此处模拟生成订单编号 String orderId = UUID.randomUUID().toString(); //定义交换机名称 String exchangeName = "fanout-order-exchange"; //fanout模式不需要routeKey String routeKey = ""; rabbitTemplate.convertAndSend(exchangeName, routeKey, orderId); } } -
绑定关系,基于配置文件的形式
package com.cn.config; import org.springframework.amqp.core.Binding; import org.springframework.amqp.core.BindingBuilder; import org.springframework.amqp.core.FanoutExchange; import org.springframework.amqp.core.Queue; import org.springframework.context.annotation.Bean; import org.springframework.context.annotation.Configuration; @Configuration public class FanoutRabbitmqConfig { //1.声明交换机 @Bean public FanoutExchange fanoutExchange(){ return new FanoutExchange("fanout-order-exchange", true, false); } //2.声明队列 @Bean public Queue fanoutEmailQueue(){ return new Queue("email.fanout.queue", true); } @Bean public Queue fanoutSmsQueue(){ return new Queue("sms.fanout.queue", true); } @Bean public Queue fanoutWeixinQueue(){ return new Queue("weixin.fanout.queue", true); } //3.交换机和队列进行绑定 @Bean public Binding fanoutEmailBinding(){ return BindingBuilder.bind(fanoutEmailQueue()).to(fanoutExchange()); } @Bean public Binding fanoutSmsBinding(){ return BindingBuilder.bind(fanoutSmsQueue()).to(fanoutExchange()); } @Bean public Binding fanoutWeixinBinding(){ return BindingBuilder.bind(fanoutWeixinQueue()).to(fanoutExchange()); } } -
测试代码
package com.cn; import com.cn.service.OrderService; import org.junit.jupiter.api.Test; import org.springframework.beans.factory.annotation.Autowired; import org.springframework.boot.test.context.SpringBootTest; @SpringBootTest class SpringbootRabbitmqFanoutProducerApplicationTests { @Autowired private OrderService orderService; @Test void testOrderFanout() { orderService.createOrderFanout("1","1",111); } } -
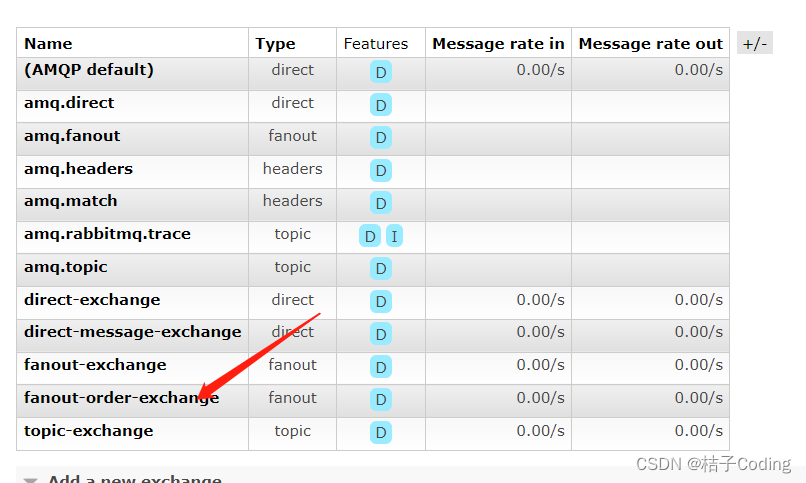
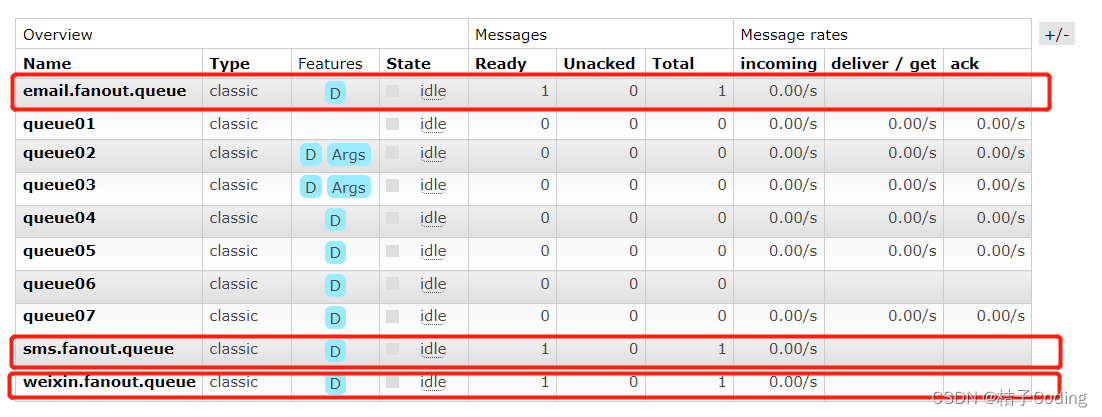
启动测试,查看图形化管理界面,可以看到交换机和队列都已创建好并且各投递了一条消息
定义消费者
-
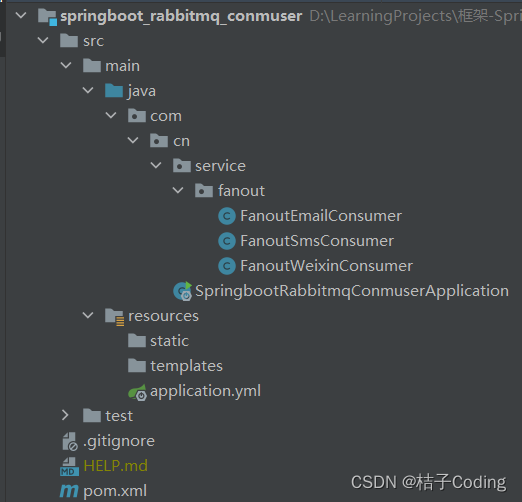
创建消费者工程 springboot_rabbitmq_consumer
-
pom.xml文件中添加依赖
<dependencies> <dependency> <groupId>org.springframework.boot</groupId> <artifactId>spring-boot-starter-amqp</artifactId> </dependency> <dependency> <groupId>org.springframework.boot</groupId> <artifactId>spring-boot-starter-web</artifactId> </dependency> <dependency> <groupId>org.springframework.boot</groupId> <artifactId>spring-boot-starter-test</artifactId> <scope>test</scope> </dependency> <dependency> <groupId>org.springframework.amqp</groupId> <artifactId>spring-rabbit-test</artifactId> <scope>test</scope> </dependency> </dependencies> -
application.yml文件配置
# 服务端口 server: port: 8081 # 配置rabbitmq服务 spring: rabbitmq: username: admin password: admin virtual-host: / host: 请填写自己的IP地址 port: 5672 -
消费者-邮件服务
package com.cn.service.fanout; import org.springframework.amqp.rabbit.annotation.RabbitHandler; import org.springframework.amqp.rabbit.annotation.RabbitListener; import org.springframework.stereotype.Service; @Service /** * @RabbitListener * 队列已经存在时,直接指定名称即可 */ @RabbitListener(queues = "email.fanout.queue") public class EmailConsumer { @RabbitHandler public void reviceMessage(String message){ System.out.println("email.fanout.queue => 接收到了订单信息:" + message); } } -
消费者-短信服务
package com.cn.service.fanout; import org.springframework.amqp.rabbit.annotation.RabbitHandler; import org.springframework.amqp.rabbit.annotation.RabbitListener; import org.springframework.stereotype.Service; @Service /** * @RabbitListener * 队列已经存在时,直接指定名称即可 */ @RabbitListener(queues = "sms.fanout.queue") public class SmsConsumer { @RabbitHandler public void reviceMessage(String message){ System.out.println("sms.fanout.queue => 接收到了订单信息:" + message); } } -
消费者-微信服务
package com.cn.service.fanout; import org.springframework.amqp.rabbit.annotation.RabbitHandler; import org.springframework.amqp.rabbit.annotation.RabbitListener; import org.springframework.stereotype.Service; @Service /** * @RabbitListener * 队列已经存在时,直接指定名称即可 */ @RabbitListener(queues = "weixin.fanout.queue") public class WeixinConsumer { @RabbitHandler public void reviceMessage(String message){ System.out.println("weixin.fanout.queue => 接收到了订单信息:" + message); } } -
启动消费者,查看日志打印

direct模式(配置文件方式)
定义生产者
-
在上个案例OrderService中修改
public void createOrderDirect(String useerId, String productId, int num){ //此处模拟生成订单编号 String orderId = UUID.randomUUID().toString(); //定义交换机名称 String exchangeName = "direct-order-exchange";; //direct模式需要routeKey String routeKey = "email"; rabbitTemplate.convertAndSend(exchangeName, routeKey, orderId); } -
绑定关系
package com.cn.config; import org.springframework.amqp.core.*; import org.springframework.context.annotation.Bean; import org.springframework.context.annotation.Configuration; @Configuration public class DirectRabbitmqConfig { //1.声明交换机 @Bean public DirectExchange directExchange(){ return new DirectExchange("direct-order-exchange", true, false); } //2.声明队列 @Bean public Queue directEmailQueue(){ return new Queue("email.direct.queue", true); } @Bean public Queue directSmsQueue(){ return new Queue("sms.direct.queue", true); } @Bean public Queue directWeixinQueue(){ return new Queue("weixin.direct.queue", true); } //3.交换机和队列进行绑定 @Bean public Binding directEmailBinding(){ return BindingBuilder.bind(directEmailQueue()).to(directExchange()).with("email"); } @Bean public Binding directSmsBinding(){ return BindingBuilder.bind(directSmsQueue()).to(directExchange()).with("sms"); } @Bean public Binding directWeixinBinding(){ return BindingBuilder.bind(directWeixinQueue()).to(directExchange()).with("weixin"); } } -
测试 代码
@Test void testOrderDirect() { orderService.createOrderDirect("1","1",222); } -
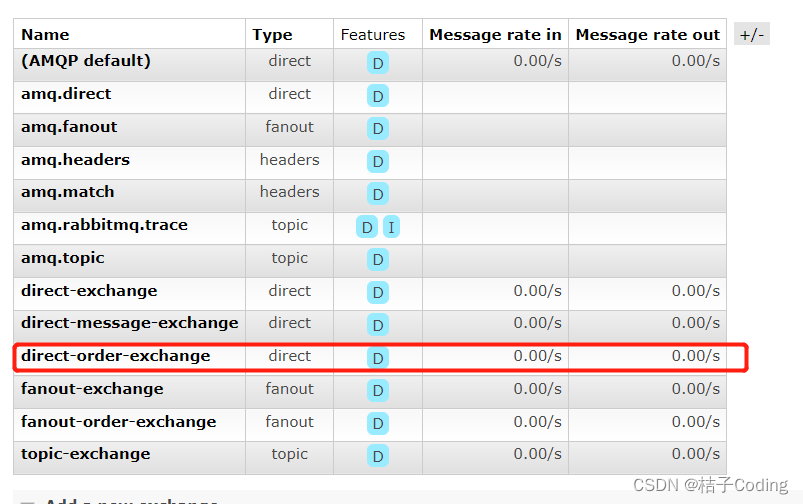
启动测试,查看图形化管理界面,可以看到交换机和队列都已创建好并且只有email.direct.queue投递了一条消息
![[外链图片转存失败,源站可能有防盗链机制,建议将图片保存下来直接上传(img-kL0fBpb2-1683753215224)(RabbitMQ.assets/image-20230511045758321.png)]](https://img-blog.csdnimg.cn/4d1527f01c4f4bd8bcf1ac5c5ad9f9db.png)
定义消费者
-
同理对上个案例中的代码进行修改
-
消费者-邮件服务
package com.cn.service.direct; import org.springframework.amqp.rabbit.annotation.RabbitHandler; import org.springframework.amqp.rabbit.annotation.RabbitListener; import org.springframework.stereotype.Service; @Service @RabbitListener(queues = "email.direct.queue") public class DirectEmailConsumer { @RabbitHandler public void reviceMessage(String message){ System.out.println("email.direct.queue => 接收到了订单信息:" + message); } } -
消费者-短信服务
package com.cn.service.direct; import org.springframework.amqp.rabbit.annotation.RabbitHandler; import org.springframework.amqp.rabbit.annotation.RabbitListener; import org.springframework.stereotype.Service; @Service @RabbitListener(queues = "sms.direct.queue") public class DirectSmsConsumer { @RabbitHandler public void reviceMessage(String message){ System.out.println("sms.direct.queue => 接收到了订单信息:" + message); } } -
消费者-微信服务
package com.cn.service.direct; import org.springframework.amqp.rabbit.annotation.RabbitHandler; import org.springframework.amqp.rabbit.annotation.RabbitListener; import org.springframework.stereotype.Service; @Service @RabbitListener(queues = "weixin.direct.queue") public class DirectWeixinConsumer { @RabbitHandler public void reviceMessage(String message){ System.out.println("weixin.direct.queue => 接收到了订单信息:" + message); } } -
启动消费者,查看日志打印

topic模式(注解方式)
定义生产者
-
在上个案例中修改
public void createOrderTopic(String useerId, String productId, int num){ String orderId = UUID.randomUUID().toString(); String exchangeName = "topic-order-exchange"; String routeKey = "com.email.xxx"; rabbitTemplate.convertAndSend(exchangeName, routeKey, orderId); } -
此处不进行绑定操作,后面在消费者中使用注解形式去修改
-
测试代码
@Test void testOrderTopic() { orderService.createOrderTopic("1","1",14); } -
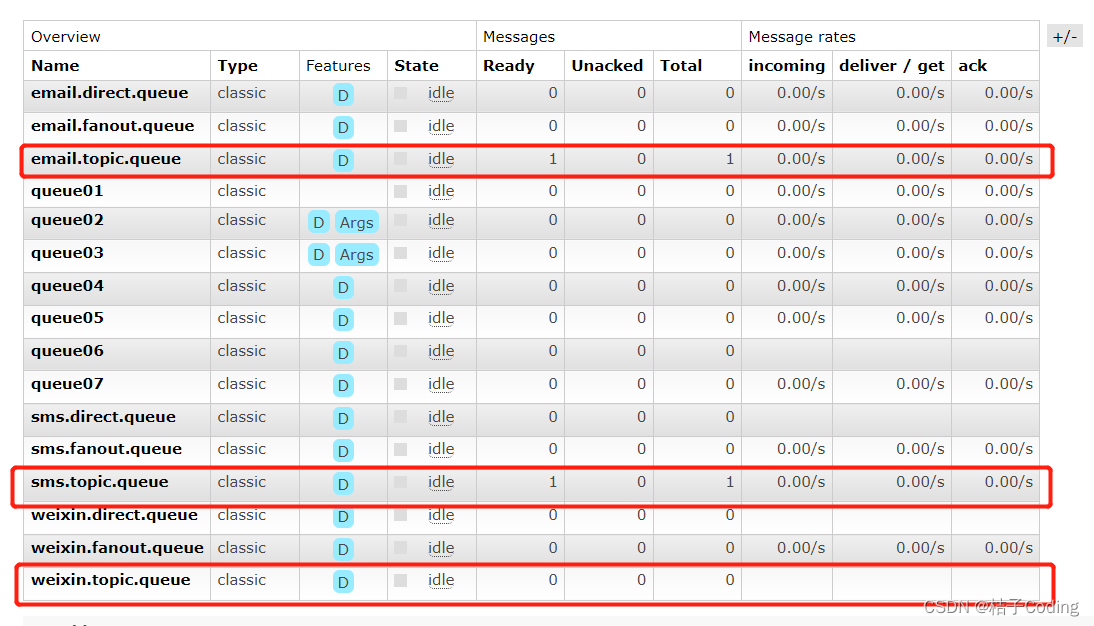
启动测试,查看图形化管理界面,可以看到交换机和队列都已创建好并且只有email.direct.queue和sms.direct.queue各投递了一条消息

定义消费者
-
同理对上个案例中的代码进行修改
-
消费者-邮件服务
package com.cn.service.topic; import org.springframework.amqp.core.ExchangeTypes; import org.springframework.amqp.rabbit.annotation.*; import org.springframework.stereotype.Service; @Service @RabbitListener(bindings = @QueueBinding( value = @Queue(value = "email.topic.queue", durable = "true", autoDelete = "false"), exchange = @Exchange(value = "topic-order-exchange", type = ExchangeTypes.TOPIC), key = "#.email.#" )) public class TopicEmailConsumer { @RabbitHandler public void reviceMessage(String message){ System.out.println("email.topic.queue => 接收到了订单信息:" + message); } } -
消费者-短信服务
package com.cn.service.topic; import org.springframework.amqp.core.ExchangeTypes; import org.springframework.amqp.rabbit.annotation.*; import org.springframework.stereotype.Service; @Service @RabbitListener(bindings = @QueueBinding( value = @Queue(value = "sms.topic.queue", durable = "true", autoDelete = "false"), exchange = @Exchange(value = "topic-order-exchange", type = ExchangeTypes.TOPIC), key = "com.#" )) public class TopicSmsConsumer { @RabbitHandler public void reviceMessage(String message){ System.out.println("sms.topic.queue => 接收到了订单信息:" + message); } } -
消费者-微信服务
package com.cn.service.topic; import org.springframework.amqp.core.ExchangeTypes; import org.springframework.amqp.rabbit.annotation.*; import org.springframework.stereotype.Service; @Service @RabbitListener(bindings = @QueueBinding( value = @Queue(value = "weixin.topic.queue", durable = "true", autoDelete = "false"), exchange = @Exchange(value = "topic-order-exchange", type = ExchangeTypes.TOPIC), key = "*.weixin.#" )) public class TopicWeixinConsumer { @RabbitHandler public void reviceMessage(String message){ System.out.println("weixin.topic.queue => 接收到了订单信息:" + message); } } -
启动消费者,查看日志打印


 3784
3784


 被折叠的 条评论
为什么被折叠?
被折叠的 条评论
为什么被折叠?
 到【灌水乐园】发言


