


SpringBoot-Canal
介绍
canal是阿里巴巴旗下的一款开源项目,纯Java开发。基于数据库增量日志解析,提供增量数据订阅&消费,目前主要支持了MySQL(也支持mariaDB)。
早期,阿里巴巴B2B公司因为存在杭州和美国双机房部署,存在跨机房同步的业务需求。不过早期的数据库同步业务,主要是基于trigger的方式获取增量变更,不过从2010年开始,阿里系公司开始逐步的尝试基于数据库的日志解析,获取增量变更进行同步,由此衍生出了增量订阅&消费的业务,从此开启了一段新纪元. 目前内部使用的同步,已经支持mysql5.x和oracle部分版本的日志解析
基于日志增量订阅&消费支持的业务:
- 数据库镜像
- 数据库实时备份
- 多级索引 (卖家和买家各自分库索引)
- search build
- 业务cache刷新
- 价格变化等重要业务消息
- 缓存更新
当前的canal开源版本支持mysql5.7及以下的版本
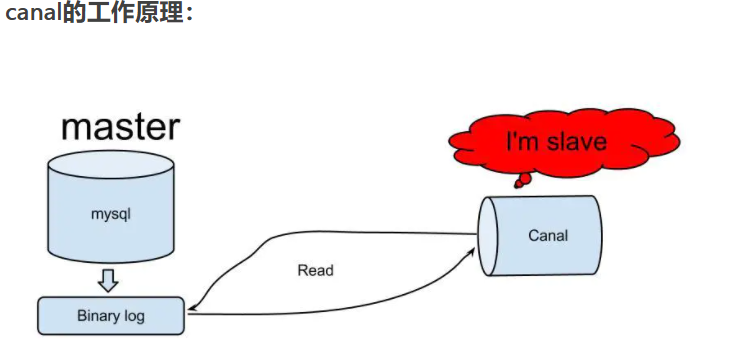
原理相对比较简单:
- canal模拟mysql slave的交互协议,伪装自己为mysql slave,向mysql master发送dump协议
- mysql master收到dump请求,开始推送binary log给slave(也就是canal)
- canal解析binary log对象(原始为byte流)
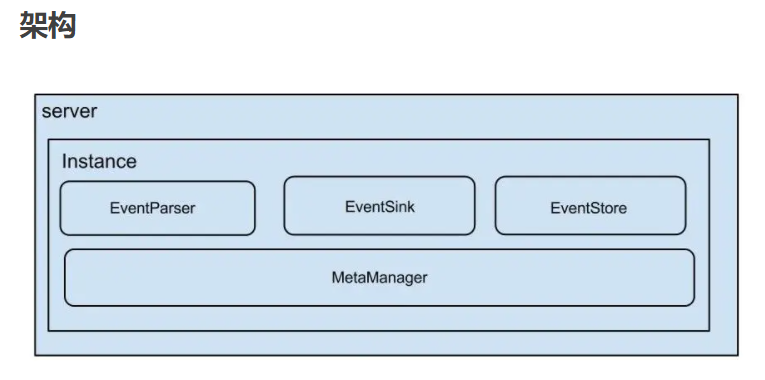
说明:
- server代表一个canal运行实例,对应于一个jvm
- instance对应于一个数据队列 (1个server对应1…n个instance)
instance模块:
- eventParser (数据源接入,模拟slave协议和master进行交互,协议解析)
- eventSink (Parser和Store链接器,进行数据过滤,加工,分发的工作)
- eventStore (数据存储)
- metaManager (增量订阅&消费信息管理器)
Canal服务搭建
监听的mysql配置
我们需要先把Msql的binlog模式开启 我已我mysql 5.7为例 mysql8没试过
先使用docker 创建mysql容器,此处不再演示. 博客里都有
(1) 进入到mysql中,开启 binlog模式。
对于自建MySQL,需要先开启Binlog写入功能,配置binlog-format为ROW模式,通过修改MySQL配置文件来开启bin_log 修改文件内容如下:
docker exec -it mysql /bin/bash
cd /etc/mysql/mysql.conf.d
vi mysqld.cnf
[mysqld]
log-bin=mysql-bin # 开启binlog
binlog-format=ROW # 选择ROW模式
server_id=1186    # 配置MySQL replaction需要定义,不要和Canal的slaveId重复
(2) 创建账号 用于canal伪装自己就是Mysql的用户 来获取binlog
使用root用户登录msyq
mysql -uroot -p
用root账号创建用户
create user canal@'%' IDENTIFIED by 'canal';
账户:canal 密码 canal
如果在创建过程中出现错误 ERROR 1396 (HY000): Operation CREATE USER failed for 'canal'@'%' 表示数据库中以有此账户了
我们可以使用 select * from mysql.user;这条命令查询到 是否存在此用户
(3)赋予canal用户权限
# 授予权限
GRANT SELECT, REPLICATION SLAVE, REPLICATION CLIENT,SUPER ON *.* TO 'canal'@'%';

# 刷新并应用
FLUSH PRIVILEGES;
如果是在本地测试 那么 需要使用localhost 而不是 % 否则canal连接不上mysql
# 授予权限
GRANT SELECT, REPLICATION SLAVE, REPLICATION CLIENT,SUPER ON *.* TO 'canal'@'localhost';
(4)设置binlog的文件过期时间 和文件大小
set global expire_logs_days = 1; #设置binlog多少天过期
然后退出容器 exit
(5)重启mysql容器
docker restart mysql # service mysql restart
重新进入容器然后 到mysql 里
docker exec -it mysql /bin/bash

mysql -uroot -p
show variables like 'log_bin';

show variables like 'binlog_format%';

show master status;
结果如下

如果你的和我 类似 那么 就表示开启了 不行就在从新来
canal容器安装配置
下载镜像:
docker pull docker.io/canal/canal-server
创建容器
docker run --name canal -e canal.instance.master.address=49.232.169.170 \
-e canal.instance.dbUsername=canal \
-e canal.instance.dbPassword=canal \
-p 11111:11111 \
--restart=always \
–network=host \
-d canal/canal-server
-e canal.instance.master.address 是你要关联的mysql 的 ip
canal.instance.dbUsername=canal 是你在 mysql创建的账户 我们上面创建的就是canal
-e canal.instance.dbPassword=canal 是你在 mysql创建的canal账户的密码
-p 11111:11111 映射本地11111端口 到容器11111端口
然后记得 开放本地的11111端口 或者把本地防火墙关了
ok以上配置好了 那么 mysql和 canal就已经建立了关联了
进入容器查看启动日志:
docker exec -it canal bash
tail -100f canal-server/logs/example/example.log

只要没报错就行
测试是否成功
需要Maven
<dependency>
     <groupId>com.alibaba.otter</groupId>
     <artifactId>canal.client</artifactId>
    <version>1.1.3</version>
 </dependency>
我们使用下面的代码来测试是否 关联数据库成功
import com.alibaba.otter.canal.client.CanalConnector;
import com.alibaba.otter.canal.client.CanalConnectors;
import com.alibaba.otter.canal.protocol.CanalEntry.*;
import com.alibaba.otter.canal.protocol.Message;
import java.net.InetSocketAddress;
import java.util.List;
/**
*
* @author PJL
*
* @note 功能描述:TODO增删改查--事件捕捉
* @package com.alibaba.otter
* @filename SimpleCanalClientExample.java
* @date 2019年4月16日 上午9:16:24
*/
public class SimpleCanalClientExample {
public static void main(String args[]) {
// 创建链接
CanalConnector connector = CanalConnectors.newSingleConnector(new InetSocketAddress("192.168.66.71"/*AddressUtils.getHostIp()*/,
11111), "example", "canal", "canal");
int batchSize = 1000;
int emptyCount = 0;
try {
connector.connect();
connector.subscribe(".*\\..*");
connector.rollback();
int totalEmptyCount = 120;
while (emptyCount < totalEmptyCount) {
Message message = connector.getWithoutAck(batchSize); // 获取指定数量的数据
long batchId = message.getId();
int size = message.getEntries().size();
if (batchId == -1 || size == 0) {
emptyCount++;
System.out.println("监控中 : " + emptyCount);
try {
Thread.sleep(1000);
} catch (InterruptedException e) {
}
} else {
emptyCount = 0;
// System.out.printf("message[batchId=%s,size=%s] \n", batchId, size);
printEntry(message.getEntries());
}
connector.ack(batchId); // 提交确认
// connector.rollback(batchId); // 处理失败, 回滚数据
}
System.out.println("empty too many times, exit");
} finally {
connector.disconnect();
}
}
private static void printEntry(List<Entry> entrys) {
for (Entry entry : entrys) {
if (entry.getEntryType() == EntryType.TRANSACTIONBEGIN || entry.getEntryType() == EntryType.TRANSACTIONEND) {
continue;
}
RowChange rowChage = null;
try {
rowChage = RowChange.parseFrom(entry.getStoreValue());
} catch (Exception e) {
throw new RuntimeException("ERROR ## parser of eromanga-event has an error , data:" + entry.toString(),
e);
}
EventType eventType = rowChage.getEventType();
// 可以获取到数据库实例名称、日志文件、当前操作的表以及执行的增删改查的操作
String logFileName = entry.getHeader().getLogfileName();
long logFileOffset = entry.getHeader().getLogfileOffset();
String dbName = entry.getHeader().getSchemaName();
String tableName = entry.getHeader().getTableName();
System.out.println(String.format("=======> binlog[%s:%s] , name[%s,%s] , eventType : %s",
logFileName, logFileOffset,
dbName, tableName,
eventType));
for (RowData rowData : rowChage.getRowDatasList()) {
if (eventType == EventType.DELETE) {
// 删除
printColumn(rowData.getBeforeColumnsList());
} else if (eventType == EventType.INSERT) {
// 新增
printColumn(rowData.getAfterColumnsList());
} else {
System.out.println("-------> before");
printColumn(rowData.getBeforeColumnsList());
System.out.println("-------> after");
printColumn(rowData.getAfterColumnsList());
}
}
}
}
private static void printColumn(List<Column> columns) {
for (Column column : columns) {
System.out.println(column.getName() + " : " + column.getValue() + " update=" + column.getUpdated());
}
}
}
运行上面代码然后你随意修改数据库 的数据
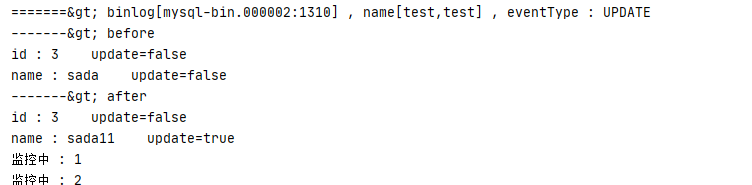
代表没问题
我使用的是mysql 5.7 有的sql语句 可能会出现下面的错误 所以为了避免下面这错误
mysql5.7报错:
[Err] 1055 - Expression #1 of ORDER BY clause is not in GROUP BY clause and contains nonaggregated column 'information_schema.PROFILING.SEQ' which is not functionally dependent on columns in GROUP BY clause; this is incompatible with sql_mode=only_full_group_by
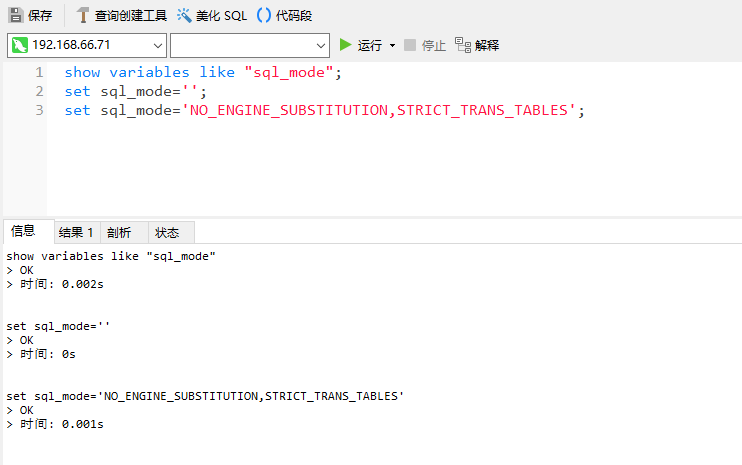
解决方法:
我懒得在进 centos7里 的docker里的msql配置 我在本地Navicat连接msql 直接运行下面命令
show variables like "sql_mode";
set sql_mode='';
set sql_mode='NO_ENGINE_SUBSTITUTION,STRICT_TRANS_TABLES';
在上面测试代码里的
connector.subscribe(".*\\..*");
有多种配置,如下:
mysql 数据解析关注的表,Perl正则表达式.
多个正则之间以逗号(,)分隔,转义符需要双斜杠(\\)
常见例子:
1.  所有表:.*   or  .*\\..*    (建议)
2.  canal schema下所有表: canal\\..*
3.  canal下的以canal打头的表:canal\\.canal.*
4.  canal schema下的一张表:canal.test1
5.  多个规则组合使用:canal\\..*,mysql.test1,mysql.test2 (逗号分隔)
注意:此过滤条件只针对row模式的数据有效(ps. mixed/statement因为不解析sql,所以无法准确提取tableName进行过滤)
安装Canal辅助jar包
当用户执行 数据库的操作的时候,binlog 日志会被canal捕获到,并解析出数据。我们就可以将解析出来的数据读取出来
下载Canal项目 里面包括教程
https://github.com/chenqian56131/spring-boot-starter-canal
或者
链接:https://pan.baidu.com/s/1Z6A0rvS8kV9u4jar_KvRAw
提取码:1234
接下来很关键 这一步如果失败了 那么你就不用玩了
-
解压 spring-boot-starter-canal-master.zip
-
将spring-boot-starter-canal-master导入IDEA中

解压 导入 idea 注意是父子级项目 要导入父级
- 将starter-canal项目导入到Maven中

- 配置好你的Maven库
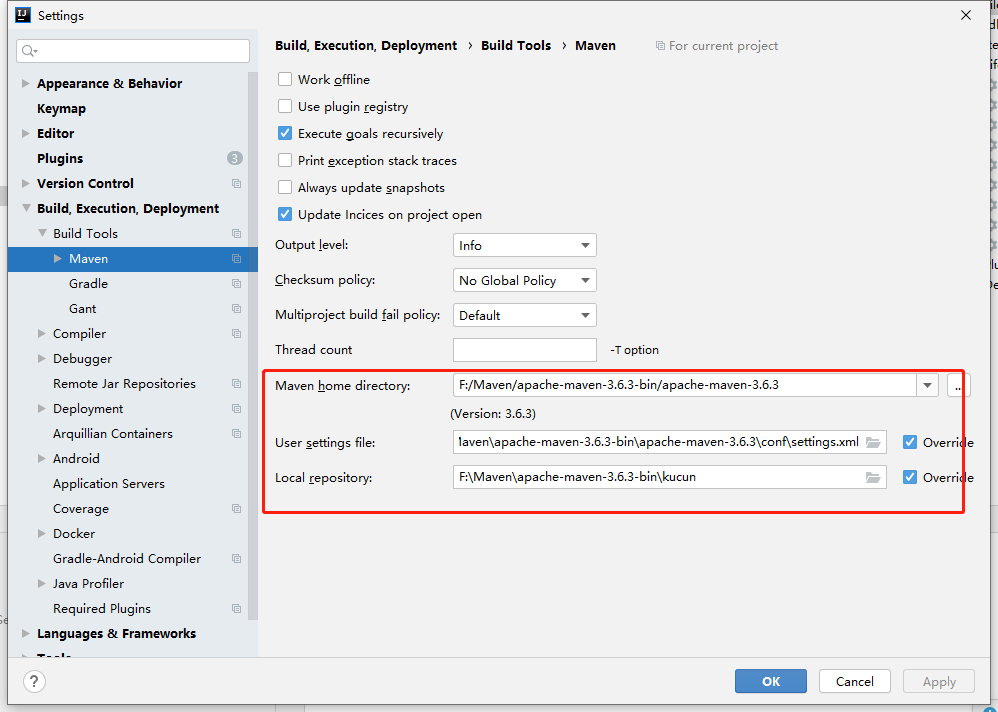
- 配置好项目的JDK Maven否则打包不了

-
使用Maven打包项目
打包到你自己的本地仓库 的地址 (默认就行)
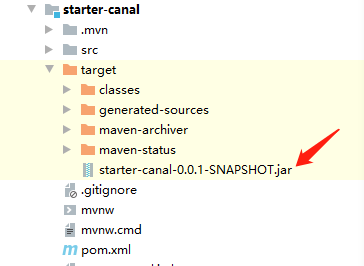
开始打包

成功后在项目下面会出现
而们本地仓库里也有
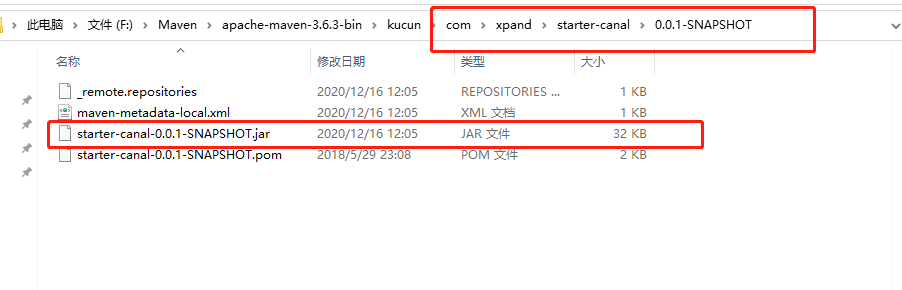
我们以后通过
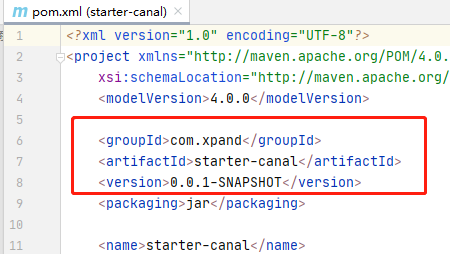
    <dependency>
        <groupId>com.xpand</groupId>
        <artifactId>starter-canal</artifactId>
        <version>0.0.1-SNAPSHOT</version>
    </dependency>
就能使用了Canal了
Springboot-Canal
需要的Maven
    <groupId>org.example</groupId>
    <artifactId>canal</artifactId>
    <version>1.0-SNAPSHOT</version>


    <parent>
        <groupId>org.springframework.boot</groupId>
        <artifactId>spring-boot-starter-parent</artifactId>
        <version>2.1.4.RELEASE</version>
    </parent>

    <dependencies>
        <dependency>
            <groupId>org.springframework.boot</groupId>
            <artifactId>spring-boot-starter-web</artifactId>
        </dependency>

        <!--Mybatis 和Spring boot 自动整合依赖(通用Mapper) -->
        <dependency>
            <groupId>tk.mybatis</groupId>
            <artifactId>mapper-spring-boot-starter</artifactId>
            <version>2.1.5</version>
        </dependency>
        <!--fastjson   json解析-->
        <dependency>
            <groupId>com.alibaba</groupId>
            <artifactId>fastjson</artifactId>
            <version>1.2.51</version>
        </dependency>
        <dependency>
            <groupId>mysql</groupId>
            <artifactId>mysql-connector-java</artifactId>
            <version>5.1.47</version>
        </dependency>
        <dependency>
            <groupId>org.springframework.boot</groupId>
            <artifactId>spring-boot-starter-jdbc</artifactId>
            <version>2.3.0.RELEASE</version>
        </dependency>
        <dependency>
            <groupId>com.xpand</groupId>
            <artifactId>starter-canal</artifactId>
            <version>0.0.1-SNAPSHOT</version>
        </dependency>

    </dependencies>

    <!--    自动查找主类  用于打包 -->
    <build>
        <plugins>
            <plugin>
                <groupId>org.springframework.boot</groupId>
                <artifactId>spring-boot-maven-plugin</artifactId>
            </plugin>
        </plugins>
    </build>
项目结构

代码
application.yml
server:
  port: 18081
spring:
  application:
    name: canal


#canal配置
canal:
  client:
    instances:
      example:
        host: 192.168.66.71
        port: 11111
CanalApplication(启动类)
package com.huitoushian.canal;

import com.xpand.starter.canal.annotation.EnableCanalClient;
import org.springframework.boot.SpringApplication;
import org.springframework.boot.autoconfigure.SpringBootApplication;
import org.springframework.boot.autoconfigure.jdbc.DataSourceAutoConfiguration;

@SpringBootApplication(exclude={DataSourceAutoConfiguration.class})
@EnableCanalClient
public class CanalApplication {

    public static void main(String[] args) {

        SpringApplication.run(CanalApplication.class,args);
    }
}
监听类
package com.huitoushian.canal.listener;

import com.alibaba.otter.canal.protocol.CanalEntry;
import com.xpand.starter.canal.annotation.*;

import java.util.HashMap;
import java.util.Map;

@CanalEventListener
public class CanalDataEventListener {

    /***
     * 增加数据监听
     * @param eventType
     * @param rowData
     */
    @InsertListenPoint
    public void onEventInsert(CanalEntry.EventType eventType, CanalEntry.RowData rowData) {

        System.out.println("-------------------------InsertListenPoint----------------");
        Map<String,String> map=new HashMap<>()  ;
        rowData.getAfterColumnsList().forEach((c) -> {
            map.put(c.getName(),c.getValue());
        });
        System.out.println(map);

    }

     /***
     *  删除数据监听  (获取删除的数据)
     * @param eventType
     * @param rowData
     */

	@DeleteListenPoint
    public void onEventDelete(CanalEntry.EventType eventType, CanalEntry.RowData rowData) {
        System.out.println("----------------------------DeleteListenPoint----------------");
        Map<String,String> map=new HashMap<>()  ;
        rowData.getBeforeColumnsList().forEach((c) -> {
            map.put(c.getName(),c.getValue());
        });
        System.out.println(map);
    }


    /***
     * 修改数据监听
     * @param rowData
     */
    @UpdateListenPoint
    public void onEventUpdate(CanalEntry.EventType eventType, CanalEntry.RowData rowData) {
        System.out.println("----------------------------UpdateListenPoint----------------");
        Map<String,String> map=new HashMap<>()  ;
        rowData.getAfterColumnsList().forEach((c) -> {
            map.put(c.getName(),c.getValue());
        });
        System.out.println(map);
    }

    /**
     * 自定义数据修改监听
     * schema  是监听的数据库
     * table  是监听数据库的表
     * eventType  监听类型  (我们平常使用的也就 增加和修改的时候)
     *               CanalEntry.EventType.INSERT( 增加)
     *               CanalEntry.EventType.UPDATE(修改)
     				..............................
     * @param rowData
     */
    @ListenPoint(destination = "example", schema = {"test"}, table = {"test1", "test2"}, eventType = CanalEntry.EventType.UPDATE)
    public void onEventCustomUpdate( CanalEntry.EventType eventType, CanalEntry.RowData rowData) {
        System.err.println("----------------------ListenPoint-------------------");
        Map<String,String> map=new HashMap<>()  ;
        rowData.getAfterColumnsList().forEach((c) -> {
            map.put(c.getName(),c.getValue());
        });
        System.out.println(map);
    }
}
自行修改数据库内信息 看查控制台变化
**注意:**在使用过程中如果出现 数据一直重复读取 和一直读取超时 你把mysql里的binglog删除然后重启下就好了 这是你canal客户端因为网络原因和服务端断开连接了.此时服务端就会陷入阻塞状态 ,这时mysql如果还在增删改的话 那么任务都会堆积到canal服务端里 等待你下次连接时候一次性执行完毕 ,如果数据量大的话那么就会读取超时 ,因为超时的时间是1分钟 canal服务端就会和你主动断开连接 然后你在次连接canal服务端又会从新读取数据然后又超时 …陷入死循环了
@InsertListenPoint @UpdateListenPoint @DeleteListenPoint @ListenPoint
@UpdateListenPoint(destination = "",schema = {""} ,table = {""})
如果什么参数都不加 那么就是默认监听 mysql所有数据库内的所有表(实际开发中 不建议这样 浪费资源)
@UpdateListenPoint
我这里来拿 @ListenPoint 这个注解进行讲解 也是我们最常使用的一个注解
这个注解唯一不同的是能自定义监听类型 而且可以同时监听多种类型
而其他三个节点只能监听 属于自己类型的 数据变化
-
@ListenPoint 用于控制到底是监听 那个数据库 那个表的
- destination 是application.yml 里的配置canal的节点

-
schema 就是指定监听的 数据库的名称 可以同时监听多个数据库 使用逗号隔开
-
table 就是指定监听的 schema配置的数据库内的表
可以同时监听多个表 使用逗号隔开 (省略就是监听全部表)
-
eventType 就是监听 数据变化的类型
常用的就这三个
CanalEntry.EventType.UPDATE
CanalEntry.EventType.DELETE
CanalEntry.EventType.INSERT
可以同时配置监听多种类型 {CanalEntry.EventType.UPDATE , CanalEntry.EventType.DELETE} 使用逗号隔开
以上就是注解方面的内容 下面我们就来讲讲方法了
可以看出来 方法参数 一共有两种 CanalEntry.EventType 和 CanalEntry.RowData
CanalEntry.EventType 主要用于 获取当前的操作类型
比如:
 if (eventType == CanalEntry.EventType.DELETE) {   //判断当前操作是不是删除
    System.out.println("------de------");
 }
而 CanalEntry.RowData 是获取当前操作中的数据 而获取数据有两种方法 一种是 获取操作前的数据 一种是获取操作后的数据
那么如何使用呢 在修改和增加 使用获取操作后的数据方法 而删除 使用获取删除前的数据方法
获取操作前的方法 Before
for (CanalEntry.Column column : rowData.getBeforeColumnsList()) {
   if (column.getName().equalsIgnoreCase("category_id")) {  //获取指定字段的值
         			 System.out.println("key:"+column.getName()+"____"+"value:"+column.getValue());
   }
}
遍历的时候 通过 column.getName()获取字段名称 column.getValue() 获取字段值
而获取操作后的方法 After
for (CanalEntry.Column column : rowData.getAfterColumnsList()) {
    if (column.getName().equalsIgnoreCase("category_id")) {//获取指定字段的值
	  System.out.println("key:"+column.getName()+"____"+"value:"+column.getValue());
    }
}
接下来就是使用 canal 和其他的功能整合了
Springboot-Canal-Redis
我们随便拿一个案例来 模拟 使用 Canal 实时更新 Redis
想一想 我么往常使用Redis的时候 如果数据库更新了
我们还需要手动写接口 来判断是否更新了数据库 如果更新了 然后更新Redis的缓存 而我们使用Canal配合Redis就将这一项变为自动化
我们来做一个广告的案例:
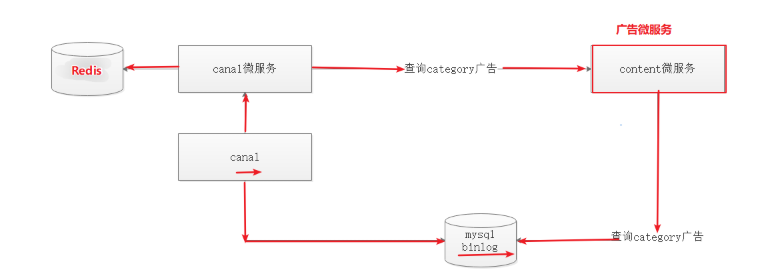
如上图,每次执行广告操作的时候,会记录操作日志到,然后将操作日志发送给canal服务,canal服务将操作记录发送给canal微服务(客户端),canal微服务根据修改的分类ID调用content微服务查询分类对应的所有广告,canal微服务再将所有广告存入到Redis缓存。 而我们往常 增删改 数据库 后都是直接覆盖掉redis中的值 而我们查询的时候无须在查询数据库了 直接查询Redis就行
我用的表:
链接:https://pan.baidu.com/s/1LNobF-vHWtIjj0fjIV8ZUQ
提取码:1234
先把Canal和mysql 关联环境搭建好 测试成功
项目结构

需要的Maven
    <parent>
        <groupId>org.springframework.boot</groupId>
        <artifactId>spring-boot-starter-parent</artifactId>
        <version>2.1.4.RELEASE</version>
    </parent>

    <dependencies>
        <dependency>
            <groupId>org.springframework.boot</groupId>
            <artifactId>spring-boot-starter-web</artifactId>
        </dependency>

        <!--Mybatis 和Spring boot 自动整合依赖(通用Mapper) -->
        <dependency>
            <groupId>tk.mybatis</groupId>
            <artifactId>mapper-spring-boot-starter</artifactId>
            <version>2.1.5</version>
        </dependency>
        <!--fastjson   json解析-->
        <dependency>
            <groupId>com.alibaba</groupId>
            <artifactId>fastjson</artifactId>
            <version>1.2.51</version>
        </dependency>
        <dependency>
            <groupId>mysql</groupId>
            <artifactId>mysql-connector-java</artifactId>
            <version>5.1.47</version>
        </dependency>
        <dependency>
            <groupId>org.springframework.boot</groupId>
            <artifactId>spring-boot-starter-jdbc</artifactId>
            <version>2.3.0.RELEASE</version>
        </dependency>
        <dependency>
            <groupId>com.xpand</groupId>
            <artifactId>starter-canal</artifactId>
            <version>0.0.1-SNAPSHOT</version>
        </dependency>

        <dependency>
            <groupId>org.springframework.boot</groupId>
            <artifactId>spring-boot-starter-data-redis</artifactId>
        </dependency>


        <dependency>
            <groupId>org.apache.commons</groupId>
            <artifactId>commons-pool2</artifactId>
            <version>2.7.0</version>
        </dependency>

        <dependency>
            <groupId>junit</groupId>
            <artifactId>junit</artifactId>
            <version>4.12</version>
            <scope>provided</scope>
        </dependency>


        <dependency>
            <groupId>com.google.code.gson</groupId>
            <artifactId>gson</artifactId>
            <version>2.8.6</version>
        </dependency>

    </dependencies>

    <!--    自动查找主类  用于打包 -->
    <build>
        <plugins>
            <plugin>
                <groupId>org.springframework.boot</groupId>
                <artifactId>spring-boot-maven-plugin</artifactId>
            </plugin>
        </plugins>
    </build>
application.yml
server:
  port: 18081
spring:
  application:
    name: canal
  redis:
    host: 192.168.66.66
    port: 6379
  datasource:
    driver-class-name: com.mysql.jdbc.Driver
    url: jdbc:mysql://192.168.66.66:3306/changgou_content?useUnicode=true&characterEncoding=UTF-8&serverTimezone=UTC
    username: root
    password: 123456


#canal配置
canal:
  client:
    instances:
      example:
        host: 192.168.66.66
        port: 11111
listener
import com.alibaba.otter.canal.protocol.CanalEntry;
import com.huitoushian.canal.pojo.Content;
import com.huitoushian.canal.service.ContentService;
import com.huitoushian.canal.utlis.JsonTurnUtils;
import com.xpand.starter.canal.annotation.CanalEventListener;
import com.xpand.starter.canal.annotation.ListenPoint;
import org.springframework.beans.factory.annotation.Autowired;
import org.springframework.data.redis.core.StringRedisTemplate;

import java.util.List;

@CanalEventListener
public class CanalDataEventListener {

    //StringRedisTemplate 是Springboot 里的封装好的操作redis的高效缓存池包括一系类方法
    @Autowired
    private StringRedisTemplate stringRedisTemplate;

    @Autowired
    private ContentService contentService;

    //自定义数据库的监听  来修改redis缓存
    @ListenPoint(destination = "example",
            schema = {"changgou_content"},
            table = {"tb_content"},
            eventType = {
                    CanalEntry.EventType.UPDATE,
                    CanalEntry.EventType.DELETE,
                    CanalEntry.EventType.INSERT})
    public void onEventCustomUpdate(CanalEntry.EventType eventType, CanalEntry.RowData rowData) {

            //1.获取列名 为category_id的值
            String categoryId = getColumnValue(eventType, rowData);
            //2.通过http访问 获取到数据
        try {


            List<Content> byCategory = contentService.findByCategory(Long.valueOf(categoryId));
            String s = JsonTurnUtils.objTurnJson(byCategory);
            System.out.println( s);
            if(byCategory!=null&&!s.equals("[]")&&!s.equals("{}")&&!s.equals("")){
                //3.使用redisTemplate存储到redis中
                System.out.println("修改或者添加缓存");
                stringRedisTemplate.opsForValue().set("content_" + categoryId, s);
            }else {
                System.out.println("删除缓存");
                stringRedisTemplate.delete("content_" + categoryId);
            }

        } catch (Exception e) {
            e.printStackTrace();
        }
    }

    //获取指定字段的值
    private String getColumnValue(CanalEntry.EventType eventType, CanalEntry.RowData rowData) {
        String categoryId = "";
        //判断 如果是删除  则获取  beforlist  删除前的值
        if (eventType == CanalEntry.EventType.DELETE) {
            System.out.println("------de------");
            for (CanalEntry.Column column : rowData.getBeforeColumnsList()) {
                if (column.getName().equalsIgnoreCase("category_id")) {  //获取指定字段的值
                    categoryId = column.getValue();
                    return categoryId;
                }
            }
        } else {
            //判断 如果是添加 或者是更新 获取  afterlist   添加或者修改后的值
            System.out.println("------up------------in------");
            for (CanalEntry.Column column : rowData.getAfterColumnsList()) {
                if (column.getName().equalsIgnoreCase("category_id")) {//获取指定字段的值
                    categoryId = column.getValue();
                    return categoryId;
                }
            }
        }
        return categoryId;
    }
}
dao
import com.huitoushian.canal.pojo.Content;
import org.springframework.stereotype.Repository;
import tk.mybatis.mapper.common.Mapper;


@Repository
public interface ContentMapper extends Mapper<Content> {
}
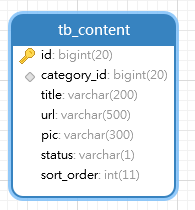
pojo
import javax.persistence.*;
import java.io.Serializable;


@Table(name="tb_content")
public class Content implements Serializable{

	@Id
    @GeneratedValue(strategy = GenerationType.IDENTITY)
    @Column(name = "id")
	private Long id;//


    @Column(name = "category_id")
	private Long categoryId;//内容类目ID

    @Column(name = "title")
	private String title;//内容标题


    @Column(name = "url")
	private String url;//链接

    @Column(name = "pic")
	private String pic;//图片绝对路径


    @Column(name = "status")
	private String status;//状态,0无效,1有效

    @Column(name = "sort_order")
	private Integer sortOrder;//排序


	//get方法
	public Long getId() {
		return id;
	}

	//set方法
	public void setId(Long id) {
		this.id = id;
	}
	//get方法
	public Long getCategoryId() {
		return categoryId;
	}

	//set方法
	public void setCategoryId(Long categoryId) {
		this.categoryId = categoryId;
	}
	//get方法
	public String getTitle() {
		return title;
	}

	//set方法
	public void setTitle(String title) {
		this.title = title;
	}
	//get方法
	public String getUrl() {
		return url;
	}

	//set方法
	public void setUrl(String url) {
		this.url = url;
	}
	//get方法
	public String getPic() {
		return pic;
	}

	//set方法
	public void setPic(String pic) {
		this.pic = pic;
	}
	//get方法
	public String getStatus() {
		return status;
	}

	//set方法
	public void setStatus(String status) {
		this.status = status;
	}
	//get方法
	public Integer getSortOrder() {
		return sortOrder;
	}

	//set方法
	public void setSortOrder(Integer sortOrder) {
		this.sortOrder = sortOrder;
	}


}
service
import com.huitoushian.canal.pojo.Content;

import java.util.List;


public interface ContentService {

    /***
     * 根据categoryId查询广告集合
     * @param id
     * @return
     */
    List<Content> findByCategory(Long id);

}
service - impl
import com.huitoushian.canal.dao.ContentMapper;
import com.huitoushian.canal.pojo.Content;
import com.huitoushian.canal.service.ContentService;
import org.springframework.beans.factory.annotation.Autowired;
import org.springframework.stereotype.Service;

import java.util.List;


@Service
public class ContentServiceImpl implements ContentService {

    @Autowired
    private ContentMapper contentMapper;


    /***
     * 根据分类ID查询
     * @param id
     * @return
     */
    @Override
    public List<Content> findByCategory(Long id) {
        Content content = new Content();
        content.setCategoryId(id);
        content.setStatus("1");
        return contentMapper.select(content);
    }
}
controller
import com.alibaba.fastjson.JSON;
import com.huitoushian.canal.pojo.Content;
import com.huitoushian.canal.service.ContentService;
import com.huitoushian.canal.utlis.Result;
import com.huitoushian.canal.utlis.StatusCode;
import org.springframework.beans.factory.annotation.Autowired;
import org.springframework.data.redis.core.StringRedisTemplate;
import org.springframework.web.bind.annotation.*;

import java.util.List;


@RestController
@RequestMapping("/content")
@CrossOrigin
public class ContentController {

    @Autowired
    private ContentService contentService;
    //字符串
    @Autowired
    private StringRedisTemplate stringRedisTemplate;

    /***
     * 根据categoryId查询广告集合
     */
    @GetMapping(value = "/list/category")
    public Result<List<Content>> findByCategory(Long id){
        String s = stringRedisTemplate.opsForValue().get("content_" + id);
        if(s!=null&&!"".equals(s)){
            System.out.println("/list/category/{id} ------读取缓存");
            return new Result<List<Content>>(true, StatusCode.OK,"查询成功!", JSON.parseArray(s));
        }
        return new Result<List<Content>>(false, StatusCode.OK,"查询失败! 可能没有这条记录", null);
    }


}
启动类
import com.xpand.starter.canal.annotation.EnableCanalClient;
import org.springframework.boot.SpringApplication;
import org.springframework.boot.autoconfigure.SpringBootApplication;
import tk.mybatis.spring.annotation.MapperScan;


@SpringBootApplication
@EnableCanalClient
@MapperScan(basePackages = {"com.huitoushian.canal.dao"})
public class CanalApplication {

    public static void main(String[] args) {

        SpringApplication.run(CanalApplication.class,args);
    }

}
utils工具包
链接:https://pan.baidu.com/s/1non0X644DwL0TreSR2LcqA
提取码:1234
然后 在 Navicat 中测试
测试添加 sql语句
INSERT INTO `changgou_content`.`tb_content`(`id`, `category_id`, `title`, `url`, `pic`, `status`, `sort_order`) VALUES (32, 4, '休息休息111', 'http://www.itheima.com', 'http://www.itheima1.com', '1', 1);
INSERT INTO `changgou_content`.`tb_content`(`id`, `category_id`, `title`, `url`, `pic`, `status`, `sort_order`) VALUES (33, 4, '休1111息111', 'http://www.ith2222a.com', 'http://www.it22ma1.com', '1', 1);
注意观察控制台打印输出变化
测试删除sql语句
DELETE FROM tb_content where category_id=4
注意观察控制台打印输出变化
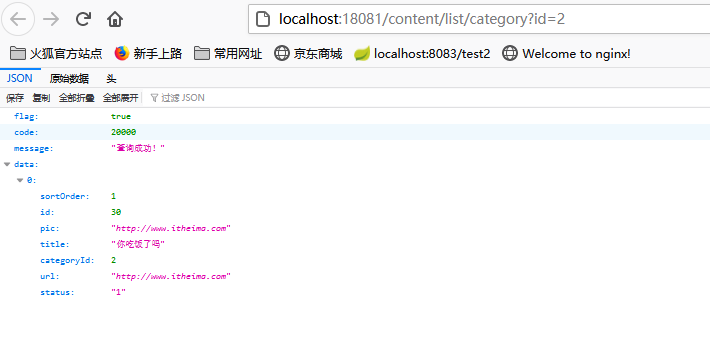
随意修改表内的数据 比如我修改了category_id为2的数据 访问接口 看看是否缓存成功
http://localhost:18081/content/list/category?id=2
Springboot-Canal-Elasticsearch
同理 Springboot-Canal-Redis 只需要把Redis的操作换成Elasticsearch就行 实在不会自行到网上查相关资料进行参照就行


 5万+
5万+


 被折叠的 条评论
为什么被折叠?
被折叠的 条评论
为什么被折叠?
 到【灌水乐园】发言


