


SpringBoot启动流程
事先声明:本文对springboot源码讲解不太深,只有皮毛而已,如有需要详细源码流程,请移步!
本文主要是部分对springboot的源码解析+可扩展的功能(初始化等)
文尾有图
启动流程
先把版本贴出来,不同的版本代码和配置可能会不大相同,但是思想都是通的
<parent>
    <groupId>org.springframework.boot</groupId>
    <artifactId>spring-boot-starter-parent</artifactId>
    <version>2.5.4</version>
</parent>
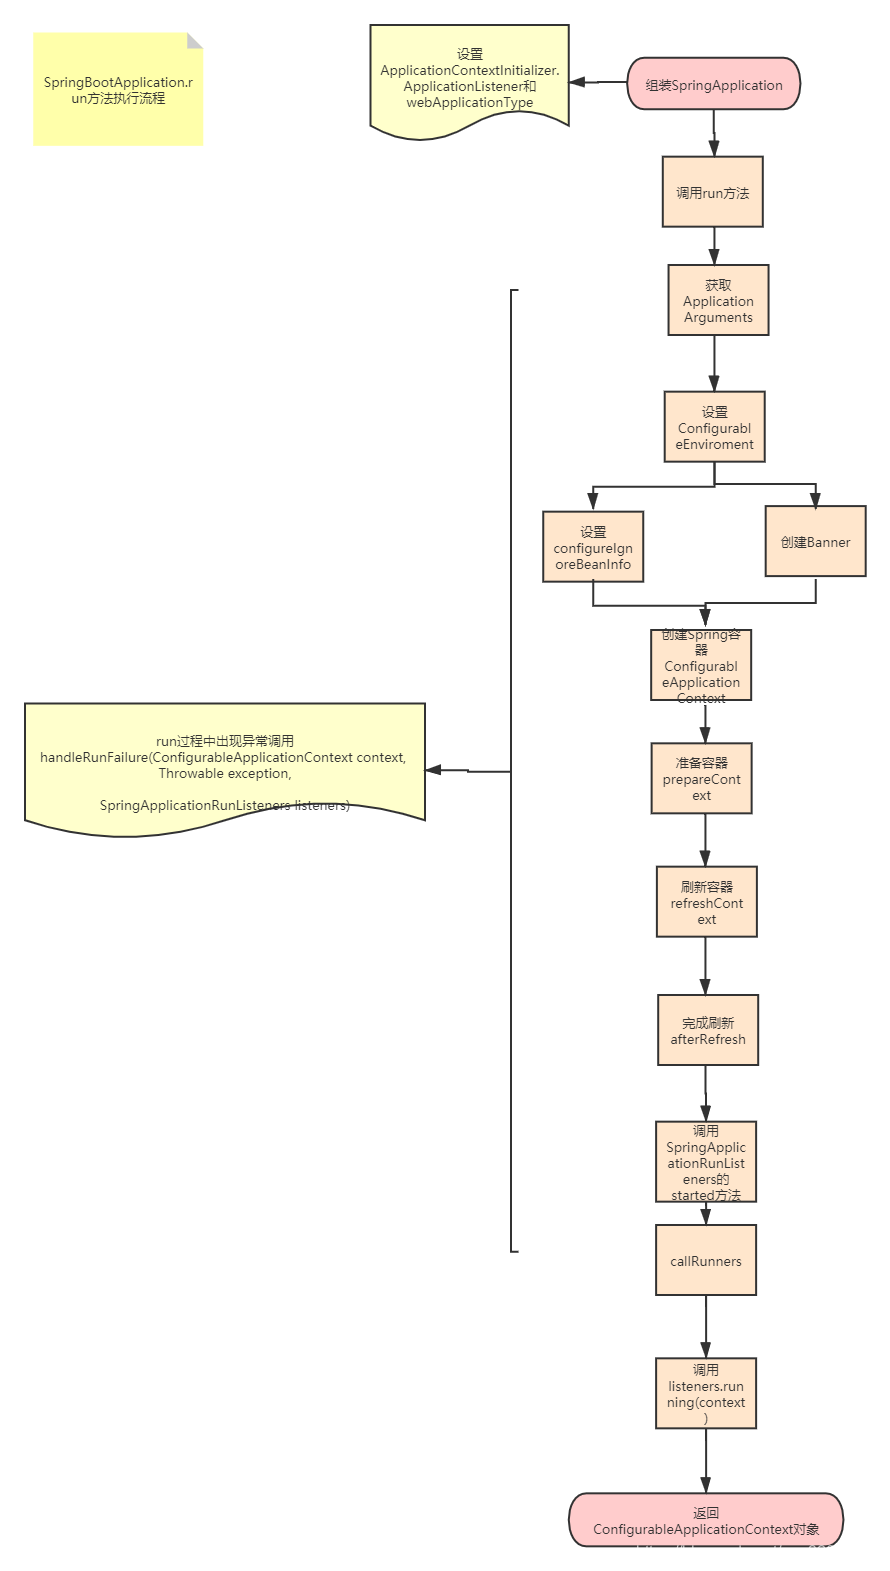
先借用下大佬的图,以便对照图来看代码
1.`首先入口处的启动类,都是创建一个Main主函数,调用run方法
@SpringBootApplication
public class DispatcherApplication {

    public static void main(String[] args) {
        SpringApplication.run(DispatcherApplication.class, args);
    }
}
2.进去run看一下,返回值是ConfigurableApplicationContext(继承自ApplicationContext),其实返回值就是spring的bean容器
public static ConfigurableApplicationContext run(Class<?> primarySource, String... args) {
    return run(new Class[]{primarySource}, args);
}
题外话:我们甚至可以去接收这个spring bean容器,获取到里面的bean组件,也可能遇到当springboot启动后立即初始化的需求,这里也是一种实现方式。
@SpringBootApplication
public class DispatcherApplication {

    public static void main(String[] args) {
        ConfigurableApplicationContext context = SpringApplication.run(DispatcherApplication.class, args);
        // 获取所有bean的名称
        String[] beanDefinitionNames = context.getBeanDefinitionNames();
        // 获取所有bean的数量
        int beanDefinitionCount = context.getBeanDefinitionCount();
        System.out.println("spring bean中有" + beanDefinitionCount + "个bean组件");
        for (String name : beanDefinitionNames) {
            System.out.println(name);
        }
        // 根据bean的class获取此bean组件
        DispatcherService bean = context.getBean(DispatcherService.class);
        System.out.println(bean);
    }

}
启动springboot看下控制台日志
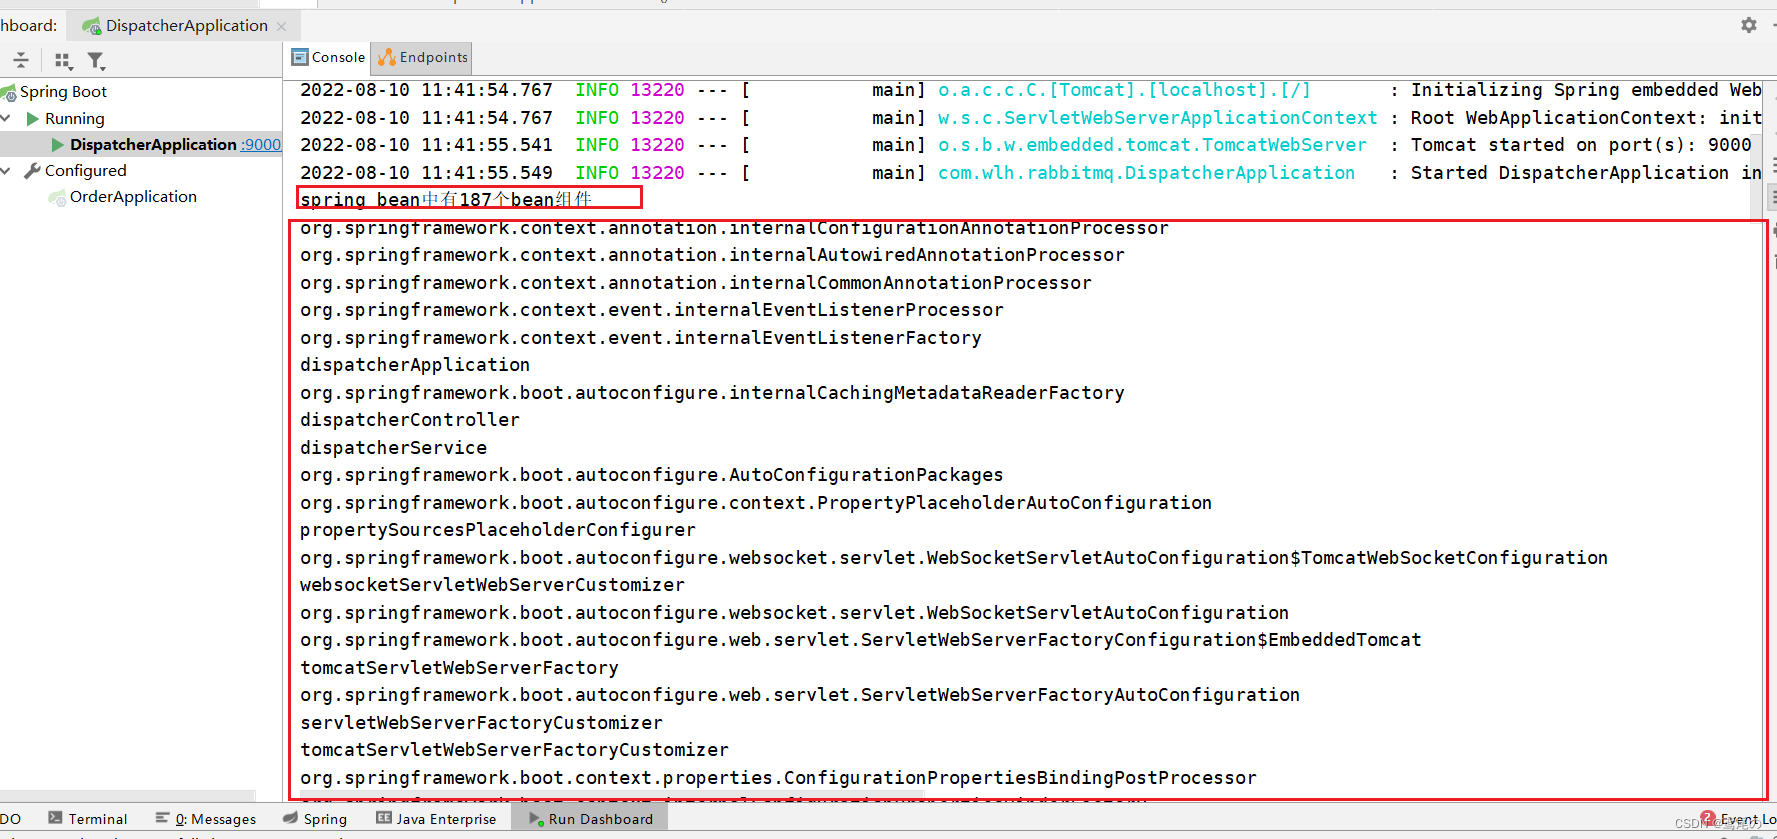
187个组件,一大堆哈哈。
最后根据类型获取bean的日志给贴一下
com.wlh.rabbitmq.service.DispatcherService@2cc04358
3.言归正传,在步骤2中继续往run方法里面看
public static ConfigurableApplicationContext run(Class<?>[] primarySources, String[] args) {
    return (new SpringApplication(primarySources)).run(args);
}
这里是先去创建了一个SpringApplication的应用对象,然后又再次调用了一个run()方法
4.看一下这个new SpringApplication(primarySources)
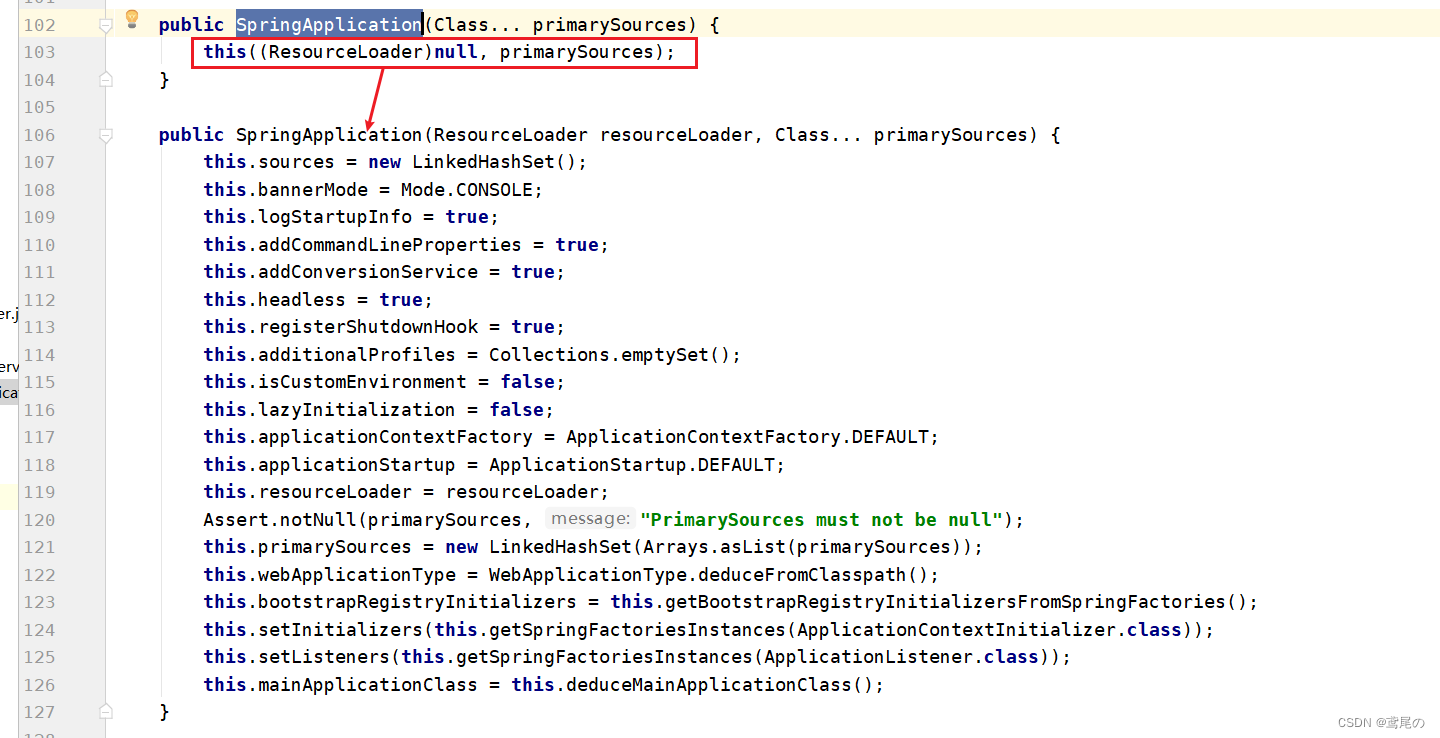
主要就是创建SpringApplication的对象,然后进行初始化一些值,如:bannerMode横幅模式(默认输出到控制台),webApplicationType(web应用环境类型,是否是web环境),设置initializers属性、设置listeners属性等(这几个属性都是通过方法的返回值设置的)
上图中
initializers属性和listeners属性都是调用了同一个方法getSpringFactoriesInstances实现的,依次点击去SpringFactoriesLoader.loadFactoryNames() ->loadSpringFactories(),发现:其实就是去读取META-INF/spring.factories中的配置
看下initializers和listeners分别读取的哪些
this.setInitializers(this.getSpringFactoriesInstances(ApplicationContextInitializer.class));
this.setListeners(this.getSpringFactoriesInstances(ApplicationListener.class));
initializers是读取的ApplicationContextInitializer的
listeners是读取的ApplicationListener的。看下分别读的哪些配置
# Initializers
org.springframework.context.ApplicationContextInitializer=\
org.springframework.boot.autoconfigure.SharedMetadataReaderFactoryContextInitializer,\
org.springframework.boot.autoconfigure.logging.ConditionEvaluationReportLoggingListener


# Application Listeners
org.springframework.context.ApplicationListener=\
org.springframework.boot.autoconfigure.BackgroundPreinitializer
5.回到步骤3,创建完SpringApplication对象后,又调用了run(),点进去看一下
public ConfigurableApplicationContext run(String... args) {
    // 使用的StopWatch计时器,记录启动总计时间
    StopWatch stopWatch = new StopWatch();
    stopWatch.start();

    DefaultBootstrapContext bootstrapContext = this.createBootstrapContext();
    // 定义了 springbean的容器(ioc容器)
    ConfigurableApplicationContext context = null;
    this.configureHeadlessProperty();

    // 创建并初始化监听器SpringApplicationRunListeners,并启动监听,用于监听run方法的执行。
    SpringApplicationRunListeners listeners = this.getRunListeners(args);
    listeners.starting(bootstrapContext, this.mainApplicationClass);

    try {
        // 创建并初始化ApplicationArguments,获取run方法传递的args参数
        ApplicationArguments applicationArguments = new DefaultApplicationArguments(args);

        // 创建并初始化ConfigurableEnvironment(环境配置)。封装main方法的参数,初始化参数,写入到 Environment中,发布 ApplicationEnvironmentPreparedEvent(环境事件),做一些绑定后返回Environment。
        ConfigurableEnvironment environment = this.prepareEnvironment(listeners, bootstrapContext, applicationArguments);
        this.configureIgnoreBeanInfo(environment);

        // 打印banner和版本。
        Banner printedBanner = this.printBanner(environment);

        // 构造Spring容器(ApplicationContext)上下文。
        context = this.createApplicationContext();
        context.setApplicationStartup(this.applicationStartup);

        // 准备spring容器,将启动类注入容器,为后续的自动装配奠定基础
        this.prepareContext(bootstrapContext, context, environment, listeners, applicationArguments, printedBanner);

        // 刷新容器(创建bean)、加载自动化配置信息(很重要)
        this.refreshContext(context);
        // spring容器后置处理
        this.afterRefresh(context, applicationArguments);

        // 计时器停止
        stopWatch.stop();
        if (this.logStartupInfo) {
            (new StartupInfoLogger(this.mainApplicationClass)).logStarted(this.getApplicationLog(), stopWatch);
        }
		// 发出启动结束事件
        listeners.started(context);
        // 执行runner的run方法
        this.callRunners(context, applicationArguments);

    } catch (Throwable var10) {
        this.handleRunFailure(context, var10, listeners);
        throw new IllegalStateException(var10);
    }

    try {
        listeners.running(context);
        // 返回spring容器
        return context;
    } catch (Throwable var9) {
        this.handleRunFailure(context, var9, (SpringApplicationRunListeners)null);
        throw new IllegalStateException(var9);
    }
}
6.那么刷新容器(创建bean)、加载自动化配置信息(很重要)这一步到底做了什么呢?
/**
	 * 刷新应用程序上下文
	 *
	 * @param context
	 */
private void refreshContext(ConfigurableApplicationContext context) {
    // 注册一个关闭钩子,在jvm停止时会触发,然后退出时执行一定的退出逻辑
    if (this.registerShutdownHook) {
        shutdownHook.registerApplicationContext(context);
    }
	// ApplicationContext真正开始初始化容器和创建bean的阶段
    this.refresh(context);
}

protected void refresh(ApplicationContext applicationContext) {
    Assert.isInstanceOf(ConfigurableApplicationContext.class, applicationContext);
    refresh((ConfigurableApplicationContext) applicationContext);
}

protected void refresh(ConfigurableApplicationContext applicationContext) {
    applicationContext.refresh();
}
applicationContext.refresh()又是调用的AbstractApplicationContext类的方法,去看一下
@Override
public void refresh() throws BeansException, IllegalStateException {
    synchronized (this.startupShutdownMonitor) {
        StartupStep contextRefresh = this.applicationStartup.start("spring.context.refresh");

        // 第一步:准备更新上下文时的预备工作
        prepareRefresh();

        // 第二步:获取上下文内部BeanFactory
        ConfigurableListableBeanFactory beanFactory = obtainFreshBeanFactory();

        // 第三步:对BeanFactory做预备工作
        prepareBeanFactory(beanFactory);

        try {
            // 第四步:允许在上下文子类中对bean工厂进行post-processing
            postProcessBeanFactory(beanFactory);

            StartupStep beanPostProcess = this.applicationStartup.start("spring.context.beans.post-process");
            // 第五步:调用上下文中注册为bean的工厂 BeanFactoryPostProcessor
            invokeBeanFactoryPostProcessors(beanFactory);

            // 第六步:注册拦截bean创建的拦截器
            registerBeanPostProcessors(beanFactory);
            beanPostProcess.end();

            // 第七步:初始化MessageSource(国际化相关)
            initMessageSource();

            // 第八步:初始化容器事件广播器(用来发布事件)
            initApplicationEventMulticaster();

            // 第九步:初始化一些特殊的bean
            onRefresh();

            // 第十步:将所有监听器注册到前两步创建的事件广播器中
            registerListeners();

            // 第十一步:结束bean的初始化工作(主要将所有单例BeanDefinition实例化)
            finishBeanFactoryInitialization(beanFactory);

            // 第十二步:afterRefresh(上下文刷新完毕,发布相应事件)
            finishRefresh();
        } catch (BeansException ex) {
            if (logger.isWarnEnabled()) {
                logger.warn("Exception encountered during context initialization - " +
                            "cancelling refresh attempt: " + ex);
            }
            destroyBeans();
            cancelRefresh(ex);
            throw ex;
        } finally {

            resetCommonCaches();
            contextRefresh.end();
        }
    }
}
以上第五步调用上下文中注册为bean的工厂 BeanFactoryPostProcessor,则是自动装配的过程。
7.再回到步骤5,最后有一步
// 执行runner的run方法
this.callRunners(context, applicationArguments);
点进去看一下
private void callRunners(ApplicationContext context, ApplicationArguments args) {
    List<Object> runners = new ArrayList();
    // 将所有spring容器中类型为ApplicationRunner和CommandLineRunner的组件加载进来
    runners.addAll(context.getBeansOfType(ApplicationRunner.class).values());
    runners.addAll(context.getBeansOfType(CommandLineRunner.class).values());
    AnnotationAwareOrderComparator.sort(runners);
    Iterator var4 = (new LinkedHashSet(runners)).iterator();

    while(var4.hasNext()) {
        Object runner = var4.next();

        if (runner instanceof ApplicationRunner) {
            this.callRunner((ApplicationRunner)runner, args);
        }

        if (runner instanceof CommandLineRunner) {
            this.callRunner((CommandLineRunner)runner, args);
        }
    }

}
将所有spring容器中类型为ApplicationRunner和CommandLineRunner的组件加载后,又调用了callRunner()方法,那么这个方法是干嘛的呢?
private void callRunner(ApplicationRunner runner, ApplicationArguments args) {
    try {
        runner.run(args);
    } catch (Exception var4) {
        throw new IllegalStateException("Failed to execute ApplicationRunner", var4);
    }
}
原来是直接调用run()方法执行了,突然感觉好像可以实现这两个接口上然后重写run方法做一些在spring容器创建完bean后做一些别的初始化任务,毕竟spring容器和里面的bean这个时候肯定已经创建好了,而且spring官方特意留了这么一步,应该就是为了让我们使用者可以在SpringBoot启动后立即做一些初始化数据的扩展!!!
而文章开头说的那种方式也可以实现初始化任务,但是感觉太low,这种方式更好扩展,并且是在返回spring容器之前就进行初始化了,更接近底层。
事不宜迟,给个例子
// 实现 ApplicationRunner
@Component
public class MyInitRunner1 implements ApplicationRunner {

    @Autowired
    private DispatcherService dispatcherService;

    @Override
    public void run(ApplicationArguments args) throws Exception {
        System.out.println(dispatcherService);
    }
}

// 实现 CommandLineRunner
@Component
public class MyInitRunner2 implements CommandLineRunner {

    @Autowired
    private DispatcherService dispatcherService;

    @Override
    public void run(String... args) throws Exception {
        System.out.println(dispatcherService);
    }
}
看结果
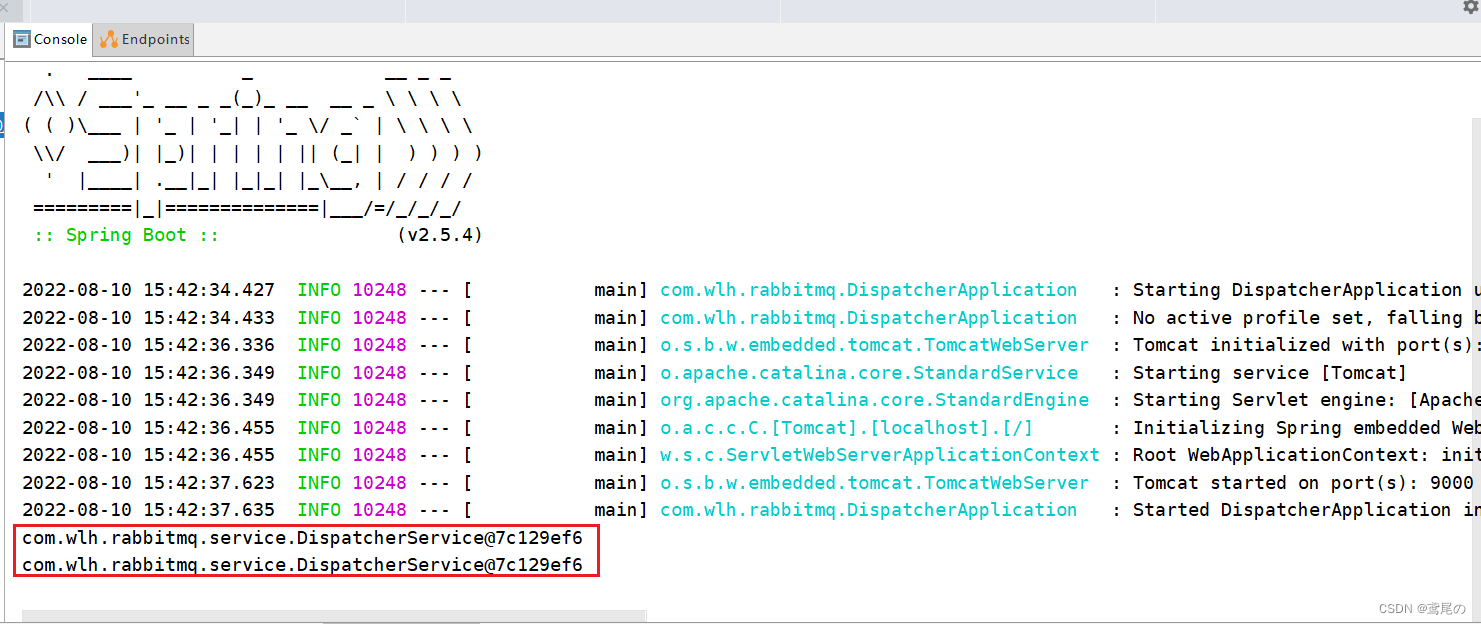
哦吼,果然可以,第一时间被初始化了,而且dispatcherService这个对象是同一个对象(spring的单例模式)。提一嘴:注意java中的单例模式和spring的单例模式不是一回事,java中的单例模式在整个jvm中有且仅有一个对象,但是如果你一个系统有多个spring的容器,那么每个spring的容器中都有一个对象,广泛意义上讲就不是单例了,当然这种一个系统有多个spring容器极低的概率遇到哈哈~~
再啰嗦一句,如果我们需要配置多个初始化的内容,但是可能创建了多个类或方法,那么如果想要控制一下加载的顺序,我们可以使用@Order注解来控制类或方法的加载顺序。
@Order(1)
@Component
public class MyInitRunner2 implements CommandLineRunner {
@Autowired
private DispatcherService dispatcherService;
@Override
public void run(String... args) throws Exception {
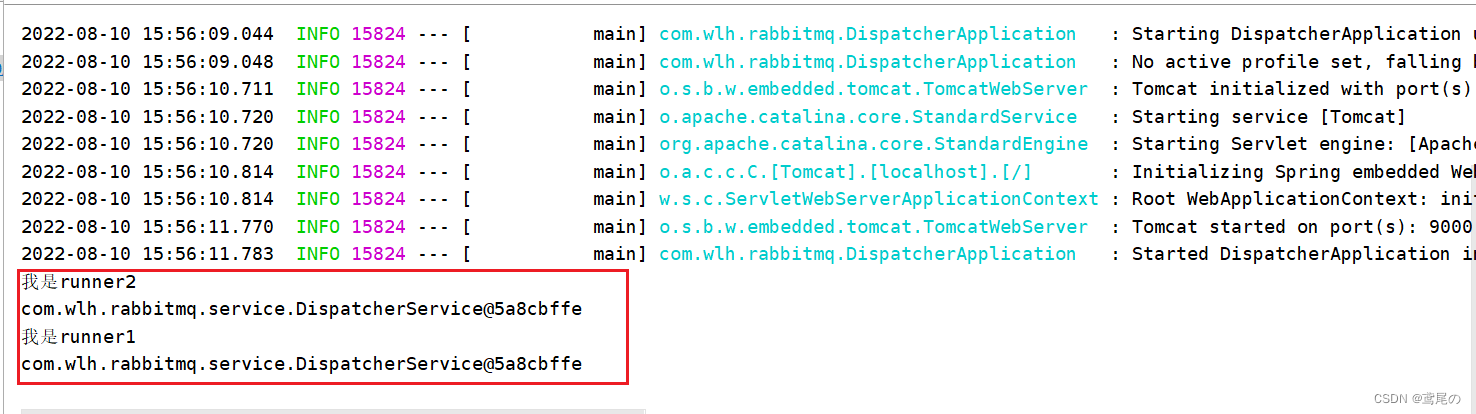
System.out.println("我是runner2");
System.out.println(dispatcherService);
}
}
@Order(2)
@Component
public class MyInitRunner1 implements ApplicationRunner {
@Autowired
private DispatcherService dispatcherService;
@Override
public void run(ApplicationArguments args) throws Exception {
System.out.println("我是runner1");
System.out.println(dispatcherService);
}
}
look结果,按照源码来看,如果不设置优先级,那么实现ApplicationRunner的子类MyInitRunner1肯定先被加载,但是我们设置MyInitRunner1的优先级比MyInitRunner2低(@Order中数值越小优先级越搞)
自动装配
ok咱们继续,自动装配其实是启动类上的@SpringBootApplication注解在起作用,点击去看一下
@Target(ElementType.TYPE)
@Retention(RetentionPolicy.RUNTIME)
@Documented
@Inherited
@SpringBootConfiguration
@EnableAutoConfiguration
@ComponentScan(excludeFilters = { @Filter(type = FilterType.CUSTOM, classes = TypeExcludeFilter.class),
		@Filter(type = FilterType.CUSTOM, classes = AutoConfigurationExcludeFilter.class) })
public @interface SpringBootApplication {

}
前四个都是注解基本的元注解,不用咋看
-
@SpringBootConfiguration,这个注解主要是声明这个类是一个配置类,给贴下源码
@Target({ElementType.TYPE}) @Retention(RetentionPolicy.RUNTIME) @Documented @Configuration @Indexed public @interface SpringBootConfiguration { @AliasFor( annotation = Configuration.class ) boolean proxyBeanMethods() default true; } -
@ComponentScan,比较常见了吧,就是扫描包下的组件用的
-
@EnableAutoConfiguration,这个比较重要
@Target(ElementType.TYPE) @Retention(RetentionPolicy.RUNTIME) @Documented @Inherited @AutoConfigurationPackage // 自动配置包 @Import(AutoConfigurationImportSelector.class) // 导入 自动配置选择器(主要) public @interface EnableAutoConfiguration { }@AutoConfigurationPackage,这个注解的作用说白了就是将主配置类(@SpringBootApplication标注的类)所在包以及子包里面的所有组件扫描并加载到spring的容器中,这也就是为什么我们在利用springboot进行开发的时候,无论是Controller还是Service的路径都是与主配置类同级或者次级的原因。而自动装配,主要是通过导入这个
AutoConfigurationImportSelector来实现的,该类重写了ImportSelector的selectImports方法,实现如下@Override public String[] selectImports(AnnotationMetadata annotationMetadata) { if (!isEnabled(annotationMetadata)) { return NO_IMPORTS; } AutoConfigurationEntry autoConfigurationEntry = getAutoConfigurationEntry(annotationMetadata); return StringUtils.toStringArray(autoConfigurationEntry.getConfigurations()); } protected AutoConfigurationEntry getAutoConfigurationEntry(AnnotationMetadata annotationMetadata) { // 是否开启自动装配 if (!isEnabled(annotationMetadata)) { // 未开启,返回空 return EMPTY_ENTRY; } AnnotationAttributes attributes = getAttributes(annotationMetadata); // 读取所有配置(jar包中的+项目中写的) List<String> configurations = getCandidateConfigurations(annotationMetadata, attributes); // 去重,可能jar包中的+项目中写的有相同的类,直接去重即可 configurations = removeDuplicates(configurations); // 过滤掉被 exclude的类,比如,@SpringBootApplication(exclude = DataSourceAutoConfiguration.class),那么DataSourceAutoConfiguration会被过滤掉 Set<String> exclusions = getExclusions(annotationMetadata, attributes); // 检查被排除类是否可实例化,是否被自动注册配置所使用,不符合条件则抛出异常 checkExcludedClasses(configurations, exclusions); // 从自动配置类集合中删除被排除的类 configurations.removeAll(exclusions); // 检查配置类的注解是否符合 spring.factories 文件中 AutoConfigurationImportFilter 指定的注解检查条件 configurations = getConfigurationClassFilter().filter(configurations); fireAutoConfigurationImportEvents(configurations, exclusions); return new AutoConfigurationEntry(configurations, exclusions); }getCandidateConfigurations方法,里面和上文中一样,调用了SpringFactoriesLoader.loadFactoryNames方法,去读取jar包(autoconfiguration)中的META-INF/spring.factories文件或者项目中创建的META-INF/spring.factories文件。然后通过去重、根据条件筛选最后把需要配置的给自动装配好。
总结
- springboot启动流程
- 实现
ApplicationRunner或者CommandLineRunner可在spring容器创建且创建完bean后进行初始化操作 - 同样,可在启动类的run()执行后,获取返回值(spring容器),再进行初始化操作
- 自动装配的重要注解
@EnableAutoConfiguration,里面导入的选择器。
springboot初始化数据扩展
最后在提一嘴,如何在springboot项目启动后,做一些初始化操作呢?
-
实现
ApplicationRunner或者CommandLineRunner可在spring容器创建且创建完bean后进行初始化操作@Component public class MyInitRunner1 implements ApplicationRunner { @Autowired private DispatcherService dispatcherService; @Override public void run(ApplicationArguments args) throws Exception { System.out.println("我是runner1"); System.out.println(dispatcherService); } } -
可在启动类的run()执行后,获取返回值(spring容器),再进行初始化操作
@SpringBootApplication public class DispatcherApplication { public static void main(String[] args) { ConfigurableApplicationContext context = SpringApplication.run(DispatcherApplication.class, args); // 获取所有bean的名称 String[] beanDefinitionNames = context.getBeanDefinitionNames(); // 获取所有bean的数量 int beanDefinitionCount = context.getBeanDefinitionCount(); System.out.println("spring bean中有" + beanDefinitionCount + "个bean组件"); for (String name : beanDefinitionNames) { System.out.println(name); } // 根据bean的class获取此bean组件 DispatcherService bean = context.getBean(DispatcherService.class); System.out.println(bean); } } -
使用@PostConstruct注解声明在类中的方法上,表示:当此类被初始化后(被调用了构造函数),执行被@PostConstruct声明的方法(注意必须是无返回值的方法,而且此类必须是被spring管理的)
@Service
public class DispatcherService {

    @PostConstruct
    public void init() {
        System.out.println("我是DispatcherService的init......");
    }
}
看结果图
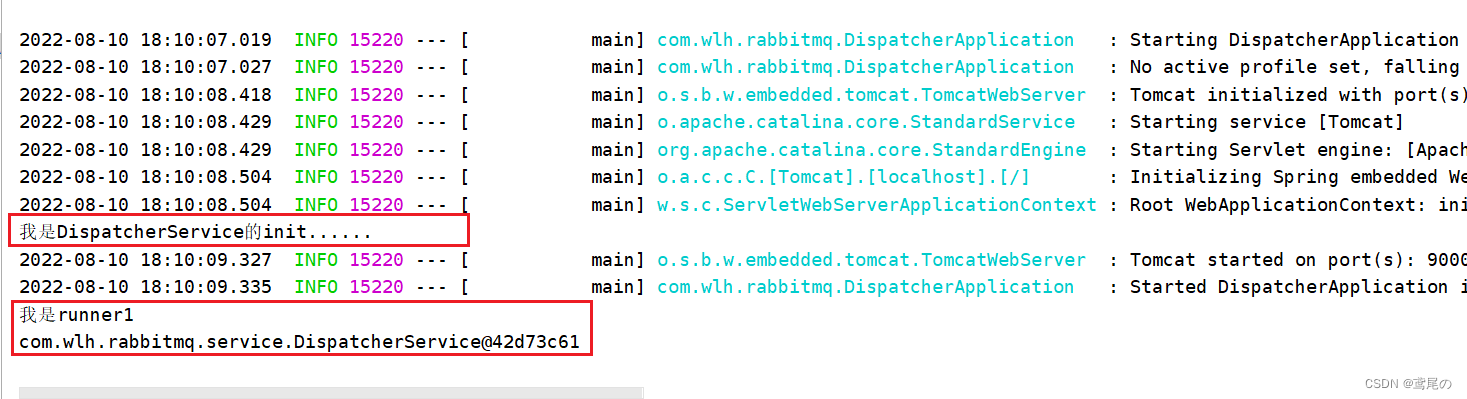
@PostConstruct注解优先于实现ApplicationRunner或CommandLineRunner接口
-
当然还有一种方式,实现InitializingBean接口重写afterPropertiesSet()方法,同样,此类必须是由spring管理
@Component
public class MyInit implements InitializingBean {
    @Override
    public void afterPropertiesSet() throws Exception {
        System.out.println("我是MyInit....");
    }
}
再看结果
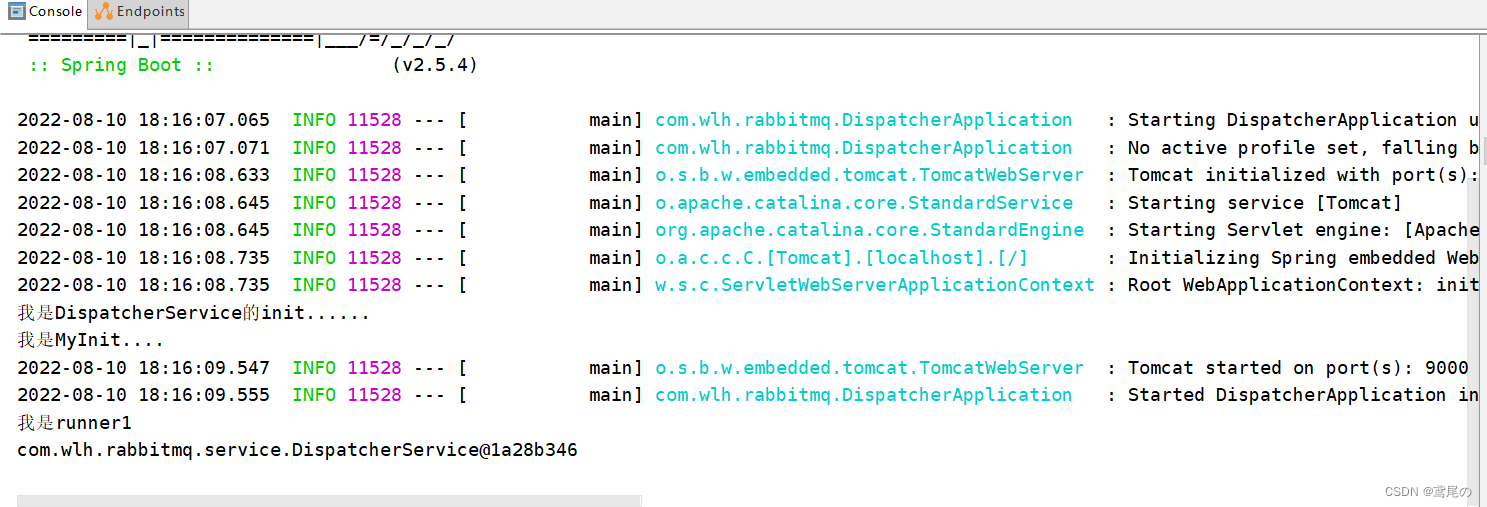
优先级:
@PostConstruct > 实现InitializingBean接口 > 实现ApplicationRunner或CommandLineRunner接口
图


参考
参考自


 4753
4753


 被折叠的 条评论
为什么被折叠?
被折叠的 条评论
为什么被折叠?
 到【灌水乐园】发言


