


提示:文章写完后,目录可以自动生成,如何生成可参考右边的帮助文档
一、使用步骤
1.引入依赖
代码如下(示例):
<dependency>
    <groupId>com.alibaba</groupId>
    <artifactId>easyexcel</artifactId>
    <version>2.2.10</version>
</dependency>
<dependency>
    <groupId>org.apache.poi</groupId>
    <artifactId>poi</artifactId>
    <version>3.17</version>
</dependency>
<dependency>
    <groupId>org.apache.poi</groupId>
    <artifactId>poi-ooxml</artifactId>
    <version>3.17</version>
</dependency>
<dependency>
    <groupId>org.projectlombok</groupId>
    <artifactId>lombok</artifactId>
    <scope>provided</scope>
</dependency>
<dependency>
    <groupId>junit</groupId>
    <artifactId>junit</artifactId>
    <scope>provided</scope>
    <version>4.12</version>
</dependency>
2.准备模板
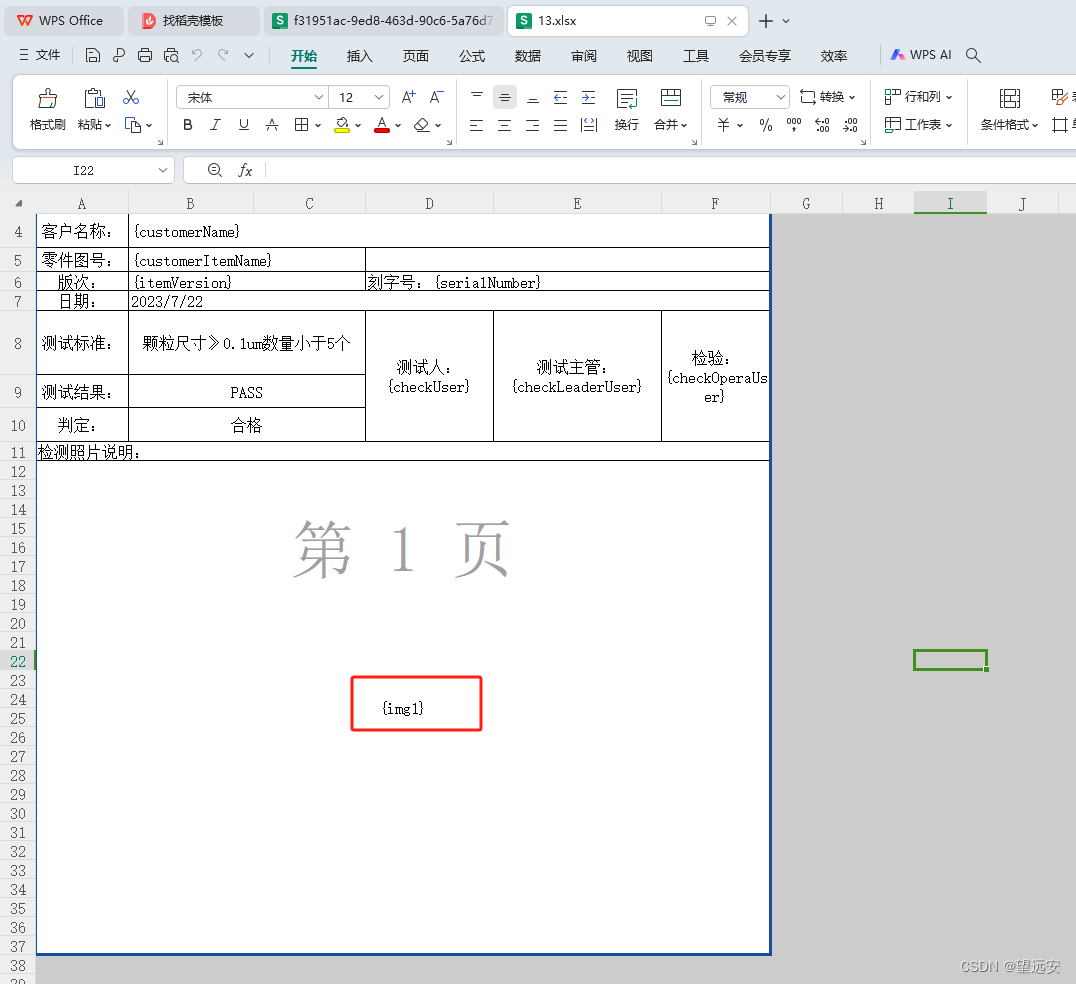
变量:{xx} 红框为图片位置
2.代码片段
代码如下(示例):
    public void transferProductionTasktest() {
        //图片路径集合
        List<String> path=new ArrayList<>();
        path.add("D:\\test\\test1.png");
        path.add("D:\\test\\test1.png");
        path.add("D:\\test\\test1.png");
        path.add("D:\\test\\test1.png");
        path.add("D:\\test\\test1.png");
        path.add("D:\\test\\test1.png");
        Map<String, Object> map = new HashMap<>();
        //map中填充变量
        map.put("customerName", "customerName");
        map.put("customerItemName", "customerItemName");
        map.put("serialNumber", "serialNumber");
        map.put("itemVersion", "itemVersion");
        InputStream is = null;

        try {
            //取出模板
            is = ResourceUtil.getStream("classpath:qms/13.xlsx");
            //定义文件名
            String fileName ="D:\\test\\test1\\"+ UuidUtils.generateUuid()+".xlsx";
            if(CollectionUtil.isNotEmpty(path)){
                //处理图片
                WriteCellData<Void> voidWriteCellData = imageCellsByPathList(path);
                map.put("img1", voidWriteCellData);
            }
            //填充写入  此时文件下载到了本地  也可以获取文件流 直接给到response中
            ExcelWriter excelWriter = EasyExcel.write(fileName).withTemplate(is).build();
            WriteSheet writeSheet = EasyExcel.writerSheet().build();
            excelWriter.fill(map, writeSheet);
            excelWriter.finish();


        } catch (Exception e) {
            e.printStackTrace();
        } finally {
            if (is != null) {
                try {
                    is.close();
                } catch (IOException e) {
                    e.printStackTrace();
                }
            }
        }


    }

    public  WriteCellData<Void> imageCellsByPathList(List<String> filePath) throws IOException {


        WriteCellData<Void> writeCellData = new WriteCellData<>();

        // 可以放入多个图片
        List<ImageData> imageDataList = new ArrayList<>();

        for(int i=1;i<=filePath.size() ;i++){
            ImageData imageData = new ImageData();
            // 设置图片
            byte[] data = Files.readAllBytes(Paths.get(filePath.get(i-1)));

            imageData.setImage(data);
            //取余数  是因为需要排两列  这个根据需求自己定 主要介绍一下8个属性
            if(i%2 != 0){
                //图片处理
                int a=(int)Math.floor(i/2);

                // 类似给定了四个点位     根据给定的首行,末行,首列,末列 来锁定图片的位置
                imageData.setRelativeFirstRowIndex(a*7);
                imageData.setRelativeLastRowIndex((a+1)*6+a);
                imageData.setRelativeFirstColumnIndex(0);
                imageData.setRelativeLastColumnIndex(2);
                //这四个属性就是在上面的范围的前提下 图片的编剧
                imageData.setTop(10);
                imageData.setBottom(10);
                imageData.setLeft(10);
                imageData.setRight(10);
            }else{
                int a=(int)Math.ceil(i/2)-1;
                imageData.setRelativeFirstRowIndex(a*7);
                imageData.setRelativeLastRowIndex((a+1)*6+a);
                imageData.setRelativeFirstColumnIndex(3);
                imageData.setRelativeLastColumnIndex(5);
                imageData.setTop(10);
                imageData.setBottom(10);
                imageData.setLeft(35);
                imageData.setRight(35);
            }

            imageDataList.add(imageData);
        }
        writeCellData.setImageDataList(imageDataList);
        return writeCellData;
    }
3.文件结果
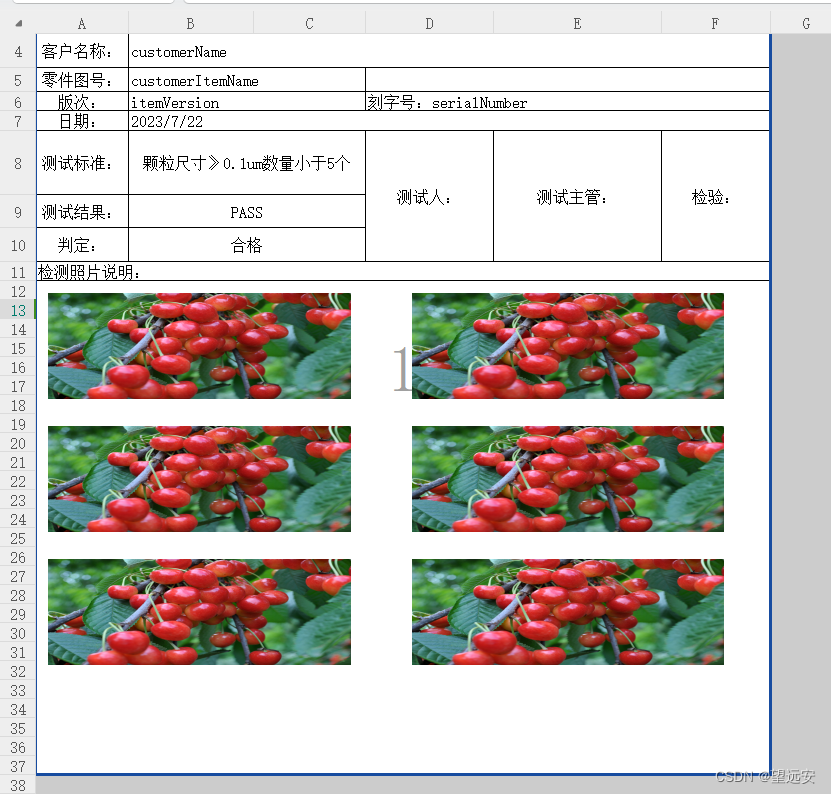


 1736
1736


 被折叠的 条评论
为什么被折叠?
被折叠的 条评论
为什么被折叠?
 到【灌水乐园】发言


