


一、前言
在vue中,组件之前的通信可以通过全局的状态管理器获取和更新数据,有Vuex和Pinia
二、Vuex
Vuex 是一个专为 Vue.js 应用程序开发的状态管理模式和库。它采用集中式存储管理应用的所有组件的状态,并以相应的规则保证状态以一种可预测的方式发生变化。
(一)、Vue2中使用
1、安装
安装命令:npm install vuex --save
2、src下创建 Store.js
import Vue from 'vue'
import vuex from 'vuex'

Vue.use(Vuex)

export default new Vuex.Store({
   // 定义共享数据,变量
  state: {
    count: 0
  },
  // 用来定义对共享数据进行修改的方法。修改数据,,是一个同步阻塞,方法名随便起
  mutations: {
    // 方法名随便起,参数state是定义中的变量,第一个变量必须是state,而且是默认的
    increment (state) {
      // 业务代码逻辑
      state.count++
    },
    // 两个参数
    increment(state,参数2){
      state.count+=参数2
    },

    //3个以上参数,可以定义对象n.m是指传参中的属性
    increment(state,obj){
      state.count+=obj.n+obj.m
    },

  },
  // vuex中计算属性,只能计算vuex中state中的属性
  getters:{
      // 方法名
      count(state){
        // 业务代码
          return state.count
      }
  },

  actions: {
    incrementAsync({ commit }) {
      setTimeout(() => {
        commit('increment');
      }, 1000); //定时任务,延时1秒
    },
  },
})
3、安装完成后需要在 main.js 中进行配置
// 引入vuex
import Vuex from 'vuex'
Vue.use(Vuex) // vue使用vuex状态管理
// 导入store
import store from './store'

new Vue({
  el: '#app',
  router,
  store, //添加到vue上
  components: { App },
  template: '<App/>'
})
Store 是一个对象,包含了应用中所有的状态(state)、修改状态的方法(mutations)、异步操作方法(actions)和计算属性(getters)等内容。
4、在组件中使用
(1)用与存放公共的数据,类似于 vue 中的 data 属性
this.$store.state.count(2)使用计算属性
// 目标组件中
// 1. 从 vuex 中按需导入 mapState 函数
import { mapState,mapGetters } from 'vuex'
// 2. 将全局数据,映射为当前组件的计算属性
computed:{
	...mapGetters(['count']),
    ...mapState({
      count: state => state.common.count
    }),
}
5、变更 Store 中的数据
(1)commit
// 目标组件
// 调用 mutation
methods:{
    handle1(){
        // 触发 mutations 的第一种方式
        this.$store.commit('increment','参数')
    }
}
(2)mapMutations
// 目标组件
// 1. 从 vuex 中按需导入 mapMutations 函数
import { mapMutations } from 'vuex'
....
// 2. 将指定的 mutations 函数,映射为当前组件的 methods 函数
methods:{
    ...mapMutations(['increment','incrementN']),
    btnHandler1(){
        this.increment()
    }
    btnHandler2(){
        this.incrementN(3)
    }
}
6、触发 actions 异步任务时携带参数
Mutations是同步的,这意味着在mutation中的函数执行时,不能包含任何异步操作,如Promise或setTimeout等。这种同步性质保证了状态变更的追踪和调试相对简单直观。
Actions可以包含异步操作,它通过分发(dispatch)来触发,并且最终会提交(commit)一个mutation来变更状态。这使得actions成为处理例如API调用等需要等待响应的操作的理想选择。
(1)dispatch
// 目标组件
methods:{
    handle(){
        // 在调用 dispatch 函数
        // 触发 actions 时携带参数
        this.$store.dispatch('incrementAsync',5)
    }
}
(二)、解决Vuex刷新数据丢失问题
JavaScript代码是运行在内存中的,代码运行时的所有变量,函数,也都是保存在内存中的。刷新页面,以前申请的内存被释放,重新加载脚本代码,变量重新赋值,所以这些数据要想储存就必须储存在外部,例如:Local Storage,Session Storage,IndexDB等。 这些是浏览器提供的API,让你可以将数据储存在硬盘上,做持久化储存。具体选择哪一个就根据实际的需求决定。
(1)Local Storage简单写法
state: {
  userInfo: window.localStorage.getItem('userInfo') || [],
},


mutations: {
  SET_USER_INFO: (state, userInfo) => {
    state.userInfo = userInfo
    window.localStorage.getItem('userInfo', userInfo)
  },
}
(2)定义文件写法
import { setStore, getStore } from '../../utils/store'

state: {
  userInfo: getStore({ name: 'userInfo' }) || [],
},


mutations: {
  SET_USER_INFO: (state, userInfo) => {
    state.userInfo = userInfo
    setStore({ name: 'userInfo', content: state.userInfo})
  },
}
store.js
import { validatenull } from './validate'

/**
 * 存储localStorage
 */
export const setStore = (params = {}) => {
  let { name, content, type } = params
  let obj = {
    dataType: typeof content,
    content: content,
    type: type,
    datetime: new Date().getTime()
  }
  if (type) window.sessionStorage.setItem(name, JSON.stringify(obj))
  else window.localStorage.setItem(name, JSON.stringify(obj))
}

/**
 * 获取localStorage
 */
export const getStore = (params = {}) => {
  let { name, debug } = params
  let obj = {},
    content
  obj = window.sessionStorage.getItem(name)
  if (validatenull(obj)) obj = window.localStorage.getItem(name)
  if (validatenull(obj)) return
  try {
    obj = JSON.parse(obj)
  } catch (e) {
    return obj
  }
  if (debug) {
    return obj
  }
  if (obj.dataType == 'string') {
    content = obj.content
  } else if (obj.dataType == 'number') {
    content = Number(obj.content)
  } else if (obj.dataType == 'boolean') {
    content = eval(obj.content)
  } else if (obj.dataType == 'object') {
    content = obj.content
  }
  return content
}

/**
 * 删除localStorage
 */
export const removeStore = (params = {}) => {
  let { name, type } = params
  if (type) {
    window.sessionStorage.removeItem(name)
  } else {
    window.localStorage.removeItem(name)
  }
}

/**
 * 获取全部localStorage
 */
export const getAllStore = (params = {}) => {
  let list = []
  let { type } = params
  if (type) {
    for (let i = 0; i <= window.sessionStorage.length; i++) {
      list.push({
        name: window.sessionStorage.key(i),
        content: getStore({
          name: window.sessionStorage.key(i),
          type: 'session'
        })
      })
    }
  } else {
    for (let i = 0; i <= window.localStorage.length; i++) {
      list.push({
        name: window.localStorage.key(i),
        content: getStore({
          name: window.localStorage.key(i)
        })
      })
    }
  }
  return list
}

/**
 * 清空全部localStorage
 */
export const clearStore = (params = {}) => {
  let { type } = params
  if (type) {
    window.sessionStorage.clear()
  } else {
    //判断如果记住密码 则声明变量保存
    let pas
    if (window.localStorage.gdLogin) {
      pas = window.localStorage.gdLogin
    }
    window.localStorage.clear()
    //清空之后继续保存用户密码
    if (pas) {
      localStorage.setItem('gdLogin', pas)
    }
  }
}
validate.js
/**
 * 判断是否为空
 */
export function validatenull(val) {
  if (typeof val === 'boolean') {
    return false
  }
  if (typeof val === 'number') {
    return false
  }
  if (val instanceof Array) {
    if (val.length == 0) return true
  } else if (val instanceof Object) {
    if (JSON.stringify(val) === '{}') return true
  } else {
    if (
      val == 'null' ||
      val == null ||
      val == 'undefined' ||
      val == undefined ||
      val == ''
    ) { return true }
    return false
  }
  return false
}
(三)、modules(模块)
在Vue中State使用是单一状态树结构,应该的所有的状态都放在state里面,如果项目比较复杂,那state是一个很大的对象,store对象也将对变得非常大,难于管理。于是Vuex中就存在了另外一个核心概念 modules。
Vuex允许我们将store分割成模块(Module),而每个模块拥有自己的state、getters、mutation、action等,甚至是嵌套子模块——从上至下进行同样方式的分割。
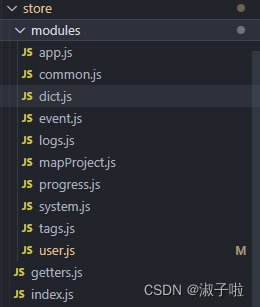
index.js
import Vue from 'vue'
import Vuex from 'vuex'
import user from './modules/user'
import common from './modules/common'
import tags from './modules/tags'
import system from './modules/system'
import logs from './modules/logs'
import dict from './modules/dict'
import app from './modules/app'
import getters from './getters'
import mapProject from './modules/mapProject'
import progress from './modules/progress'

Vue.use(Vuex)
const store = new Vuex.Store({
  modules: {
    user,
    common,
    logs,
    tags,
    system,
    dict,
    app,
    mapProject,
    progress
  },
  getters
})

export default store
module user.js(举例)
const user = {
  state: {
    userInfo: window.localStorage.getItem('userInfo') || [],
  },

  actions: {
    incrementAsync({ commit },参数) {
      setTimeout(() => {
        commit('SET_USER_INFO',参数);
      }, 1000); //定时任务,延时1秒
    },
  },

  mutations: {
    SET_USER_INFO: (state, userInfo) => {
      state.userInfo = userInfo
      window.localStorage.getItem('userInfo', userInfo)
    },
  }

}

export default user
getters.js
const getters = {
  sidebar: state => state.app.sidebar,
  tag: state => state.tags.tag,
  ...其他module定义可以访问的数据
}
export default getters
(四)、Vue3中使用
1、安装
安装命令:npm install vuex@next --save
2、在src下创建store.js
// store.js
import { createStore } from 'vuex';

export default createStore({
  state() {
    return {
      count: 0,
    };
  },
  mutations: {
    increment(state) {
      state.count++;
    }
  },
  actions: {},
  modules: {}
});
3、Vue应用中引入并配置store
在main.js或者main.ts中
// main.js
import { createApp } from 'vue';
import App from './App.vue';
import store from './store';

const app = createApp(App);

app.use(store);

app.mount('#app');
4、在组件中使用Vuex状态和操作
<template>
  <div>{{ count }}</div>
  <button @click="increment">Increment</button>
</template>

<script>
import { useStore } from 'vuex';
import { defineComponent } from 'vue';

export default defineComponent({
  setup() {
    const store = useStore();
    const count = computed(() => store.state.count);

    function increment() {
      store.commit('increment');
    }

    return { count, increment };
  },
});
</script>
vue3中也可以使用modles,这里不再说明
三、Pinia
(一)、在Vue3中使用
1、安装
安装命令:npm install pinia --save
2、在main.ts或者main.js中使用
import { createApp } from 'vue'
import App from './App.vue'
import { createPinia } from 'pinia';
const app = createApp(App);
const pinia = createPinia();
app.use(pinia);
app.mount('#app')
3、管理Pinia模块
在vue项目中,我们常常在 src 目录中新建一个名为 stores 的文件夹,用来管理Pinia模块
我们可以在这个文件夹里创建多个js或ts文件作为模块
# src/stores/index.js

// 使用前先引入 defineStore;
import { defineStore } from 'pinia';
// 我们可以使用es6 的模块化规范进行导出

// defineStore 方法有两个参数,第一个参数是模块化名字(相当于ID,不能重复)

// 第二个参数是选项
export const useStore = defineStore('main', {
  state(){  // 存放模块的变量
    return {
      count: 10
    }
  },
  getters:{ // 相当于vue的计算属性,可以缓存数据

  },
  actions:{ // 可以通过actions 方法,改变 state 里面的值。

  }
})
4、在页面中使用
<template>
  <div>
    <p>{{store.count}}</p>
  </div>
</template>
<script>
// 引入 useStore;
import { useStore } from '../store/index.js'
export default {
  setup(props) {
   // useStore 是一个方法,调用之后返回一个对象。
    const store = useStore();
    return {
      store
    }
  }
}
</script>
其他写法
<template>
  <div>
    <p>{{count}}</p>
  </div>
</template>
<script>
import { useStore } from '../store/index.js'
import { storeToRefs } from 'pinia';
export default {
  setup(props) {
    const store = useStore();
    return {
      ...storeToRefs(store)
    }
  }
}
</script>
5、pinia修改state数据的方法
1.修改 store对象的数据
// html 代码
<p>{{count}}</p>
<button @click="add">累加</button>
// js 代码
const store = useStore();
const add = () => {
       store.count ++
}
2.$patch传递一个对象来修改
// html 代码
<p>{{count}}</p>
<button @click="add">累加</button>
// js 代码
const store = useStore();
const add = () => {
      store.$patch({
        count: store.count + 1
      })
}
可以同时修改多个数据:
// html 代码
 <p>我是count数据{{count}}</p>
 <p>num{{num}}</p>
 <button @click="add">累加</button>

// js 代码
const store = useStore();
const add = () => {
      store.$patch({
        count: store.count + 1,
        num: store.num + 1
      })
}
3. $patch传递一个函数来修改
// html 代码
 <p>count数据:{{count}}</p>
 <p>num{{num}}</p>
 <button @click="add">累计</button>

// js 代码
const store = useStore();
const add = () => {
      store.$patch(state => {
         state.count++;
         state.num++;
      })
}
4. actions里修改
// 在 actions 里面定义一个方法
import { defineStore } from 'pinia';
export const useStore = defineStore('main', {
  state(){
    return {
      count: 10,
      num: 20
    }
  },
  getters:{

  },

  actions:{
    piniaAdd(){
       this.count++;
       // 注意:如果使用箭头函数,this 指向就会发生改变,不能再使用 this.count++ 了
    }
  }
})

// 页面
// html 代码
 <p>我是count数据{{count}}</p>
 <p>num{{num}}</p>
 <button @click="add">累计</button>
// js代码
const store = useStore();
const add = () => {
      store.piniaAdd();
}
(二)、Pinia持久化
1、安装持久化插件
// 使用 npm 安装
npm i pinia-plugin-persist --save --include=dev
// 使用 yarn 安装
yarn add pinia-plugin-persist
2、引入持久化插件
import { createApp } from 'vue'

import App from './App.vue'

import { createPinia } from 'pinia';
// 下面是持久化插件。
import piniaPersist from 'pinia-plugin-persist'

const app = createApp(App);

const pinia = createPinia();

pinia.use(piniaPersist);

// 注意:是 pinia.use 不能写成 app.use

app.use(pinia);

app.mount('#app')
3、在模块中使用
import { defineStore } from 'pinia';
export const useStore = defineStore('main', {
  state(){
    return {
      count: 10,
      num: 20
    }
  },
  persist: { //  持久化插件
    enabled: true, // 使用存储
     strategies: [ // 此属性选写
      //在不写的情况下,默认存储到 sessionStorage 里,默认存储 state 里的所有数据。
      { storage: localStorage, paths: ["count"] },
      // paths 是一个数组,如果写了 就会只存储 count 变量,可以写多个。
    ]
  },
  getters:{

  },

  actions:{
    piniaAdd(){
       this.count++;
    }
  }
})
(三)、在Vue2中使用
1、安装
安装命令:npm install pinia --save
2、在main.js中配置
# main.js

import Vue from 'vue'
import App from './App.vue'
import pinia from './stores/index'
import { PiniaVuePlugin } from 'pinia'

Vue.use(PiniaVuePlugin)

new Vue({
  render: h => h(App),
  pinia,
}).$mount('#app')
3、新建stores文件,建立入口文件index.js
import { createPinia } from 'pinia'
export * from './nodules/useUserStore'


const pinia = createPinia()

export default pinia
stores文件下新建nodules模块文件
在nodules中新建useUserStore.js文件
# useUserStore.js

import { defineStore } from 'pinia'
export const useUserStore = defineStore('store', {
    state: () => {
        return {
            tagslist: [{
                title: '首页',
                key: 'home',
                closable: false
            }, {
                title: '用户中心',
                key: 'home',
                closable: false
            }, {
                title: '讨论',
                key: 'home',
                closable: false
            }],
        }
    },
    actions: {
        changeTagList(obj) {
            console.log(this.tagslist);
            if (!this.tagslist.some(ele => ele.key === obj.key)) {
                const objs = {
                    ...obj,
                    closable: false
                }
                console.log(this.tagslist.some(ele => ele.key === obj.key));
                this.tagslist.push(objs)
            }
        },
        deleteTagList(k) {
            const key = this.tagslist.findIndex(item => {
                return item.key == k
            })
            this.tagslist.splice(key, 1)
        },
    }
})

// pinia不需要mutation,只需要使用action来改变状态
3、在组件中使用
<template>
  <div>
    <el-row :gutter="10">
      <el-col :span="6"
        ><el-input v-model="input" placeholder="请输入内容"></el-input
      ></el-col>
      <el-col :span="3">
        <el-Button
          @click="
            toUrl({
              title: input,
              key: input,
            })
          "
          >按钮</el-Button
        ></el-col
      >
    </el-row>
    <ul>
      <li :span="2" v-for="(p, index) in tagslist" :key="index">
        <span>{{ p.title }}</span>
      </li>
    </ul>
  </div>
</template>

<script>
import { useUserStore } from "@/stores/index";
import { mapState, mapActions } from "pinia"; //引入映射函数

export default {
  data() {
    return {
      input: "",
    };
  },
  computed: {
    ...mapState(useUserStore, ["tagslist"]), //映射函数,取出tagslist
  },
  methods: {
    ...mapActions(useUserStore, ["changeTagList"]), //映射action
    toUrl(item) {
      console.log(item);
      const obj = {
        title: item.title,
        key: item.key,
      };
      this.changeTagList(obj); //直接使用action改变状态
    },
  },
};
</script>
四、Vuex和Pinia的优缺点
Pinia 和 Vuex 都是 Vue.js 应用程序的状态管理库。以下是它们各自的优点和缺点:
Pinia 的优点:
更好的 TypeScript 支持:Pinia 使用 TypeScript 编写,因此它对此语言有更好的支持。
更简单的 API:Pinia 的 API 设计得更简洁,更容易理解。
更轻量:Pinia 的核心更小巧,这意味着它会更快地加载和执行。
更灵活:Pinia 允许你创建模块并以你需要的方式组织它们。
Pinia 的缺点:
可能不够成熟:Pinia 发布时间较短,可能还不如 Vuex 那么成熟。
社区支持不如 Vuex:虽然 Vuex 已经有了很多应用,Pinia 的社区支持可能还不如 Vuex。
Vuex 的优点:
成熟稳定:Vuex 已经在 Vue.js 应用程序中被广泛使用多年,有很大的社区支持。
更多的插件和复杂功能:Vuex 提供了丰富的插件和复杂功能,如模块化、插件等。
更好的与 Vue.js 整合:Vuex 设计得和 Vue.js 整合得更好,例如它支持 Vue.js 的响应式系统。
Vuex 的缺点:
不够简洁:Vuex 的 API 相对来说较为复杂,需要更多的代码来实现相同的功能。
对 TypeScript 支持有限:虽然 Vuex 也使用 TypeScript 编写,但它的类型定义可能不如 Pinia 全面。
可能较慢:Vuex 的核心可能会比 Pinia 稍微大一些,这可能会稍微影响加载时间。
总结:
Vuex适合大型的项目,Pinia适合中小型项目,而且Vuex有时间旅行(回滚,可以查看历史存储情况)和当运行Vue应用并打开Vue开发者工具时,可以在“Vuex“标签页中查看和编辑Vuex store的状态。


 3470
3470

 被折叠的 条评论
为什么被折叠?
被折叠的 条评论
为什么被折叠?
 到【灌水乐园】发言


