


Vue知识点汇总
vue双向绑定原理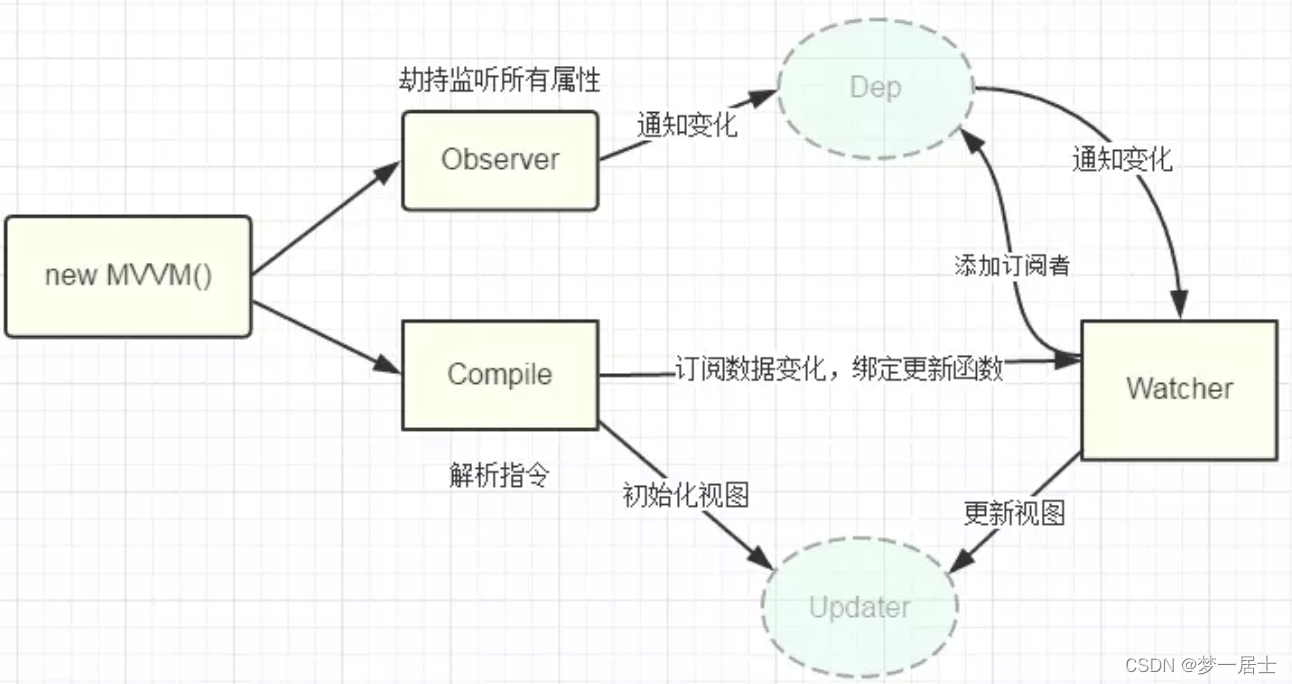
vue.js是采用了数据劫持结合发布者-订阅者模式的方式,通过Object.defineProperty来劫持各个属性的setter和getter,在数据变动的时候发布消息给订阅者,触发相应的监听回调
具体步骤:
第一步:需要observe的数据对象来进行递归遍历,包括子属性对象的属性,都加上setter和getter,这样的话,给这个对象的某个值赋值时,就会触发setter,那么就能监听到数据的变化
第二步:compile解析模板指令,将模板中的变量替换成数据 ,然后初始化渲染页面的视图,并将每个指令的对应的节点绑定的更新函数,添加监听数据的订阅者,一旦数据发生变化,就收到通知,更新视图。
第三步:watcher订阅者是observer和compile之间通讯的桥梁,主要做的事情就是1.自身实例化的时候向属性订阅器(dep)中添加自己,2.自己必须要有一个update()的方法,3.待属性变动dep.notice()通知时,能调用自身的update()方法,并触发compile中绑定的回调函数,则功成身退
第四步:MVVM作为数据绑定函数入口,整合Observer、complie和watcher三者,通过Observer来监听自己的model数据变化,通过complie来解析编译模板的指令,最终利用Watcher搭起Observer和Complie之间的通讯桥梁,达到数据变化==>视图变化,视图变化==>数据响应的变化的双向绑定效果
method watch和computed的区别
- methods:事件调用的钩子
- computed: 计算属性是根据他依赖的值计算的,当依赖值发生变化,其跟着改变,计算属性是有缓存的
计算属性调用的时机:- 初次渲染的时候
- 所依赖的值发生变化
- watch:
watch 和 computed 区别:
watch 强调的是 观测某个状态,根据状态的改变而做事情
而computed 强调的是 根据状态返回一个新的状态 。 另外computed能实现的,watch肯定能实现,但watch能实现的,computed不一定能实现(比如说在watch里面执行一个异步操作)//watch里面使用异步操作,可正确返回数据 watch:{ firstName(value){ setTimeout(()=>{ this.fullName = value + this.lastName }) } lastName(value){ setTimeout(()=>{ this.fullName = this.firstName + value }) } }
  //computed里面使用异步操作,不可以  正确返回数据
   computed:{
   		fullName(){
   			setTimeout(()=>{
   				return this.firstName + ' - ' + this.lastName
   			})
   		}
this.$nextTick()
使用场景:适用于在随数据改变而改变的DOM的应用场景中,vue中数据和DOM渲染是异步的,所以,要让DOM结构随数据改变这样的操作都应该放在this.$nextTick( )中。
created()中使用方法是,DOM还没渲染,如果此时在该钩子函数中进行DOM赋值数据(或者其他的DOM操作),都是徒劳,所以,此时this.$nextTick()就会被大量使用,而与created()对应的是mounted()的钩子函数则是在dom完全渲染后才开始渲染数据,所以mounted()中操作DOM,基本上不会存在渲染的问题
this.$set()
vue中的data中的数据都是响应式的,也就是说,如果操作data中的数据,视图也会实时的更新,但实际开发中,遇到过一个坑就是:若data中,数据类型较为复杂,方法methods中改变对象的属性,视图也就是页面并不会改变。
原因是vue监听不到数据类型特别复杂的属性,这个时候就可以用this.$set()来进行强制更新,进而解决问题
Vue.use(plugin)
参数 :{object | Function} plugin
用法: 安装Vue.js插件。如果插件是一个对象,必须提供install方法。如果插件是一个函数,它会被作为install方法。install 方法调用是,会将Vue 作为参数传入。
该方法需要在调用new Vue() 之前被调用,当 install方法被同一个插件多次调用,插件将只会被安装一次
Vue.use ()什么时候使用?
它在使用时实际是调用该插件的install方法,所以引入的当前插件如果含有install 方法,我们就是需要使用Vue.use( ),例如在vue中引入Element
import Vue from 'vue'
import Element from 'element-ui'
vue.use(ELement)
Vue父子组件生命周期执行顺序
父beforeCreate->父created->父beforeMount->子beforeCreate->子created->子beforeMount->子mounted->父mounted
vue优化方案:
Object.freeze() 冻结一个对象。一个被冻结的对象再也不能被修改;
vue请求的数据中存在不会被修改的数据,只是作为展示,未避免vue给这些数据添加get和set方法,影响性能,可以使用Object.freeze()这个方法!!!!
Vue 生命周期
vue生命周期就是指vue实例从创建到销毁的整个过程。既是指从创建、初始化数据、编译模板、挂载DOM到渲染页面,更新渲染、和销毁这些过程。它主要分为8个阶段,创建前后,载入前后,更新前后、和卸载前后。另外还有两个特殊的路由组件钩子函数:activedh和deactived(是配合keep-alive使用的,如果没有keep-alive是不会触发这两个钩子,actived相当与created ,deactived相当于destory)
真实开发的时候,我们会在created 中发送给ajax请求,在created之前我们是没有办法使用this的,mounted 之前是无法获取DOM元素的
keep-alive 组件缓存
vue 内置组件,能在组件切换的过程中奖状态保留在内存中,防止重复渲染DOM
路由文件:
exprot defalult new Router({
    routes:[
        {
            path:'/',
            name:'index',
            component:index
        },
        {
            path:"/A",
            name:"A",
            component:B
        },
        {
            path:"/B",
            name:'B',
            component:B
        },
         {
            path:"/C",
            name:'C',
            component:C,
             meta:{
                 keepAlive:false
             }
        },
        {
            path:"/D",
            name:'D',
            component:D,
             meta:{
                 keepAlive:true
             }
        }
    ]
})
-
利用include、exclude属性:(注意是组件的名字,不是路由的名字)
include属性表示只有name属性为A,B的组件会被缓存,其它组件不会被缓存
exclude属性表示除了name属性为C的组件不会被缓存,其它组件都会被缓存
<template>
  <div id="app">
    <!-- 表示只有name属性为A,B的组件会被缓存,其它组件不会被缓存 -->
    <keep-alive include="A,B">
      <router-view></router-view>
    </keep-alive>
    <!-- //除了name属性为C的组件不会被缓存,其它组件都会被缓存 -->
    <keep-alive exclude="C">
      <router-view></router-view>
    </keep-alive>
  </div>
</template>
- 利用meta属性
<template>
  <div id="app">
    <!--这里是会被缓存的组件-->
    <keep-alive>
      <router-view v-if="$route.meta.keepAlive"></router-view>
    </keep-alive>
    <!--这里是会被缓存的组件-->
    <router-view v-if="!$route.meta.keepAlive"></router-view>
  </div>
</template>
vue — 插槽
默认插槽
插槽里面可以又默认值,父组件传递值的时候,会覆盖子组件插槽里面的值,不传,就使用默认的值
父组件:
<template>
	<div>
        <h1>{{msg}}</h1>
        <children>
    		<h3>我是子组件里面的传递的插槽</h3>
    	</children>
    </div>
</template>

<script>
	import children from './children'
    export default {
        name:'index',
        data(){
            return {
                msg:'vue 插槽slot - 父组件'
            }
         components:{children}
        }
    }
</script>
子组件:
<template>
	<div>
        <h1>{{msg}}</h1>
        <slot>我是插槽里面的默认值</slot>
    </div>
</template>

<script>
export default{
    name:'children',
    data(){
        return {
            msg:'我是子组件'
        }
    }
}
</script>
具名插槽
有名字的插槽,可以将v-slot简写为#
父组件:
<template>
	<div>
        <h1>{{msg}}</h1>
        <children>
    		<template v-slot:top>
                <p>插槽name为top的插槽 </p>
			</template>
			<template v-slot:center>
				<p>插槽name为center的插槽 </p>
			</template>
			<template v-slot:bottom>
				<p>插槽name为bottom的插槽 </p>
			</template>
    	</children>
    </div>
</template>

<script>
	import children from './children'
    export default {
        name:'index',
        data(){
            return {
                msg:'vue 插槽slot - 父组件'
            }
         components:{children}
        }
    }
</script>
简写:
<template>
	<div>
        <h1>{{msg}}</h1>
        <children>
    		<template #top>
                <p>插槽name为top的插槽 </p>
			</template>
			<template #center>
				<p>插槽name为center的插槽 </p>
			</template>
			<template #bottom>
				<p>插槽name为bottom的插槽 </p>
			</template>
    	</children>
    </div>
</template>

<script>
	import children from './children'
    export default {
        name:'index',
        data(){
            return {
                msg:'vue 插槽slot - 父组件'
            }
         components:{children}
        }
    }
</script>
子组件:
<template>
	<div>
        <h1>{{msg}}</h1>
        <slot name='top'></slot>
        <slot name='center'></slot>
        <slot name='bottom'></slot>
    </div>
</template>

<script>
export default{
    name:'children',
    data(){
        return {
            msg:'我是子组件'
        }
    }
}
</script>
作用域插槽
父组件在子组件的插槽里面用子组件的数据
父组件:
<template>
	<div>
        <h1>{{msg}}</h1>
        <children>
    		<template v-slot:age='perspmProps'>
                <p>{{perspmProps.person.age}} </p>
			</template>
			<template v-slot:name='perspmProps'>
				<p>{{perspmProps.person.name}} </p>
			</template>

    	</children>
    </div>
</template>

<script>
	import children from './children'
    export default {
        name:'index',
        data(){
            return {
                msg:'vue 插槽slot - 父组件'
            }
         components:{children}
        }
    }
</script>
子组件:
<template>
	<div>
        <h1>{{msg}}</h1>
        <slot v-bind:str='person' name='age'>
             {{person.age}}
   		</slot>
        <slot v-bind:str='person' name='name'>
            {{person.name}}
    	</slot>
    </div>
</template>

<script>
export default{
    name:'children',
    data(){
        return {
            msg:'我是子组件'
            person:{
            	age:12,
            	name:'wy'
        	}
        }
    }
}
</script>


 861
861


 被折叠的 条评论
为什么被折叠?
被折叠的 条评论
为什么被折叠?
 到【灌水乐园】发言


