


1.bond网络接口的介绍
原理:
Red Hat Enterprise Linux 允许管理员使用 bonding 内核模块和称为通道绑定接口的特殊网络接口将多个网络接口绑定到一个通道。根据选择的绑定模式,通道绑定使两个或更多个网络接口作为一个网络接口,从而增加带宽和 / 提供冗余性。
工作模式
roundrobin平衡轮询模式:两块网卡轮流接收数据包。由于两块网卡都正常工作,它能提供两倍的带宽,在这种情况下出现一块网卡失效,仅仅会是服务器出口带宽下降,也不会影响网络使用。
activebackup主动备份模式:只有主网卡 eth0 工作,eth1 作为备份网卡是不工作的,只有当一个网络接口失效时 ( 例如主交换机掉电等 ),为了不会出现网络中断,系统会按照配置指定的网卡顺序启动工作,保证机器仍能对外服务,起到了失效保护的功能。
bond网络接口只支持两块网卡绑定。
2.bond网络接口的建立
先建立bond网络接口,并添加IP地址:
nmcli connection add con-name bond0 ifname bond0 type bond mode active-backup ip4 172.25.254.134/24

将网卡eth0添加到bond接口中:
nmcli connection add con-name eth0 ifname eth0 type bond-slave master bond0

将网卡eth1添加到bond接口中:
nmcli connection add con-name eth1 ifname eth1 type bond-slave master bond0

查看工作状态:

模拟网卡eth0出故障时,网络不会断掉,会由eth1接替eth0工作:
ifconfig eth0 down #模拟网卡eth0不工作

就算网卡eth0恢复正常,bond依然由eth1工作:


3.team网络接口的介绍
网卡绑定bond可以提高网络的冗余,保证网络可靠性,提高网络速度。为了提高网络容错或吞吐量,一般服务器都会采取多网卡绑定的策略,在RHEL5/RHEL6中使用的是Bond。而RHEL7提供了一项新的实现技术Team,用来实现链路聚合的功能,但是在RHEL7中,不会使用team替换bond,它们是并存的,我们可以选择Team,也可以选择Bond。
该接口与bond接口功能类似,但该接口可以支持八块网卡,不需要手动加载相应内核模块该接口比bond接口多一个模式。
4.team网络接口的搭建
先建立team网络接口,并添加IP地址:
nmcli connection add con-name team0 ifname team0 type team config ‘{“runner”:{“activebackup”}}’ ip4 172.25.254.134/24

将网卡eth0添加到team接口中:
nmcli connection add con-name eth0 ifname eth0 type team-slave master team0

将网卡eth1添加到team接口中:
nmcli connection add con-name eth1 ifname eth1 type team-slave master team0

systemctl restart network
nmcli connection show

teamdctl team0 stat

5.网络桥接
网络桥接是用来连接不同的网段,使虚拟机的网卡直接连接到真机的真实网卡,使上网速度更快。
1.用命令临时添加网桥:
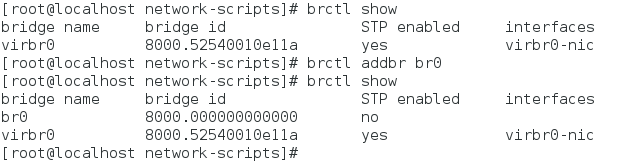
brctl show #查看主机原有的网桥
brctl addbr br0 #添加新的网桥
brctl show #查看是否添加成功
ifconfig br0 172.25.254.134/24 #给br0添加IP
ifconfig #查看是否添加成功


brctl show #查看网桥状态,没有真实的物理设备与网桥对应
brctl addif br0 eth0 #使网卡eth0与网桥br0对应
brctl show #查看是否对应成功
ping 172.25.254.34 #查看网桥是否建立成功

2.删除网桥:
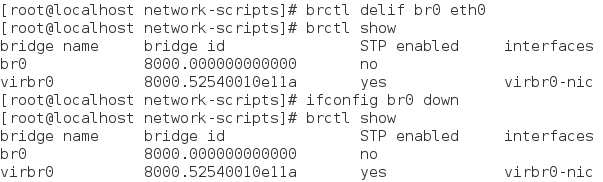
brctl delif br0 eth0 #解除对应关系
brctl show
ifconfig br0 down #关闭网桥
brctl show
brctl delbr br0 #删除网桥
systemctl restart network #重启网络
brctl show #查看是否成功删除

3.用文件永久添加网桥:
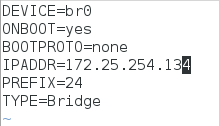
vim /etc/sysconfig/network-scripts/ifcfg-br0 #建立网桥
DEVICE=br0
ONBOOT=yes
BOOTPROTO=none
IPADDR=172.25.254.134
PREFIX=24
TYPE=Bridge
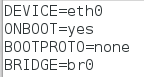
vim /etc/sysconfig/network-scripts/ifcfg-eth0 #使网卡eth0与网桥对应
DEVICE=eth0
ONBOOT=yes
BOOTPROTO=none
BRIDGE=br0
systemctl restart network
brctl show
ping 172.25.254.34


 3973
3973


 被折叠的 条评论
为什么被折叠?
被折叠的 条评论
为什么被折叠?
 到【灌水乐园】发言


