


定义
Ceph对象存储使用Ceph对象网关守护程序(radosgw),这是一个用于与Ceph存储集群交互的HTTP服务器。由于它提供了与openstackswift和amazons3兼容的接口,因此Ceph对象网关有自己的用户管理。Ceph对象网关可以在用于存储来自Ceph文件系统客户端或Ceph块设备客户端的数据的Ceph存储集群中存储数据。
桶(Bucket)是对象的载体,可理解为存放对象的“容器”,且该“容器”无容量上限。对象以扁平化结构存放在存储桶中,无文件夹和目录的概念,用户可选择将对象存放到单个或多个存储桶中。
对象存储呈现出来的是一个“桶”(bucket),你可以往“桶”里面放“对象(Object)”。这个对象包括三个部分:Key、Data、Metadata。
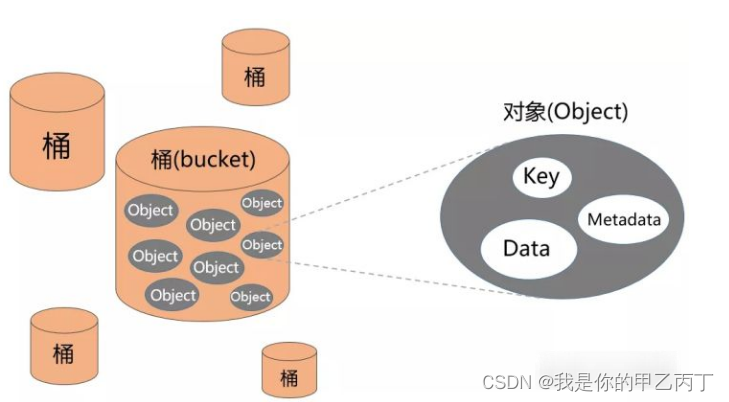
Key可以理解文件名,是该对象的全局唯一标识符(UID)。
Key是用于检索对象,服务器和用户不需要知道数据的物理地址,也能通过它找到对象。这种方法极大地简化了数据存储。
Data就是用户数据本体。
Metadata叫做元数据,它是对象存储一个非常独特的概念。
元数据有点类似数据的标签,标签的条目类型和数量是没有限制的,可以是对象的各种描述信息。
优点:
- 具备块存储的读写高速;
- 具备文件存储的共享等特性;
使用场景
- 图片存储;
- 视频存储;
部署环境
1、 部署集群
[root@ceph1 ~]# cd my-cluster/
[root@ceph1 my-cluster]# ceph-deploy rgw create ceph1 ceph2 ceph3
2、 部署完成后默认的端口是7480将其修改为80端口
[root@ceph1 my-cluster]# vim ceph.conf
[global]
fsid = 4d02981a-cd20-4cc9-8390-7013da54b161
mon_initial_members = ceph1, ceph2, ceph3
mon_host = 172.30.25.101,172.30.25.102,172.30.25.103
auth_cluster_required = cephx
auth_service_required = cephx
auth_client_required = cephx
增加以下内容,client.rgw.后面为主机名称
[client.rgw.ceph1]
rgw_frontends = "civetweb port=80"
[client.rgw.ceph2]
rgw_frontends = "civetweb port=80"
[client.rgw.ceph3]
rgw_frontends = "civetweb port=80"
3、将配置文件推送到集群其它节点中
[root@ceph1 my-cluster]# ceph-deploy --overwrite-conf config push ceph1 ceph2 ceph3
4、 各节点重启服务
[root@ceph1 ~]# systemctl restart ceph-radosgw@rgw.ceph1.service
[root@ceph2 ~]# systemctl restart ceph-radosgw@rgw.ceph2.service
[root@ceph3 ~]# systemctl restart ceph-radosgw@rgw.ceph3.service
5、查看对象存储服务是否启动
[外链图片转存失败,源站可能有防盗链机制,建议将图片保存下来直接上传(img-DiWsHAKT-1653383014019)(/media/202205/2022-05-24_164957_263604.png)]
S3 API 访问对象存储
1、 创建创建 radosgw 用户
[root@ceph1 ~]# radosgw-admin user create --uid=radosgw --display-name='radosgw' -k /var/lib/ceph/radosgw/ceph-rgw.ceph1/keyring --name client.rgw.ceph1
创建完成之后需要把access_key和secret_key保存下来,也可以使用下面的命令来查看
[root@ceph1 ~]# radosgw-admin user info --uid=radosgw --display-name='radosgw' -k /var/lib/ceph/radosgw/ceph-rgw.ceph1/keyring --name client.rgw.ceph1
2、在客户端安装s3cmd软件
[root@ceph1 ~]# apt install s3cmd -y
3、生成配置文件
[root@ceph1 ~]# s3cmd --configure
nter new values or accept defaults in brackets with Enter.
Refer to user manual for detailed description of all options.

Access key and Secret key are your identifiers for Amazon S3. Leave them empty for using the env variables.
Access Key: D028HA7T16KJHU2602YA                                        # 粘贴服务端生成的Access Key
Secret Key: RWczKVORMdDBw2mtgLs2dUPq2xrCehnjOtB6pHPY                    # 粘贴服务端生成的Secret Key

Encryption password is used to protect your files from reading
by unauthorized persons while in transfer to S3
Encryption password:                                                     # 空密码回车
Path to GPG program [/usr/bin/gpg]:                                      # /usr/bin/gpg命令路径 回车

When using secure HTTPS protocol all communication with Amazon S3
servers is protected from 3rd party eavesdropping. This method is
slower than plain HTTP, and can only be proxied with Python 2.7 or newer
Use HTTPS protocol [Yes]: no                                             # 是否使用https,选no

On some networks all internet access must go through a HTTP proxy.
Try setting it here if you can't connect to S3 directly
HTTP Proxy server name:                                                  # haproxy 留空回车

New settings:
  Access Key: D028HA7T16KJHU2602YA
  Secret Key: RWczKVORMdDBw2mtgLs2dUPq2xrCehnjOtB6pHPY
  Encryption password:
  Path to GPG program: /usr/bin/gpg
  Use HTTPS protocol: False
  HTTP Proxy server name:
  HTTP Proxy server port: 0

Test access with supplied credentials? [Y/n] n

Save settings? [y/N] y                                                    # y 要保存配置文件
Configuration saved to '/root/.s3cfg'                                     # 最后配置文件保存的位置/root.s3cfg
4、修改配置文件
根据实际IP地址修改
host_base = 10.0.0.101
host_bucket = %(bucket)s.10.0.0.101
website_endpoint = http://%(bucket)s.10.0.0.101/
5、s3cmd验证基础操作
[root@ceph1 ~]# s3cmd mb s3://my-bucket                            # 创建my-bucket桶
 Bucket 's3://my-bucket/' created
[root@ceph1 ~]# s3cmd ls                                           # 查看所有的桶
2020-02-12 07:07  s3://my-bucket
[root@ceph1 ~]# s3cmd put /etc/hosts s3://my-bucket                # 向指定桶中上传/etc/hosts文件
upload: '/etc/hosts' -> 's3://my-bucket/hosts'  [1 of 1]
 158 of 158   100% in    0s     2.67 kB/s  done
[root@ceph1 ~]# s3cmd ls s3://my-bucket                            # 显示my-bucket中的文件
2020-02-12 07:07       158   s3://my-bucket/hosts
[root@ceph1 ~]# s3cmd del s3://my-bucket/hosts                     # 删除my-bucket中的hosts文件
delete: 's3://my-bucket/hosts'
[root@ceph1 ~]# s3cmd rb s3://my-bucket                            # 删除my-bucket
Bucket 's3://my-bucket/' removed
Swift API 访问对象存储
1、创建swift api子帐户
[root@ceph1 ~]#radosgw-admin subuser create --uid=radosgw --subuser=radosgw:swift --access=full
2、安装swift命令工具
[root@ceph1 ~]# apt install swift -y
3、使用swift进行访问
[root@ceph1 ~]# swift -A http://10.0.0.101/auth/1.0 -U radosgw:swift -K IlX5guDnsqPGEpKOGgfR4AtuFxPTGr0VQF6F6Iwy post lin-bucket # 创建lin-bucket桶
[root@ceph1 ~]# swift -A http://10.0.0.101/auth/1.0 -U radosgw:swift -K IlX5guDnsqPGEpKOGgfR4AtuFxPTGr0VQF6F6Iwy list # 查看所有的桶
lin-bucket


 1万+
1万+


 被折叠的 条评论
为什么被折叠?
被折叠的 条评论
为什么被折叠?
 到【灌水乐园】发言


