一招教会你如何用vue+node生成登录页面的验证码

首先,先说一下生成验证码的思路:前端调用获取验证码的接口 ==> 后端生成验证码返回给前端 ==> 前端渲染验证码(是不是非常滴简单呢!)

话不多说 直接上代码

后端接口代码,我用的是egg.js的框架(其实就是基于node.js的框架,前端的小伙伴看一下文档上手也非常快,如果是自己搞练手项目的话也够用了,附上egg.js官网链接egg - Born to build better enterprise frameworks and apps - Egg

  async verification() {
    const { ctx } = this;
    const img = svgCaptcha.create({
      size: 4, // 验证码长度
      ignoreChars: '0oO1ilI', // 验证码字符中排除 0oO1ilI
      noise: 2, // 干扰线条的数量
      width: 160,
      height: 40,
      fontSize: 50,
      color: true, // 验证码的字符是否有颜色,默认没有,如果设定了背景,则默认有
      background: '#fff',
  })
    console.log(img)
    ctx.body = img;
  }

接口返回的数据结构如下:{"text": "","data":""}  data就是前端需要渲染的svg

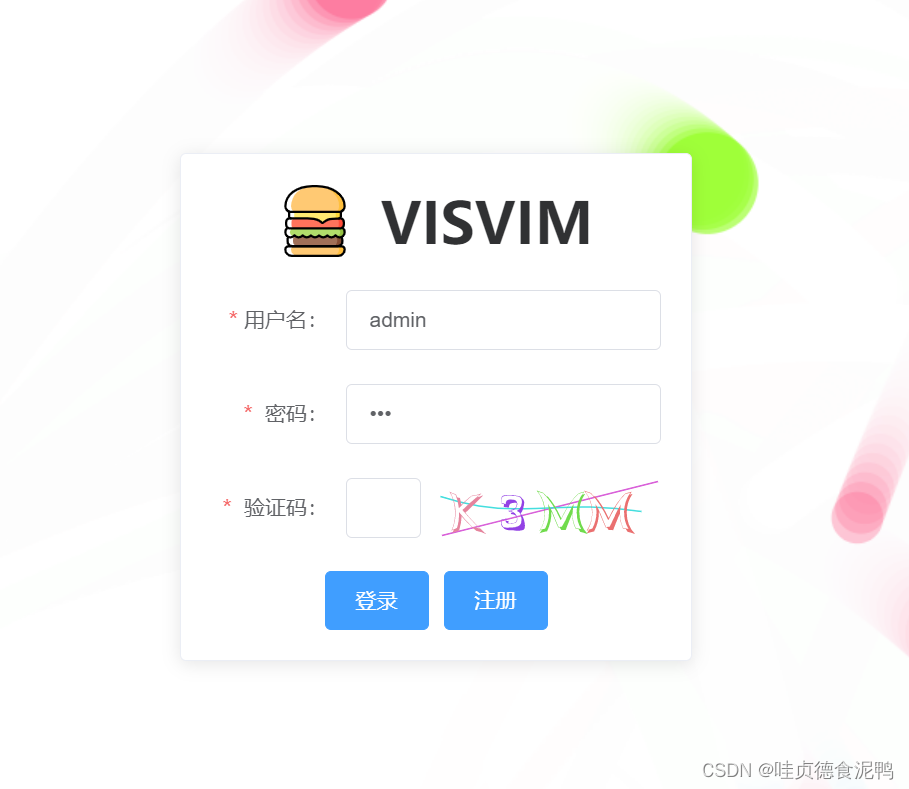
附上前端登录页样式代码,本人经验欠缺,代码仅供参考,如有错误希望大家提出!

<template>
  <div class="loginbox">
    <particles-bg type="ball" :bg="true" />
    <div class="formcard">
      <div class="formcard-top">
        <img src="../assets/logo1.svg" alt="" />
        <div class="title">VISVIM</div>
      </div>
      <el-form
        label-width="90px"
        :model="formInline"
        class="form-box"
        :rules="rules"
        ref="ruleForm"
      >
        <el-form-item label="用户名:" prop="username">
          <el-input
            v-model="formInline.username"
            placeholder="请输入用户名"
          ></el-input>
        </el-form-item>
        <el-form-item label=" 密码:" prop="password">
          <el-input
            v-model="formInline.password"
            placeholder="请输入密码"
            type="password"
          ></el-input>
        </el-form-item>
        <el-form-item
          class="verificationbox"
          label=" 验证码:"
          prop="verification"
        >
          <el-input
            v-model="formInline.verification"
            style="width: 40%"
          ></el-input>
          <div
            style="height: 40px"
            v-html="verificationsvg"
            @click="getverificationsvg"
          ></div>
        </el-form-item>
      </el-form>
      <div class="formcard-bottom">
        <el-button class="login" type="primary" @click="onlogin"
          >登录</el-button
        >
        <el-button type="primary">注册</el-button>
      </div>
    </div>
  </div>
</template>

<script>
import { ParticlesBg } from "particles-bg-vue";
export default {
  components: {
    ParticlesBg,
  },
  data() {
    return {
      verificationsvg: "", //验证码
      verificationtext: "", //验证码
      // 表单信息
      formInline: {
        username: "",
        password: "",
        verification: "",
      },
      rules: {
        username: [
          { required: true, message: "请输入用户名", trigger: "blur" },
        ],
        password: [{ required: true, message: "请输入密码", trigger: "blur" }],
        verification: [
          { required: true, message: "请输入验证码", trigger: "blur" },
        ],
      },
      // 暂无作用
      config: {
        num: [4, 7],
        rps: 0.1,
        radius: [5, 40],
        life: [1.5, 3],
        v: [2, 3],
        tha: [-30, 30],
        alpha: [0.6, 0],
        scale: [0.1, 0.4],
        position: "all",
        cross: "dead",
        random: 15,
      },
    };
  },
  created() {
    // 获取验证码
    this.getverificationsvg();
    // 默认填充账号密码
    this.formInline.username = "admin";
    this.formInline.password = "123";
  },
  methods: {
    // 登录
    onlogin() {
      this.$refs.ruleForm.validate((valid) => {
        if (valid) {
          if (this.verificationtext.toLowerCase() == this.formInline.verification.toLowerCase()) {
            this.$message({
              showClose: true,
              message: "登录成功",
              type: "success",
            });
          } else {
            this.$message.error('验证码错了哦!');
          }
        }
      });
    },
    getverificationsvg() {
      this.$axios.get("http://10.3.17.49:7001/verification").then((res) => {
        console.log(res);
        this.verificationtext = res.data.text
        this.verificationsvg = res.data.data;
      }).catch((err) => {
        this.$message.error('验证码接口服务失败');
      })
    },
  },
};
</script>

<style lang="less" scoped>
.loginbox {
  height: 100%;
  position: relative;
  .formcard {
    .formcard-top {
      display: flex;
      justify-content: center;
      align-items: center;
      margin-bottom: 20px;
      img {
        margin-right: 20px;
      }
      .title {
        font-weight: 600;
        font-size: 38px;
      }
    }
    .formcard-bottom {
      display: flex;
      justify-content: center;
    }

    position: absolute;
    top: 20%;
    left: 50%;
    transform: translate(-50%, 0);
    width: 25%;
    min-width: 300px;
    padding: 20px;
    border-radius: 4px;
    border: 1px solid #ebeef5;
    background-color: #fff;
    overflow: hidden;
    color: #303133;
    transition: 0.3s;
    box-shadow: 0 2px 12px 0 rgba(0, 0, 0, 0.1);
  }
}
</style>
<style scoped>
.verificationbox /deep/ .el-form-item__content {
  display: flex !important;
}
</style>

  • 0
    点赞
  • 0
    收藏
    觉得还不错? 一键收藏
  • 0
    评论
验证码登录通常包含以下步骤: 1. 在前端页面上展示验证码图片,并在提交表单时将验证码值一并提交到后端。 2. 后端接收到验证码值后,通过比较用户提交的验证码值和生成验证码值是否一致来判断验证码是否正确。 3. 如果验证码正确,则继续进行登录操作;否则返回错误提示信息。 下面是一个使用Vue和Spring Boot实现验证码登录的示例代码: 前端页面(使用Element UI库): ```html <template> <el-form :model="loginForm" ref="loginForm" :rules="rules" label-width="100px"> <el-form-item label="用户名" prop="username"> <el-input v-model="loginForm.username" placeholder="请输入用户名"></el-input> </el-form-item> <el-form-item label="密码" prop="password"> <el-input type="password" v-model="loginForm.password" autocomplete="off" placeholder="请输入密码"></el-input> </el-form-item> <el-form-item label="验证码" prop="verifyCode"> <el-input v-model="loginForm.verifyCode" placeholder="请输入验证码"></el-input> <img :src="verifyCodeUrl" @click="refreshVerifyCode" style="cursor: pointer;"> </el-form-item> <el-form-item> <el-button type="primary" @click="login">登录</el-button> </el-form-item> </el-form> </template> <script> import { login } from '@/api/user' export default { data() { return { loginForm: { username: '', password: '', verifyCode: '' }, rules: { username: [{ required: true, message: '请输入用户名', trigger: 'blur' }], password: [{ required: true, message: '请输入密码', trigger: 'blur' }], verifyCode: [{ required: true, message: '请输入验证码', trigger: 'blur' }] }, verifyCodeUrl: '/api/verifyCode?timestamp=' + new Date().getTime() } }, methods: { refreshVerifyCode() { this.verifyCodeUrl = '/api/verifyCode?timestamp=' + new Date().getTime() }, login() { this.$refs.loginForm.validate(valid => { if (valid) { login(this.loginForm).then(res => { // 登录成功后的操作 }).catch(error => { // 登录失败后的操作 }) } }) } } } </script> ``` 后端代码: ```java @RestController public class LoginController { @Autowired private RedisTemplate<String, String> redisTemplate; @GetMapping("/api/verifyCode") public void verifyCode(HttpServletRequest request, HttpServletResponse response) throws Exception { // 生成验证码 String verifyCode = VerifyCodeUtils.generateVerifyCode(4); // 将验证码存入Redis中,有效期为5分钟 String key = "verifyCode_" + request.getSession().getId(); redisTemplate.opsForValue().set(key, verifyCode, 5, TimeUnit.MINUTES); // 将验证码图片写入响应流中 response.setContentType("image/jpeg"); ServletOutputStream out = response.getOutputStream(); VerifyCodeUtils.outputImage(100, 40, out, verifyCode); } @PostMapping("/api/login") public Result login(@RequestBody LoginForm form, HttpServletRequest request) { // 校验验证码 String key = "verifyCode_" + request.getSession().getId(); String verifyCode = redisTemplate.opsForValue().get(key); if (StringUtils.isBlank(verifyCode)) { return Result.error("验证码已过期,请重新获取"); } if (!verifyCode.equalsIgnoreCase(form.getVerifyCode())) { return Result.error("验证码不正确"); } // 校验用户名和密码 // ... return Result.ok(); } } ``` 其中,`VerifyCodeUtils`是一个工具类,用于生成验证码图片。`LoginForm`是一个表单类,用于接收前端传递的用户名、密码和验证码值。`Result`是一个自定义的返回结果类,用于返回登录结果和错误信息。

“相关推荐”对你有帮助么?

  • 非常没帮助
  • 没帮助
  • 一般
  • 有帮助
  • 非常有帮助
提交
评论
添加红包

请填写红包祝福语或标题

红包个数最小为10个

红包金额最低5元

当前余额3.43前往充值 >
需支付:10.00
成就一亿技术人!
领取后你会自动成为博主和红包主的粉丝 规则
hope_wisdom
发出的红包
实付
使用余额支付
点击重新获取
扫码支付
钱包余额 0

抵扣说明:

1.余额是钱包充值的虚拟货币,按照1:1的比例进行支付金额的抵扣。
2.余额无法直接购买下载,可以购买VIP、付费专栏及课程。

余额充值