


文章目录
一、原理详解
1、基本介绍
链表和数组同属于线性表,与数组不同的是,链表不必顺序存储,因此能够灵活利用计算机中的空间,并且链表在插入的时候可以达到O(1)的复杂度。
有利必有弊,在查找一个节点或者访问特定编号的节点时,链表需要O(n)的时间,而顺序表相应的时间复杂度分别是O(logn)和O(1)。
2、链表的结构
1、单向链表
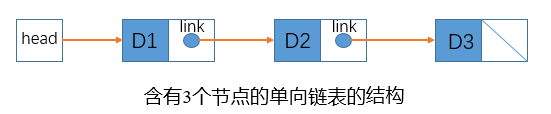
如图所示,单向链表通过一个外部的头链接来访问第1项,单向链表的节点被分成两个部分,第一部分保存或显示关于节点的信息,第二部分储存下一节点地址。
单向链表只能向一个方向遍历。
2、双向链表
(以下图片均来自于百度图片)

双向链表中每个节点有两个指针,一个指向前一节点,另一个指向后一节点。最后一项没有指向下一项的指针,第一项没有指向前一项的指针。在双向链表中还有一个外部的tail指针,它允许直接访问结构中的最后一个节点。
简单总结就是
单链表中只存储了下一个元素的地址,双向链表在此基础之上增加了上一个元素的地址。
3、循环链表

在单链表的基础上,增加了尾部→头部的功能。
4、双向循环链表

在双向链表的基础上,增加了头部和尾部的相互链接。
二、python实现
1、单链表的Python实现
1、代码部分
链表与数组不同,链表中的基本单位是节点,单向链表的节点包含:数据项、指向下一节点的链接。双向链表的节点包含:数据项、指向下一节点的链接、指向上一节点的链接。
所以链表要先定义一个节点类
class Node(object):
	'''定义单链表节点类'''
	def __init__(self,data,next = None):
		'''data为数据项,next为下一节点的链接,初始化节点默认链接为None'''
		self.elem= elem
		self.next = None
接下来定义操作对象类,每个函数都有很详细的注释,应该很好理解
# 下面创建单链表,并实现其应有的功能

class SingleLinkList(object):
    """单链表"""

    def __init__(self, node=None):  # 使用一个默认参数,在传入头结点时则接收,在没有传入时,就默认头结点为空
        # 这段语句必须要有  用于给出头节点的属性
        self.__head = node  # 加双下划线表示私有属性(因为不供外部使用)

    def is_empty(self):
        '''链表是否为空'''
        return self.__head == None  # 判断头节点的指向即可

    def length(self):
        '''计算链表长度——需要从头到尾遍历一遍'''
        # cur游标,用来移动遍历节点
        cur = self.__head
        # count记录数量
        count = 0
        while cur != None:  # 如果count初始值为1,这里就改为cur.next,但同时需要额外处理空节点的特殊情况
            count += 1
            cur = cur.next
        return count

    def travel(self):
        '''遍历整个列表'''
        cur = self.__head
        while cur != None:
            print(cur.elem,end='')  # python3中用end=''来取消换行
            cur = cur.next
        print("\n")

    def add(self, item):
        '''头插法:链表头部添加元素'''
        node = Node(item)  # item是要插入的元素
        '''
        这里的先后顺序极为重要!
        必须先让待插入节点指向原有链表的头部,再让头节点指向待插入节点.
        要是头节点先指向待插入节点,那么原有链表串后面的内容就都丢失了!
        '''
        node.next = self.__head
        self.__head = node

    def append(self, item):
        '''尾插法:链表尾部添加元素'''
        node = Node(item)  # item就是要添加的元素
        # 当链表为空时没有next,所以要先判空
        if self.is_empty():
            self.__head = node
        else:
            cur = self.__head
            while cur.next != None:  # 如果未判空,空链表会在这出错
                cur = cur.next
            cur.next = node

    def insert(self, pos, item):
        '''指定位置添加元素'''
        if pos <= 0:  # pos是需要插入的位置坐标
            # 如果pos位置在0或者以前,那么都当做头插法来做
            self.add(item)
        elif pos > self.length() - 1:
            # 如果pos位置比原链表长,那么都当做尾插法来做
            self.append(item)
        else:
            per = self.__head
            count = 0
            while count < pos - 1:
                count += 1
                per = per.next
            # 当循环退出后,pre指向pos-1位置
            node = Node(item)
            node.next = per.next  # 顺序同样重要,还是得先让待插入节点指向原链表后面的节点
            per.next = node  # pre只是一个游标,所以都是用pre.next去操作,不然原链表根本没改动

    def remove(self, item):
        '''删除节点'''
        cur = self.__head
        pre = None
        while cur != None:
            if cur.elem == item:
                # 先判断该节点是否是头结点
                if cur == self.__head:
                    self.__head = cur.next  # 如果是头节点,直接将头指针调到下一位
                else:
                    pre.next = cur.next  # 将cur现在所在的节点直接跳过,达到删除的目的
                break
            else:
                pre = cur  # 这条的作用是始终保持pre在cur前一个节点上
                cur = cur.next

    def search(self, item):
        '''查找节点是否存在'''
        cur = self.__head
        while not cur:
            if cur.elem == item:
                return True
            else:
                cur = cur.next
        return False
2、代码测试
if __name__ == "__main__":

        # node = Node(100)  # 先创建一个节点传进去

    ll = SingleLinkList()
    print(ll.is_empty())
    print(ll.length())

    ll.append(3)
    ll.add(999)
    ll.insert(-3, 110)
    ll.insert(99, 111)
    print(ll.is_empty())
    print(ll.length())
    ll.travel()
    ll.remove(111)
    ll.travel()
执行结果如下

2、双向链表的python实现
与单向链表相比多了一个指向前节点的指针,话不多说,直接看代码吧
class Node(object):
    def __init__(self, value):
        self.value = value
        # 前驱区
        self.prev = None
        # 后继区
        self.next = None


class LinkedListTwoway(object):
    def __init__(self):
        self.__head = None

    def is_empty(self):
        return self.__head is None

    def __len__(self):
        count = 0
        cur = self.__head
        while cur:
            count += 1
            cur = cur.next
        return count

    def traverse(self):
        cur = self.__head
        while cur:
            print(cur.value)
            cur = cur.next

    def add(self, value):
        node = Node(value)
        if self.is_empty():
            self.__head = node
        else:
            # 待插入节点的后继区指向原头节点
            node.next = self.__head
            # 原头节点的前驱区指向待插入节点
            self.__head.prev = node
            self.__head = node

    def append(self, value):
        node = Node(value)
        cur = self.__head
        if self.is_empty():
            self.__head = Node
            return
        while cur.next:
            cur = cur.next
        cur.next = node
        node.prev = cur

    def insert(self, pos, value):
        if pos <= 0:
            self.add(value)
        elif pos > len(self) - 1:
            self.append(value)
        else:
            # 单向链表中为了在特定位置插入,要先在链表中找到待插入位置和其前一个位置
            # 双向链表中就不需要两个游标了(当然单向链表中一个游标也是可以只找前一个位置)
            node = Node(value)
            count = 0
            cur = self.__head
            while count < pos - 1:
                count += 1
                cur = cur.next
            # 此时的游标指向pos的前一个位置
            # 这里的相互指向需尤为注意,有多种实现,需细细分析
            node.next = cur.next
            cur.next.prev = node
            node.prev = cur
            cur.next = node

    def search(self, value):
        cur = self.__head
        while cur:
            if cur.value == value:
                return True
            else:
                cur = cur.next
        return False

    def remove(self, value):
        if self.is_empty():
            return
        cur = self.__head
        while cur:
            if cur.value == value:
                if cur == self.__head:
                    self.__head = cur.next
                    # 处理链表只有一个节点的特殊情况
                    if cur.next:
                        cur.next.prev = None
                else:
                    cur.prev.next = cur.next
                    # 处理待删除节点是最后一个情况
                    if cur.next:
                        cur.next.prev = cur.prev
                return
            else:
                cur = cur.next
3、单向循环链表的python实现
注意两个点(与单链表相比):
1、需要遍历找到尾结点给其补完整循环
2、while遍历不包含尾结点
class Node(object):
    def __init__(self, value):
        # 元素域
        self.value = value
        # 链接域
        self.next = None


class CircularLinkedListOneway(object):
    # 单向循环链表与单向链表唯一的区别就是尾部指针指向head节点
    def __init__(self, node=None):
        # 构造非空链时,让其地址域指向自己
        if node:
            node.next = node  # 这里一开始就要构造循环
        self.__head = node

    def is_empty(self):
        # 判空与单链表一致
        return self.__head == None

    def __len__(self):
        # 遍历求长度
        count = 1
        cur = self.__head
        if self.is_empty():
            return 0
        while cur.next != self.__head:  # 与单链表相比,将指向none的判断条件改为指向头节点
            count += 1
            cur = cur.next
        return count

    def traversal(self):
        if self.is_empty():
            return
        cur = self.__head
        while cur.next != self.__head:
            print(cur.value,end='')
            cur = cur.next
        # 退出循环时,cur正是尾节点,尾结点的值未打印,所以要手动打印一下,这就是边界条件
        print(cur.value)

    def add(self, value):
        """头插法"""
        node = Node(value)
        if self.is_empty():
            self.__head = node  # 将新节点指向头节点
            self.__head.next = self.__head  # 别忘了加循环
            return
        cur = self.__head
        while cur.next != self.__head:
            cur = cur.next
        # 新节点的next指针指向原头节点
        node.next = self.__head
        # 将新节点指向头节点
        self.__head = node
        # 尾节点next指针指向新头节点
        cur.next = self.__head  # 这个是比单链表多出来的部分,而且为了找到尾结点,需要遍历一遍

    def append(self, value):
        node = Node(value)
        cur = self.__head
        if self.is_empty():
            self.__head = node
            self.__head.next = self.__head
            return
        while cur.next != self.__head:
            cur = cur.next
        node.next = cur.next
        cur.next = node

    def insert(self, pos, value):
        if pos <= 0:
            self.add(value)
        elif pos > len(self) - 1:
            self.append(value)
        else:
            node = Node(value)
            cur = self.__head
            count = 0
            while count < pos - 1:
                count += 1
                cur = cur.next
            node.next = cur.next
            cur.next = node

    def search(self, value):
        if self.is_empty():
            return False
        cur = self.__head
        while cur.next != self.__head:
            if cur.value == value:
                return True
            else:
                cur = cur.next
        # 别忘了while循环外的尾节点,尾结点还要再判断一遍
        if cur.value == value:
            return True
        return False

    def remove(self, value):
        cur = self.__head
        prior = None  # prior就是pre 始终在cur前面
        if self.is_empty():
            return
        while cur.next != self.__head:
            # 待删除节点如果找到
            if cur.value == value:
                # 待删除节点恰好是头节点,还要遍历一遍找到尾结点给它安排循环
                if cur == self.__head:
                    rear = self.__head
                    while rear.next != self.__head:  # 找尾部
                        rear = rear.next
                    self.__head = cur.next
                    rear.next = self.__head
                # 待删除节点在中间
                else:
                    prior.next = cur.next
                    return  # 这里不是跳出循环的break,而是退出函数的return哦,因为已经处理完毕了
                # 如果还没找到
            else:  # 跳出循环体,表示要删除的是尾结点
                prior = cur
                cur = cur.next
        # 待删除节点在尾部
        if cur.value == value:
            # 如果链表中只有一个元素,则此时prior为None,Next属性就会报错
            # 此时直接使其头部元素为None即可
            if cur == self.__head:
                self.__head = None
                return
            prior.next = cur.next  # 因为这个cur.next就等于头节点,这一步其实就是去掉尾结点直接连在头节点上了
参考:
https://www.cnblogs.com/yifeixu/p/8966613.html
https://blog.csdn.net/Tonywu2018/article/details/88853533
https://www.cnblogs.com/yudanqu/p/9172459.html


 2393
2393


 被折叠的 条评论
为什么被折叠?
被折叠的 条评论
为什么被折叠?
 到【灌水乐园】发言


