


系列文章目录
torchvision是pytorch的一个图形库,它包含了torchvision.datasets、torchvision.models、torchvision.transforms、torchvision.utils四部分。
1、torchvision.datasets: 一些数据集。
2、torchvision.models: 常见卷积网络模型。
3、torchvision.transforms: 数据预处理、图片变换等操作。
4、torchvision.utils: 其他函数。
前言
最近在学习卷积神经网络,遇到了transform = transforms.Compose([transforms.ToTensor(), transforms.Normalize((0.5, 0.5, 0.5), (0.5, 0.5, 0.5))]) ,不是很懂,就学习了一下transforms包。
一、图像变换
1.transforms.Compose()
torchvision.transforms是pytorch中的图像预处理包。一般用Compose把多个步骤整合到一起,个人认为与nn.Sequential函数类似,如下。但也有不同的地方,可以参考这个。
m = nn.Sequential(
        conv2d(in_filters, filters_list[0], 1),
        conv2d(filters_list[0], filters_list[1], 3)
    )
transform = transforms.Compose(
          [transforms.ToTensor(),
          transforms.Normalize((0.5, 0.5, 0.5), (0.5, 0.5, 0.5))])
2. transforms.ToTensor()
将PIL Image或者 ndarray 转换为tensor,并且归一化至[0-1]。
torchvision.transforms.ToTensor()
3.transforms.Normalize()
这个函数作用是用均值和标准差标准化张量图像。
对每个通道而言,Normalize执行以下操作:
image=(image-mean)/std
torchvision.transforms.Normalize(mean, std)
torchvision.transforms.Normalize(0.5,0.5)  # 1维  均值0.5 ,方差0.5
transforms.Normalize((0.5, 0.5, 0.5), (0.5, 0.5, 0.5))  # 3维  均值0.5 ,方差0.5
4.transforms.Pad()
填充
from torchvision import transforms
import matplotlib.pyplot as plt
from PIL import Image
img = Image.open("D:/code/picture processing/jupyter_code/data/AM.png")

# padding:数量,    fill: 填充值 ,   padding_mode: constant常量、edge边缘值
data1 = transforms.Pad(padding=5, fill=0, padding_mode='constant')(data)
print('data',data.size)
print('data1',data1.size)
data (320, 320)
data1 (330, 330)
5.transforms.ColorJitter()
修改亮度、对比度和饱和度
from torchvision import transforms
import matplotlib.pyplot as plt
from PIL import Image
img = Image.open("D:/code/picture processing/jupyter_code/data/AM.png")
# brightness:亮度,contrast:对比度 ,saturation:饱和度,hue: 色调
img1 = transforms.ColorJitter(brightness=2, contrast=0, saturation=0, hue=0)(img)
plt.subplot(2,2,1),plt.imshow(img),plt.title("原图",fontname="SimHei")
plt.subplot(2,2,2),plt.imshow(img1),plt.title("ColorJitter",fontname="SimHei")

plt显示挂内核 添加下面两行代码
# plt显示挂内核 添加下面两行代码
import os  # 添加代码①
os.environ["KMP_DUPLICATE_LIB_OK"] = "TRUE"  # 添加代码②
6.转灰度图
from torchvision import transforms
import matplotlib.pyplot as plt
from PIL import Image
img = Image.open("D:/code/picture processing/jupyter_code/data/AM.png")
# num_output_channels =1 灰度图,  =3 :r g b
img1 = transforms.Grayscale(num_output_channels=1)(img)
#img1 = transforms.RandomGrayscale(p=0.1)(img) # 依概率p转为灰度图
img1.show()

数据集预处理函数示例
transform=transforms.Compose(
	[transforms.ToTensor(),
	transforms.Normalize((0.1307,),(0.3081))])    # 1维  黑白图片
transform = transforms.Compose(
    [transforms.ToTensor(),
     transforms.Normalize((0.5, 0.5, 0.5), (0.5, 0.5, 0.5))])   # 3维  彩色图片 r g b
刚开始我没有弄懂均值和方差是2个值为什么第二个代码有6个值。后来我才知道第二个代码是三维的。转换流程如下,以第二个程序为例,对每一个维度,首先ToTensor函数会把灰度范围从0-255变换到0-1之间,然后transform.Normalize()函数把数值0-1变换到-1,1。这里可以带入公式看一下:image=(image-mean)/std
图片均值和方差都为0.5。数值最小为0,最大为1。最小值 = (0-0.5)/0.5=-1,最大值 = (1-0.5)/0.5=1。
7.transforms.Resize
Resize会改变图片的长宽比,但是本身并没有发生裁切,仍可以通过resize方法返回原来的形状。
需要注意的一点是PILImage对象size属性返回的是w, h,而resize的参数顺序是h, w
torchvision.transforms.Resize(size, interpolation=2)
interpolation=2 是采用双线性插值的方法。
五种插值算法:最近邻、双线性、双三次、基于像素区域关系、兰索斯插值。
二、图像裁剪
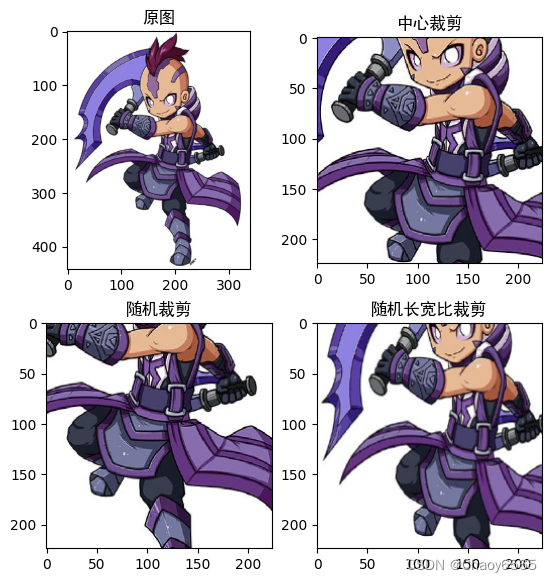
中心裁剪、随机裁剪、随机长宽比裁剪
from torchvision import transforms
import matplotlib.pyplot as plt
from PIL import Image

img = Image.open("D:/code/picture processing/jupyter_code/data/AM.png")

img1 = transforms.CenterCrop(224)(img) # 中心裁剪
img2 = transforms.RandomCrop(224)(img) # 随机裁剪
img3 = transforms.RandomResizedCrop(224)(img) # 随机长宽比裁剪

# 显示
plt.subplot(2,2,1),plt.imshow(img),plt.title("原图",fontname="SimHei")
plt.subplot(2,2,2),plt.imshow(img1),plt.title("中心裁剪",fontname="SimHei")
plt.subplot(2,2,3),plt.imshow(img2),plt.title("随机裁剪",fontname="SimHei")
plt.subplots_adjust(top=1.2)
plt.subplot(2,2,4),plt.imshow(img3),plt.title("随机长宽比裁剪",fontname="SimHei")
plt.subplots_adjust(top=1.2)
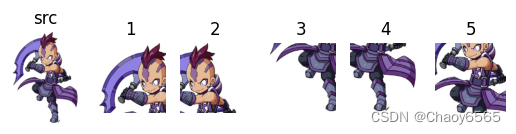
上下左右中心裁剪
img4 = transforms.FiveCrop(224)(img)  # 上下左右中心裁剪
# 显示
axs = plt.figure().subplots(1, 6)
axs[0].imshow(img);axs[0].set_title('src');axs[0].axis('off')
axs[1].imshow(img4[0]);axs[1].set_title('1');axs[1].axis('off')
axs[2].imshow(img4[1]);axs[2].set_title('2');axs[2].axis('off')
axs[3].imshow(img4[2]);axs[3].set_title('3');axs[3].axis('off')
axs[4].imshow(img4[3]);axs[4].set_title('4');axs[4].axis('off')
axs[5].imshow(img4[4]);axs[5].set_title('5');axs[5].axis('off')
plt.show()
上下左右中心裁剪后翻转
img5 = transforms.TenCrop(224)(img) # 上下左右中心裁剪后翻转
# 显示
axs = plt.figure().subplots(1, 10)
axs[0].imshow(img5[0]);axs[0].set_title('0');axs[0].axis('off')
axs[1].imshow(img5[1]);axs[1].set_title('1');axs[1].axis('off')
axs[2].imshow(img5[2]);axs[2].set_title('2');axs[2].axis('off')
axs[3].imshow(img5[3]);axs[3].set_title('3');axs[3].axis('off')
axs[4].imshow(img5[4]);axs[4].set_title('4');axs[4].axis('off')
axs[5].imshow(img5[5]);axs[5].set_title('5');axs[5].axis('off')
axs[6].imshow(img5[6]);axs[6].set_title('6');axs[6].axis('off')
axs[7].imshow(img5[7]);axs[7].set_title('7');axs[7].axis('off')
axs[8].imshow(img5[8]);axs[8].set_title('8');axs[8].axis('off')
axs[9].imshow(img5[9]);axs[9].set_title('9');axs[9].axis('off')
plt.show()

总代码
from torchvision import transforms
import matplotlib.pyplot as plt
from PIL import Image
img = Image.open("D:/code/picture processing/jupyter_code/data/AM.png")

img1 = transforms.CenterCrop(224)(img) # 中心裁剪
img2 = transforms.RandomCrop(224)(img) # 随机裁剪
img3 = transforms.RandomResizedCrop(224)(img) # 随机长宽比裁剪
img4 = transforms.FiveCrop(224)(img) # 上下左右中心裁剪
img5 = transforms.TenCrop(224)(img) # 上下左右中心裁剪后翻转

plt.subplot(2,2,1),plt.imshow(img),plt.title("原图",fontname="SimHei")
plt.subplot(2,2,2),plt.imshow(img1),plt.title("中心裁剪",fontname="SimHei")
plt.subplot(2,2,3),plt.imshow(img2),plt.title("随机裁剪",fontname="SimHei")
plt.subplots_adjust(top=1.2)
plt.subplot(2,2,4),plt.imshow(img3),plt.title("随机长宽比裁剪",fontname="SimHei")
plt.subplots_adjust(top=1.2)

axs = plt.figure().subplots(1, 10)
axs[0].imshow(img5[0]);axs[0].set_title('0');axs[0].axis('off')
axs[1].imshow(img5[1]);axs[1].set_title('1');axs[1].axis('off')
axs[2].imshow(img5[2]);axs[2].set_title('2');axs[2].axis('off')
axs[3].imshow(img5[3]);axs[3].set_title('3');axs[3].axis('off')
axs[4].imshow(img5[4]);axs[4].set_title('4');axs[4].axis('off')
axs[5].imshow(img5[5]);axs[5].set_title('5');axs[5].axis('off')
axs[6].imshow(img5[6]);axs[6].set_title('6');axs[6].axis('off')
axs[7].imshow(img5[7]);axs[7].set_title('7');axs[7].axis('off')
axs[8].imshow(img5[8]);axs[8].set_title('8');axs[8].axis('off')
axs[9].imshow(img5[9]);axs[9].set_title('9');axs[9].axis('off')
plt.show()
plt.subplots_adjust(top=1.2)

axs = plt.figure().subplots(1, 6)
axs[0].imshow(img);axs[0].set_title('src');axs[0].axis('off')
axs[1].imshow(img4[0]);axs[1].set_title('1');axs[1].axis('off')
axs[2].imshow(img4[1]);axs[2].set_title('2');axs[2].axis('off')
axs[3].imshow(img4[2]);axs[3].set_title('3');axs[3].axis('off')
axs[4].imshow(img4[3]);axs[4].set_title('4');axs[4].axis('off')
axs[5].imshow(img4[4]);axs[5].set_title('5');axs[5].axis('off')
plt.show()
plt.subplots_adjust(top=1.2)
三、图像翻转和旋转
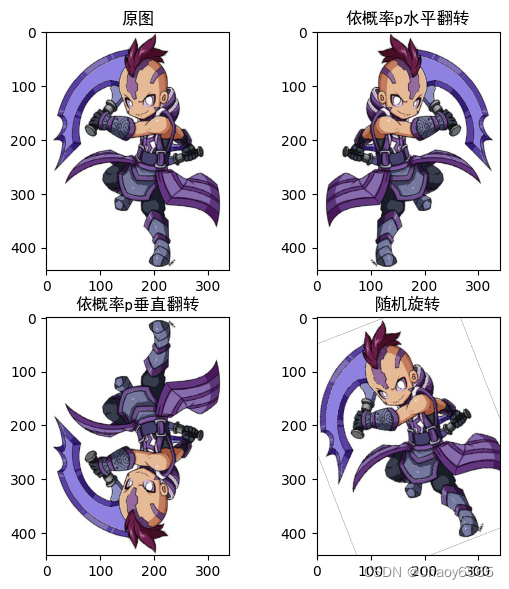
水平翻转、垂直翻转、随机旋转
from torchvision import transforms
import matplotlib.pyplot as plt
from PIL import Image
# plt显示挂内核 添加下面两行代码
import os  # 添加代码①
os.environ["KMP_DUPLICATE_LIB_OK"] = "TRUE"  # 添加代码②
img = Image.open("D:/code/picture processing/jupyter_code/data/AM.png")
img1 = transforms.RandomHorizontalFlip(p=0.5)(img) # 依概率p水平翻转
img2 = transforms.RandomVerticalFlip(p=0.5)(img) # 依概率p垂直翻转
img3 = transforms.RandomRotation(30, resample=False, expand=False, center=None)(img)  # 随机旋转
# 显示
plt.subplot(2,2,1),plt.imshow(img),plt.title("原图",fontname="SimHei")
plt.subplot(2,2,2),plt.imshow(img1),plt.title("依概率p水平翻转",fontname="SimHei")
plt.subplot(2,2,3),plt.imshow(img2),plt.title("依概率p垂直翻转",fontname="SimHei")
plt.subplots_adjust(top=1.2)
plt.subplot(2,2,4),plt.imshow(img3),plt.title("随机旋转",fontname="SimHei")
plt.subplots_adjust(top=1.2)
四、RandomChoice()、RandomApply()、RandomOrder()
构建transforms,使数据增强更灵活
从给定的一系列transforms中选一个进行操作
torchvision.transforms.RandomChoice(transforms)
给一个transform加上概率,以一定的概率执行该操作
torchvision.transforms.RandomApply(transforms, p=0.5)
将transforms中的操作顺序随机打乱
torchvision.transforms.RandomOrder(transforms)
总代码
from torchvision import transforms
transform = transforms.Compose([transforms.ToTensor(),transforms.Normalize((0.5, 0.5, 0.5), (0.5, 0.5, 0.5))])
transform1 = transforms.RandomChoice([transforms.ToTensor(),transforms.Normalize((0.1307,),(0.3081))])
# 以一定的概率执行该操作
transform2 = transforms.RandomApply([transforms.ColorJitter(brightness=(0.45,1.4))], p=0.2)
# 选一个进行操作
transform3 = transforms.RandomChoice([transform1,transform2])
# 打乱操作顺序随机
transform4 = transforms.RandomOrder([transform1,transform2])
6.transforms函数其他子函数功能
| 函数 | 功能 |
|---|---|
| Resize | 把给定的图片resize到given size |
| Normalize | 用均值和标准差归一化张量图像 |
| ToTensor | 将 PIL 图像转换为范围 [0,255] 内的张量 (HWC) to a torch。范围 [0.0,1.0] 范围内的张量(CHW) |
| CenterCrop | 在图片的中间区域进行裁剪 |
| RandomCrop | 在一个随机的位置进行裁剪 |
| FiceCrop | 把图像裁剪为四个角和一个中心 |
| RandomResizedCrop | 将PIL图像裁剪成任意大小和纵横比 |
| ToPILImage | convert a tensor to PIL image |
| RandomHorizontalFlip | 以0.5的概率水平翻转给定的PIL图像 |
| RandomVerticalFlip | 以0.5的概率竖直翻转给定的PIL图像 |
| Grayscale | 将图像转换为灰度图像 |
| RandomGrayscale | 将图像以一定的概率转换为灰度图像 |
| ColorJitter | 随机改变图像的亮度对比度和饱和度 |
总结
当然还有其他的函数,以后再慢慢学习。


 1万+
1万+


 被折叠的 条评论
为什么被折叠?
被折叠的 条评论
为什么被折叠?
 到【灌水乐园】发言


