


1. 声明
当前内容主要为复习在spring中注入多个sqlSessionFactoryBean来访问不同的数据库的操作
主要为:
- 注入mysql的sqlSessionFactoryBean
- 注入iotdb的sqlSessionFactoryBean
- 实现数据访问操作
pom依赖
<parent>
		<groupId>org.springframework.boot</groupId>
		<artifactId>spring-boot-starter-parent</artifactId>
		<version>2.1.18.RELEASE</version>
	</parent>
	<properties>
		<java.version>1.8</java.version>
		<project.build.sourceEncoding>UTF-8</project.build.sourceEncoding>
	</properties>

	<dependencies>
		<dependency>
			<groupId>org.springframework.boot</groupId>
			<artifactId>spring-boot-starter-web</artifactId>
		</dependency>
		<dependency>
			<groupId>org.apache.iotdb</groupId>
			<artifactId>iotdb-jdbc</artifactId>
			<version>0.11.1</version>
		</dependency>
		<dependency>
			<groupId>mysql</groupId>
			<artifactId>mysql-connector-java</artifactId>
			<version>8.0.13</version>
		</dependency>
		<dependency>
			<groupId>org.mybatis.spring.boot</groupId>
			<artifactId>mybatis-spring-boot-starter</artifactId>
			<version>1.1.1</version>
		</dependency>
		<dependency>
			<groupId>commons-dbcp</groupId>
			<artifactId>commons-dbcp</artifactId>
			<version>1.4</version>
		</dependency>
		<dependency>
			<groupId>junit</groupId>
			<artifactId>junit</artifactId>
			<version>3.8.1</version>
			<scope>test</scope>
		</dependency>
	</dependencies>
2.基本demo
1.首先创建基本的config类,用于向当前的spring容器中注入,主要靠@Bean(“id”)的方式进行唯一标识
@Configuration
// 需要放在两个配置类上面
public class AppConfig {
	// 采用多个配置方式访问其他的数据库(为其他的数据库使用mybatis框架)
	// 1. 配置多个数据源

	private static final Class<?> LOG_IMPL_CLASS = org.apache.ibatis.logging.stdout.StdOutImpl.class;

	@Bean("mysqlDataSource")
	public DataSource mysqlDataSource() {
		String driverClassName = "com.mysql.cj.jdbc.Driver";
		String url = "jdbc:mysql://localhost:3306/test?serverTimezone=UTC&useUnicode=true&characterEncoding=UTF-8";
		String username = "root";
		String password = "root";
		return getBasicDataSource(driverClassName, url, username, password);
	}

	@Bean("iotdbDataSource")
	public DataSource iotdbDataSource() {
		String driverClassName = "org.apache.iotdb.jdbc.IoTDBDriver";
		String url = "jdbc:iotdb://localhost:6667/";
		String username = "root";
		String password = "root";
		return getBasicDataSource(driverClassName, url, username, password);
	}

	private DataSource getBasicDataSource(String driverClassName, String url, String username, String password) {
		BasicDataSource dataSource = new BasicDataSource();
		dataSource.setDriverClassName(driverClassName);
		dataSource.setUrl(url);
		dataSource.setUsername(username);
		dataSource.setPassword(password);
		return dataSource;
	}

	// 2. 配置多个SqlSessionFactoryBean

	@Bean("mysqlSqlSessionFacotry")
	public SqlSessionFactoryBean mysqlSqlSessionFactory(@Autowired @Qualifier("mysqlDataSource") DataSource dataSource)
			throws Exception {
		/* SqlSessionFactory sqlSessionFactory=new SqlSessionFactoryBuilder(). */
		// 与spring整合的过程中只需要SqlSessionFactoryBean这个对象
		org.apache.ibatis.session.Configuration configuration = new org.apache.ibatis.session.Configuration();
		configuration.setLogImpl(LOG_IMPL_CLASS);
		configuration.setEnvironment(new Environment("mysqlEnv", new JdbcTransactionFactory(), dataSource));
		SqlSessionFactoryBean sqlSessionFactory = new SqlSessionFactoryBean();
		sqlSessionFactory.setConfiguration(configuration);
		sqlSessionFactory.setDataSource(dataSource);
		//
		/*
		 * MapperScannerConfigurer scanner = new MapperScannerConfigurer();
		 * scanner.setSqlSessionFactory(sqlSessionFactory.getObject());
		 * scanner.setBasePackage("com.hy.springboot.test.mapper.mysql");
		 * scanner.afterPropertiesSet();// 触发操作
		 */
		// 手动扫描映射文件
		sqlSessionFactory.setMapperLocations(new Resource[] { new ClassPathResource("mapper/mysql/MySqlMapper.xml") });
		return sqlSessionFactory;

	}

	@Bean("iotdbSqlSessionFactory")
	public SqlSessionFactoryBean iotdbSqlSessionFactory(@Autowired @Qualifier("iotdbDataSource") DataSource dataSource)
			throws Exception {
		org.apache.ibatis.session.Configuration configuration = new org.apache.ibatis.session.Configuration();
		configuration.setLogImpl(LOG_IMPL_CLASS);
		configuration.setEnvironment(new Environment("iotdbEnv", new JdbcTransactionFactory(), dataSource));
		SqlSessionFactoryBean sqlSessionFactory = new SqlSessionFactoryBean();
		sqlSessionFactory.setConfiguration(configuration);
		sqlSessionFactory.setDataSource(dataSource);
		// 手动扫描映射文件
		sqlSessionFactory.setMapperLocations(new Resource[] { new ClassPathResource("mapper/iotdb/IOTDBMapper.xml") });
		return sqlSessionFactory;
	}

	@Bean("mysqlMapperScanner")
	public MapperScannerConfigurer mysqlMapperScanner(
			@Autowired @Qualifier("mysqlSqlSessionFacotry") SqlSessionFactoryBean sqlSessionFactory) throws Exception {
		MapperScannerConfigurer scanner = new MapperScannerConfigurer();
		scanner.setSqlSessionFactory(sqlSessionFactory.getObject());
		scanner.setBasePackage("com.hy.springboot.test.mapper.mysql");
		return scanner;
	}

	@Bean("iotdbMapperScanner")
	public MapperScannerConfigurer iotdbMapperScanner(
			@Autowired @Qualifier("iotdbSqlSessionFactory") SqlSessionFactoryBean sqlSessionFactory) throws Exception {
		MapperScannerConfigurer scanner = new MapperScannerConfigurer();
		scanner.setSqlSessionFactory(sqlSessionFactory.getObject());
		scanner.setBasePackage("com.hy.springboot.test.mapper.iotdb");
		return scanner;
	}
}
这里采用了手动创建MapperScannerConfigurer来为各个不同的接口生成代理
注意如果使用注解@MapperScan(basePackages = {"com.hy.springboot.test.mapper.iotdb"},sqlSessionFactoryRef = "iotdbSqlSessionFactory")和@MapperScan(basePackages = {"com.hy.springboot.test.mapper.mysql"},sqlSessionFactoryRef = "mysqlSqlSessionFactory"),必须将其分别放在不同的配置类的上面可以替换上面的手动创建两个MapperScannerConfigurer
此时,spring容器中有两个类型为SqlSessionFactoryBean的bean如果直接启动会出现报错,无法注入不唯一的bean
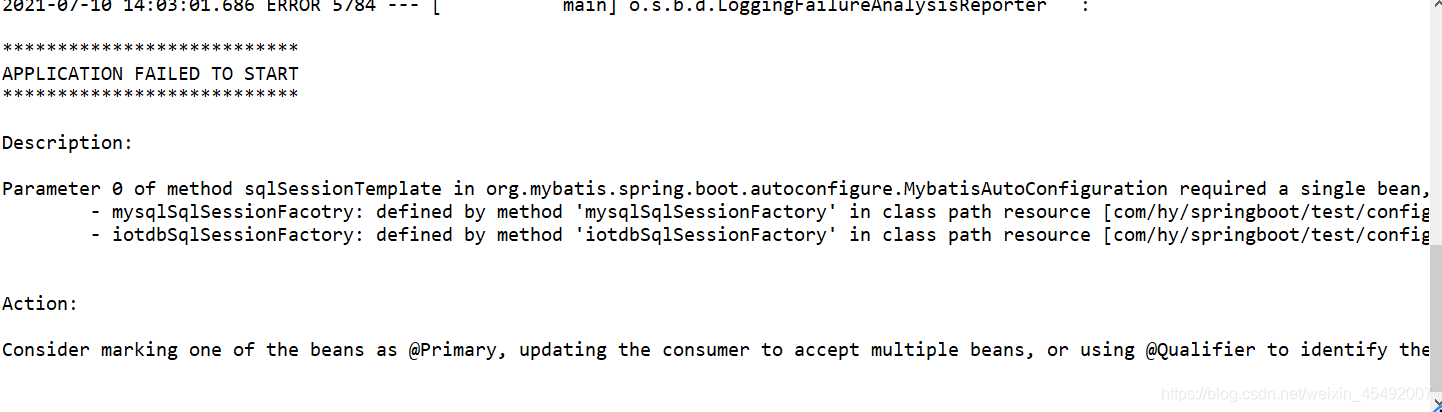
解决办法:直接取消自动注入的配置类即可(排除这个MybatisAutoConfiguration即可)
@SpringBootApplication(exclude = MybatisAutoConfiguration.class)
public class Application {
	public static void main(String[] args) {
		SpringApplication.run(Application.class, args);
	}
}
2.开始创建实体类(mysql中的User类,iotdb中的MeasurementValue类)
public class MeasurementValue {
	private String path;
	private String timestamp;
	private String value;
	// 省略get,set,toString等方法
}
public class User {
	private Integer id;
	private String username;
	private String pwd;
	// 省略get,set,toString等方法
}
3.开始创建mapper文件(区分为不同的包)
iotdb
<?xml version="1.0" encoding="UTF-8"?>
<!DOCTYPE mapper PUBLIC "-//mybatis.org//DTD Mapper 3.0//EN" "http://mybatis.org/dtd/mybatis-3-mapper.dtd">
<mapper namespace="com.hy.springboot.test.mapper.iotdb.IOTDBMapper">
  <resultMap id="BaseResultMap" type="com.hy.springboot.test.entity.iotdb.MeasurementValue">
    <result column="timeseries"  property="path" />
    <result column="Time"  property="timestamp" />
    <result column="value"  property="value" />
  </resultMap>
  <select id="getAllStorageGroup" resultType="string">
  	show storage group
  </select>
  <select id="getMeasurementPointLastValue" resultMap="BaseResultMap">
  	select last ${field} from ${path}
  </select>
</mapper>
mysql
<?xml version="1.0" encoding="UTF-8"?>
<!DOCTYPE mapper PUBLIC "-//mybatis.org//DTD Mapper 3.0//EN" "http://mybatis.org/dtd/mybatis-3-mapper.dtd">
<mapper namespace="com.hy.springboot.test.mapper.mysql.UserMapper">
  <resultMap id="BaseResultMap" type="com.hy.springboot.test.entity.mysql.User">
    <id column="id" jdbcType="INTEGER" property="id" />
    <result column="name" jdbcType="VARCHAR" property="username" />
    <result column="pwd" jdbcType="VARCHAR" property="pwd" />
  </resultMap>
 <select id="getAllUsers" resultMap="BaseResultMap">
 	select id,name,pwd from user
 </select>
</mapper>
4.开始创建接口(这个也区分不同的包)
@Repository
public interface IOTDBMapper {
	List<String> getAllStorageGroup();

	MeasurementValue getMeasurementPointLastValue(@Param("field")String field, @Param("path") String path);
}
@Repository
public interface UserMapper {
	List<User> getAllUsers();
}
5.开始创建controller类
import org.springframework.beans.factory.annotation.Autowired;
import org.springframework.web.bind.annotation.RequestMapping;
import org.springframework.web.bind.annotation.RequestMethod;
import org.springframework.web.bind.annotation.RestController;

import com.hy.springboot.test.mapper.iotdb.IOTDBMapper;

@RestController
public class IOTDBController {
	@Autowired
	IOTDBMapper iotdbMapper;

	@RequestMapping(value = "/getAllStorageGroup", method = RequestMethod.GET)
	public Object getAllStorageGroup() {
		return iotdbMapper.getAllStorageGroup();
	}

	@RequestMapping(value = "/getMeasurementPointLastValue", method = RequestMethod.GET)
	public Object findAllStorageGroup(String field,String path) {
		return iotdbMapper.getMeasurementPointLastValue(field, path);
	}
}
import org.springframework.beans.factory.annotation.Autowired;
import org.springframework.web.bind.annotation.RequestMapping;
import org.springframework.web.bind.annotation.RequestMethod;
import org.springframework.web.bind.annotation.RestController;
import com.hy.springboot.test.mapper.mysql.UserMapper;

@RestController
public class MySqlController {
	@Autowired
	UserMapper userMapper;

	@RequestMapping(value = "/getAllUsers", method = RequestMethod.GET)
	public Object findAllStorageGroup() {
		return userMapper.getAllUsers();
	}
}
3. 测试


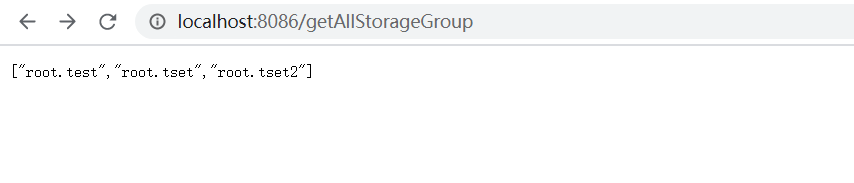


测试成功!
可以向Spring容器中注入多个sqlSessionFactory方式来实现不同的数据库的切换(主要为处理不同数据库之间的问题)


 343
343


 被折叠的 条评论
为什么被折叠?
被折叠的 条评论
为什么被折叠?
 到【灌水乐园】发言


