


vue的组件化
vue最重要的核心之一就是组件化。就是把页面拆分成多个组件 (component),每个组件依赖的 CSS、JavaScript、模板、图片等资源放在一起开发和维护。组件是资源独立的,组件在系统内部可复用,组件和组件之间可以嵌套。
Vue中使用组件的三大步骤:
一、定义组件(创建组件)
二、注册组件
三、使用组件(写组件标签)
注册组件
Vue提供了全局注册和局部注册两种方式。
全局注册:
Vue.component('my-component-name', { /* ... */ })
局部注册:
var ComponentA = { /* ... */ }

new Vue({
  el: '#app',
  components: {
    'component-a': ComponentA
  }
})
ok 重点来了!通过源码分析可以发现这个Vue.component()是在assets.js文件中的initAssetRegisters方法里面实现的。
PS:初始化的时候首先会调用initGlobalAPI(Vue)方法,而initGlobalAPI方法定义在global-api文件的index.js里面initAssetRegisters(Vue)方法同时调用了这个assets文件的方法。
在这之前先看initMixin的init方法中的代码:
  Vue.prototype._init = function (options?: Object) {
    //..................
    // merge options
    if (options && options._isComponent) {
    // 优化内部组件实例化,因为动态选项合并非常慢,而且内部组件选项都不需要特殊处理。
    // 当满条件,即是component组件时调用initInternalComponent方法,这部分暂时不表,等组件部分再介绍。
      initInternalComponent(vm, options)
    } else {
      // new Vue对象,不是组件
      // 合并vue选项对象,合并构造函数的选项对象和实例中的选项对象
      vm.$options = mergeOptions(
        resolveConstructorOptions(vm.constructor),
        options || {},
        vm
      )
    }
    //...........
    if (vm.$options.el) {
      vm.$mount(vm.$options.el)
    }
  }
init方法初始化了配置项,可以发现有两种合并策略。
-
第一种:在Component组件的情况下,在从vnode创建组件实例是,会执行initInternalComponent进行内部组件配置合并。主要是1.指定组件$options原型,2.把组件依赖于父组件的props、listeners也挂载到options上,方便子组件调用。
-
第二种:非组件的情况,即根实例创建时,直接通过mergeOptions做配置合并。
mergeOptions 函数的三个参数。
第一个参数:resolveConstructorOptions方法,其实就是处理了内置的三个配置项,并且把相关内置组件和方法挂载到options上面。然后暴露给$options便于开发者查看。
Vue.options = {
	components: {
		KeepAlive
		Transition,
    	TransitionGroup
	},
	directives:{
	    model,
        show
	},
	filters: Object.create(null),
	_base: Vue
}
第二个参数:options就是我们在new Vue()的时候传入的配置项参数。
第三个参数:就是vue实例对象本身。
再回到assets.js中看Vue.component()的核心代码
//  ASSET_TYPES = ['component', 'directive', 'filter']
  ASSET_TYPES.forEach(type => {
    Vue[type] = function (
      id: string,
      definition: Function | Object
    ): Function | Object | void {
      if (!definition) {
        return this.options[type + 's'][id]
      } else {
        /* istanbul ignore if */
        if (process.env.NODE_ENV !== 'production' && type === 'component') {
          validateComponentName(id)
        }
        if (type === 'component' && isPlainObject(definition)) {
          definition.name = definition.name || id
          definition = this.options._base.extend(definition)
        }
        if (type === 'directive' && typeof definition === 'function') {
          definition = { bind: definition, update: definition }
        }
        // 将组件添加到构造函数的选项对象中Vue.options上
        this.options[type + 's'][id] = definition
        return definition
      }
    }
  })
当type是component且definition是一个对象,需要调用Vue.extend()转换成函数。Vue.extend会创建一个Vue的子类(组件类),并返回子类的构造函数。
最后会把extend处理后的对象重新赋值给definition,并且挂载到options配置项上去。所以全局注册的组件,实际上通过Vue.component添加到了Vue构造函数的选项对象 Vue.options.components 上了。PS:通过Vue.component()注册的组件也就是Vue.extend(),都是全局组件。
上面可以看出,注册组件本质还是调用了this.options._base.extend这个方法。其实在initGlobalAPI中可以发现.
   // .....
  Vue.options = Object.create(null)
  ASSET_TYPES.forEach(type => {
    Vue.options[type + 's'] = Object.create(null)
  })

  // this is used to identify the "base" constructor to extend all plain-object
  // components with in Weex's multi-instance scenarios.
  Vue.options._base = Vue

  extend(Vue.options.components, builtInComponents)
  initExtend(Vue)
可以发现,this.options._base.extend其实就是Vue.extend。那么Vue.extend()到底做了些什么呢?
注册组件的第二种方式
在extend.js的 initExtend方法中
 Vue.extend = function (extendOptions: Object): Function {
    extendOptions = extendOptions || {}
    const Super = this
    const SuperId = Super.cid
    //组件缓存 默认为空对象
    const cachedCtors = extendOptions._Ctor || (extendOptions._Ctor = {})
    if (cachedCtors[SuperId]) {
    //如果有则直接取出
      return cachedCtors[SuperId]
    }
    const name = extendOptions.name || Super.options.name
    if (process.env.NODE_ENV !== 'production' && name) {
      validateComponentName(name)
    }
    // 创建VueComponent构造函数
    const Sub = function VueComponent (options) {
      this._init(options)
    }
    // 将vue上原型的方法挂在Sub.prototype中,Sub的实例同时也继承了vue.prototype上的所有属性和方法。
    Sub.prototype = Object.create(Super.prototype)
    Sub.prototype.constructor = Sub
    Sub.cid = cid++
    // 通过vue的合并策略合并添加项到新的构造器上
    Sub.options = mergeOptions(
      Super.options,
      extendOptions
    )
    Sub['super'] = Super

    // 处理props和computed响应式配置项
    if (Sub.options.props) {
      initProps(Sub)
    }
    if (Sub.options.computed) {
      initComputed(Sub)
    }

    // allow further extension/mixin/plugin usage
    Sub.extend = Super.extend
    Sub.mixin = Super.mixin
    Sub.use = Super.use

    // create asset registers, so extended classes
    // can have their private assets too.
    // 在新的构造器上挂上vue的工具方法
    ASSET_TYPES.forEach(function (type) {
      Sub[type] = Super[type]
    })
    // enable recursive self-lookup
    if (name) {
      Sub.options.components[name] = Sub
    }

    // keep a reference to the super options at extension time.
    // later at instantiation we can check if Super's options have
    // been updated.
    Sub.superOptions = Super.options
    Sub.extendOptions = extendOptions
    Sub.sealedOptions = extend({}, Sub.options)

    // cache constructor 缓存组件构造器在extendOptions上
    cachedCtors[SuperId] = Sub
    return Sub
  }
Vue.extend首先是创建缓存空间,然后去根据cid查找组件。通过一些列挂载使得最终返回的Sub构造器和vue构造器基本一致。
- 值得一提的是每次调用Vue.extend,返回的都是一个全新的VueComponent,即每个组件都是全新的,而且会调用init方法,使得每个组件和初始化new Vue()一样可以配置选项。
- 关于原型链:将vue上原型的方法挂在Sub.prototype中,Sub的实例同时也继承了vue.prototype上的所有属性和方法,所以我们在每个组件中也能使用vue实例对象this访问vue原型上的问题。
const Sub = function VueComponent (options) {
   this._init(options)
}
Sub.prototype = Object.create(Super.prototype)
Sub.prototype.constructor = Sub
关于this指向:
(1).组件配置中:data函数、methods中的函数、watch中的函数、computed中的函数 它们的this均是【VueComponent实例对象】。
(2).new Vue(options)配置中:data函数、methods中的函数、watch中的函数、computed中的函数 它们的this均是【Vue实例对象】。
vue组件创建原理
上面分析了vue中创建组件的两种方法及其原理。那么组件是如何被创建在我们的html并且识别的呢?
组件的初始化
首先回溯上文提到的initMixin的init方法中,就是初始化配置项合并问题
    if (options && options._isComponent) {
      initInternalComponent(vm, options)
    } else {
      vm.$options = mergeOptions(
        resolveConstructorOptions(vm.constructor),
        options || {},
        vm
      )
    }
这里是两种合并策略,第一种就是内部组件实例化的方法,意思就是当有组件初始化的时候 会进入这个方法initInternalComponent()
function initInternalComponent (vm, options) {
  //在所有组件创建的过程中,都会从全局的 Vue.options.components 扩展到当前组件的 vm.$options.components 下,这就是全局注册的组件能被任意使用的原因。
  var opts = vm.$options = Object.create(vm.constructor.options);
  // 这样做是因为它比动态枚举更快。
  var parentVnode = options._parentVnode;
  opts.parent = options.parent;
  opts._parentVnode = parentVnode;

  var vnodeComponentOptions = parentVnode.componentOptions;
  opts.propsData = vnodeComponentOptions.propsData;
  opts._parentListeners = vnodeComponentOptions.listeners;
  opts._renderChildren = vnodeComponentOptions.children;
  opts._componentTag = vnodeComponentOptions.tag;

  if (options.render) {
    opts.render = options.render;
    opts.staticRenderFns = options.staticRenderFns;
  }
}
new Vue()初始化的过程会有一些列初始化过程,具体可看源码分析(一)中,可以看到最终会有一个挂载的动作,大致分析如下。
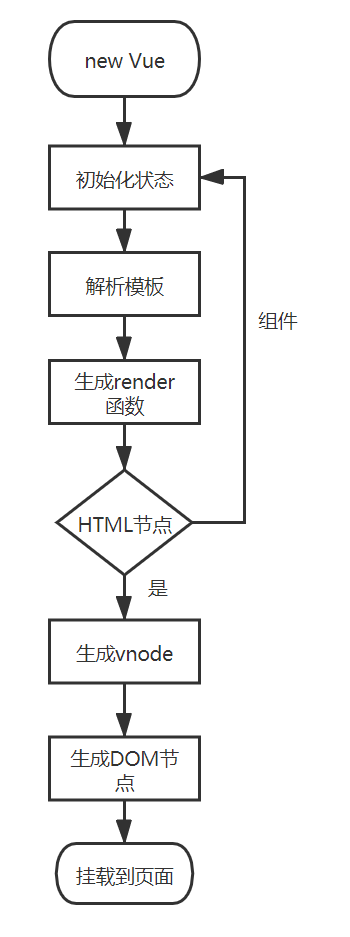
- new Vue()初始化时会先init方法先合并options,然后根据里面的el通过$mount方法去挂载,这个方法内部是去先找options里面的render方法 ,如果没有就去找template,template如果也没有,直接将el给template,最终转换成
render方法。最终渲染到dom树上 - $mount方法本质上都会调用mountComponent方法,其实就是挂载组件,如果没有render方法,就让它等于 createEmptyVNode(生成虚拟dom)这个函数。
- mountComponent方法方法中也还定义了updateComponent函数,也就是更新组件,其中
vm._update(vm._render(), hydrating)这里有个Vue.prototype._render方法最终是生成一个vnode,这里的render会依次调用createElement方法,然后会将组件的配置,合并到构造方法中,调用Vue.extend()再次初始化组件。
组件的渲染
为什么在代码中我们输入自己定义的组件能被识别并且渲染出来呢。本质上还是因为在挂载时期编译了template模板。也就是之前说过的$mount方法里面的vm._update(vm._render(), hydrating)render函数中_createElement方法。
  function _createElement (
    context,
    tag,
    data,
    children,
    normalizationType
  ) {
    // ...............
     // 组件格式化
    if (normalizationType === ALWAYS_NORMALIZE) {
      children = normalizeChildren(children);
    } else if (normalizationType === SIMPLE_NORMALIZE) {
      children = simpleNormalizeChildren(children);
    }
    var vnode, ns;
    if (typeof tag === 'string') {
      var Ctor;
      ns = (context.$vnode && context.$vnode.ns) || config.getTagNamespace(tag);
      // 如果是普通的HTML标签
      if (config.isReservedTag(tag)) {
        // platform built-in elements
        if (isDef(data) && isDef(data.nativeOn)) {
          warn(
            ("The .native modifier for v-on is only valid on components but it was used on <" + tag + ">."),
            context
          );
        }
        vnode = new VNode(
          config.parsePlatformTagName(tag), data, children,
          undefined, undefined, context
        );
      } else if ((!data || !data.pre) && isDef(Ctor = resolveAsset(context.$options, 'components', tag))) {
         // 如果是组件标签,e.g. my-custom-tag
        // component
        vnode = createComponent(Ctor, data, context, children, tag);
      } else {
        // unknown or unlisted namespaced elements
        // check at runtime because it may get assigned a namespace when its
        // parent normalizes children
        vnode = new VNode(
          tag, data, children,
          undefined, undefined, context
        );
      }
    } else {
      // direct component options / constructor
      vnode = createComponent(tag, data, context, children);
    }
     // 。。。。。。。。。。。。。。。。
  }
可以看出来 以my-button自定义组件为例,由于my-button标签不是合法的HTML标签,不能直接new VNode()创建vnode。所以vue会通过resolveAsset函数去当前实例作用域options中的component中查找,是否存在对该类标签的声明,存在,即使组件。
- 所以会在_createElement方法中识别我们自定义的组件,然后就可以通过这个在options中的component里面定义的组件,去实例化它。
创建 vnode
既然找到了组件的标签,接下来就是生成他的虚拟dom,也就是vnode.
export function createComponent (
  Ctor: Class<Component> | Function | Object | void,
  data: ?VNodeData,
  context: Component,
  children: ?Array<VNode>,
  tag?: string
): VNode | Array<VNode> | void {
  if (isUndef(Ctor)) {
    return
  }
  // 获取Vue基础构造函数,在initGlobal中,将vue基础构造方法赋值给_base属性
  const baseCtor = context.$options._base

  // plain options object: turn it into a constructor
  if (isObject(Ctor)) {
    // 将组件的配置,合并到构造方法中,extend是定义在Vue构造方法中的
    Ctor = baseCtor.extend(Ctor)
  }

  // if at this stage it's not a constructor or an async component factory,
  // reject.
  if (typeof Ctor !== 'function') {
    if (process.env.NODE_ENV !== 'production') {
      warn(`Invalid Component definition: ${String(Ctor)}`, context)
    }
    return
  }

  // async component
  let asyncFactory
  if (isUndef(Ctor.cid)) {
    asyncFactory = Ctor
    Ctor = resolveAsyncComponent(asyncFactory, baseCtor)
    if (Ctor === undefined) {
      // return a placeholder node for async component, which is rendered
      // as a comment node but preserves all the raw information for the node.
      // the information will be used for async server-rendering and hydration.
      return createAsyncPlaceholder(
        asyncFactory,
        data,
        context,
        children,
        tag
      )
    }
  }

  data = data || {}

  // resolve constructor options in case global mixins are applied after
  // component constructor creation
  resolveConstructorOptions(Ctor)

  // transform component v-model data into props & events
  if (isDef(data.model)) {
    transformModel(Ctor.options, data)
  }

  // extract props
  const propsData = extractPropsFromVNodeData(data, Ctor, tag)

  // functional component
  if (isTrue(Ctor.options.functional)) {
    return createFunctionalComponent(Ctor, propsData, data, context, children)
  }

  // extract listeners, since these needs to be treated as
  // child component listeners instead of DOM listeners
  const listeners = data.on
  // replace with listeners with .native modifier
  // so it gets processed during parent component patch.
  data.on = data.nativeOn

  if (isTrue(Ctor.options.abstract)) {
    // abstract components do not keep anything
    // other than props & listeners & slot

    // work around flow
    const slot = data.slot
    data = {}
    if (slot) {
      data.slot = slot
    }
  }

  // install component management hooks onto the placeholder node
  // 初始化组件的钩子函数
  installComponentHooks(data)

  // return a placeholder vnode
  // 体现了组件名称在这里面的作用
  const name = Ctor.options.name || tag
  // 创建vnode
  const vnode = new VNode(
    `vue-component-${Ctor.cid}${name ? `-${name}` : ''}`,
    data, undefined, undefined, undefined, context,
    { Ctor, propsData, listeners, tag, children },
    asyncFactory
  )

  // Weex specific: invoke recycle-list optimized @render function for
  // extracting cell-slot template.
  // https://github.com/Hanks10100/weex-native-directive/tree/master/component
  /* istanbul ignore if */
  if (__WEEX__ && isRecyclableComponent(vnode)) {
    return renderRecyclableComponentTemplate(vnode)
  }

  return vnode
}
简单分析:
- 构造子类构造函数:这里也就是说明了初始化组件的原因,会再次调用Vue.extend()里面生成一个新的VueComponent构造函数,然后再次调用init方法。此时vue的初始化合并逻辑就会进入组件的合并逻辑中。
// 获取Vue的构造函数
const baseCtor = context.$options._base

// 如果Ctor是一个选项对象,需要使用Vue.extend使用选项对象,创建将组件选项对象转换成一个Vue的子类
if (isObject(Ctor)) {
  Ctor = baseCtor.extend(Ctor)
  //这里就是调用Vue.extend的地方,每次编译模板的时候触发render函数,里面的_createElement=》createComponent,在生成vnode过程中调用
}
- 安装组件钩子函数
installComponentHooks(data)
VNode 的 patch 流程中对外暴露了各种时机的钩子函数,方便我们做一些额外的事情,Vue.js 也是充分利用这一点,在初始化一个 Component 类型的 VNode 的过程中实现了几个钩子函数(componentVNodeHooks 方法中生成),然后把这些勾子合并到 data.hook 中,在 VNode 执行 patch 的过程中执行相关的钩子函数方便。
在创建组件时,调用了installComponentHooks,componet hooks主要包含init、prepatch、insert、destory,init在实例化组件时调用,insert是插入DOM时调用,destory是在销毁组件时调用,而prepatch是在更新组件时调用。
const componentVNodeHooks = {
  // 组件初始化方法
  init (vnode: VNodeWithData, hydrating: boolean): ?boolean {
    if (
      vnode.componentInstance &&
      !vnode.componentInstance._isDestroyed &&
      vnode.data.keepAlive
    ) {
      // kept-alive components, treat as a patch
      const mountedNode: any = vnode // work around flow
      componentVNodeHooks.prepatch(mountedNode, mountedNode)
    } else {
      // 实例化组件
      const child = vnode.componentInstance = createComponentInstanceForVnode(
        vnode,
        activeInstance
      )
      //挂载组件
      child.$mount(hydrating ? vnode.elm : undefined, hydrating)
    }
  },

  prepatch (oldVnode: MountedComponentVNode, vnode: MountedComponentVNode) {
    const options = vnode.componentOptions
    const child = vnode.componentInstance = oldVnode.componentInstance
    updateChildComponent(
      child,
      options.propsData, // updated props
      options.listeners, // updated listeners
      vnode, // new parent vnode
      options.children // new children
    )
  },

  insert (vnode: MountedComponentVNode) {
    const { context, componentInstance } = vnode
    if (!componentInstance._isMounted) {
      componentInstance._isMounted = true
      callHook(componentInstance, 'mounted')
    }
    if (vnode.data.keepAlive) {
      if (context._isMounted) {
        // vue-router#1212
        // During updates, a kept-alive component's child components may
        // change, so directly walking the tree here may call activated hooks
        // on incorrect children. Instead we push them into a queue which will
        // be processed after the whole patch process ended.
        queueActivatedComponent(componentInstance)
      } else {
        activateChildComponent(componentInstance, true /* direct */)
      }
    }
  },

  destroy (vnode: MountedComponentVNode) {
    const { componentInstance } = vnode
    if (!componentInstance._isDestroyed) {
      if (!vnode.data.keepAlive) {
        componentInstance.$destroy()
      } else {
        deactivateChildComponent(componentInstance, true /* direct */)
      }
    }
  }
}
其实这里的
// 生成组件实例
const child = vnode.componentInstance = createComponentInstanceForVnode(vnode, activeInstance)
// 挂载组件,与vue的$mount一样
child.$mount(hydrating ? vnode.elm : undefined, hydrating)
// ==============================================>
// 等价于: new VueComponent(options).$mount(hydrating ? vnode.elm : undefined, hydrating)
// 这里也就解释了为什么Vue.extend可以作为vue的子类,单独生成一个边界挂载的用处
- 实例化 VNode
const name = Ctor.options.name || tag
const vnode = new VNode(
  `vue-component-${Ctor.cid}${name ? `-${name}` : ''}`,
  data, undefined, undefined, undefined, context,
  { Ctor, propsData, listeners, tag, children },
  asyncFactory
)
return vnode
nt一样
child.
m
o
u
n
t
(
h
y
d
r
a
t
i
n
g
?
v
n
o
d
e
.
e
l
m
:
u
n
d
e
f
i
n
e
d
,
h
y
d
r
a
t
i
n
g
)
/
/
=
=
=
=
=
=
=
=
=
=
=
=
=
=
=
=
=
=
=
=
=
=
=
=
=
=
=
=
=
=
=
=
=
=
=
=
=
=
=
=
=
=
=
=
=
=
>
/
/
等价于:
n
e
w
V
u
e
C
o
m
p
o
n
e
n
t
(
o
p
t
i
o
n
s
)
.
mount(hydrating ? vnode.elm : undefined, hydrating) // ==============================================> // 等价于: new VueComponent(options).
mount(hydrating?vnode.elm:undefined,hydrating)//==============================================>//等价于:newVueComponent(options).mount(hydrating ? vnode.elm : undefined, hydrating)
// 这里也就解释了为什么Vue.extend可以作为vue的子类,单独生成一个边界挂载的用处
- 实例化 VNode
```js
const name = Ctor.options.name || tag
const vnode = new VNode(
  `vue-component-${Ctor.cid}${name ? `-${name}` : ''}`,
  data, undefined, undefined, undefined, context,
  { Ctor, propsData, listeners, tag, children },
  asyncFactory
)
return vnode
最后通过虚拟dom中patch 函数比对节点,渲染到dom树上,然后就能看到自定义组件的内容了。这里就可以解释new Vue()初始化第一次是挂载实例,也就是el边界,后面挂载都是通过生成组件的vnode中patch调用了componentVNodeHooks中的init初始化挂载组件的方法。


 2317
2317


 被折叠的 条评论
为什么被折叠?
被折叠的 条评论
为什么被折叠?
 到【灌水乐园】发言


