


 本文详细介绍了Nginx的安装、配置文件详解,包括核心模块、事件模块、HTTP内核模块,以及目录索引、状态监控、访问控制、访问限制等。讲解了基于IP、端口和域名实现不同虚拟站点的方法,并讨论了日志管理和访问限制策略。此外,还展示了如何防止PHP文件下载和配置日志分割。
Nginx原理及部署
1.Nginx基本简述
Nginx是一个开源且高性能、可靠的Http Web 服务、代理服务。
开源:直接获取源代码
高性能:支持海量并发
可靠:服务稳定
1).常见的HTTP Web服务
Httpd 由Apache基金会
IIS微软服务器版
GWS Google开发
Openrestry 基于nginx+lua
Tengline 淘宝基于Nginx开发
优势:
Nginx技术成熟,国内公司基本大规模使用
适合当前主流架构趋势,微服务、云架构、中间层统一技术栈,降低维护成本,降低技术更新或本。
Nginx采用Epoll网络模型,Apache采用select模型
Select:当用户发起一次请求,select模型就会进行一次遍历扫描,从而导致性能低下。
Epo11:当用户发起请求,epool模型会直接进行处理,效率高效,并无连接限制。
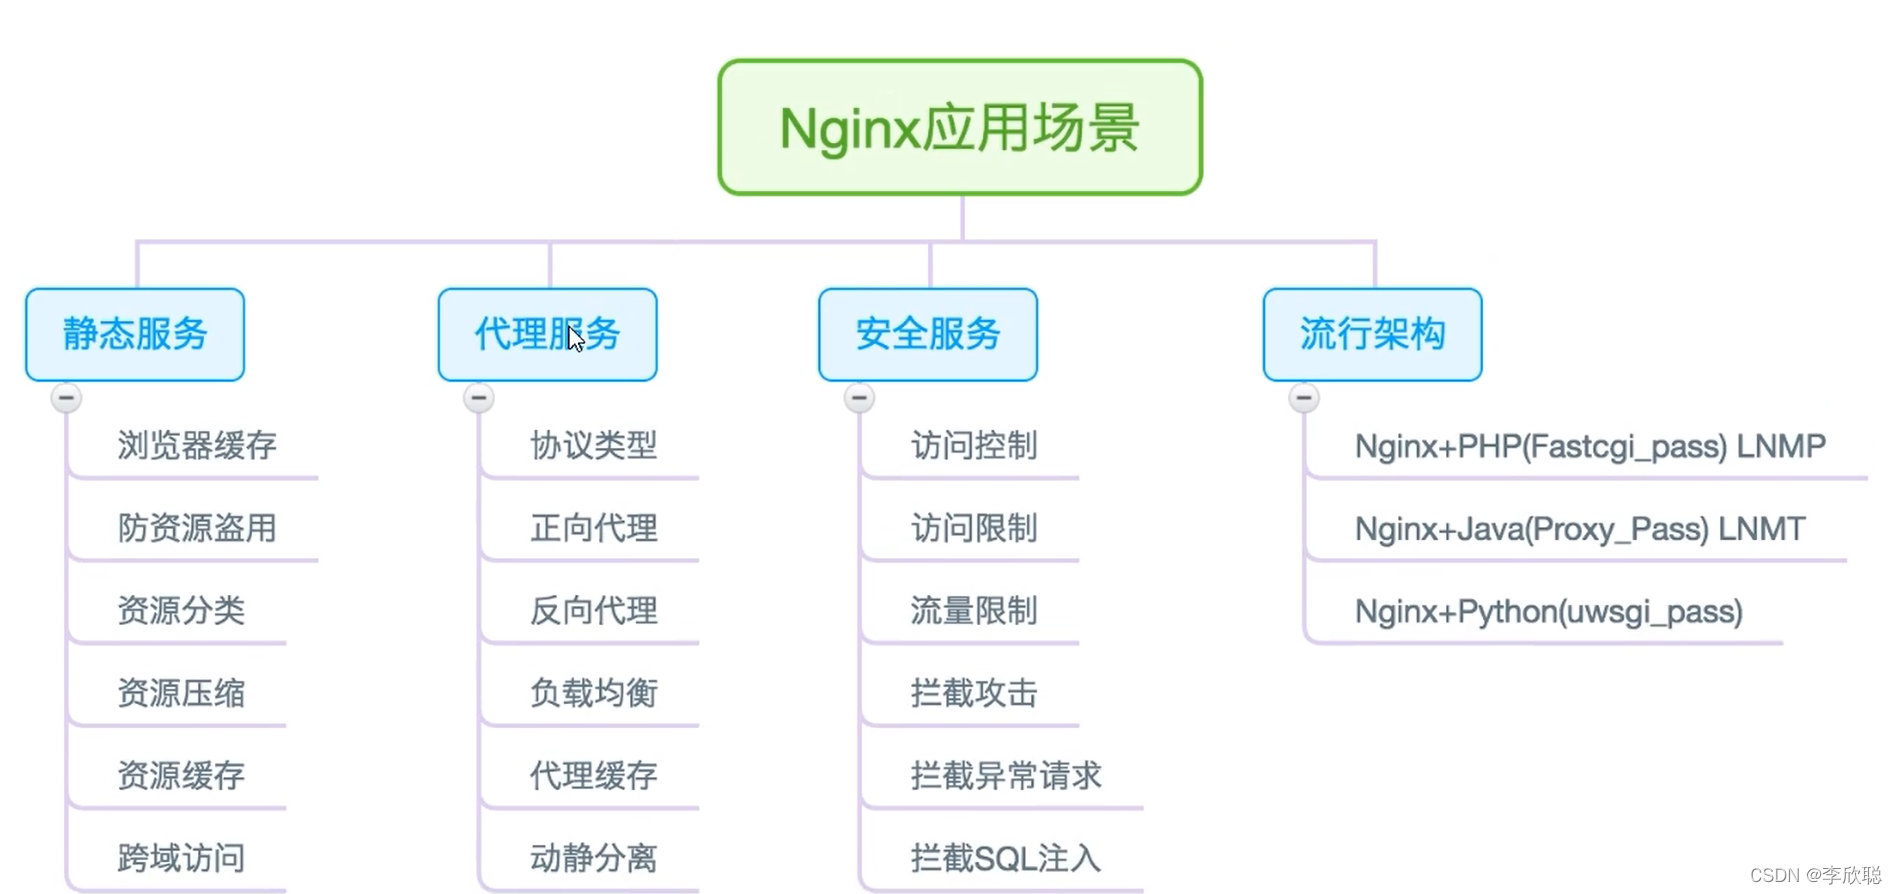
应用场景
2.Nginx快速安装
Nginx软件安装的方式有很多种
1.源码编译=>Nginx(1.版本随意2.安装复杂3.升级繁琐)
2.epel仓库=>Nginx(1.版本较低2.安装简单3.配置不易读)
3.官方仓库=>Nginx(1.版本较新2.安装简单3.配置易读)建议采用
使用官方仓库方式安装
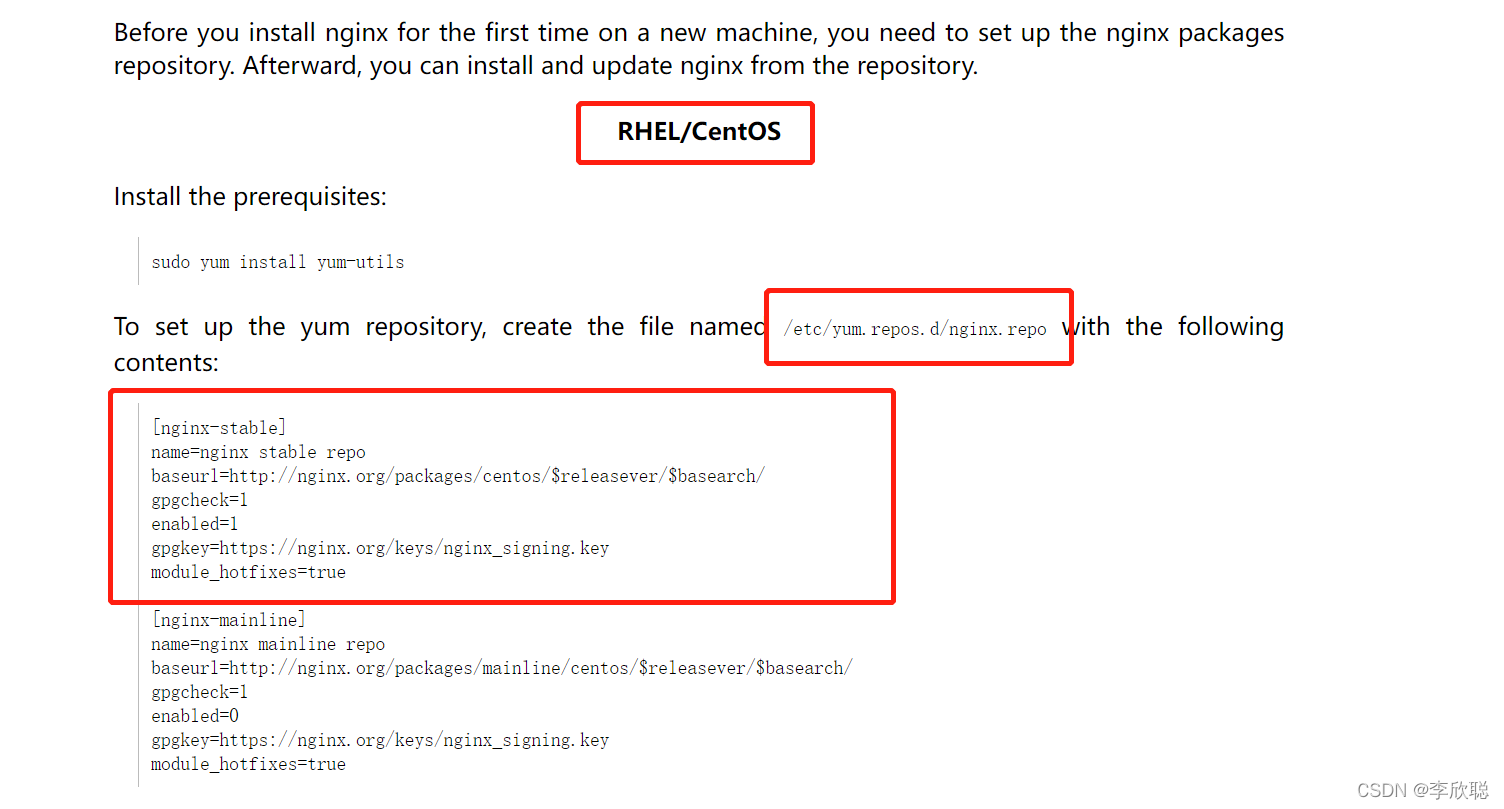
1)一般使用官方仓库安装nginx进入nginx.org官网, 找到 stable 开头的稳定版本, 进去找到stable and (mainline意思是开发版本) 官方仓库下载。

2)创建 /etc/yum.repos.d/nginx.repo源, 将nginx-stable内容复制到nginx.repo文件内。
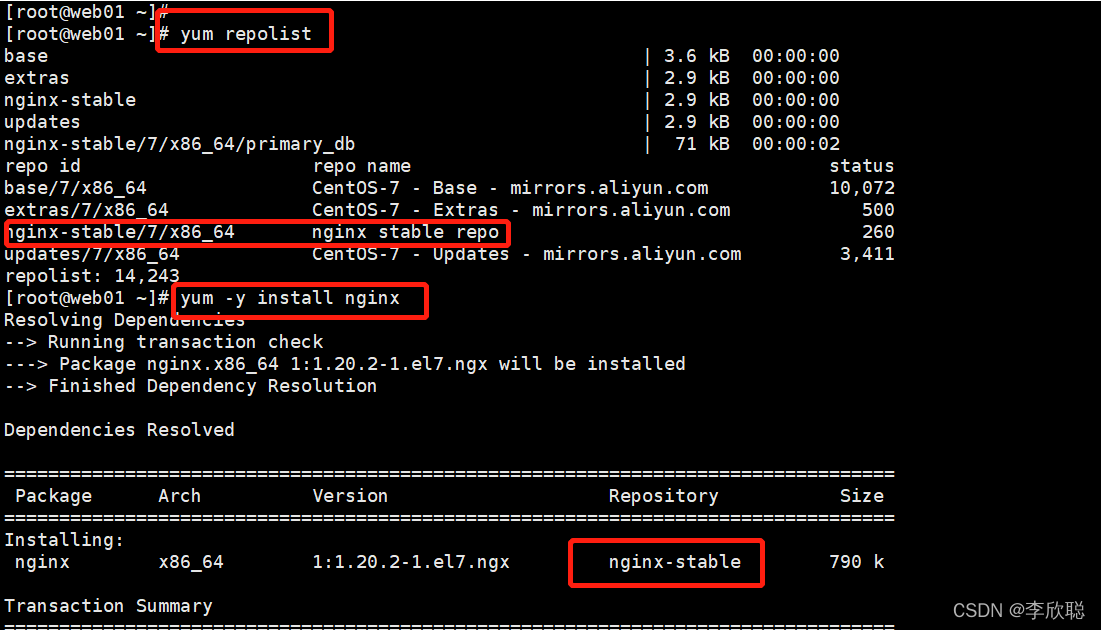
3)安装nginx服务, 使用官方源nginx进行安装最新版本的nginx。
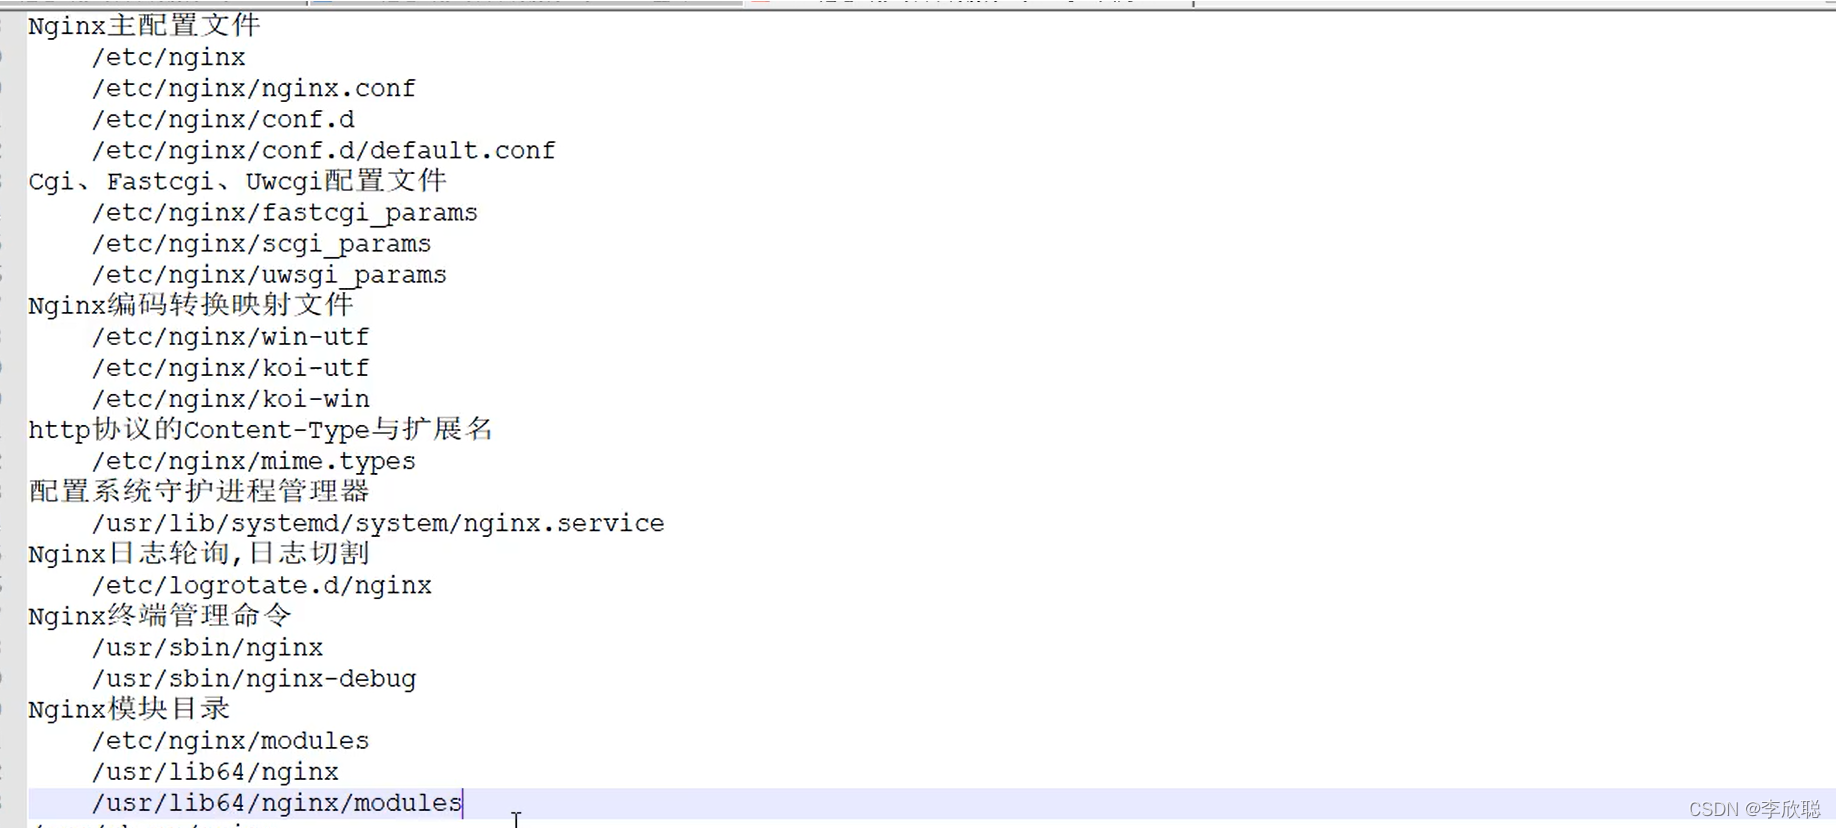
4)配置文件介绍
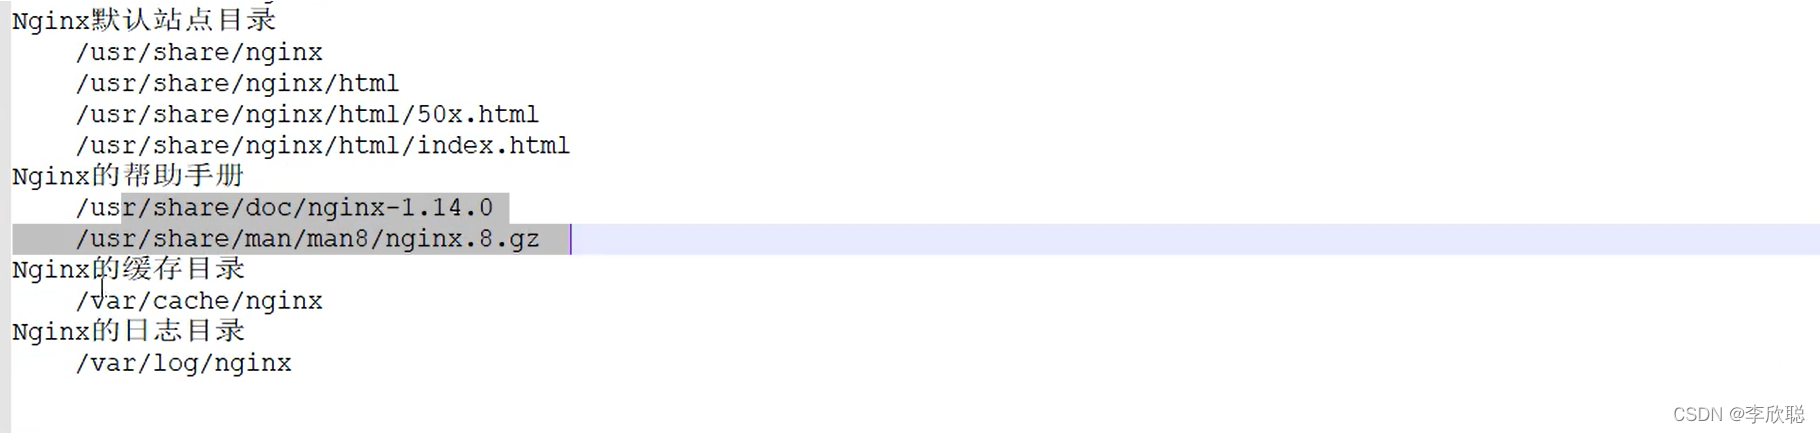
3.配置文件详解
1)Nginx配置文件
Nginx主配置文件/etc/nginx/nginx.conf是一个纯文本类型的文件,整个配置文件是以区块的形式组织的。一般,每个区块以一对大括号{}来表示开始与结束。
1.coreModule核心模块全局配置
2.EventModule事件驱动模块
3.HttpcoreModule http内核模块局部
2)需了解扩展项
CoreModule层下可以有Event、HTTP
HTTP模块层允许有多个server层,server主要用于配置多个网站
server层又允许有多个Location,Location主要用于定义网站访问路径
coreModule核心模块
user nginx;                           #Nginx进程所使用的用户
worker processes 1;                   #Nginx运行的work进程数量(建议与cpU数量一致或auto)
error_log    /1og/nginx/error.log     #Nginx错误日志存放路径
pid/var/run/nginx.pid                 #Nginx服务运行后产生的pid进程号
events事件模块
events{
	worker connections   //每个worker进程支持的最大连接数
	use epoo1;          //事件驱动模型,epo11默认http内核模块
	}
http内核模块
//公共的配置定义在http{}
http{ //http层开始
…
//使用server配置网站,每个server{}代表一个网站(简称虚拟主机)
server{
	listen  80;                //监听端口,默认80
	server name localhost;     //提供服务的域名或主机名
	access 1og host.access.log  //访问日志
//控制网站访问路径1ocation/{
	root  /usr/share/nginx/html;//存放网站代码路径
	index index.php index.html index.htm;//服务器返回的默认页面文件
//指定错误代码,统一定义错误页面,错误代码重定向到新的Locaiton
	error_page 500 502 503 504/50x.html;
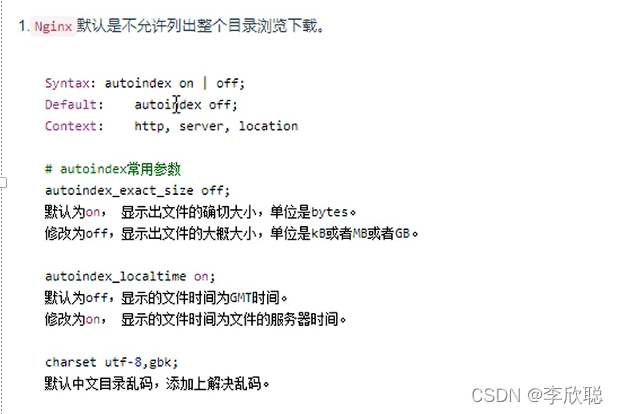
4.nginx目录索引 (默认不列出目录)
server {
        listen 80;
        server_name www.baidu.com;

        location / {
                root /oldboy_code;
                index index.html;
        }
#下列配置列出目录配置
        location /download {
                root /oldboy_code;   #目录
                autoindex on;             #显示为目录
                charset utf-8,gbk;        #识别汉字
                autoindex_exact_size on;  #显示详细大小
                autoindex_localtime on;   # 显示创建时间
        }

}
[root@web01 ~]# mkdir -p /oldboy_code
[root@web01 ~]# echo "123"  > index.html

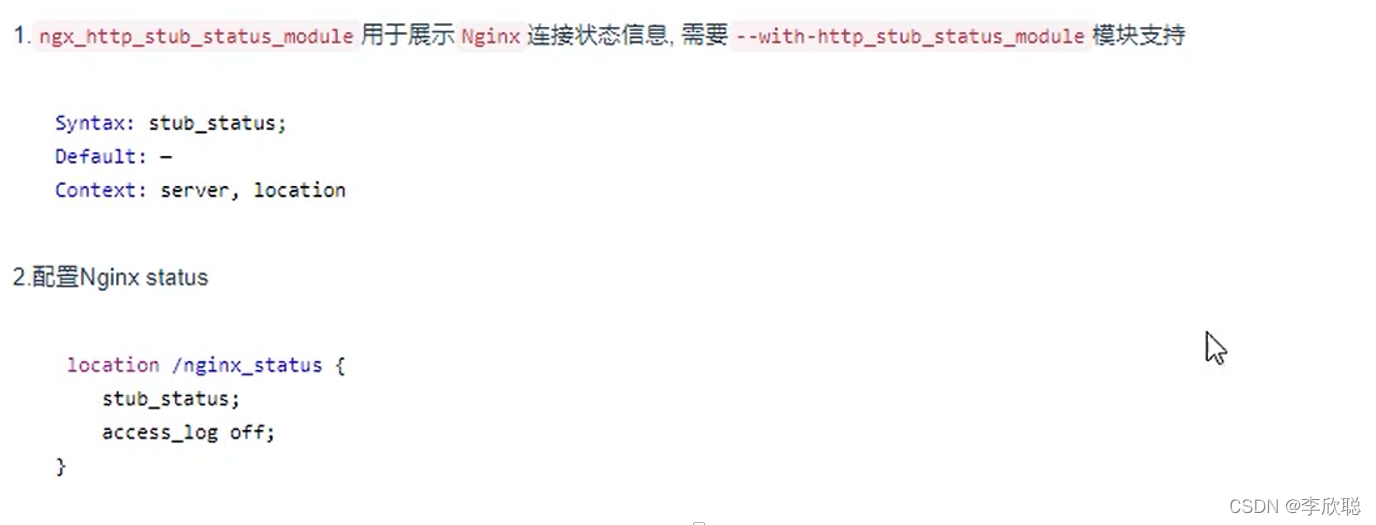
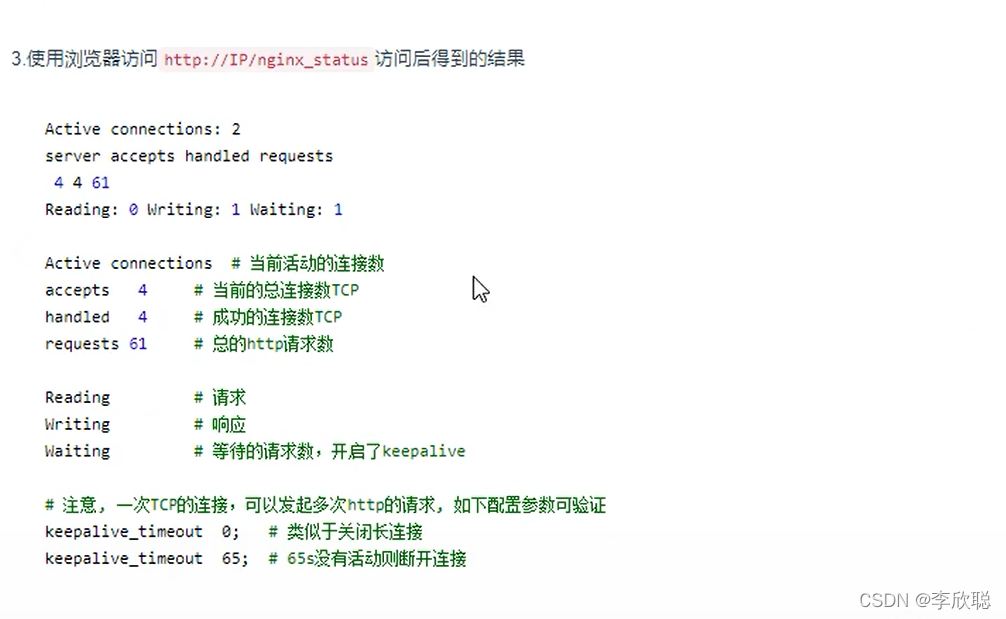
5.Nginx状态监控
server {
        listen 80;
        server_name www.baidu.com;

        location / {
                root /oldboy_code;
                index index.html;
        }

        location /status {
                stub_status;     #开启tcp监控状态
}

        location /download {
                root /oldboy_code;
                autoindex on;
                charset utf-8,gbk;
                autoindex_exact_size on;
                autoindex_localtime on;
        }

}
#修改访问网页为短链接
[root@web01 conf.d]# vim /etc/nginx/nginx.conf
    keepalive_timeout  0;  # 修改为短链接(默认65秒)
6.nginx访问控制
甚于IP的访问控制 http_access_modul
基于用户登陆认证 http_auth_basic_module
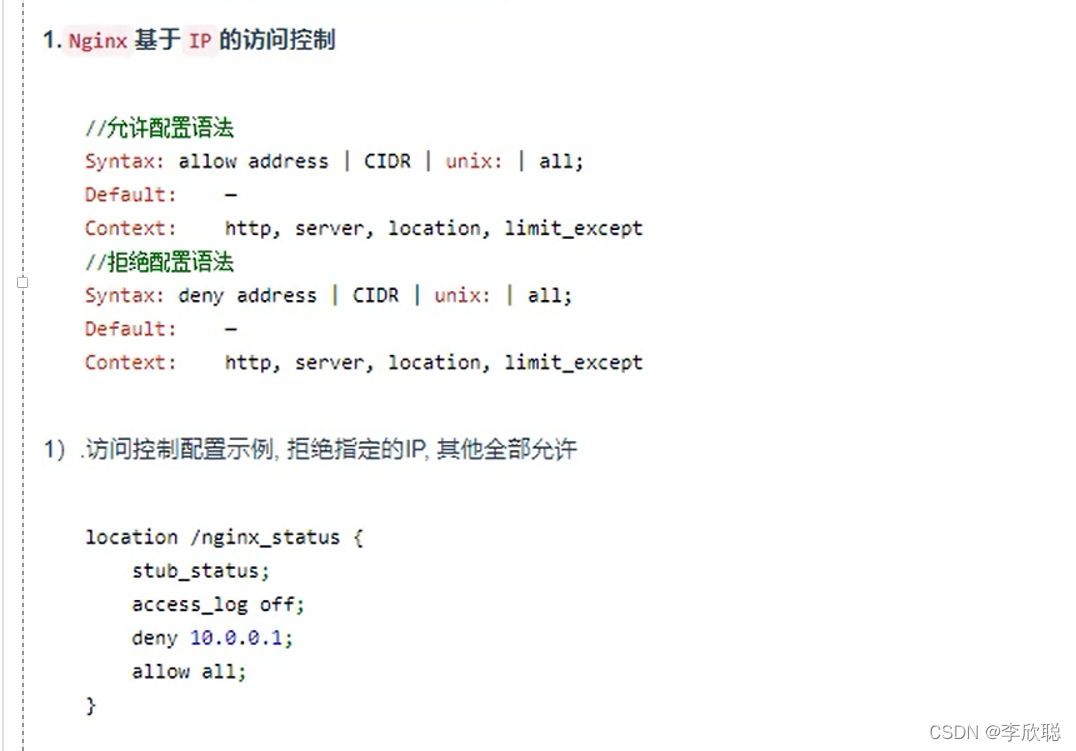
#基于IP访问控制(只允许192.168.43.238)
server {
        listen 80;
        server_name www.baidu.com;

        location / {
                root /oldboy_code;
                index index.html;
        }

        location /status {
                stub_status;
                access_log off;
                allow 192.168.43.238;    #允许访问IP
                deny all;				 #拒绝所有访问(访问呢从上到下匹配)
        }

        location /download {
                root /oldboy_code;
                autoindex on;
                charset utf-8,gbk;
                autoindex_exact_size on;
                autoindex_localtime on;
        }

}

//需要安装依赖组件
[rootCguliangwei~]#yum install httpd-tools
[root@xuliangwei~]#htpasswd-b-c /etc/nginx/conf.d/.auth_conf oldboy 123456
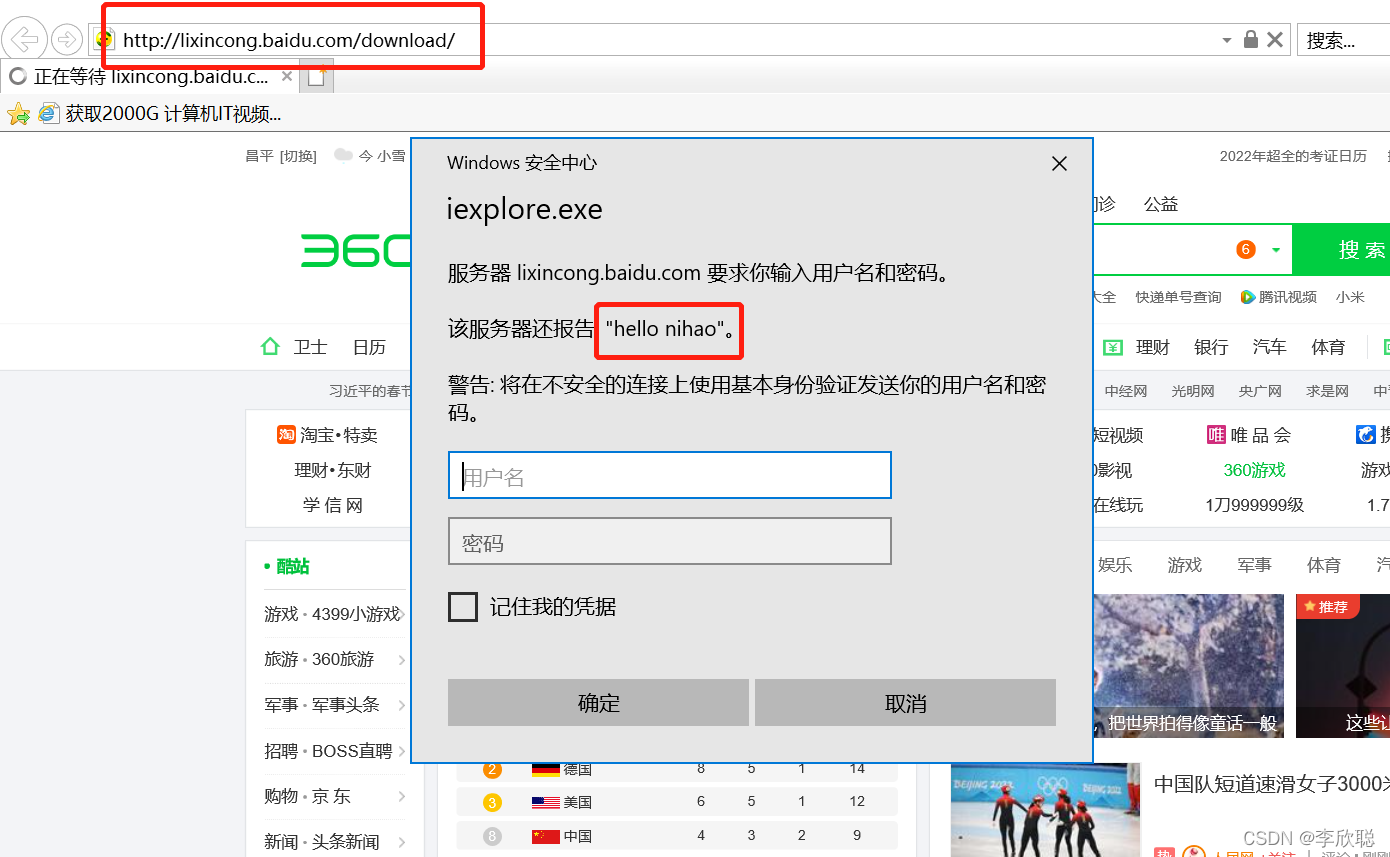
Vim /etc/nginx/conf.d/baidu.conf
server {
listen 80;
server_name www.baidu.com;
location / {
root /oldboy_code;
index index.html;
}
location /status {
stub_status;
access_log off;
allow 192.168.43.238;
deny all;
}
location /download {
root /oldboy_code;
autoindex on;
charset utf-8,gbk;
autoindex_exact_size on;
autoindex_localtime on;
auth_basic "hello nihao";
auth_basic_user_file /etc/nginx/conf.d/.auth_conf;
}
}
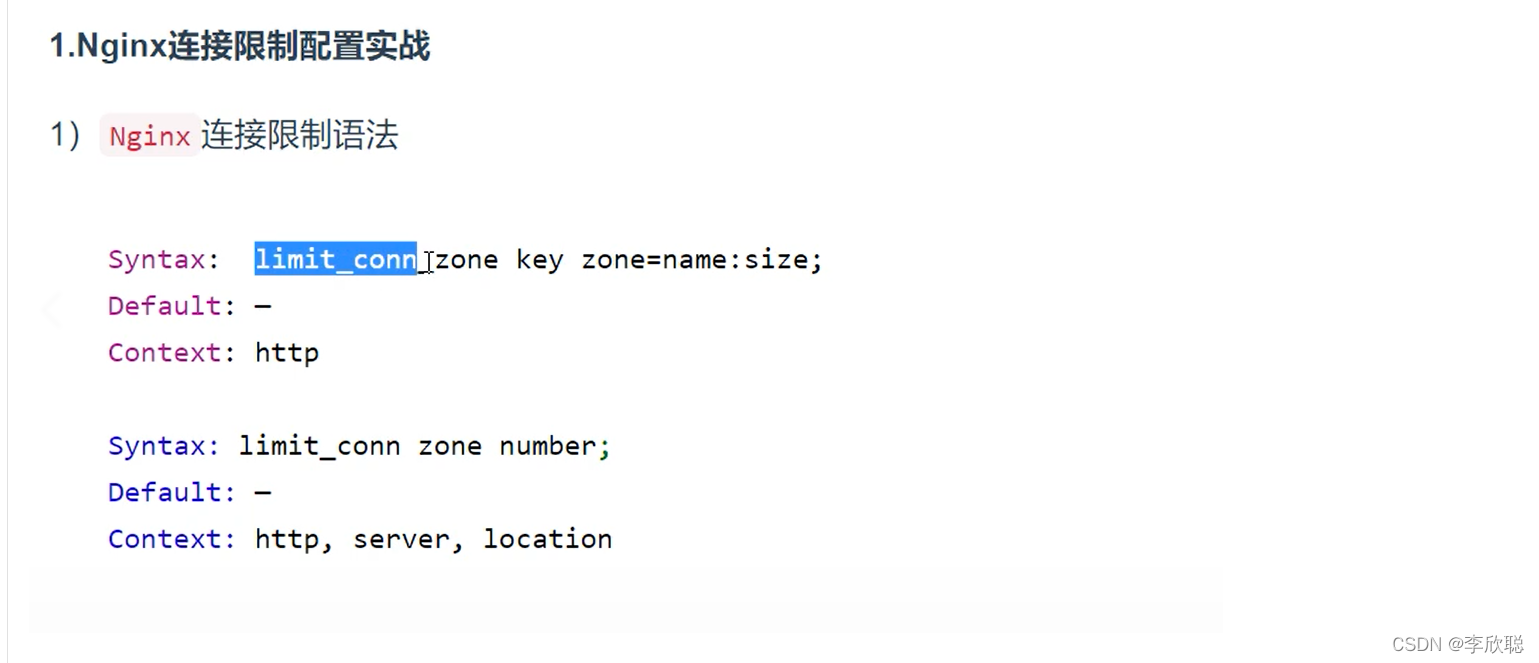
7.Nginx访问限制
经常会遇到这种情况,服务器流量异常,负载过大等等。对于大流量恶意的攻击访问,会带来带宽的浪费,服务器压力,影响业务,往往考虑对同一个IP的连接数,并发数进行限制。
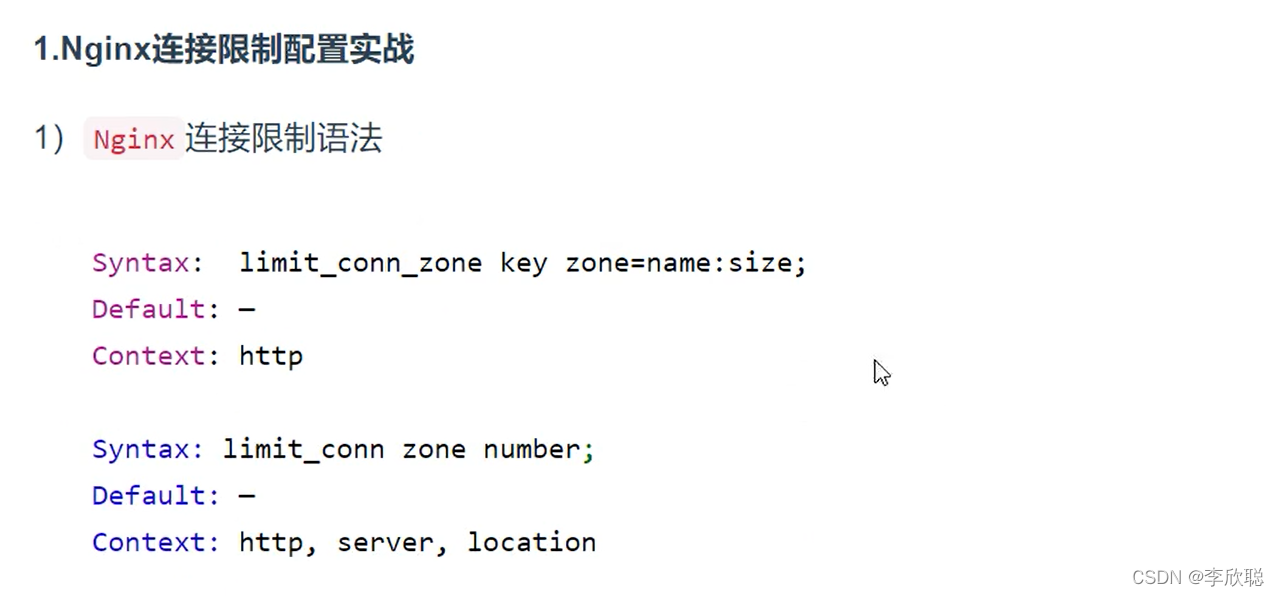
ngx_http_limit_conn_module 模块可以根据定义的key来限制每个键值的连接数,如同一个IP来源的连接数。
limit_conn_module 连接频率限制
limit_req_module 请求频率限制
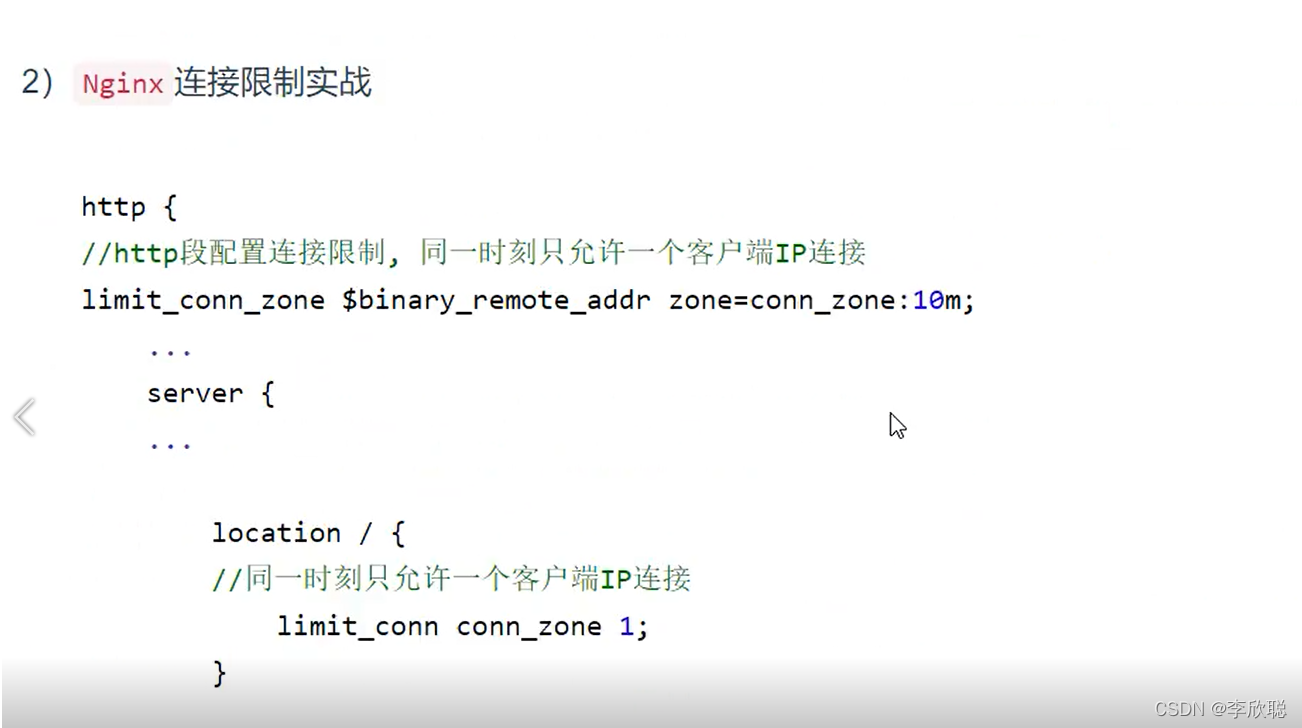
案例:限制只能同时一个客户端IP访问
Vim/etc/nginx/conf.d/baidu.conf
limit_conn_zone $binary_remote_addr zone=baidu_zone:10M;

server {
        listen 80;
        server_name www.baidu.com;

        location / {
                root /oldboy_code;
                index index.html;
                limit_conn baidu_zone 1;   #同时只允许一个IP访问
        }

        location /status {
                stub_status;
                access_log off;
                allow 192.168.43.238;
                deny all;
        }

        location /download {
                root /oldboy_code;
                autoindex on;
                charset utf-8,gbk;
                autoindex_exact_size on;
                autoindex_localtime on;
                auth_basic "hello nihao";
                auth_basic_user_file /etc/nginx/conf.d/.auth_conf;
        }

}
案例:限制1秒最多处理三个http请求
Vim/etc/nginx/conf.d/baidu.conf
limit_conn_zone $binary_remote_addr zone=baidu_zone:10M;
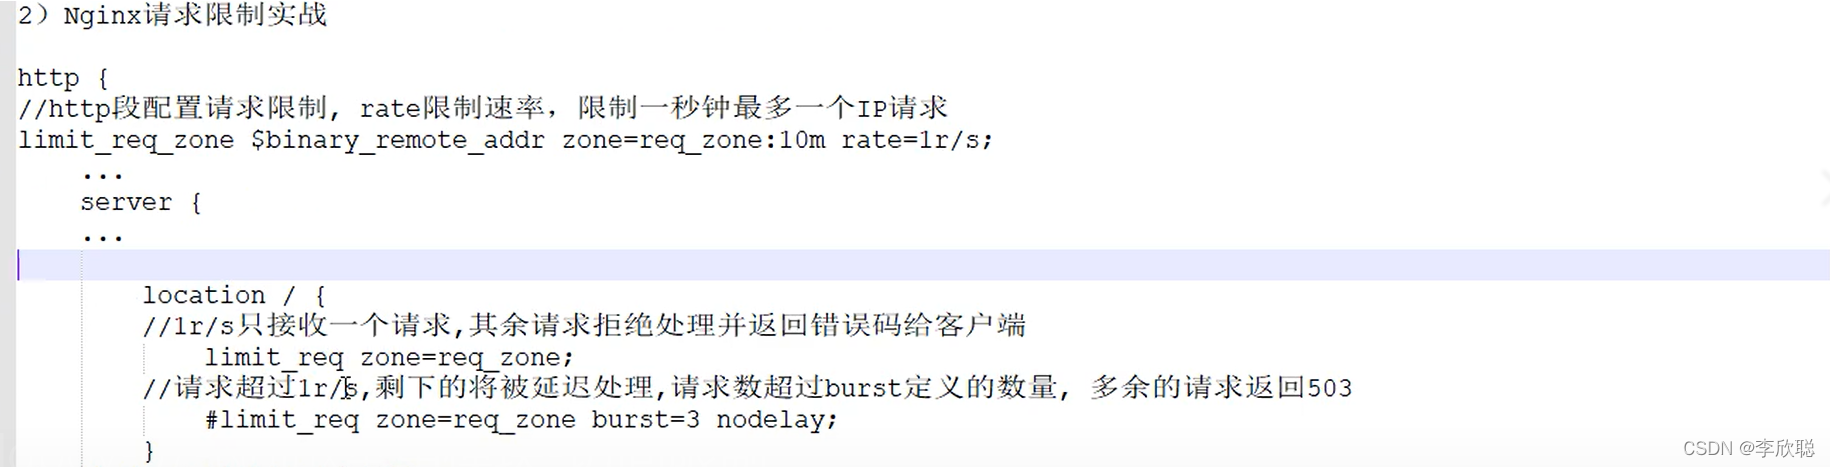
limit_req_zone $binary_remote_addr zone=req_zone:10m rate=1r/s; #限制1秒最多处理三个http请求
server {
listen 80;
server_name www.baidu.com;
location / {
root /oldboy_code;
index index.html;
limit_conn baidu_zone 1;
limit_req zone=req_zone burst=3 nodelay; #限制1秒最多处理三个http请求
}
location /status {
stub_status;
access_log off;
allow 192.168.43.238;
deny all;
}
location /download {
root /oldboy_code;
autoindex on;
charset utf-8,gbk;
autoindex_exact_size on;
autoindex_localtime on;
auth_basic "hello nihao";
auth_basic_user_file /etc/nginx/conf.d/.auth_conf;
}
}
#压力测试循环。
ab-n 1000-c 20 http://www.baidu.com/index.htal
#-n 1000 表示每次发送1000次请求
#-c 20 表示总共有20个用户发送,每个用户发送1000次请求
8.日志设置
access.log :查看用户不管访问成功还是失败的日志。
error.log:查看用户访问网站返回的错误代码日志。

/etc/nginx/nginx.conf

Vim /etc/nginx/nginx.conf #进入http配置文件查看默认日志格式
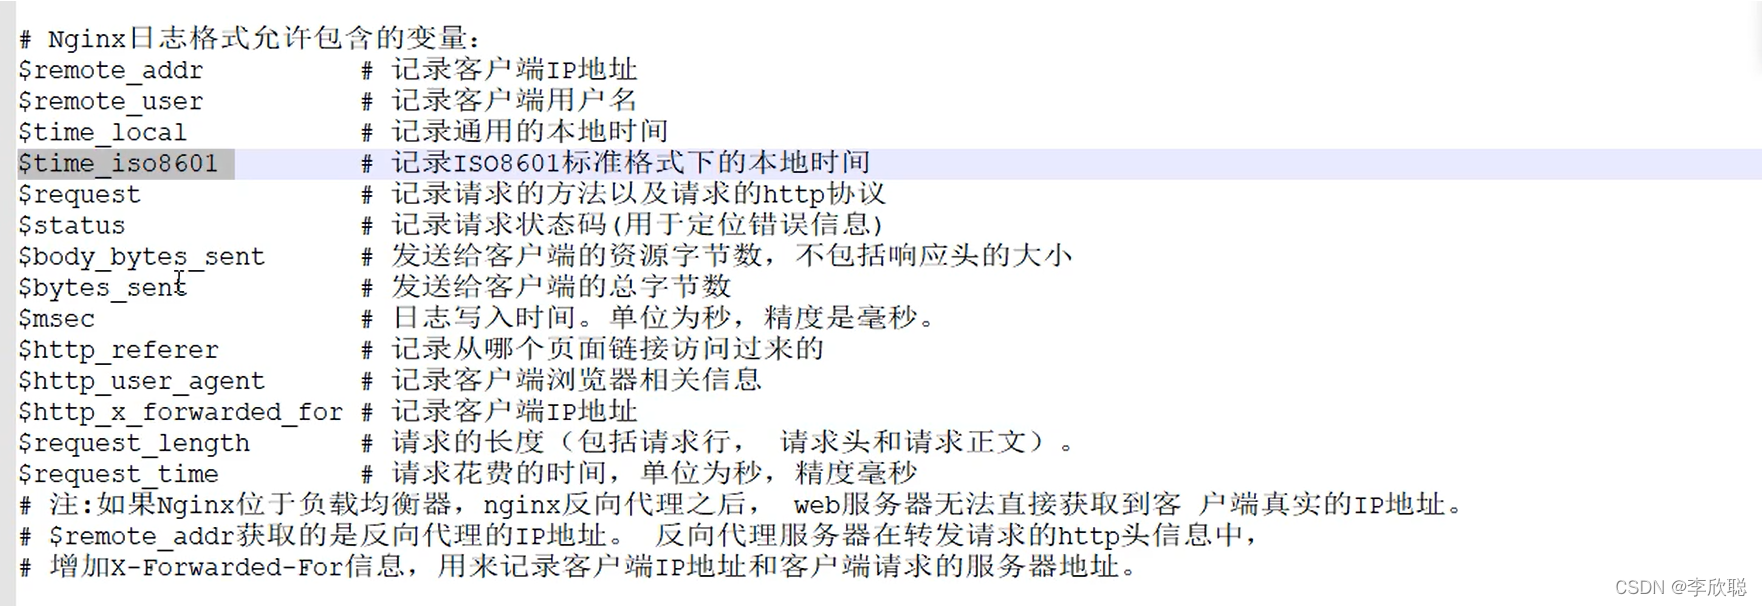
log_format main '$remote_addr - $remote_user [$time_iso8601] "$request" '
'$status $body_bytes_sent "$http_referer" '
'"$http_user_agent" "$http_x_forwarded_for"';
access_log /var/log/nginx/access.log main;
需要修改日志格式直接将下列选项复制到log-format里面
9.Nginx 虚拟站点
所谓虚拟主机,及在一台服务器上配置多个网站
如:公司主页、博客、论坛看似三个网站,实则可以运行在一台服务器上。
基于IP实现不同虚拟站点(少见)
基于IP实现不同虚拟站点(少见)
www配置文件
[root@web01 conf.d]# vim www.conf
server {
	listen 192.168.43.125:80;
	server_name www.oldboy.com;
	location /{
		root /code/www;
		index index.html;
		}
}
Bbs配置文件
[root@web01 conf.d]# vim bbs.conf
server {
	listen 192.168.43.123:80;
	server_name bbs.oldboy.com;
	location /{
		root /code/www;
		index index.html;
		}
}
blog配置文件
[root@web01 conf.d]# vim blog.conf
server {
	listen 192.168.43.124:80;
	server_name blog.oldboy.com;
	location /{
		root /code/www;
		index index.html;
		}
}
基于端口实现不同虚拟站点配置文件
#创建存放首页目录
[root@web01 ~]# cd /code
#创建存放各个站点目录
[root@web01 code]# mkdir  {www,bbs,blog}
#创建www首页
[root@web01 code]# echo www > www/index.html
#创建bb首页
[root@web01 code]# echo bbs > bbs/index.html
#创建blog首页
[root@web01 code]# echo blog > blog/index.html
#基于端口实现访问不同网站
[root@web01 conf.d]# vim www.conf
server {
	listen 80;
	server_name www.oldboy.com;
	location /{
		root /code/www;
		index index.html;
		}
}
[root@web01 conf.d]# vim bbs.conf
server {
	listen 81;
	server_name bbs.oldboy.com;
	location /{
		root /code/bbs;
		index index.html;
		}
}
[root@web01 conf.d]# vim blog.conf
server {
	listen 82;
	server_name blog.oldboy.com;
	location /{
		root /code/blog;
		index index.html;
		}
}
#检查配置文件语句,重载nginx
Nginx -t
Systemclt reload nginx

#写hosts解析
192.168.43.125     www.oldboy.com bbs.oldboy.com blog.oldboy.com

测试网站
www.oldboy.com
bbsb.oldboy.com:81
blog.oldboy.com:82
基于域名实现不同虚拟站点配置文件
#创建存放首页目录
[root@web01 ~]# cd /code
#创建存放各个站点目录
[root@web01 code]# mkdir  {www,bbs,blog}
#创建www首页
[root@web01 code]# echo www > www/index.html
#创建bb首页
[root@web01 code]# echo bbs > bbs/index.html
#创建blog首页
[root@web01 code]# echo blog > blog/index.html
#基于端口实现访问不同网站
[root@web01 conf.d]# vim www.conf
server {
	listen 80;
	server_name www.oldboy.com;
	location /{
		root /code/www;
		index index.html;
		}
}
[root@web01 conf.d]# vim bbs.conf
server {
	listen 80;
	server_name bbs.oldboy.com;
	location /{
		root /code/bbs;
		index index.html;
		}
}
[root@web01 conf.d]# vim blog.conf
server {
	listen 80;
	server_name blog.oldboy.com;
	location /{
		root /code/blog;
		index index.html;
		}
}
#检查配置文件语句,重载nginx
Nginx -t
Systemclt reload nginx
#写hosts解析
192.168.43.125     www.oldboy.com bbs.oldboy.com blog.oldboy.com

测试网站
www.oldboy.com
bbsb.oldboy.com
blog.oldboy.com
所有站点access日志默认都存放在默认日志文件,需要分割日志存放位置。
需要将主配置文件注释掉
 #   access_log  /var/log/nginx/access.log  main;

#在站点配置文件中分割日志文件
[root@web01 conf.d]# vim www.conf
server {
	listen 80;
	server_name www.oldboy.com;
	access_log /code/log/www.oldboy.com_access.log main;
	location /{
		root /code/www;
		index index.html;
		}
}
[root@web01 conf.d]# vim bbs.conf
server {
	listen 80;
	server_name bbs.oldboy.com;
	access_log /code/log/bbs.oldboy.com_access.log main;
	location /{
		root /code/bbs;
		index index.html;
		}
}
[root@web01 conf.d]# vim blog.conf
server {
	listen 80;
	server_name blog.oldboy.com;
	access_log /code/log/blog.oldboy.com_access.log main;
	location /{
		root /code/blog;
		index index.html;
		}
}
#创建存放日志的目录
Mkdir  /code/log


#检查配置文件语句,重载nginx
Nginx -t
Systemclt reload nginx
10:nginx Location

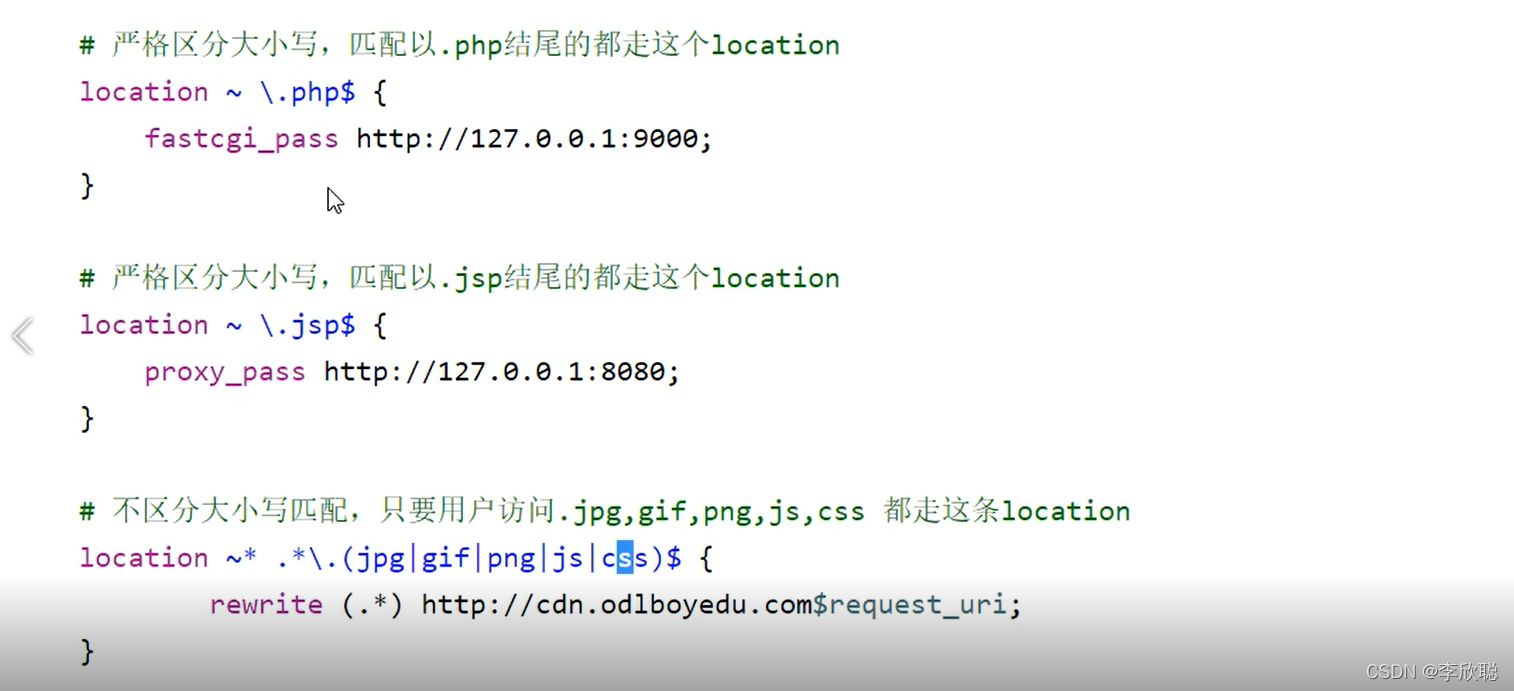


案例:拒绝网站下载.php 文件

#location #模块拒绝下载php文件
        location ~ \.php$ {
                deny all;
访问网页提示拒绝


 8698
8698

 被折叠的 条评论
为什么被折叠?
被折叠的 条评论
为什么被折叠?
 到【灌水乐园】发言


