


前端模板-1
1 axios请求封装
//封装通用请求
import axios from 'axios';
axios.defaults.timeout = 5000; //超时时间:5s
axios.defaults.withCredentials = true;// 允许跨域
//Content-Type 响应头
axios.defaults.headers.post['Content-Type'] = 'application/x-www.form-urlencoded;charset=UTF-8';
//访问基础url
axios.defaults.baseURL = "http://localhost:8888";

//响应拦截器
axios.interceptors.response.use(
    response => {
        //如果response里面的status是200,说明访问到接口了,否则失败
        if(response.status == 200){
            //Promise:异步框架
            return Promise.resolve(response);
        }else {
            return Promise.reject(response);
        }
    },
    error => {
        if(error.response.status){
            //根据访问失败返回的状态码,分别做不同的处理
            switch(error.response.status){
                case 401:   //未登录
                    router.replace({
                        path: '/',
                        query:{
                            redirect: router.currentRoute.fullPath //存之前访问地址
                        }
                    });
                    break;
                case 404: //not found
                    break;
            }
            return Promise.reject(error.response);
        }
    }
);

/**
 * 封装get请求
 */
export function get(url, params={}){
    return new Promise((resolve, reject) => {
        axios.get(url, {params:params})
        .then(response => {
            resolve(response.data);
        })
        .catch(err => {
            reject(err);
        })
    });
}

/**
 * 封装post请求
 */
export function post(url, data={}){
    return new Promise((resolve, reject) => {
        axios.post(url, data)
        .then(response => {
            resolve(response.data);
        })
        .catch(err => {
            reject(err);
        })
    })
}
2 Echarts
2.1 实现动态图表切换
<template>
  <div>
    <div style="width:500px;height:500px" ref="chart"></div>
  </div>
</template>
<script>
// eslint-disable-next-line @typescript-eslint/no-var-requires
const echarts = require('echarts');
export default{
  data () {
    return {};
  },
  methods: {
    initCharts () {
      let myChart = echarts.init(this.$refs.chart);
      let option = {
        toolbox: {//添加一个toolbox配置
          show: true,
          feature: {
            dataZoom: {
              yAxisIndex: "none"
            },
            dataView: {
              readOnly: false
            },
            magicType: {//配置可以动态切换的类型:
              type: ["line", "bar"]
            },
            restore: {},
            saveAsImage: {}
          }
        },
        xAxis: {
          type: "category",
          boundaryGap: false,
          data: ["Mon", "Tue", "Wed", "Thu", "Fri", "Sat", "Sun"]
        },
        yAxis: {
          type: "value",
          axisLabel: {
            formatter: "{value} °C"
          }
        },
        series: [{
          name: "最高气温",
          type: "line",
          data: [11, 11, 15, 13, 12, 13, 10],
          markPoint: {
            data: [{
              type: "max",
              name: "Max"
            }, {
              type: "min",
              name: "Min"
            }]
          },
          markLine: {
            data: [{
              type: "average",
              name: "Avg"
            }]
          }
        }, {
          name: "最低气温",
          type: "line",
          data: [1, -2, 2, 5, 3, 2, 0],
          markPoint: {
            data: [{
              name: "周最低",
              value: -2,
              xAxis: 1,
              yAxis: -1.5
            }]
          },
          markLine: {
            data: [{
              type: "average",
              name: "Avg"
            },
              [{
                symbol: "none",
                x: "90%",
                yAxis: "max"
              }, {
                symbol: "circle",
                label: {
                  position: "start",
                  formatter: "Max"
                },
                type: "max",
                name: "Top"
              }]
            ]
          }
        }]
      }

// 绘制图表
      myChart.setOption(option);
    }
  },
  mounted () {
    this.initCharts();
  }
}
</script>
2.2 实现表格展示数据
- data中定义数据
export default {
    data(){
        return{
                consumerSex:{       //按性别对用户进行分类
                columns: ['性别', '总数'],
                rows: [
                    	{'性别': '男', '总数': 0},
                    	{'性别': '女', '总数': 0},
                	]
            	},
            	//自定义风格【表格展示】
            	options: {
                	color: ['#87cefa', '#ffc0cb']
            	},

			// 柱状图
            // singerCountry:{ //歌手国籍分类
            //     columns: ['国籍', '总数'],
            //     rows: [
            //         {'国籍':'中国', '总数':0},
            //         {'国籍':'美国', '总数':0},
            //         {'国籍':'日本', '总数':0},
            //         {'国籍':'新加坡', '总数':0},
            //         {'国籍':'韩国', '总数':0},
            //         {'国籍':'其他', '总数':0},
            //     ]
            // }
           }
      }
}
- methods中动态获取数据
methods:{
    getConsumer(){
        getAllConsumer().then(res => {
            this.consumerCount = res.length;
            this.consumerSex.rows[0]['总数'] = this.setSex(1, res);
            this.consumerSex.rows[1]['总数'] = this.setSex(0, res);
        })
    },
    //按性别进行分类
    setSex(sex, val){
        let count = 0;
        for(let item of val){
            if(sex == item.sex){
                count++;
            }
        }
        return count;
    }

        // 柱状图部分
        // getSinger(){
        //     getAllSinger().then(res => {
        //         this.singerCount = res.length;
        //         //与上面定义的singerSex对应
        //         this.singerSex.rows[0]['总数'] = this.setSex(0, res);
        //         this.singerSex.rows[1]['总数'] = this.setSex(1, res);
        //         this.singerSex.rows[1]['总数'] = this.setSex(2, res);
        //         this.singerSex.rows[1]['总数'] = this.setSex(3, res);
        //         // 国籍【柱状图】
        //         for(let item of res){
        //             this.setCountry(item.location);
        //         }
        //     })
        // },
        // setCountry(location){
        //     for(let item of this.singerCountry.rows){
        //         if(location.includes(item['国籍'])){
        //             item['总数']++;
        //         }
        //     }
        // }

}
- div中使用
<el-row :gutter="20">
   <!-- 用户性别比例 -->
   <el-col :span="12">
       <h3>用户性别比例</h3>
       <div style="background-color:white">
       		<!-- 饼图 -->
           <ve-pie :data="consumerSex" :theme="options"></ve-pie>
       </div>
</el-col>

<!-- 柱状图 -->
<!-- <el-col :span="12">
    <h3 class="mgb20">歌手国籍分布</h3>
    <div style="background-color:white">
        <ve-histogram :data="singerCountry" :color="optionCountry"></ve-histogram>
    </div>
</el-col> -->
大家可以根据需要自行选择图表类型
3 Element-ui
3.1 封装notify
- 在main.js中引入element-ui
import Vue from 'vue'
import App from './App'
import router from './router/index'
import ElementUI from 'element-ui'
import store from './store/index'
import 'element-ui/lib/theme-chalk/index.css'
import './assets/css/main.css'
import 'babel-polyfill'
import VCharts from 'v-charts'

Vue.use(ElementUI)
Vue.use(VCharts)

/* eslint-disable no-new */
new Vue({
  el: '#app',
  router,
  store,
  render: h => h(App)
})
如果没有安装部分依赖,通过
npm install+缺少的依赖名安装对应依赖即可
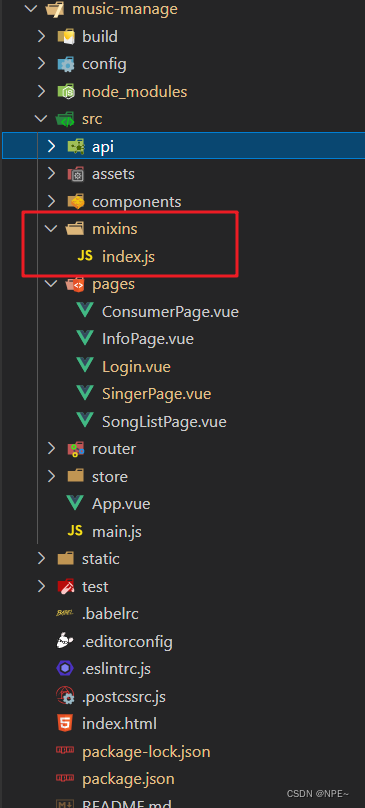
- 编写工具类,新建文件夹mixins,编写文件index.js【文件夹与文件名任意起】
//工具类
export const mixin = {
    methods: {
        //提示信息
        notify(title,type){
            this.$notify({
                title: title,
                type: type
            })
        }
    },
}
- 在其他页面中引入该工具类【如:Login.vue】
<script>
import {mixin} from "../mixins/index"; //工具类
export default {
  mixins:[mixin]
}
Login.vue页面全部代码结构:
<script>
import {mixin} from "../mixins/index"; //工具类
import {getLoginStatus} from "../api/index"
export default {
  mixins:[mixin],
  data: function(){
    return {
      ruleForm:{
        username: "admin", //默认填充,仅供调试
        password: "123"
      },
      rules:{
        username:[
          {required:true, message:"请输入用户名", trigger:"blur"}
        ],
        password:[
          {required:true, message:"请输入密码", trigger:"blur"}
        ]
      }
    };
  },

  methods:{
    submitForm(){
      //TODO 登录前做用户名密码是否为空校验
        let params = new URLSearchParams();
        params.append("name", this.ruleForm.username);
        params.append("password", this.ruleForm.password);
        getLoginStatus(params)
          .then((res) => {
            if(res.code == 1){
              localStorage.setItem('userName', this.ruleForm.username);//缓存用户名,方便其他页面展示【TheHeader.vue】
              this.$router.push("/Info");
              this.notify("登录成功", "success");
            }else {
              this.notify("登录失败", "error")
            }
          });
    }
  }
}
</script>
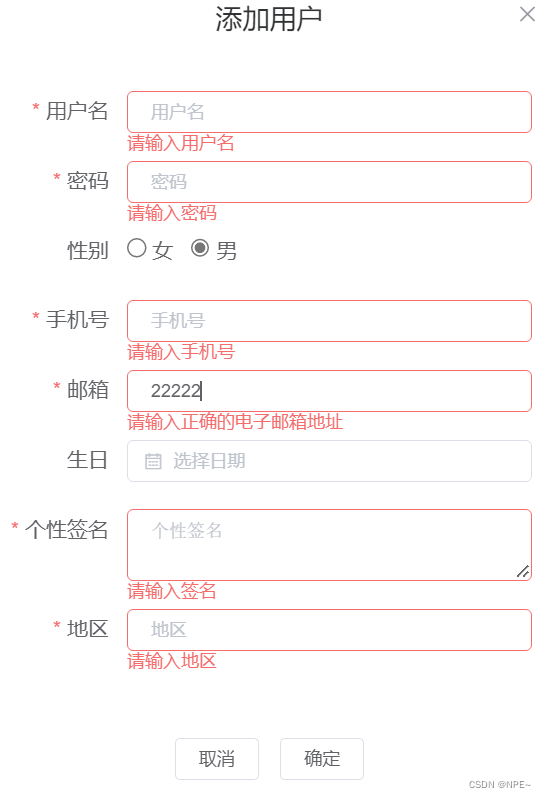
3.2 实现表单验证
- 编写规则
在data中添加
rules,名字任意取
export default {
    mixins:[mixin],
    data: function(){
        return{
            centerDialogVisible: false, //添加弹窗是否展示
            editVisible:false,  //编辑弹窗是否展示
            delVisiable:false, //删除弹窗是否展示
            registerForm:{  //添加框
                username:'',
                password:'',
                sex: 1, //默认男
                phoneNum:'',
                email:'',
                birth:'',
                introduction:'',
                location:''

            },
            rules:{ //表单规则校验,名字任意起,到时候引用一致就行
                username: [
                    {required: true, message:'请输入用户名', trigger: 'blur'}
                ],
                password: [
                    {required: true, message:'请输入密码', trigger: 'blur'}
                ],
                phoneNum: [
                    {required: true, message:'请输入手机号', trigger: 'blur'}
                ],
                email: [
                    {required: true, message:'请输入邮箱', trigger: 'blur'},
                    {type: 'email', message:'请输入正确的电子邮箱地址', trigger:['blur', 'change']}
                ],
                introduction: [
                    {required: true, message:'请输入签名', trigger: 'blur'}
                ],
                location: [
                    {required: true, message:'请输入地区', trigger: 'blur'}
                ]
            }
        };
    },
 }
- 引用规则:
- 在el-form部分添加
:rules=""
<el-dialog title="添加用户" :visible.sync="centerDialogVisible" width="400px" center>
    <!-- 对表单进行规则校验rules -->
    <el-form :model="registerForm" ref="registerForm" label-width="80px" :rules="rules">
      <el-form-item prop="username" label="用户名" size="mini">
          <el-input v-model="registerForm.username" placeholder="用户名"></el-input>
      </el-form-item>
      <el-form-item prop="password" label="密码" size="mini">
          <el-input v-model="registerForm.password" type="password" placeholder="密码"></el-input>
      </el-form-item>
    <span slot="footer">
        <el-button size="mini" @click="centerDialogVisible = false">取消</el-button>
        <el-button size="mini" @click="addConsumer">确定</el-button>
    </span>
</el-dialog>
- 在想要校验的方法处添加【methods中】
//规则校验,如果校验失败,不让用户请求后端接口
this.$refs['registerForm'].validate(valid => { if(valid){ }}
//添加用户
addConsumer(){
     //规则校验,如果校验失败,不让用户请求后端接口
     this.$refs['registerForm'].validate(valid => {
         if(valid){
             let d = this.registerForm.birth;
             //d.getMonth()计算方式不一样,如:1月,get之后是0,因此要手动+1
             let datetime = d.getFullYear() + '-' + (d.getMonth()+1) + '-' + d.getDate();
             let params = new URLSearchParams();
             params.append('username', this.registerForm.username);
             params.append('password', this.registerForm.password);
             params.append('sex', this.registerForm.sex);
             params.append('phoneNum', this.registerForm.phoneNum);
             params.append('email', this.registerForm.email);
             params.append('birth', datetime);
             params.append('introduction', this.registerForm.introduction);
             params.append('location', this.registerForm.location);
             params.append('avator', '/img/consumerPic/consumer1.png');//默认用户图片

             setConsumer(params)
             .then(res => {
                 if(res.code == 1){
                     this.getData();
                     this.notify("添加成功", "success");
                 } else {
                     this.notify("添加失败", "error");
                 }
             })
             .catch(err => {
                 console.log(err);
             });
             //添加成功之后清除添加框
             this.registerForm = {}
             this.centerDialogVisible = false;
         }
     })
 },
效果:
3.3 实现轮播图
- 创建swiper.js
//轮播图的数据
const swiperList = [
    {picImg :require('@/assets/img/swiper/1.jpg')},
    {picImg :require('@/assets/img/swiper/2.jpg')},
    {picImg :require('@/assets/img/swiper/3.jpg')},
    {picImg :require('@/assets/img/swiper/4.jpg')},
    {picImg :require('@/assets/img/swiper/5.jpg')},
    {picImg :require('@/assets/img/swiper/6.jpg')},
    {picImg :require('@/assets/img/swiper/7.jpg')},
    {picImg :require('@/assets/img/swiper/8.jpg')},
]

export {
    swiperList
}
- 创建Swiper.vue(用于在首页中引入)
<template>
    <div class="swiper">
        <!-- 轮播图 -->
        <el-carousel :interval="4000" type="card" height="280px">
          <el-carousel-item v-for="(item, index) in swiperList" :key="index">
              <img :src="item.picImg"/>
          </el-carousel-item>
        </el-carousel>
    </div>
</template>

<script>
import {swiperList} from "../assets/data/swiper";
export default {
    name: 'swiper',
    data(){
        return {
            swiperList: []
        }
    },
    created(){
        this.swiperList = swiperList;
    }
}
</script>
<style>
@import '../assets/css/swiper.scss';
</style>
swiper.css:
.swiper {
  width: 90%;
  margin: auto;
  margin-top: 40px;
  img {
    width: 100%;
  }
}
- 在pages下的Home.vue引入
<template>
  <div class="home">
    <swiper/>
  </div>
</template>

<script>
import Swiper from '@/components/Swiper';

export default {
  name: 'home',
  components: {
    Swiper
  },
  data () {
    return {

    }
  },
  created () {

  },
  methods: {

  }
}
</script>

<style lang="scss" scoped>
@import '../assets/css/home.scss';
</style>
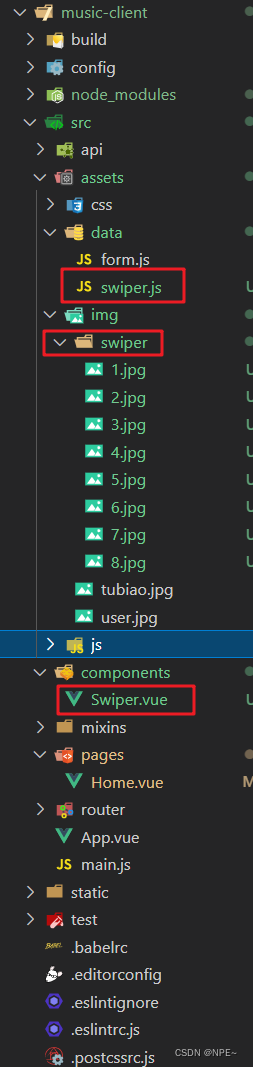
- 目录结构:
- 实现效果:

3.3 实现日期选择不超过当前日期
<el-form-item label="生日" prop="birth">
  <!-- pickerOptionsStart控制日期不超过当前日期 -->
    <el-date-picker
      v-model="registerForm.birth"
      :picker-options="{
        disabledDate: (time) => {
          return time.getTime() > Date.now();
        }
      }"
      placeholder="选择日期"
      style="width: 100%;"
    ></el-date-picker>
 </el-form-item>
picker-options是关键,当它为true的时候,触发disableDate,限制用户无法点击


 433
433


 被折叠的 条评论
为什么被折叠?
被折叠的 条评论
为什么被折叠?
 到【灌水乐园】发言


