axios拦截器、ElementUI组件的使用

一、axios拦截器

1、axios模块的作用

是对基于http请求的封装。在浏览器对异步请求对象XMLHttpRequest进行封装
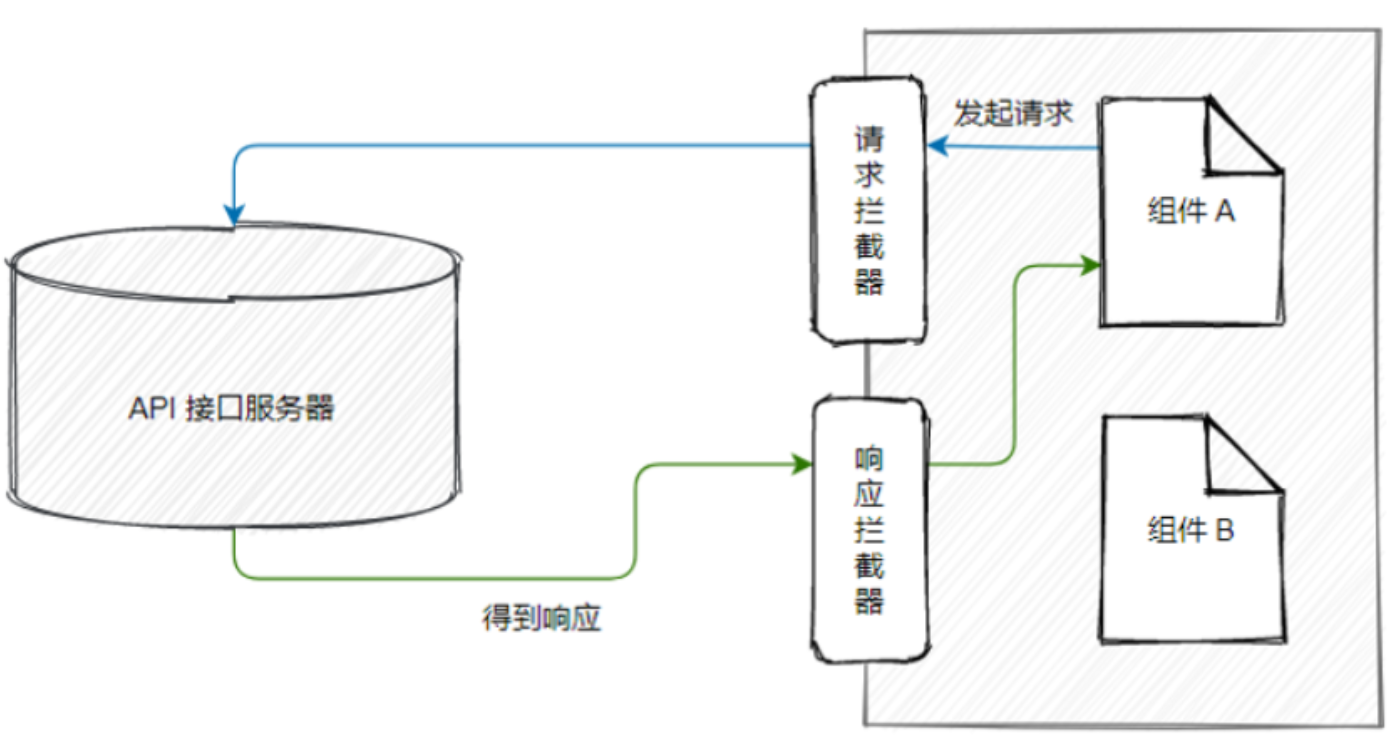
2、拦截器

​ (1)请求拦截器:对客户端发起的请求进行统一的前期处理(token、时间戳、cookie等)

​ (2)响应拦截器:对服务器端响应给客户端的数据统一进行处理之后再发给客户端

 3、使用方法

import axios from "axios";
//1. 创建axios的实例,配置基础路径
const axiosInstance = axios.create({
    baseURL: 'http://localhost:8089',
    timeout: 5000
})
//2. 定义请求拦截器:给所有请求都带上token
axiosInstance.interceptors.request.use((req)=>{
    let token = sessionStorage.getItem('Auth') //获取页面存储中的token信息
    if(token){ //若token存在
        req.headers['Auth'] = token
    }
    return req;
},(err)=>{
    return Promise.reject(err)
})
//3.响应拦截器:对服务器响应给客户端的数据进行统一的处理
axiosInstance.interceptors.response.use((res)=>{
    //1.对响应数据进行处理
    let result = res.data
    let code = result.code
    if (code == 200){
        return result
    }else{
        return Promise.reject(result)
    }
},(err)=>{
    return Promise.reject(err)
})
export default axiosInstance

二、ElementUI

1、简介:是’饿了么’公司推出的基于Vue2.0的组件库

2、使用方法

​ (1)安装:npm install element-ui

​ (2)在main.js文件中进行全局的配置

import ElementUI from ‘element-ui’ //导入element-ui库
import ‘element-ui/lib/theme-chalk/index.css’ //导入element-ui的样式文件

Vue.use(ElementUI)

3、UI组件的使用:所有的DOM元素都带有前缀 el-

​ (1)按钮:< el-button >

        plain:悬浮后颜色变深

        circle:圆形或椭圆

        disabled:按钮不可用

//1.1 按钮的类型    
    <el-button>普通按钮</el-button>
    <el-button type="primary">Primary按钮</el-button>
    <el-button type="info">Info按钮</el-button>
    <el-button type="success">Success</el-button>
    <el-button type="warning">Warning</el-button>
    <el-button type="danger">Danger</el-button>
//1.2 带边框的按钮(鼠标悬浮效果)
    <el-button plain>普通按钮</el-button>
    <el-button type="primary" plain>Primary按钮</el-button>
    <el-button type="info" plain>Info按钮</el-button>
    <el-button type="success" plain>Success</el-button>
    <el-button type="warning" plain>Warning</el-button>
    <el-button type="danger" plain>Danger</el-button>
//1.3 圆角按钮
    <el-button round>普通按钮</el-button>
    <el-button type="primary" round>Primary按钮</el-button>
    <el-button type="info" round>Info按钮</el-button>
    <el-button type="success" round>Success</el-button>
    <el-button type="warning" round>Warning</el-button>
    <el-button type="danger" round>Danger</el-button>
//1.4 带图标的圆形按钮
    <el-button icon="el-icon-search" circle></el-button>
    <el-button type="primary" icon="el-icon-edit" circle></el-button>
    <el-button type="info" icon="el-icon-delete" circle></el-button>
//1.5 按钮不可用:disabled
//1.6 文字按钮:type='text'
//1.7 按钮组:
    <el-button-group>
      <el-button type="primary" icon="el-icon-arrow-left">上一个</el-button>
      <el-button type="primary">下一个<i class="el-icon-arrow-right el-icon--right"></i></el-button>
    </el-button-group>
//1.8 加载中按钮:设置loading属性
   <el-button type="primary" :loading="true">加载中</el-button>
//1.9 按钮的尺寸:设置按钮的size属性:medium(中等)、small(小型)、mini(超小)
        <el-button>默认按钮</el-button>
        <el-button size="medium">中型按钮</el-button>
        <el-button size="small">小型按钮</el-button>
        <el-button size="mini">超小按钮</el-button>
        icon:图标
        <el-button icon="el-icon-search" circle></el-button>
        <el-button icon="el-icon-edit" circle></el-button>
        <el-button icon="el-icon-remove" circle></el-button>
        <el-button icon="el-icon-delete" circle></el-button>
        <el-button icon="el-icon-user" circle></el-button>

​ (2)布局组件:Layout(采用栅格布局方式,把一行分成24栏),用el-row表示行,

        ​ A、用el-col表示列,每列有span属性,用来指定列的栏数,offset属性设置分栏之间的间隔

        ​ B、给el-row设置gutter属性,可以指定每行的栏数,设置type=’flex’表示行的布局方式是flex

​ (3)布局容器:Container(搭建页面的基本结构)

        ​ A、<el-container>:外层容器,可以嵌套

        ​ B、<el-header>:顶栏容器。 有height属性设置高度,默认值为60px

        ​ C、<el-aside>:侧边栏容器。有width属性设置宽度,默认值为300px

        ​ D、<el-main>:主要区域容器。

        ​ E、<el-footer>:底栏容器。有height属性设置高度,默认值为60px

​ (4)Table 表格:< el-table >

        ​ A、属性包括:data(绑定表格的数据)、style(设置表格的样式)

        ​ B、列:< el-table-column>,prop属性绑定的数据的键(key)、label属性(在页面中显示的列名)、width属性表示列宽

  • 0
    点赞
  • 3
    收藏
    觉得还不错? 一键收藏
  • 0
    评论
### 回答1: 请问您的问题是如何在Vue3使用axios拦截器来添加token吗?如果是这样的话,可以通过以下代码来实现: 首先,在main.js引入axios和设置拦截器: import axios from 'axios'; // 设置baseUrl axios.defaults.baseURL = 'http://localhost:8000/'; // 设置拦截器 axios.interceptors.request.use( config => { const token = localStorage.getItem('token'); if (token) { config.headers.authorization = `Bearer ${token}`; } return config; }, error => { return Promise.reject(error); } ); 然后,您可以在代码使用axios请求,并且该请求会自动带上token: // 发起一个有token的GET请求 axios.get('/api/user').then(response => { console.log(response); }).catch(error => { console.log(error); }); ### 回答2: 在Vue3使用axios拦截器来为每个HTTP请求设置token是一种常见实践。Axios拦截器可以帮助我们在请求发送之前或响应返回之前拦截,并在拦截器添加必要的数据,如token。为了在Vue3使用Axios拦截器为每个HTTP请求设置token,下面的内容将提供一些具体方法。 首先,我们需要安装Axios和Vue3,安装方法为: ```vue3 # 安装vue3 npm i vue@next -S # 安装axios npm i axios -S ``` 然后,我们需要在Vue3应用创建一个Axios实例,代码如下: ```vue3 import axios from 'axios'; const api = axios.create({ baseURL: 'http://localhost:3000', }); export default api; ``` 在应用程序,我们可以在需要发送HTTP请求的组件导入并使用此api实例。 接下来,我们需要在Axios实例创建一个拦截器拦截器拦截HTTP请求并在其添加必要的headers。在这里,我们添加一个头部,它包含一个名为“Authorization”的令牌。代码如下: ```vue3 api.interceptors.request.use((config) => { config.headers.Authorization = 'Bearer ' + localStorage.getItem('token'); return config; }); ``` 通过使用这个拦截器,我们可以在每个HTTP请求自动添加一个名为“Authorization”的头部,它包含了从localStorage获取的令牌。 在这里,我们还要考虑到token可能会过期,因此我们还可以添加一个拦截器检查HTTP响应。如果响应包含401状态码,我们会强制用户重新登录以获取新的token。代码如下: ```vue3 api.interceptors.response.use( response => response, error => { if (error.response.status === 401) { localStorage.removeItem('token'); router.push('/login'); } return Promise.reject(error); }); ``` 在这个拦截器,我们首先检查响应是否包含401状态码。如果是,我们清除localStorage的token并强制用户重新登录。 总之,Vue3使用Axios拦截器为每个HTTP请求设置token是一种常见实践,并且可以非常轻松地实现。借助Axios拦截器,我们可以自动为每个HTTP请求设置token,并在token过期时强制用户重新登录。 ### 回答3: 在Vue3使用Axios拦截器使用token进行身份验证是一种非常常见的做法。以下是详细的步骤: 第一步:安装Axios和Vue-Router 安装Axios和Vue-Router: ``` npm install axios vue-router --save ``` 该命令会将axios和vue-router安装到项目。 第二步:创建Axios实例和拦截器 创建一个名为axios.js的新文件,并在其添加以下代码: ```javascript import axios from "axios"; import router from "@/router"; const axiosInstance = axios.create({ baseURL: process.env.VUE_APP_API_BASE_URL }); axiosInstance.interceptors.request.use(config => { const token = localStorage.getItem("token"); if (token) { config.headers["Authorization"] = `Bearer ${token}`; } return config; }, error => { return Promise.reject(error); }); axiosInstance.interceptors.response.use(response => { return response; }, error => { if (error.response.status === 401) { router.push("/login"); } return Promise.reject(error); }); export default axiosInstance; ``` 在这里,我们创建了一个Axios实例,并在请求添加了一个拦截器来检查本地存储是否有token。如果存在,则将其添加到请求头。此外,我们还添加了一个拦截器来处理401未授权错误响应,并重定向到登录页面。 第三步:在Vue组件使用Axios实例 确保我们在请求数据时始终使用我们创建的Axios实例。为此,我们需要在组件导入该实例: ```javascript import axiosInstance from "@/axios"; ``` 我们现在可以像这样在组件使用Axios: ```javascript axiosInstance.get("/users") .then(response => { console.log(response); }) .catch(error => { console.log(error); }); ``` 现在,我们已经成功地设置了Axios拦截器使用token进行身份验证。我们可以在Axios实例添加其他拦截器,以满足特定的需求。

“相关推荐”对你有帮助么?

  • 非常没帮助
  • 没帮助
  • 一般
  • 有帮助
  • 非常有帮助
提交
评论
添加红包

请填写红包祝福语或标题

红包个数最小为10个

红包金额最低5元

当前余额3.43前往充值 >
需支付:10.00
成就一亿技术人!
领取后你会自动成为博主和红包主的粉丝 规则
hope_wisdom
发出的红包
实付
使用余额支付
点击重新获取
扫码支付
钱包余额 0

抵扣说明:

1.余额是钱包充值的虚拟货币,按照1:1的比例进行支付金额的抵扣。
2.余额无法直接购买下载,可以购买VIP、付费专栏及课程。

余额充值