


一、初识Redis
1. 认识NoSQL
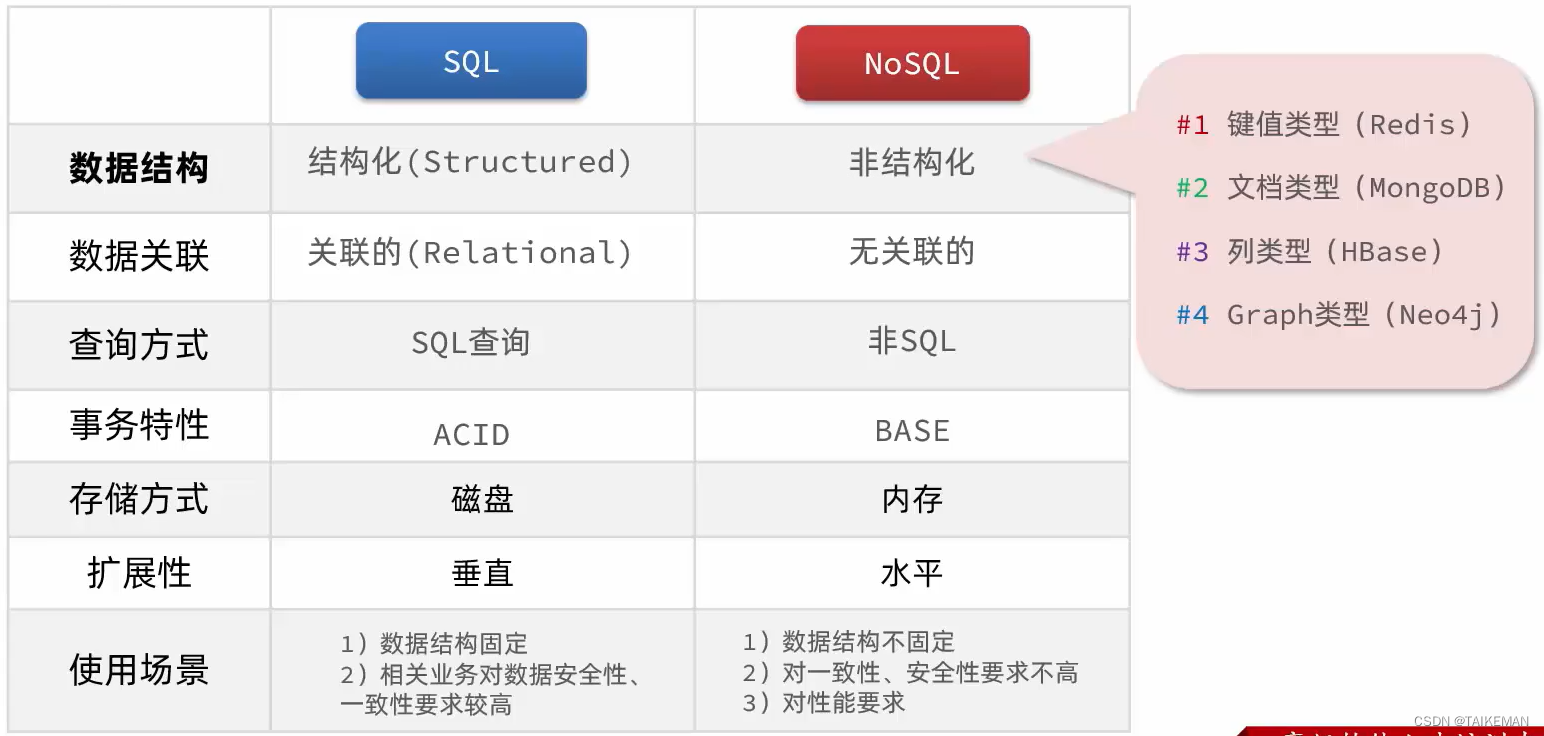
2. 认识Redis
- Redis诞生于2009年,全称是Remote Dictionary Server(远程词典服务器),是一个基于内存的键值型NoSQL数据库
- 特征
(1)键值(key-value)型,value支持多种不同数据结构,功能丰富
(2)单线程执行命令,所有命令是串行执行的,每个命令具备原子性,不会存在一个命令执行过程中,其他命令插入进来的情况(注意:Redis 6.0的多线程仅仅是针对网络请求处理这块,而核心的命令的执行这部分依然是单线程)
(3)低延迟,速度快(基于内存、IO多路复用、良好的编码:C语言编写)
(4)支持数据持久化,定期将内存中数据持久化到磁盘,确保数据的安全性
(5)支持主从集群、分片集群
(6)支持多语言客户端
3. 安装Redis
-
安装Redis依赖
(1)Redis是基于C语言编写的,因此首先需要安装Redis所需要的gcc依赖yum install -y gcc tcl -
上传Redis安装包并解压、安装
(1)将redis-6.2.6.tar.gz包,上传到/usr/local/src目录下
(2)解压redis-6.2.6.tar.gz,进入解压后目录,运行编译命令,如果没有报错则安装成功tar -zxvf redis-6.2.6.tar.gz cd redis-6.2.6 make && make install(3)默认的安装路径:/usr/local/bin目录下
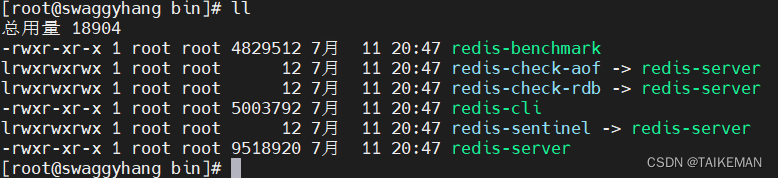
(4)该目录已经默认配置到环境变量中,可以在任意目录下运行这些命令
1)redis-cli:Redis提供的命令行客户端 2)redis-server:Redis的服务端启动脚本 3)redis-sentinel:Redis的哨兵启动脚本 -
启动Redis
(1)默认启动1)安装完成后,在任意目录输入redis-server命令即可启动Redis 2)这种启动属于前台启动,会阻塞整个会话窗口,窗口关闭或者按下CTRL + C,则Redis停止【不推荐使用】 redis-server(2)指定配置启动
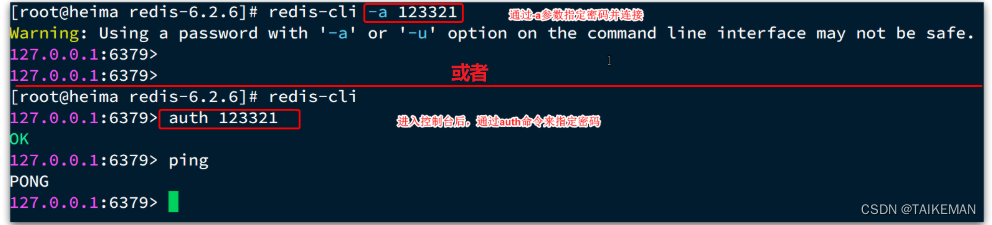
1)修改Redis配置文件redis.conf(路径:/usr/local/src/redis-6.2.6)

2)备份redis.conf
cp redis.conf redis.conf.bak

3)修改redis.conf文件中的一些配置
# 监听的地址,默认是127.0.0.1,会导致只能在本地访问。修改为0.0.0.0则可以在任意IP访问,生产环境不要设置为0.0.0.0
bind 0.0.0.0
# 守护进程,修改为yes后即可后台运行
daemonize yes
# 密码,设置后访问Redis必须输入密码
requirepass 123321

4)Redis的其它常见配置
# 监听的端口
port 6379
# 工作目录,默认是当前目录(哪里启动,哪里就是工作目录),也就是运行redis-server时的命令,日志、持久化等文件会保存在这个目录
dir .
# 数据库数量,设置为1,代表只使用1个库,默认有16个库,编号0~15
databases 1
# 设置redis能够使用的最大内存
maxmemory 512mb
# 日志文件,默认为空,不记录日志,可以指定日志文件名
logfile "redis.log"

5)启动Redis
# 进入redis安装目录
cd /usr/local/src/redis-6.2.6
# 启动
redis-server redis.conf

6)停止服务
# 利用redis-cli来执行shutdown命令,即可停止Redis服务,因为之前配置了密码,因此需要通过-a来指定密码
redis-cli -a 123321 shutdown
(3)开机自启
1)新建一个系统服务文件
vim /etc/systemd/system/redis.service

2)输入以下内容
[Unit]
Description=redis-server
After=network.target

[Service]
Type=forking
ExecStart=/usr/local/bin/redis-server /usr/local/src/redis-6.2.6/redis.conf
PrivateTmp=true

[Install]
WantedBy=multi-user.target

3)重载系统服务
systemctl daemon-reload

4)可以用下面这组命令来操作redis
# 启动
systemctl start redis
# 停止
systemctl stop redis
# 重启
systemctl restart redis
# 查看状态
systemctl status redis

5)让redis开机自启
systemctl enable redis
4. Redis客户端
-
命令行客户端
-
图形化桌面客户端
(1)安装包:https://github.com/lework/RedisDesktopManager-Windows/releases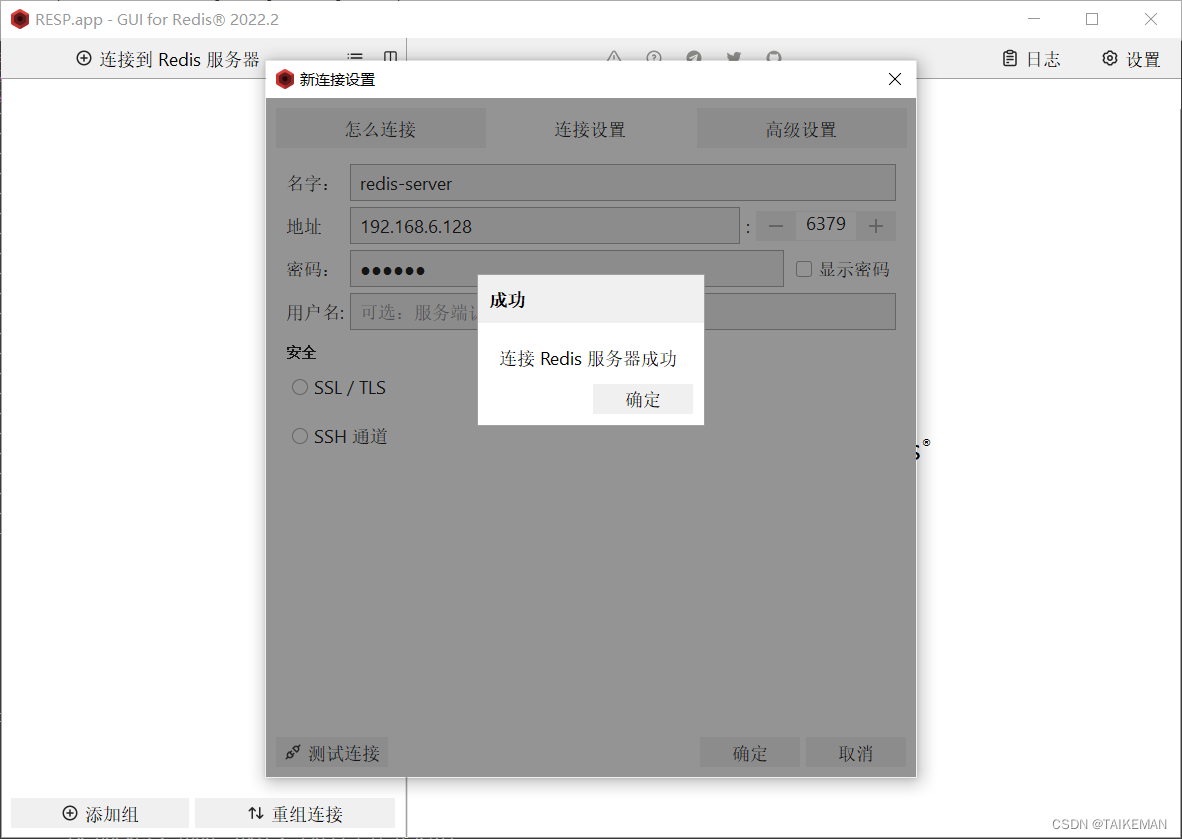
-
编程客户端【后续实现】
二、Redis常见命令
1. Redis数据结构介绍
- Redis是一个key-value的数据库,key一般是String类型,但是value的类型多种多样
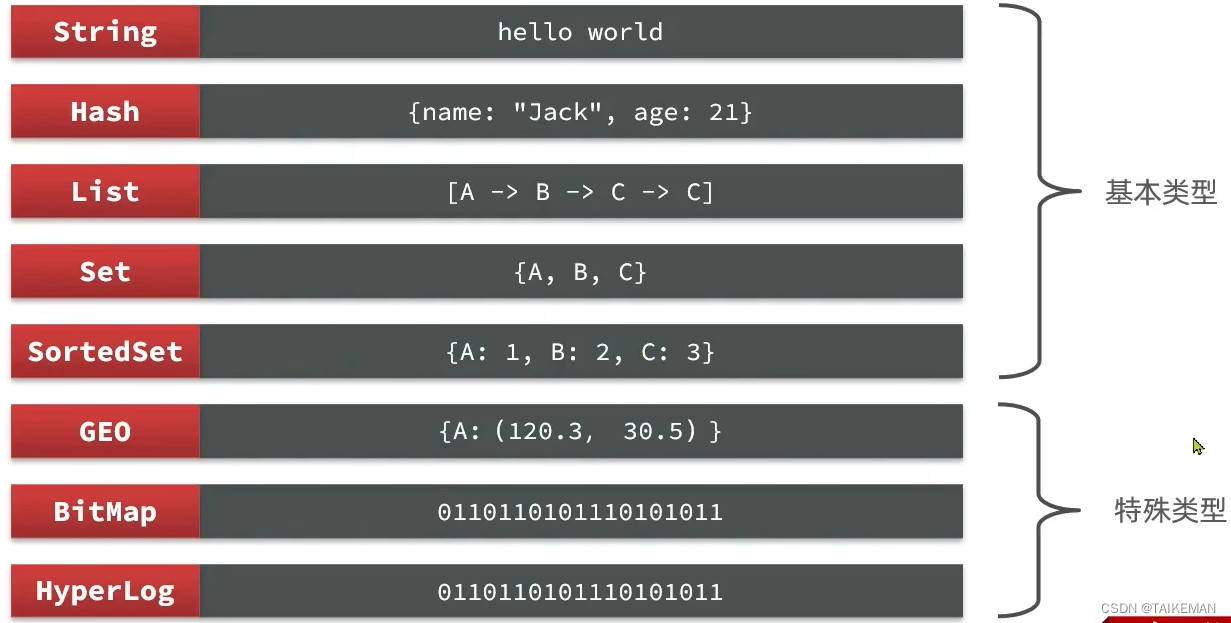
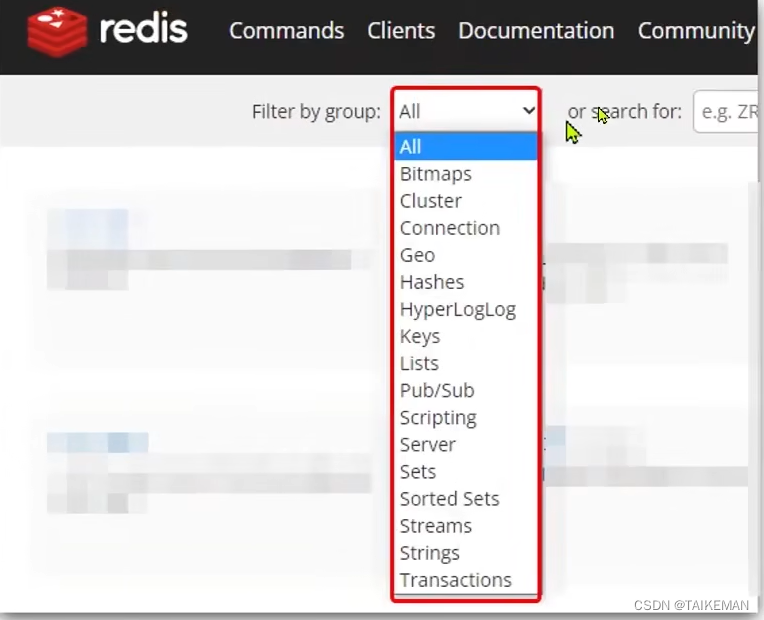
- Redis将操作不同数据类型的命令进行分组,在官网(https://redis.io/commands)可以查看不同命令组
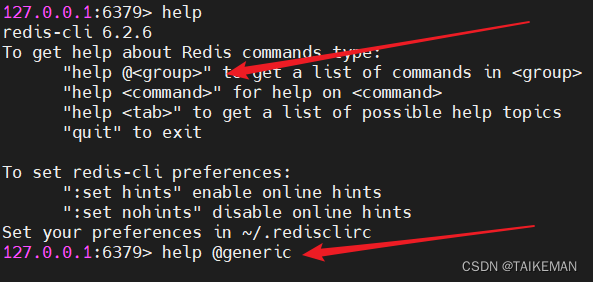
- 通过help也可以查看命令分组
2. Redis通用命令
- KEYS:查看符合模板的所有key,不建议在生产环境中使用
- DEL:删除一个指定的key
- EXISTS:判断key是否存在
- EXPIRE:给一个KEY设置有效期,有效期到期时该key会被自动删除
- TTL:查看一个key的剩余有效期
3. String类型
4. Hash类型
5. List类型
6. Set类型
7. SortedSet类型
三、Redis的Java客户端
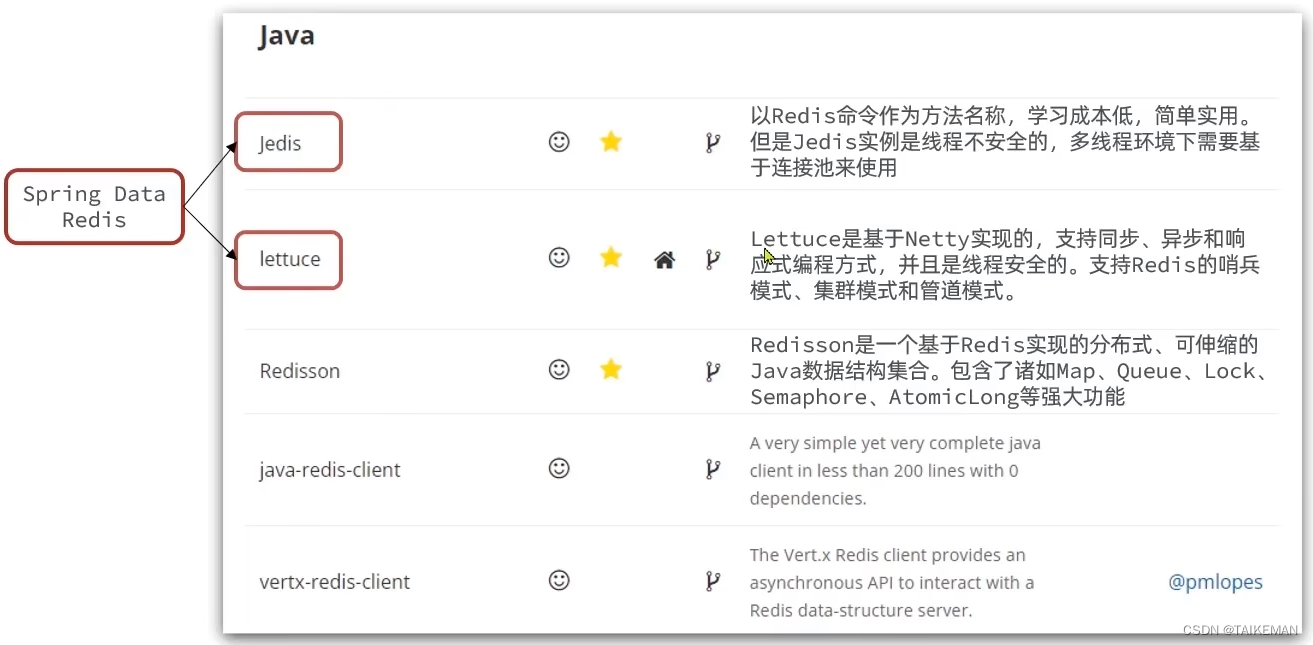
1. Jedis客户端
-
Jedis官网:https://github.com/redis/jedis
-
maven依赖
<dependency> <groupId>junit</groupId> <artifactId>junit</artifactId> <version>4.11</version> <scope>test</scope> </dependency> <dependency> <groupId>redis.clients</groupId> <artifactId>jedis</artifactId> <version>3.7.0</version> </dependency> -
Jedis基础操作
package com.swaggyhang; import org.junit.After; import org.junit.Before; import org.junit.Test; import redis.clients.jedis.Jedis; import java.util.Map; /** * Jedis基础操作 */ public class JedisTest { private Jedis jedis; @Before public void setUp() { // 1.建立连接 jedis = new Jedis("192.168.6.128", 6379); // 2.设置密码 jedis.auth("123321"); // 3.选择库 jedis.select(0); } @Test public void testString() { // 存入数据 String result = jedis.set("name", "虎哥"); System.out.println("result = " + result); // 获取数据 String name = jedis.get("name"); System.out.println("name = " + name); } @Test public void testHash() { // 存入数据 jedis.hset("user:1", "name", "jack"); jedis.hset("user:1", "age", "21"); // 获取数据 Map<String, String> map = jedis.hgetAll("user:1"); System.out.println(map); } @After public void tearDown() { if (jedis != null) { // 关闭连接 jedis.close(); } } } -
Jedis连接池
(1)Jedis本身是线程不安全的,并且频繁的创建和销毁连接会有性能损耗,推荐使用Jedis连接池代替Jedis的直连方式package com.swaggyhang.jedis.util; import redis.clients.jedis.Jedis; import redis.clients.jedis.JedisPool; import redis.clients.jedis.JedisPoolConfig; /** * Jedis连接池工具类 * * @author swaggyhang * @create 2023-07-12 20:52 */ public class JedisConnectionFactory { private static final JedisPool JEDIS_POOL; static { JedisPoolConfig poolConfig = new JedisPoolConfig(); poolConfig.setMaxTotal(8); poolConfig.setMaxIdle(8); poolConfig.setMaxWaitMillis(1000); // 创建连接池对象 JEDIS_POOL = new JedisPool(poolConfig, "192.168.6.128", 6379, 1000, "123321"); } public static Jedis getJedis() { return JEDIS_POOL.getResource(); } }
2. SpringDataRedis客户端
-
SpringData:是Spring中数据操作的模块,包含对各种数据库的集成,其中对Redis的集成模块就是SpringDataRedis
-
SpringDataRedis官网:https://spring.io/projects/spring-data-redis
-
特征
(1)提供了对不同Redis客户端的整合(Lettuce和Jedis)
(2)提供了RedisTemplate统一API来操作Redis
(3)支持Redis的发布/订阅模型
(4)支持Redis哨兵和Redis集群
(5)支持基于Lettuce的响应式编程
(6)支持基于JDK(默认)、JSON、字符串、Spring对象的数据序列化和反序列化
(7)支持基于Redis的JDKCollection实现 -
常见API
(1)SpringDataRedis中通过提供了RedisTemplate工具类,其中封装了各种对Redis的操作,并且将不同数据类型的操作API封装到不同的类型中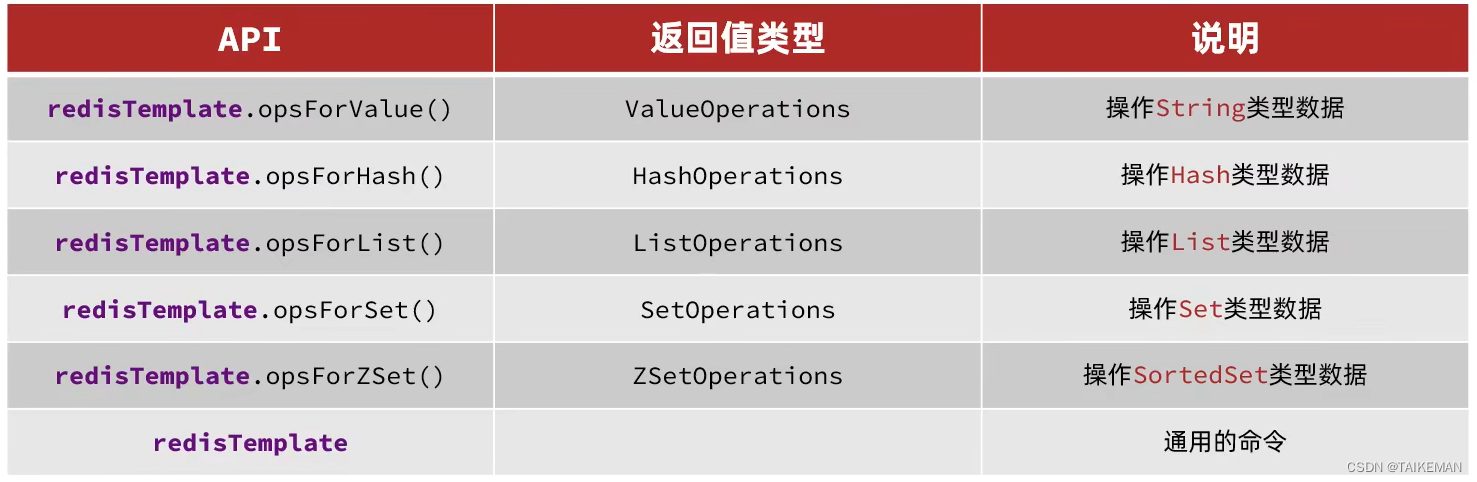
-
maven依赖
<dependency> <groupId>org.springframework.boot</groupId> <artifactId>spring-boot-starter-data-redis</artifactId> </dependency> <dependency> <groupId>org.apache.commons</groupId> <artifactId>commons-pool2</artifactId> </dependency> <dependency> <groupId>com.fasterxml.jackson.core</groupId> <artifactId>jackson-databind</artifactId> </dependency> <dependency> <groupId>org.projectlombok</groupId> <artifactId>lombok</artifactId> <optional>true</optional> </dependency> <dependency> <groupId>org.springframework.boot</groupId> <artifactId>spring-boot-starter-test</artifactId> <scope>test</scope> </dependency> -
application.yaml配置
spring: redis: host: 192.168.6.128 port: 6379 password: 123321 lettuce: pool: max-active: 8 max-idle: 8 min-idle: 0 max-wait: 1000ms -
基础操作:SpringBoot已经提供了对SpringDataRedis的支持,使用非常简单
package com.swaggyhang;

import org.junit.jupiter.api.Test;
import org.springframework.beans.factory.annotation.Autowired;
import org.springframework.boot.test.context.SpringBootTest;
import org.springframework.data.redis.core.RedisTemplate;

@SpringBootTest
class RedisDemoApplicationTests {

    @Autowired
    private RedisTemplate redisTemplate;

    @Test
    public void testString() {
        // 写入数据
        redisTemplate.opsForValue().set("name", "虎哥");
        // 读取数据
        Object value = redisTemplate.opsForValue().get("name");
        System.out.println("value = " + value);
    }
}
3. SpringDataRedis的序列化方式
-
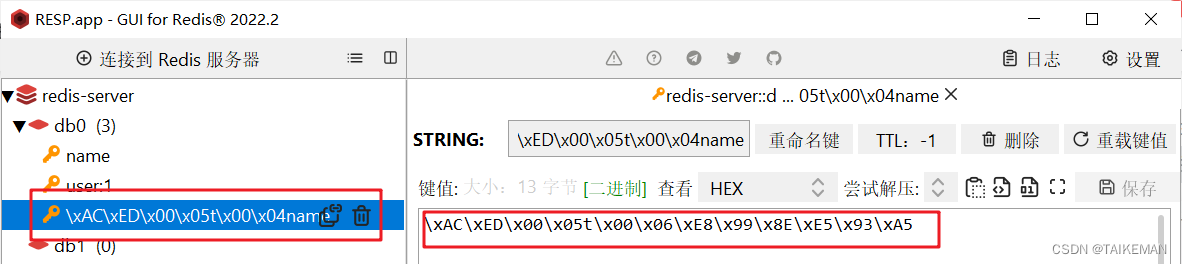
RedisTemplate可以接收任意Object作为值写入Redis,在写入Redis之前会把Object序列化为字节形式,默认采用JDK序列化
-
采用JDK序列化的缺点
(1)可读性差
(2)内存占用较大 -
一般情况下,采用下面方式,手动指定Redis的key和value的序列化方式
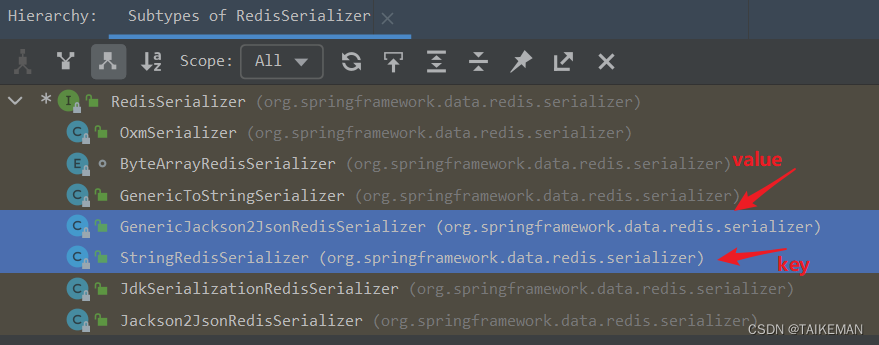
-
创建Redis配置类,指定RedisTemplate的key和value的序列化方式
package com.swaggyhang.redis.config; import org.springframework.context.annotation.Bean; import org.springframework.context.annotation.Configuration; import org.springframework.data.redis.connection.RedisConnectionFactory; import org.springframework.data.redis.core.RedisTemplate; import org.springframework.data.redis.serializer.RedisSerializer; /** * @author swaggyhang * @create 2023-07-12 21:32 */ @Configuration public class RedisConfig { /** * RedisConnectionFactory无需手动创建,由SpringBoot自动创建 * * @param connectionFactory redis连接工厂类 * @return RedisTemplate */ @Bean public RedisTemplate<String, Object> redisTemplate(RedisConnectionFactory connectionFactory) { // 创建RedisTemplate对象 RedisTemplate<String, Object> template = new RedisTemplate<>(); // 设置连接工厂 template.setConnectionFactory(connectionFactory); // 设置key的序列化:StringRedisSerializer template.setKeySerializer(RedisSerializer.string()); template.setHashKeySerializer(RedisSerializer.string()); // 设置value的序列化:GenericJackson2JsonRedisSerializer template.setValueSerializer(RedisSerializer.json()); template.setHashValueSerializer(RedisSerializer.json()); return template; } } -
测试类
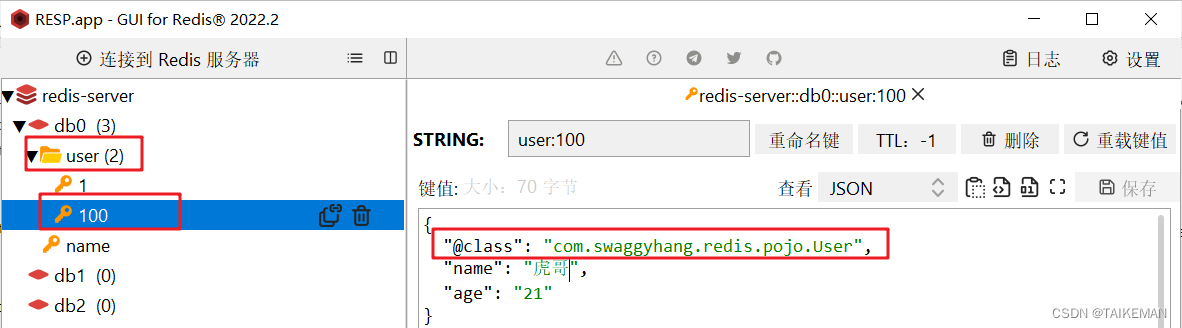
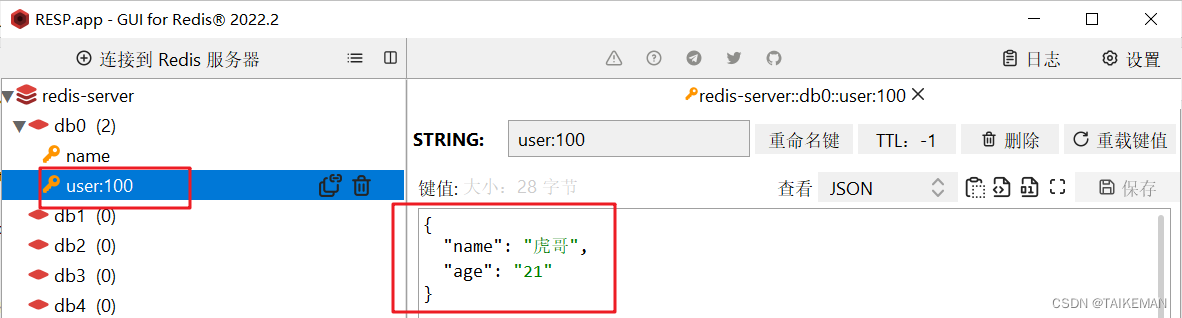
package com.swaggyhang; import com.swaggyhang.redis.pojo.User; import org.junit.jupiter.api.Test; import org.springframework.beans.factory.annotation.Autowired; import org.springframework.boot.test.context.SpringBootTest; import org.springframework.data.redis.core.RedisTemplate; @SpringBootTest class RedisDemoApplicationTests { @Autowired private RedisTemplate<String, Object> redisTemplate; @Test public void testString() { // 写入数据 redisTemplate.opsForValue().set("name", "虎哥"); // 读取数据 Object value = redisTemplate.opsForValue().get("name"); System.out.println("value = " + value); } @Test public void testSaveUser(){ redisTemplate.opsForValue().set("user:100", new User("虎哥", "21")); User user = (User) redisTemplate.opsForValue().get("user:100"); System.out.println("user = " + user); } } -
测试结果:这种方式可以自动序列化和反序列化
4. StringRedisTemplate
-
尽管JSON的序列化方式可以满足需求,但依然存在一些问题,为了在反序列化时知道对象的类型,JSON序列化器会将类的class类型写入Redis的value中,带来额外的内存开销
-
为了节省内存空间,我们并不会使用JSON序列化器来处理value,而是统一使用String序列化器,要求只能存储String类型的key和value。当需要存储Java对象时,手动完成对象的序列化和反序列化

-
Spring默认提供了一个StringRedisTemplate类,其key和value的序列化方式默认就是String方式,因此,我们无需自定义StringRedisTemplate
package com.swaggyhang; import com.fasterxml.jackson.core.JsonProcessingException; import com.fasterxml.jackson.databind.ObjectMapper; import com.swaggyhang.redis.pojo.User; import org.junit.jupiter.api.Test; import org.springframework.beans.factory.annotation.Autowired; import org.springframework.boot.test.context.SpringBootTest; import org.springframework.data.redis.core.StringRedisTemplate; @SpringBootTest class RedisDemoApplicationTests { @Autowired private StringRedisTemplate stringRedisTemplate; private static final ObjectMapper OBJECT_MAPPER = new ObjectMapper(); @Test public void testString() { // 写入数据 stringRedisTemplate.opsForValue().set("name", "虎哥"); // 读取数据 Object value = stringRedisTemplate.opsForValue().get("name"); System.out.println("value = " + value); } @Test public void testSaveUser() throws JsonProcessingException { User user = new User("虎哥", "21"); String json = OBJECT_MAPPER.writeValueAsString(user); stringRedisTemplate.opsForValue().set("user:100", json); String jsonUSer = stringRedisTemplate.opsForValue().get("user:100"); User user1 = OBJECT_MAPPER.readValue(jsonUSer, User.class); System.out.println("user1 = " + user1); } } -
测试结果
-
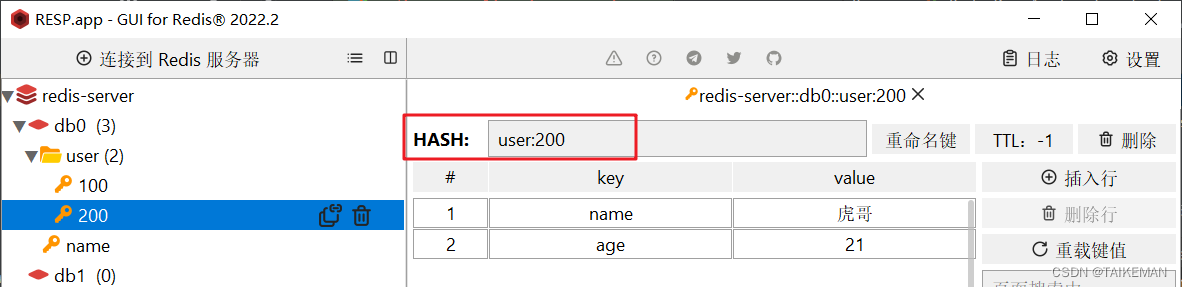
操作Hash类型
@Test public void testHash() { stringRedisTemplate.opsForHash().put("user:200", "name", "虎哥"); stringRedisTemplate.opsForHash().put("user:200", "age", "21"); // 获取所有 Map<Object, Object> entries = stringRedisTemplate.opsForHash().entries("user:200"); System.out.println("entries = " + entries); } -
测试结果


 239
239


 被折叠的 条评论
为什么被折叠?
被折叠的 条评论
为什么被折叠?
 到【灌水乐园】发言


