


文章目录
01.概述
什么是ShardingSphere?
- 就是一个分库分表的中间件。
- 定位为关系型数据库的中间件,合理在分布式环境下使用关系型数据库。
- 包含两个产品:ShardingSphere-JDBC,ShardingSphere-Proxy,
主要介绍ShardingSphere-Proxy的使用。
为什么要分库分表?
- 因为随着业务量的增大,表里面的数据会越来越多,当表里的数据非常多的时候,对数据库进行CRUD操作就会造成性能问题,分库分表就是为了解决这个问题。
分库分表的方案:
- 垂直分库,垂直分表(按字段拆分)
- 水平分库,水平分表(数据库或者表结构相同,存的数据不同)
分库分表带来的问题?
- 多数据源管理的问题:如,需要查询的数据存储在两个
不同的数据库,连接两个数据库的数据源不一样。 - 跨节点连接查询的问题:如,需要查询的数据存储在两个
不同的数据库,这 - 两个数据库部署在
不同的服务器上。
中文官方网址:https://shardingsphere.apache.org/document/current/cn/overview/
本人的demo代码仓库地址:https://gitee.com/aismall/mystudym
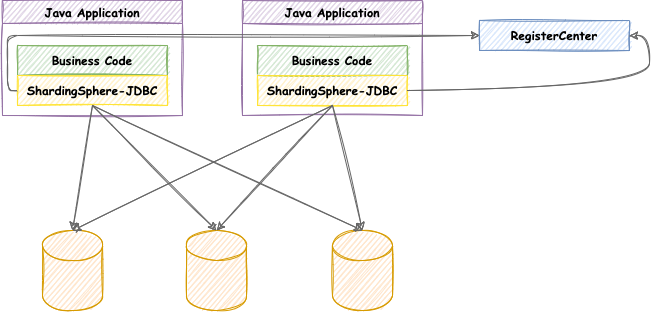
02.ShardingSphere-JDBC介绍
定位为轻量级 Java 框架,在 Java 的 JDBC 层提供的额外服务。 它使用客户端直连数据库,以 jar 包形式提供服务,无需额外部署和依赖,可理解为增强版的 JDBC 驱动,完全兼容 JDBC 和各种 ORM 框架。
- 适用于任何基于 JDBC 的 ORM 框架,如:JPA, Hibernate, Mybatis, Spring JDBC Template 或直接使用 JDBC;
- 支持任何第三方的数据库连接池,如:DBCP, C3P0, BoneCP, HikariCP 等;
- 支持任意实现 JDBC 规范的数据库,目前支持 MySQL,PostgreSQL,Oracle,SQLServer 以及任何可使用 JDBC 访问的数据库。
ShardingSphere-JDBC的功能:
- 数据分片
- 读写分离
注意:
-
ShardingSphere-JDBC并不是帮我们做分库分表的工作,分库分表需要我们自己来做,
它主要是方便我们管理这些划分的数据库和表。 -
简单一句话总结:使用 ShardingSphere-JDBC就是为了
简化分库分表之后对数据的操作。应用场景
-
Apache ShardingSphere-JDBC 可以通过
Java,YAML,Spring 命名空间和Spring Boot Starter这 4 种方式进行配置,开发者可根据场景选择适合的配置方式。
使用限制
- 目前
仅支持 JAVA 语言
前提条件
- 开发环境需要具备 Java JRE 8 或更高版本。
03.环境搭建
SharingSphereJDBC
  │
  └─src.main      包
  |    │
  |    ├─java           微服务接口和传输对象定义
  |    │  ├─entity		实体类
  |    │  ├─mapper      mapper接口
  |    ├─resource                    资源类
  |    │  ├─application.properties   服务配置相关
  |    │
  |    └─SharingSphereJDBCApplication    服务启动类
  |
  └─src.test 测试类
1、新建一个SpringBoot项目(SpringBoot版本:2.2.1.RELEASE)
2、引入依赖
<dependencies>
    <dependency>
        <groupId>org.springframework.boot</groupId>
        <artifactId>spring-boot-starter</artifactId>
    </dependency>

    <dependency>
        <groupId>org.springframework.boot</groupId>
        <artifactId>spring-boot-starter-test</artifactId>
        <scope>test</scope>
    </dependency>

    <dependency>
        <groupId>com.alibaba</groupId>
        <artifactId>druid-spring-boot-starter</artifactId>
        <version>1.1.20</version>
    </dependency>

    <dependency>
        <groupId>mysql</groupId>
        <artifactId>mysql-connector-java</artifactId>
    </dependency>

    <dependency>
        <groupId>org.apache.shardingsphere</groupId>
        <artifactId>sharding-jdbc-spring-boot-starter</artifactId>
        <version>4.0.0-RC1</version>
    </dependency>

    <dependency>
        <groupId>com.baomidou</groupId>
        <artifactId>mybatis-plus-boot-starter</artifactId>
        <version>3.4.3</version>
    </dependency>

    <dependency>
        <groupId>org.projectlombok</groupId>
        <artifactId>lombok</artifactId>
    </dependency>
</dependencies>
3、创建实体类
@Data
public class Demo {
	@TableId(type = IdType.AUTO)
    private  Long tid ;
    private String tname ;
    private  int tage ;
}
@Data
@TableName(value="t_user")
public class User {
    @TableId(type = IdType.AUTO)
    private Long uid;
    private String name;
    private String sex;
}
@Data
@TableName(value="t_course")
public class Course {
    @TableId(type = IdType.AUTO)
    private Long cid;
    private String cname;
    private String cinfo;
}
@Data
@TableName(value="t_common")
public class Common {
    @TableId(type = IdType.AUTO)
    private Long coid;
    private String coinfo;
}
4、创建mapeer接口
/*
* 使用 mybatis-plus
* */
@Repository
public interface DemoMapper extends BaseMapper<Demo> {

}
@Repository
public interface UserMapper extends BaseMapper<User> {

}
@Repository
public interface CourseMapper extends BaseMapper<Course> {
}
@Repository
public interface CommonMapper extends BaseMapper<Common> {
}
5、修改主启动
@SpringBootApplication
@MapperScan("com.aismall.shardingspherejdbc.mapper")
public class ShardingSphereJdbcApplication {
    public static void main(String[] args) {
        SpringApplication.run(ShardingSphereJdbcApplication.class, args);
    }
}
6、注意事项:
- 如果使用mybatisplus,
实体类的名字要和数据库表名的前缀相对应,否则可能会报错,例如:数据表名字为demo_1,前缀为demo,则实体类的名字最好为Demo.java
04.入门案例:水平分表的方式
水平分表:把同一个表的数据按一定规则拆到不同的表中,不同的表可以在同一个数据库中,表的名字不同,表的结构相同。
创建数据库和表
1、创建一个数据库:demo_db
2、在数据库中创建两个结构相同的表:demo_0,demo_1
CREATE TABLE demo_0(
	tid BIGINT(20) PRIMARY KEY,
	tname VARCHAR(50) NOT NULL,
	tage  INT(10) NOT NULL
)
CREATE TABLE demo_1(
	tid BIGINT(20) PRIMARY KEY,
	tname VARCHAR(50) NOT NULL,
	tage  INT(10) NOT NULL
)
3、约定表规则:tid为奇数就将数据添加到表demo_0中,否则添加到表demo_1表。
修改项目
4、配置application.properties
# ============================水平分表============================
# 应用名称
spring.application.name=ShardingSphereJDBC
# 一个实体类对应两张表
spring.main.allow-bean-definition-overriding=true

# 数据源别名,因为我们使用一个数据库,所以配置一个数据源即可:ds0
spring.shardingsphere.datasource.names=ds-0

# 配置数据源具体内容:包含连接池,驱动,地址,用户名,密码
spring.shardingsphere.datasource.ds-0.type= com.alibaba.druid.pool.DruidDataSource
#spring.shardingsphere.datasource.ds-0.driver-class-name=com.mysql.jdbc.Driver
spring.shardingsphere.datasource.ds-0.driver-class-name=com.mysql.cj.jdbc.Driver
spring.shardingsphere.datasource.ds-0.url=jdbc:mysql://localhost:3306/demo_db?serverTimezone=UTC&useSSL=false&useUnicode=true&characterEncoding=UTF-8
spring.shardingsphere.datasource.ds-0.username=root
spring.shardingsphere.datasource.ds-0.password=12345678

# 指定demo表的分布情况,配置表在那个数据库里面,表的名称都是什么,ds-0.demo_0,ds-0.demo_1
spring.shardingsphere.sharding.tables.demo.actual-data-nodes=ds-0.demo_$->{0..1}

# 指定表里面的主键生成策略
spring.shardingsphere.sharding.tables.demo.key-generator.column=tid
spring.shardingsphere.sharding.tables.demo.key-generator.type=SNOWFLAKE

# 指定表的分片策略,约定tid值为偶数就添加到demo_0,奇数添加到demo_1
spring.shardingsphere.sharding.tables.demo.table-strategy.inline.sharding-column=tid
spring.shardingsphere.sharding.tables.demo.table-strategy.inline.algorithm-expression= demo_$->{tid % 2}

# 打开sql的输出日志
spring.shardingsphere.props.sql.show=true
5、在测试类中编写测试代码
@RunWith(SpringRunner.class)
@SpringBootTest
public class ShardingSphereJdbcApplicationTests {
    @Autowired
    private DemoMapper testMapper;
    @Test
    public void addTestTable() {
        Demo demo=new Demo();
        demo.setTname("aismall");
        demo.setTage(18);
        testMapper.insert(demo);
    }
}
6、控制台输出(tid=757748027229208577,为奇数):添加到表demo_1
INSERT INTO demo  ( tname,tage )  VALUES  ( ?,? ))

 Actual SQL: ds-0 ::: INSERT INTO demo_1   (tname, tage, tid) VALUES (?, ?, ?) ::: [aismall, 18, 757748027229208577]
05.入门案例:水平分库的方式
水平分库:把同一个表的数据按一定规则拆到不同的数据库中,每个库可以放在不同的服务器上,表的名字相同,表存在的数据库不同。
创建数据库和表
1、创建两个数据库:demo_db_0,demo_db_1
2、分别在每个数据库中创建两张表:demo_0,demo_1
CREATE TABLE demo_0(
	tid BIGINT(20) PRIMARY KEY,
	tname VARCHAR(50) NOT NULL,
	tage  INT(10) NOT NULL
)
CREATE TABLE demo_1(
	tid BIGINT(20) PRIMARY KEY,
	tname VARCHAR(50) NOT NULL,
	tage  INT(10) NOT NULL
)
3、约定数据库和表规则:
- 数据库约定规则:tage为偶数就将数据添加到数据库demo_db_0中,否则就添加到数据库demo_db_1中。
- 表约定规则:tid为奇数就将数据添加到表demo_0中,否则添加到表demo_1表。
修改项目
4、配置application.properties(替换之前的配置文件)
# ==================================水平分库=====================================
# 应用名称
spring.application.name=ShardingSphereJDBC
# 一个实体类对应两张表
spring.main.allow-bean-definition-overriding=true
# 水平分库,需要配置两个数据源:ds-0,ds-1
spring.shardingsphere.datasource.names=ds-0,ds-1

# 配置第一个数据源具体内容:包含连接池,驱动,地址,用户名,密码
spring.shardingsphere.datasource.ds-0.type= com.alibaba.druid.pool.DruidDataSource
spring.shardingsphere.datasource.ds-0.driver-class-name=com.mysql.cj.jdbc.Driver
spring.shardingsphere.datasource.ds-0.url=jdbc:mysql://localhost:3306/demo_db_0?serverTimezone=UTC&useSSL=false&useUnicode=true&characterEncoding=UTF-8
spring.shardingsphere.datasource.ds-0.username=root
spring.shardingsphere.datasource.ds-0.password=12345678

# 配置第二个数据源具体内容:包含连接池,驱动,地址,用户名,密码
spring.shardingsphere.datasource.ds-1.type= com.alibaba.druid.pool.DruidDataSource
spring.shardingsphere.datasource.ds-1.driver-class-name=com.mysql.cj.jdbc.Driver
spring.shardingsphere.datasource.ds-1.url=jdbc:mysql://localhost:3306/demo_db_1?serverTimezone=UTC&useSSL=false&useUnicode=true&characterEncoding=UTF-8
spring.shardingsphere.datasource.ds-1.username=root
spring.shardingsphere.datasource.ds-1.password=12345678

# 指定数据库和数据库中表的分布情况
spring.shardingsphere.sharding.tables.demo.actual-data-nodes=ds-$->{0..1}.demo_$->{0..1}

# 指定表里面的主键生成策略
spring.shardingsphere.sharding.tables.demo.key-generator.column=tid
spring.shardingsphere.sharding.tables.demo.key-generator.type=SNOWFLAKE

# 指定数据库的分片策略,tage为奇数就添加到demo_db_1,偶数就添加到demo_db_0
spring.shardingsphere.sharding.tables.demo_db.database-strategy.inline.sharding-column=tage
spring.shardingsphere.sharding.tables.demo_db.database-strategy.inline.algorithm-expression= demo_$->{tage  % 2}

# 指定数据库的分片策略,tage为奇数就添加到demo_db_1=ds-1,偶数就添加到demo_db_0=ds-0
spring.shardingsphere.sharding.tables.demo.database-strategy.inline.sharding-column=tage
spring.shardingsphere.sharding.tables.demo.database-strategy.inline.algorithm-expression= ds-$->{tage  % 2}

# 打开sql的输出日志
spring.shardingsphere.props.sql.show=true
5、在测试类中编写测试代码
@RunWith(SpringRunner.class)
@SpringBootTest
public class ShardingSphereJdbcApplicationTests {
    @Autowired
    private DemoMapper testMapper;
    @Test
    public void addTestDB(){
        Demo demo=new Demo();
        //demo.setTid(10L);
        demo.setTname("aismall");
        demo.setTage(10);
        testMapper.insert(demo);
    }
}
6、控制台输出(tage=10为偶数,tid=760131713975189505为奇数):添加到demo_db_0数据库中的表demo_1
Actual SQL: ds-0 ::: INSERT INTO demo_1   (tname, tage, tid) VALUES (?, ?, ?) ::: [aismall, 10, 760131713975189505]

Actual SQL: ds-1 ::: INSERT INTO demo_1   (tname, tage, tid) VALUES (?, ?, ?) ::: [aismall, 10, 760131713975189505]
06.入门案例:垂直分库的方式
垂直分库:是指按照业务将表进行分类,分布到不同的数据库上面,每个库可以放在不同的服务器上,它的核心理念是专库专用(同一类业务的表放在一个数据库中)。
创建数据库和表
1、创建两个数据库(一个存放用户信息,一个存放用户的课程信息):user_db,course_db
2、分别在每个数据库中创建表:t_user,t_course
CREATE TABLE t_user(
	uid BIGINT(20) PRIMARY KEY,
	name VARCHAR(50) NOT NULL,
	sex  VARCHAR(50) NOT NULL
)
CREATE TABLE t_course(
	cid BIGINT(20) PRIMARY KEY,
	cname VARCHAR(50) NOT NULL,
	cinfo VARCHAR(50) NOT NULL
)
3、约定数据库和表规则:
- user_db数据库中的t_user表。
- course_db数据库中的t_course表
修改项目
4、配置application.properties(替换之前的配置文件)
# =========================垂直分库===========================
# 应用名称
spring.application.name=ShardingSphereJDBC
# 一个实体类对应两张表
spring.main.allow-bean-definition-overriding=true

# 垂直分库,演示使用两个数据源:ds-0,ds-1
spring.shardingsphere.datasource.names=ds-0,ds-1
# 配置第一个数据源具体内容:包含连接池,驱动,地址,用户名,密码
spring.shardingsphere.datasource.ds-0.type= com.alibaba.druid.pool.DruidDataSource
spring.shardingsphere.datasource.ds-0.driver-class-name=com.mysql.cj.jdbc.Driver
spring.shardingsphere.datasource.ds-0.url=jdbc:mysql://localhost:3306/user_db?serverTimezone=UTC&useSSL=false&useUnicode=true&characterEncoding=UTF-8
spring.shardingsphere.datasource.ds-0.username=root
spring.shardingsphere.datasource.ds-0.password=12345678

# 配置第二个数据源具体内容:包含连接池,驱动,地址,用户名,密码
spring.shardingsphere.datasource.ds-1.type= com.alibaba.druid.pool.DruidDataSource
spring.shardingsphere.datasource.ds-1.driver-class-name=com.mysql.cj.jdbc.Driver
spring.shardingsphere.datasource.ds-1.url=jdbc:mysql://localhost:3306/course_db?serverTimezone=UTC&useSSL=false&useUnicode=true&characterEncoding=UTF-8
spring.shardingsphere.datasource.ds-1.username=root
spring.shardingsphere.datasource.ds-1.password=12345678

# 配置user_db数据库里面的t_user专库专表
spring.shardingsphere.sharding.tables.t_user.actual-data-nodes=ds-$->{0}.t_user
# 指定表里面的主键生成策略:uid为主键
spring.shardingsphere.sharding.tables.t_user.key-generator.column=uid
spring.shardingsphere.sharding.tables.t_user.key-generator.type=SNOWFLAKE
# 指定数据库的分片策略:ds-0数据库
spring.shardingsphere.sharding.tables.t_user.database-strategy.inline.sharding-column=uid
spring.shardingsphere.sharding.tables.t_user.database-strategy.inline.algorithm-expression= ds-$->{0}

# 配置course_db数据库里面的t_course专库专表
spring.shardingsphere.sharding.tables.t_course.actual-data-nodes=ds-$->{1}.t_course
# 指定表里面的主键生成策略:cid为主键
spring.shardingsphere.sharding.tables.t_course.key-generator.column=cid
spring.shardingsphere.sharding.tables.t_course.key-generator.type=SNOWFLAKE
# 指定数据库的分片策略:ds-1数据库
spring.shardingsphere.sharding.tables.t_course.database-strategy.inline.sharding-column=cid
spring.shardingsphere.sharding.tables.t_course.database-strategy.inline.algorithm-expression= ds-$->{1}

# 打开sql的输出日志
spring.shardingsphere.props.sql.show=true
5、在测试类中编写测试代码
@RunWith(SpringRunner.class)
@SpringBootTest
public class ShardingSphereJdbcApplicationTests {
    @Autowired
    private UserMapper userMapper;
    @Autowired
    private CourseMapper courseMapper;
   @Test
    public void addUser(){
        User user=new User();
        user.setName("001");
        user.setSex("male");
        userMapper.insert(user);
    }
    @Test
    public void addCourse(){
        Course course=new Course();
        course.setCname("English");
        course.setCinfo("The First Book");
        courseMapper.insert(course);
    }
}
6、控制台输出
-
运行第一个测试方法,将数据添加到user_db.t_user表中
Actual SQL: ds-0 ::: INSERT INTO t_user (name, sex, uid) VALUES (?, ?, ?) ::: [001, male, 760476697261768705] -
运行第二个测试方法,将数据添加到user_db.t_course表中
Actual SQL: ds-1 ::: INSERT INTO t_course (cname, cinfo, cid) VALUES (?, ?, ?) ::: [English, The First Book, 760479797565456385]
07.入门案例:公共表
公共表:
- 存储固定的数据,表的数据很少发生改变,查询的时候经常需要关联此表(即查多,改少)
- 每个数据库中创建出
结构和名字相同的公共表。
创建数据库和表
1、分别在数据库user_db和course_db数据库中都创建一个表:t_common(公共表)
CREATE TABLE t_common(
	coid BIGINT(20) PRIMARY KEY,
	coinfo VARCHAR(50) NOT NULL
)
2、约定表规则:操作t_common表,所有配置的数据库中的t_common表都一同被操作。
修改项目
3、配置application.properties(替换之前的配置文件)
# 应用名称
spring.application.name=ShardingSphereJDBC
# 一个实体类对应两张表
spring.main.allow-bean-definition-overriding=true

#=====================在垂直分库的基础上演示:公共表=============================
spring.shardingsphere.datasource.names=ds-0,ds-1
# 配置第一个数据源具体内容:包含连接池,驱动,地址,用户名,密码
spring.shardingsphere.datasource.ds-0.type= com.alibaba.druid.pool.DruidDataSource
spring.shardingsphere.datasource.ds-0.driver-class-name=com.mysql.cj.jdbc.Driver
spring.shardingsphere.datasource.ds-0.url=jdbc:mysql://localhost:3306/user_db?serverTimezone=UTC&useSSL=false&useUnicode=true&characterEncoding=UTF-8
spring.shardingsphere.datasource.ds-0.username=root
spring.shardingsphere.datasource.ds-0.password=12345678

# 配置第二个数据源具体内容:包含连接池,驱动,地址,用户名,密码
spring.shardingsphere.datasource.ds-1.type= com.alibaba.druid.pool.DruidDataSource
spring.shardingsphere.datasource.ds-1.driver-class-name=com.mysql.cj.jdbc.Driver
spring.shardingsphere.datasource.ds-1.url=jdbc:mysql://localhost:3306/course_db?serverTimezone=UTC&useSSL=false&useUnicode=true&characterEncoding=UTF-8
spring.shardingsphere.datasource.ds-1.username=root
spring.shardingsphere.datasource.ds-1.password=12345678

# 配置user_db数据库里面的t_user专库专表
spring.shardingsphere.sharding.tables.t_user.actual-data-nodes=ds-$->{0}.t_user
# 指定表里面的主键生成策略:uid为主键
spring.shardingsphere.sharding.tables.t_user.key-generator.column=uid
spring.shardingsphere.sharding.tables.t_user.key-generator.type=SNOWFLAKE
# 指定数据库的分片策略:ds-0数据库
spring.shardingsphere.sharding.tables.t_user.database-strategy.inline.sharding-column=uid
spring.shardingsphere.sharding.tables.t_user.database-strategy.inline.algorithm-expression= ds-$->{0}

# 配置course_db数据库里面的t_course专库专表
spring.shardingsphere.sharding.tables.t_course.actual-data-nodes=ds-$->{1}.t_course
# 指定表里面的主键生成策略:cid为主键
spring.shardingsphere.sharding.tables.t_course.key-generator.column=cid
spring.shardingsphere.sharding.tables.t_course.key-generator.type=SNOWFLAKE
# 指定数据库的分片策略:ds-1数据库
spring.shardingsphere.sharding.tables.t_course.database-strategy.inline.sharding-column=cid
spring.shardingsphere.sharding.tables.t_course.database-strategy.inline.algorithm-expression= ds-$->{1}

#公共表配置:使用broadcast-tables进行声明配置
spring.shardingsphere.sharding.broadcast-tables=t_common
spring.shardingsphere.sharding.tables.t_common.key-generator.column=coid
spring.shardingsphere.sharding.tables.t_common.key-generator.type=SNOWFLAKE

# 打开sql的输出日志
spring.shardingsphere.props.sql.show=true
4、编写测试代码
@RunWith(SpringRunner.class)
@SpringBootTest
public class ShardingSphereJdbcApplicationTests {
    @Autowired
    private UserMapper userMapper;
    @Autowired
    private CourseMapper courseMapper;
    @Autowired
    private CommonMapper CommonMapper;
    @Test
    public void testAddCommon(){
        Common common = new Common();
        common.setCoinfo("common info");
        CommonMapper.insert(common);
    }
    @Test
    public void testCommonById(){
        QueryWrapper<Common> commonQueryWrapper = new QueryWrapper<>();
        // coid的值根据你自己的表来确定
        commonQueryWrapper.eq("coid",760527149667975169L);
        Common data = CommonMapper.selectOne(commonQueryWrapper);
        System.out.println(data);
    }
    @Test
    public void tesCommonDel(){
        QueryWrapper<Common> commonQueryWrapper = new QueryWrapper<>();
        commonQueryWrapper.eq("coid",760527149667975169L);
        CommonMapper.delete(commonQueryWrapper);
    }
}
5、控制台输出
-
添加操作
Actual SQL: ds-0 ::: INSERT INTO t_common (coinfo, coid) VALUES (?, ?) ::: [common info, 760527149667975169] Actual SQL: ds-1 ::: INSERT INTO t_common (coinfo, coid) VALUES (?, ?) ::: [common info, 760527149667975169] -
查询操作
Actual SQL: ds-0 ::: SELECT coid,coinfo FROM t_common WHERE (coid = ?) ::: [760527149667975169] Common(coid=760527149667975169, coinfo=common info) -
删除操作
Actual SQL: ds-0 ::: DELETE FROM t_common  WHERE (coid = ?) ::: [760527149667975169]

Actual SQL: ds-1 ::: DELETE FROM t_common  WHERE (coid = ?) ::: [760527149667975169]
6、分析
- 从打印的日志可以看出,添加和删除操作,会对所有配置的数据库中的t_common(公共表)产生影响。
- 查询操作会随机查询配置的一个数据库中的t_common表(因为所有t_common表中的的数据都一样)
08.后记
另外ShardingSphere-JDBC还支持对数据库的读写分离操作,想要了解的可以参考官方文档。


 2123
2123


 被折叠的 条评论
为什么被折叠?
被折叠的 条评论
为什么被折叠?
 到【灌水乐园】发言


