


springboot整合elasticsearch8.2.0
文章目录
一、application.yml或者其他的配置文件皆可
两种方式:【1】
elasticsearch:
  hosts: 127.0.0.1:9200     # 如果有多个IP就自己加逗号吧
【2】
spring:
	elasticsearch:
    	uris: localhost:9200   #这样子自动配置了
二、config类
不同的版本会有不同的config类要求,这里只提供es8.2.0的,对应着上面两种application文件,此处也提供两种对应的config类,至于之后和springboot整合就不会出现分类了。
【1】自定义属性
/**
 * @Author Caosen
 * @Date 2022/9/22 10:34
 * @Version 1.0
 */
@Configuration
public class EsUtilConfigClint2 {

    @Value("elasticsearch.hosts")
    private String hosts;

    private HttpHost[] getHttpHost(){
        if (hosts.length() > 0){
            System.out.println(hosts);

        }
        else {
            throw new RuntimeException("invalid");
        }
        String[] hosts_array = hosts.split(",");
        //用string类型创建host的集合

        HttpHost[] httpHosts = new HttpHost[hosts_array.length];

        int i = 0;
        for (String s : hosts_array) {
            //这里解析端口
            String[] hosts_array_in = s.split(":");
            //到这里就有了id和端口两个东西
            HttpHost http = new HttpHost(hosts_array_in[0], Integer.parseInt(hosts_array_in[1]), "http");
            httpHosts[i++] = http;

        }
        System.out.println("目前的配置加入了" + i + "个id及其端口");
        return httpHosts;
    }

    /**
     * 客户端
     * @return
     * @throws IOException
     */
    @Bean
    public ElasticsearchClient configClint() throws IOException {
        // Create the low-level client
        HttpHost[] httpHosts = getHttpHost();
        RestClient restClient = RestClient.builder(httpHosts).build();

        // Create the transport with a Jackson mapper
        ElasticsearchTransport transport = new RestClientTransport(
                restClient, new JacksonJsonpMapper());

        // 客户端
        ElasticsearchClient client = new ElasticsearchClient(transport);

        return client;
    }
}
【2】使用自带的属性
/**
 * @Author Caosen
 * @Date 2022/9/18 15:01
 * @Version 1.0
 */
@Configuration
public class EsUtilConfigClint {
    /**
     * 客户端
     * @return
     * @throws IOException
     */
    public ElasticsearchClient configClint() throws IOException {
        // Create the low-level client
        RestClient restClient = RestClient.builder(
                new HttpHost("127.0.0.1", 9200)).build();

        // Create the transport with a Jackson mapper
        ElasticsearchTransport transport = new RestClientTransport(
                restClient, new JacksonJsonpMapper());

        // 客户端
        ElasticsearchClient client = new ElasticsearchClient(transport);

        return client;
    }

}
三、测试
【1】service接口
由于作者是直接在项目里面加内容的,可能会出现一些不相关的东西,我尽量截取相关代码
/**
     * 从数据库中导入所有商品到ES
     */
    int importAll();

    /**
     * 新建指定名称的索引
     * @param name
     * @throws IOException
     */
    void addIndex(String name) throws IOException;

    /**
     * 检查指定名称的索引是否存在
     * @param name
     * @return
     * @throws IOException
     */
    boolean indexExists(String name) throws IOException;

    /**
     * 删除指定索引
     * @param name
     * @throws IOException
     */
    void delIndex(String name) throws IOException;

    /**
     * 创建索引,指定setting和mapping
     * @param name 索引名称
     * @param settingFn 索引参数
     * @param mappingFn 索引结构
     * @throws IOException
     */
    void create(String name,
                Function<IndexSettings.Builder, ObjectBuilder<IndexSettings>> settingFn,
                Function<TypeMapping.Builder, ObjectBuilder<TypeMapping>> mappingFn) throws IOException;
【2】serviceImpl,主要看create ,add,exsits, delete
@Autowired
    private EsProductDao esProductDao;

    @Autowired
    private EsProductRepository esProductRepository;

    @Autowired
    private ElasticsearchClient elasticsearchClient;

    @Override
    public int importAll() {
        List<EsProduct> allEsProductList = esProductDao.getAllEsProductList(null);
        Iterable<EsProduct> esProducts = esProductRepository.saveAll(allEsProductList);
        Iterator<EsProduct> iterator = esProducts.iterator();
        int result = 0;
        while (iterator.hasNext()) {
            result++;
            iterator.next();
        }
        return result;
    }

    @Override
    public void addIndex(String name) throws IOException {
        elasticsearchClient.indices().create(b -> b.index(name));

    }

    @Override
    public boolean indexExists(String name) throws IOException {
        return elasticsearchClient.indices().exists(b -> b.index(name)).value();
    }

    @Override
    public void delIndex(String name) throws IOException {
        elasticsearchClient.indices().delete(b -> b.index(name));
    }

    @Override
    public void create(String name, Function<IndexSettings.Builder, ObjectBuilder<IndexSettings>> setting, Function<TypeMapping.Builder, ObjectBuilder<TypeMapping>> mapping) throws IOException {
        elasticsearchClient.indices()
                .create(b -> b
                        .index(name)
                        .settings(setting)
                        .mappings(mapping));
    }
【3】测试
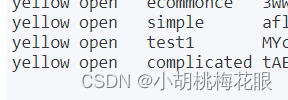
测试可以用controller 或者 用test伪装controller,自己测试的时候还是用postman接口比较合适。这里测试两种创建index,一种简单,一种稍微复杂,结果都是通过,见图。其他的删除啊,导入数据库的数据(repository)都是可以查到的。
@Test
    void addIndexSimple() throws IOException {
        String s = "simple";

        esProductService.addIndex(s);
        System.out.println("创建success");
    }
    @Test
    void addIndexComplicated() throws IOException {

        String s = "complicated";
        Function<IndexSettings.Builder, ObjectBuilder<IndexSettings>> setting = builder -> builder
                .index(i -> i.numberOfShards("3").numberOfReplicas("1"));
        Property keywordproperty = Property.of(p -> p.keyword(k -> k.ignoreAbove(256)));
        Property testproperty = Property.of(p -> p.text(builder -> builder));
        Property integerproperty = Property.of(builder -> builder.integer(i -> i));

        Function<TypeMapping.Builder, ObjectBuilder<TypeMapping>> mapping = builder -> builder
                .properties("name", keywordproperty)
                .properties("description", testproperty)
                .properties("price", integerproperty);
        esProductService.create(s, setting, mapping);

    }
ilder -> builder
.properties(“name”, keywordproperty)
.properties(“description”, testproperty)
.properties(“price”, integerproperty);
esProductService.create(s, setting, mapping);
}


 1792
1792

 被折叠的 条评论
为什么被折叠?
被折叠的 条评论
为什么被折叠?
 到【灌水乐园】发言


