


Preface
之前做了一些涉及对后缀为.JPEG格式的图片的解析工作,虽然最终证明是努力错了方向,但是对.JPEG图片解析也学到一些,整理一下,以备不时之需,同样也希望给有这个需求的人一定帮助。
XMP&Exif
这两种一般是我们常见的所谓的图片的“信息”,一般情况下,对与原始图片,我们单击右键属性,弹出来的相关信息即是储存在这两个文件中间。
Exif(Exchangeable image file format)与XMP(Extensible Metadata Platform)可以简单的理解XMP存储比Exif更多的信息,很多信息可以以XMP的形式存储于图片中,使用python3,两者分别可以使用exifread,以及libxmp进行相应信息读取:
#get the exif info from the image
def exif(infile):
    import sys
    import exifread
    image_content = open(infile, 'rb')
    tags = exifread.process_file(image_content)
    if tags is None:
        print('Could not open ' + infile)
        sys.exit(1)

    image_content.close()
    return tags
#read the relevant xmp information
def xmp_info(infile):
from libxmp import XMPFiles, consts
try:
xmpfile = XMPFiles(file_path=infile, open_forupdate=True)
xmp = xmpfile.get_xmp()
return xmp
except:
print('Unable to get xmp information')对于Exif信息,可以使用piexif进行相应编辑,例如可以将exif信息进行转移:
import piexif
piexif.transplant(src, dst)可以参考包的相关描述:
piexif.load(filename) - Get exif data as dict.
piexif.dump(exif_dict) - Get exif as bytes.
piexif.insert(exif_bytes, filename) - Insert exif into JPEG, or WebP.
piexif.remove(filename) - Remove exif from JPEG, or WebP.
piexif.transplant(filename, filename) - Transplant exif from JPEG to JPEG.
Marker
大部分的时候,对图像的一些简单信息提取,或者相应编辑,使用exif以及xmp中的metadata足以应付。对于图像更深度信息提取,需要对图像本身的结构做一定了解。所有的文件,不管是图片还是其他,都是数据,对JPEG文件而言,其使用了一些特定的字符来进行其数据的标记,即所谓的markers,一副图片的完整数据结构如下所示:
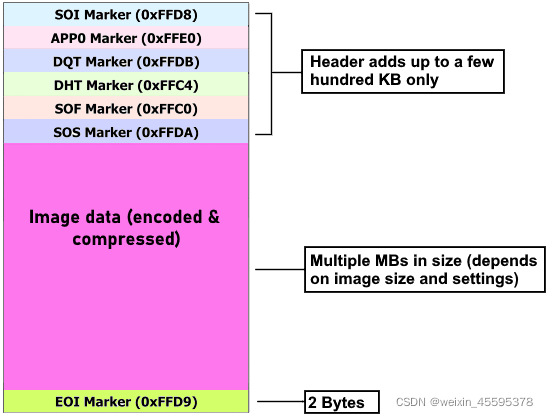
SOI(0xFFD8)代表Start Of Image,因此,所有的图片数据开始的字符均是FFD8。
EOI(0xFFD9)代表End Of Image,一般图片的结尾应该是FFD9,但可能存在需要将一些额外信息写入图片,这种情况下,在FFD9之后还会存在其他markers。
对于不同markers代表意思。详见此文章:List of JPEG Markers。
狭义上,我们所关注的图片为图中红色部分,而广义部分则是包括header+payload,而我们所谓的exif或者xmp其实就是其头信息的一部分。而不同的markers(即图片中括号内FFD8等)是由2个字节组成。读取图片并以16进制显示:
#read images by bytes and return as in Hexadecimal System

def read_bytes(image):
    with open(image, 'rb') as f:
        data = f.read()
    return data.hex()
在传统一般的ffd8-ffd9外还有ffe2—ffe5四个marker段,这四个markers即常被称为APP2-APP5(application segment),这四段一般为自定义段,一般的都是用户写入一些自定义的信息或者扩展信息。而我么熟悉的exif或者xmp一般即写在ffe1内,关于头文件内部的详细一些介绍,可以查看这篇文章:JPEG文件格式解析(一)Exif与JFIF。
JPEG图片解析代码:
def image_parse(image):
    # read image and save as bytes in a list
    with open(image, 'rb') as f:
        image_data = f.read()
        image_data = ['%x' % image_data[i] for i in range(len(image_data))]

    # index = ['d8', 'e1', 'db', 'c4', 'c0', 'da', 'd9', 'e2', 'e3', 'e4', 'e5']
    # parse the image markers and save in dictionary
    tagmarker = dict()
    tag = ''
    tag_start = False
    data_start = False
    for i, b in enumerate(image_data):
        if len(b) == 1:
            b = '0' + b
        if b == 'ff':
            tag_start = True
            continue
        if tag_start:
            if b != 'ff' and (b != '00'):
            #if b in index:
                tag = 'ff' + b
                if not tag in tagmarker:
                    tagmarker[tag] = list()
                tag_start = False
                data_start = True
                continue
            else:
                tag_start = False
                tagmarker[tag].append('ff')
        if data_start:
            tagmarker[tag].append(b)

    # list the markers
    for tag, arr in tagmarker.items():
        s = len(arr)
        if s == 0:
            print(tag)
            continue
        print("{}:\t{}\tbytes".format(tag, s))
    # pdb.set_trace()
    return tagmarker
上述代码需要一定的优化,并非所有ff代表的就是marker开始,使用该方法粗略找到之后,可以再进行一次筛选(即自定义index即可以)。或者进行相应的优化即可。(由于这个也不是工作重点,所以代码也没进行普遍性优化),另:这段代码是在哪里copy来的,也不太记得了,所以就没参考了。
下图即为实际图片解析后结构:
ffd8
ffe1:	9364	bytes
ffdb:	432	bytes
ffc4:	1382	bytes
ffc0:	69	bytes
ffda:	228997	bytes
ffd9
ffe2:	180	bytes
ffe3:	655382	bytes
ffe4:	2561	bytes
ffe5:	32540	bytes


 770
770

 被折叠的 条评论
为什么被折叠?
被折叠的 条评论
为什么被折叠?
 到【灌水乐园】发言


