


1.随机飘雪的网页特效经常在网站中见到,再配合音乐可以更好的营造温馨的氛围,效果如图:
 该项目需要实现的功能主要包含如下几个方面:
1.通过代码来新增一片或多片雪花;
2.雪花新增的位置是随机的;
3.可以随时开始或暂停雪花移动;
4.可以删除部分或所有雪花;
5.雪花向下移动过程中还需要适时补充雪花,这样才能模拟下雪的效果;
6.当雪花移出整个屏幕区域后,不应该继续保留该雪花,应该及时将其删除,节约浏览器资源;
7.背景音乐的播放;
8.开始按钮和停止按钮应该交替使用,不能多次单击。
开发思路:
1.新增雪花:新增一片雪花测操作其实和新增一个普通html元素没有任何本质区别,可以通过调用document.createElement()方法相任意容器中添加元素,并以对该元素设置CSS属性的方式完成元素的增加。
2.位置随机:要实现一片随机位置的雪花,需要考虑两个因素:一是必须使用固定定位,这样才能实现位置的强制调整;而是必须考虑浏览器窗口的高度和宽度,因为如果让雪花飘在窗口之外就没有任何意义了。
3.开始和暂停:当开始让雪花移动时,需要使用setInterval()定时器来实现。定时器本身就像一个死循环结构以信仰,在定时器任务代码中,,每触发一次定时器,就让所有雪花的top属性基于该片雪花现在的位置再增加几个随机像素值,这样就可以实现快慢不一、雪花飞舞的效果。
4.删除雪花:要实现删除雪花,首先必须要获取某片雪花对应的元素,然后调用remove()。
5.补充新的雪花:由于雪花会一直向下移动,最终会消失在浏览器窗口中,所以为了保持雪花一直在下的效果,还需要在此过程中不停的自动增加雪花。要实现这一效果,方法很多,但是其核心目的是:当触发到一定条件时,就应该考虑让雪花新增。如当某片雪花距离浏览器顶部的距离超过了浏览器窗口的高度时,就应该新增一片雪花。
6.移出无效雪花:只需要在计时器代码中对所有雪花的位置进行一下判断,当其offsetTop属性对应的值超过浏览器窗口高度时,即可将该片雪花移除。
7.背景音乐:使用HTML5自带的标签实现。
8.开始、停止按钮交替单击
<!DOCTYPE html>
<html>

	<head>
		<meta charset="UTF-8">
		<title>10-2</title>
		<bgsound src="img/庭園にて。在庭园中。-泠鸢翻唱(2019音质提升)(Cover:acane_madder) - 泠鸢yousa.mp3" loop="-1">
			<style>
				body {
					background-image: url(img/88b35690f603738d1d1cc0cebe1bb051f919ec3f.jpg);
					background-size: cover;
				}

				input {
					width: 80px;
					height: 30px;
					font-weight: bold;
				}
			</style>
			<script>
				var timer;

				function createOneSnow() {
					var leftX = Math.random() * window.innerWidth;
					var topY = Math.random() * window.innerHeight;
					var snowDiv = document.createElement("div");
					snowDiv.style.position = "fixed";
					snowDiv.style.left = leftX + "px";
					snowDiv.style.top = topY + "px";
					snowDiv.innerHTML = "<img src='img/snows.png' width='20' />";
					document.body.appendChild(snowDiv);
				}

				function createManySnow() {
					for(var i = 1; i <= 20; i++) {
						createOneSnow();
					}
				}

				function startFly() {
					var allSnows = document.getElementsByTagName("div");
					for(var i = 0; i < allSnows.length; i++) {
						var randomTop = Math.random() * 6;
						allSnows[i].style.top = allSnows[i].offsetTop + randomTop + "px";

						if(allSnows[i].offsetTop % 200 == 0) {
							createOneSnow();
						}
						if(allSnows[i].offsetTop > window.innerHeight) {
							allSnows[i].remove();
							createOneSnow();
						}
					}
					document.getElementById("startButton").disabled = "disabled";
					document.getElementById("stopButton").disabled = "";
				}

				function stopFly() {
					clearInterval(timer);
					document.getElementById("startButton").disabled = "";
					document.getElementById("stopButton").disabled = "disabled";
				}

				function removeSnow() {
					var allSnows = document.getElementsByTagName("div");
					var snowLength = allSnows.length;
					for(var i = 0; i < snowLength; i++) {
						allSnows[i].remove();
					}
				}
			</script>
	</head>

	<body>
		<input type="button" value="增加雪花" size="4" onclick="createManySnow()" />
		<input type="button" value="开始运动" size="4" id="startButton" onclick="timer=setInterval(startFly,100)" />
		<input type="button" value="停止运动" size="4" id="stopButton" disabled="disabled" onclick="stopFly()" />
		<input type="button" value="删除雪花" size="4" onclick="removeSnow()" />
	</body>
	<EMBED src="img/庭園にて。在庭园中。-泠鸢翻唱(2019音质提升)(Cover:acane_madder) - 泠鸢yousa.mp3" autostart="true" loop="true" width="80" height="20">

</html>
2.在线计算器
 实现功能主要包括:
1.当用户输入0-9的数字和运算符时,如实反应在结果框中,便于用户核对输入;
2.单击AC按钮清除所有内容,单击退格按钮只删除最后一个字符;
3.单击=按钮对结果框中用户输入内容计算并显示结果;
4.按±按钮对某个数字进行正负数切换;
5.如果用户输入的表达式出现错误,无法计算结果,则在结果框中提示错误信息;
6.不能重复输入运算符,比如5±+*6等。
开发思路:
1.运算表达式的输入:如document.getElementById(“result”).value+=”3”
2.清除结果:如document.getElementById(“result”).value+=” ”
3.计算结果:可以使用eval()函数
4.正负号切换:可以直接用0来对其数字进行减法运算;
5.错误提示:建议使用JavaScript的异常处理机制。通过捕获eval()函数在运算表达式时出现的异常来提示出错信息;
6.重复运算符验证:可以检测用户输入的最后一个符号是数字还是符号,如果是符号,则不允许再输入一个符号。
<!DOCTYPE html>
<html>
<head>
<meta charset="UTF-8">
<title>10-2</title>
<style type="text/css">
#div1{
text-align: center;
background-color: grey;
border-radius: 15px;
width: 420px;
height: 580px;
}
input[type =button]{
background-color:#7FFFD4 ;
border: 0px;
width: 98px;
height: 78px;
font-size: 30px;
}
p{
margin: 4px;
}
.span1{
background-color: orangered;
float: left;
display:block;
width: 40px;
height: 40px;
border-radius: 50px;
position: relative;
top: 20px;
left: 10px;
}
.span2{
background-color: deepskyblue;
float: left;
display:block;
width: 40px;
height: 40px;
border-radius: 50px;
position: relative;
top: 20px;
left: 30px;
}
.span3{
background-color: darkgreen;
float: left;
display:block;
width: 40px;
height: 40px;
border-radius: 50px;
position: relative;
top: 20px;
left: 50px;
}
#in1{
width: 403px;
height: 65px;
margin-top: 43px;
border-color: red;
font-size: 30px;
text-align: right;
}
</style>
<script>
function calculate(m){
var num = document.getElementById("in1");
switch(m){
case "=":
var a = null;
num.value = num.value.replace("÷",'/');
try{
num.value = eval(num.value);
}catch(err){
num.value = "错误";
}
break;
case "AC":
num.value = "";
break;
case "+/-":
num.value = (-(num.value));
break;
case "退格":
if(num.value.length > 0){
num.value = num.value.substr(0,num.value.length-1);
}
break;
case "%":
num.value = num.value/100;
break;
case "÷":
num.value = num.value+"÷";
break;
default:
num.value =num.value+ m;
break;
}
}
</script>
</head>
<body>
<div id="div1">
<span class="span1"> </span>
<span class="span2"> </span>
<span class="span3"> </span>
<p>
<input type="text" id="in1"/><br/>
</p>
<p>
<input type="button" value="AC" onclick="calculate(this.value)"/>
<input type="button" value="+/-" onclick="calculate(this.value)"/>
<input type="button" value="%" onclick="calculate(this.value)"/>
<input type="button" value="÷" onclick="calculate(this.value)"/>
</p>
<p>
<input type="button" value="7" onclick="calculate(this.value)"/>
<input type="button" value="8" onclick="calculate(this.value)"/>
<input type="button" value="9" onclick="calculate(this.value)"/>
<input type="button" value="*" onclick="calculate(this.value)"/>
</p>
<p>
<input type="button" value="4" onclick="calculate(this.value)"/>
<input type="button" value="5" onclick="calculate(this.value)"/>
<input type="button" value="6" onclick="calculate(this.value)"/>
<input type="button" value="-" onclick="calculate(this.value)"/>
</p>
<p>
<input type="button" value="1" onclick="calculate(this.value)"/>
<input type="button" value="2" onclick="calculate(this.value)"/>
<input type="button" value="3" onclick="calculate(this.value)"/>
<input type="button" value="+" onclick="calculate(this.value)"/>
</p>
<p>
<input type="button" value="0" onclick="calculate(this.value)"/>
<input type="button" value="退格" onclick="calculate(this.value)"/>
<input type="button" value="." onclick="calculate(this.value)"/>
<input type="button" value="=" onclick="calculate(this.value)"/>
</p>
</div>
</body>
</html>
3.在线时钟
 1.根据当前的系统时间,精确到秒显示时间;
2.模拟正常的时钟走时效果,每一秒秒针走一小格;
3.分针每一分钟走一小格;
4.时针不能直接从6点到7点,不是每小时走一大格,而是模拟每分钟都移动一点点角度的真实效果。
开发思路:
1.表盘是一张固定的背景图片;
2.三个指针是三个DIV,通过设置类似指针的背景图或者利用DIV的背景色模拟即可;
3.通过设置CSS中Transform变形属性值rotatep完成相应角度的旋转,即可模拟走时效果;
4.可以通过设置指针的旋转基点为左边或下边来完成指针旋转,也可以设置为拉通的一条DIV,而只为其一般设置背景色或背景图来模拟指针旋转,这种情况下不需要修改指针的旋转基点(即默认绕DIV的正中心点旋转)。
布局:核心元素4个,一个表盘,三个指针,并建议对三个指针使用绝对定位。绝对定位的一个前提是其父容器不能是默认值static,所以只需要将时钟表盘这个父容器设置为position:relative即可,并不需要设置任何偏移量。
另外对于指针旋转角度问题,一个表盘有60个刻度,每一个小时之间有5个小格子,一个圆圈是360度(deg),所以每一小格要旋转的角度是6deg,每一个小时是30deg;通过每秒钟的定时器来获取当前秒数,进而让该数据乘以6,即可得到当前需要旋转的角度。再获取当前的分钟数,进而完成让分针每一分钟转到6deg的效果,同时让时针每一分钟转到0.5deg。需要注意的是,角度是假设从12点钟为0deg来进行计算的,所以在布局时,三个指针都应该在12点钟方向的纵向布局。
<!DOCTYPE html>
<html>
	<head>
		<meta charset="UTF-8">
		<title>10-3</title>
		<style type="text/css">
			#p1 {
				width: 600px;
				height: 600px;
				position: relative;
				margin: 20px auto;
			}

			#hour {
				width: 15px;
				height: 190px;
				background-color: dodgerblue;
				position: absolute;
				left: 308px;
				top: 150px;
				transform-origin: bottom center;
			}

			#minute {
				width: 10px;
				height: 220px;
				background-color: black;
				position: absolute;
				left: 310px;
				top: 120px;
				transform-origin: bottom center;
			}

			#second {
				width: 4px;
				height: 240px;
				background-color: red;
				position: absolute;
				left: 313px;
				top: 100px;
				transform-origin: bottom center;
			}

			#center {
				width: 30px;
				height: 30px;
				background-color: black;
				position: absolute;
				left: 300px;
				top: 322px;
				border-radius: 50%;
			}
		</style>
		<script type="text/javascript" >
				setInterval(function(){
					var time = new Date();
					var hour = time.getHours();
					var minute = time.getMinutes();
					var second = time.getSeconds();
					var hourDeg = hour % 12 * 30 + minute * 0.5;

					document.getElementById("hour").style.transform ="rotate(" + hourDeg + "deg)";
					document.getElementById("minute").style.transform ="rotate(" + minute * 6 + "deg)";
					document.getElementById("second").style.transform ="rotate(" + second * 6 + "deg)";
				},1000);
		</script>
	</head>

	<body>
		<div>
			<img id="p1" src="img/timg-(1).gif"/>
			<div id="hour"></div>
			<div id="minute"></div>
			<div id="second"></div>
			<div id="center"></div>
		</div>
	</body>

</html>
4.倒计时程序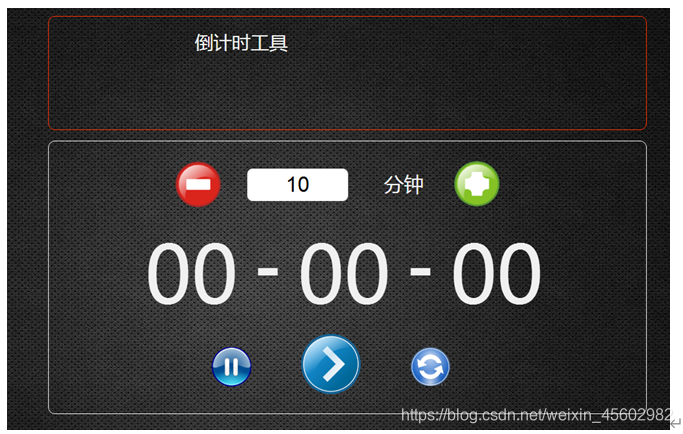
1.可以自己设置时间,单位为分钟。可以通过两边的加减按钮来微调时间,也可以手动在文本框中输入;
2.倒计时按照“时:分:秒”的方式显示;
3.可以随时暂停计时;
4.当倒计时完成后,自动播放一首音乐作为提醒。
<!DOCTYPE html>
<html>
	<head>
		<meta charset="UTF-8">
		<title>10-4</title>
		<style type="text/css">
			body{
				background-color: black;
			}
			#div1 {
				border: 1px solid red;
				width: 600px;
				height: 100px;
				text-align: center;
				color: white;
			}

			#div2 {
				border: 1px solid gainsboro;
				position: relative;
				height: 300px;
				width: 600px;
			}

			#div3 {
				color: white;
				position: absolute;
				font-size: 90px;
				top: 90px;
				left: 100px;
			}

			#b1 {
				float: left;
				border-radius: 50px;
				background-color: red;
				position: absolute;
				font-size: 70px;
				font-weight: 700;
				color: white;
				width: 50px;
				height: 50px;
				line-height: 0px;
				left: 150px;
			}

			#in1 {
				border: 1px;
				width: 130px;
				height: 35px;
				position: absolute;
				left: 220px;
				top: 26px;
				text-align: right;
				font-size: 30px;
			}

			#b2 {
				float: left;
				border-radius: 50px;
				background-color: yellowgreen;
				position: absolute;
				font-size: 50px;
				font-weight: 900;
				color: white;
				width: 50px;
				height: 50px;
				line-height: 0px;
				left: 450px;
			}

			#b3 {
				float: left;
				border-radius: 50px;
				background-color: cornflowerblue;
				position: absolute;
				font-size: 30px;
				font-weight: 900;
				color: white;
				width: 50px;
				height: 50px;
				line-height: 0px;
				left: 180px;
				top: 215px;
			}

			#b4 {
				float: left;
				border-radius: 50px;
				background-color: cornflowerblue;
				position: absolute;
				font-size: 60px;
				font-weight: 900;
				color: white;
				width: 65px;
				height: 65px;
				line-height: 0px;
				left: 290px;
				top: 205px;
			}

			#b5 {
				float: left;
				border-radius: 50px;
				background-color: cornflowerblue;
				position: absolute;
				font-size: 40px;
				font-weight: 900;
				color: white;
				width: 50px;
				height: 50px;
				left: 430px;
				top: 215px;
			}
			#hour{
				font-size: 90px;
				color: white;
				position: absolute;
				left: 120px;
				top: 95px;
			}
			#minute{
				font-size: 90px;
				color: white;
				position: absolute;
				left: 260px;
				top: 95px;
			}
			#second{
				font-size: 90px;
				color: white;
				position: absolute;
				left: 400px;
				top: 95px;
			}
			#art1{
				color: white;
				font-size: 100px;
				position: absolute;
				left: 218px;
				top:80px;
			}
			#art2{
				color: white;
				font-size: 100px;
				position: absolute;
				left: 360px;
				top:80px;
			}
		</style>
		<script type="text/javascript">
			var interval = null;
			var totalSecond = 0;
			var inPaused = false;
			var inStarted = false;
			//增加分钟
			function add(){
				var total = parseInt(document.getElementById("in1").value);
				if(total>9999){
					document.getElementById("in1").value=10000;
				}
				else{
					document.getElementById("in1").value=total+1;
				}
			}
			//减少分钟
			function sub(){
				var input = parseInt(document.getElementById("in1").value);
				if(input=1){
					document.getElementById("in1").value=1;
				}
				else{
					document.getElementById("in1").value=total-1;
				}
			}

			//检查输入的数字位数
			function check(){
				var input1=document.getElementById("in1");
				var input2=input1.value;
				var pattern = new RegExp("^\\d{1,5}$");
				if(!pattern.test(input2)){
					input1.value = input2.substring(0,input2.length-1);
				}
			}

			//开始
			function start(){
				inStarted = true;
				var totalMinute = parseInt(document.getElementById("in1").value);
				if(inPaused==false){
					totalSecond=totalMinute*60;
				}
				interval = setInterval("timerDown()",1000);
			}

			function timerDown(){
				if(totalSecond <= 0){
					clearInterval(interval);
					document.getElementById("music").play();
				}

				var hour = Math.floor(totalSecond/3600);
				if(hour<10){
					hour = "0"+hour;
				}

				var minute = Math.floor((totalSecond-hour*3600)/60);
				if(minute<10){
					minute="0"+minute;
				}

				var second=totalSecond%60;
				if(second<10){
					second = "0"+second;
				}
				document.getElementById("hour").innerHTML=hour.toString();
				document.getElementById("minute").innerHTML=minute.toString();
				document.getElementById("second").innerHTML=second.toString();
				totalSecond--;
			}

			//暂停
			function pause(){
				if(inStarted){
					inPaused = true;
				}
				clearInterval(interval);
			}
			//刷新
			function refresh(){
				window.location.reload();
			}
		</script>
	</head>

	<body>
		<div id="div1">
			<h1>倒计时工具</h1>
		</div>
		<br />
		<div id="div2" ">
			<br />
			<input type="button" value="-" id="b1" onclick="sub()" />
			<input type="text" id="in1" value="0" onclick="check()" />
			<h2 style="position: absolute;left: 370px;top:12px;color: white; ">分钟</h2>
			<input type="button" value="+" id="b2" onclick="add()" />
			<div nowrapid id="hour">00</div>
			<div nowrapid id="art1">-</div>
			<div nowrapid id="minute">00</div>
			<div nowrapid id="art2">-</div>
			<div nowrapid id="second">00</div>
			<input type="button" value="||" id="b3" onclick="pause()"/>
			<input type="button" value=">" id="b4" onclick="start()" />
			<input type="button" value="↺" id="b5" onclick="refresh()"/>
		</div>
		<audio id="music" preload="auto">
			<source src="css/庭園にて。在庭园中。-泠鸢翻唱(2019音质提升)(Cover:acane_madder) - 泠鸢yousa.mp3"></source>
		</audio>
	</body>
</html>


 5255
5255

 被折叠的 条评论
为什么被折叠?
被折叠的 条评论
为什么被折叠?
 到【灌水乐园】发言


