


halo的缓存模式
为什么要把halo的缓存模式拿出来说说呢?虽然halo个人博客是一个比较小的项目,但是缓存也必不可少。halo的缓存用到了作者自己编写的缓存组件,也帮忙配置了level-db cache 和redis cluster cache。深入了解halo的缓存模式有助于我自己对于缓存组件的运行与编写,增强对cache的了解!
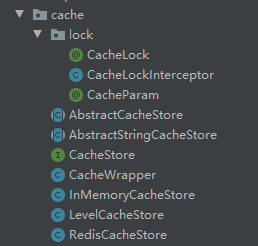
一、包结构
二、自定义注解和AOP
cache包下有一个lock包,lock包中定义了@CacheLock与@CacheParam两个注解。我们进入CacheLockItercepter拦截器来看看它到底做了什么?
@Slf4j
@Aspect
@Configuration
public class CacheLockInterceptor {
    ...
}
首先,看到@Aspect@Configuration两个注解我们可以判断这是一个切面类,那么我们看看这个切面到底增强了什么!
 @Around("@annotation(run.halo.app.cache.lock.CacheLock)")
    public Object interceptCacheLock(ProceedingJoinPoint joinPoint) throws Throwable {
        // Get method signature
        //获取被注解的方法
        MethodSignature methodSignature = (MethodSignature) joinPoint.getSignature();

        log.debug("Starting locking: [{}]", methodSignature.toString());

        // Get cache lock
        //获取CacheLock注解的实例
        CacheLock cacheLock = methodSignature.getMethod().getAnnotation(CacheLock.class);

        // Build cache lock key
        //生成缓存的key
        String cacheLockKey = buildCacheLockKey(cacheLock, joinPoint);

        log.debug("Built lock key: [{}]", cacheLockKey);


        try {
            // Get from cache
            Boolean cacheResult = cacheStore.putIfAbsent(cacheLockKey, CACHE_LOCK_VALUE, cacheLock.expired(), cacheLock.timeUnit());

            if (cacheResult == null) {
                throw new ServiceException("Unknown reason of cache " + cacheLockKey).setErrorData(cacheLockKey);
            }

            if (!cacheResult) {
                throw new FrequentAccessException("访问过于频繁,请稍后再试!").setErrorData(cacheLockKey);
            }

            // Proceed the method
            return joinPoint.proceed();
        } finally {
            // Delete the cache
            if (cacheLock.autoDelete()) {
                cacheStore.delete(cacheLockKey);
                log.debug("Deleted the cache lock: [{}]", cacheLock);
            }
        }
    }
很明显这是对被注解方法的增强,我们首先通过反射获取方法对象和注解的对象按照buildCacheLockKey(cacheLock, joinPoint)方法生成缓存的key,并将缓存信息存储到一个缓存空间中。
那么你可能会问,缓存的空间是怎么实现的?我猜测是一个map,因为他用了put方法。不相信?那我们来看看他的缓存实现。
三、缓存容器的实现

顶层定义了CacheStore接口,一层层实现,三个实现类都继承了AbstractStringCacheStore的抽象类,这个抽象类被halo作为解耦的一种方式。在HaloConfiguration中向容器中注入的是AbstractStringCacheStore,而并不是某个具体实现类,给与了用户自定义的选择。这种模式是值得我们学习的!!!
    @Bean
    @ConditionalOnMissingBean
    public AbstractStringCacheStore stringCacheStore() {
        AbstractStringCacheStore stringCacheStore;
        switch (haloProperties.getCache()) {
            case "level":
                stringCacheStore = new LevelCacheStore();
                break;
            case "redis":
                stringCacheStore = new RedisCacheStore(this.haloProperties);
                break;
            case "memory":
            default:
                //memory or default
                //默认的缓存实现
                stringCacheStore = new InMemoryCacheStore();
                break;

        }
        log.info("halo cache store load impl : [{}]", stringCacheStore.getClass());
        return stringCacheStore;

    }
从配置类我们可以看出默认情况下,我们采取的是 InMemoryCacheStore()的实现。这个类中定义了缓存过期的时间,缓存的容器ConcurrentHashMap<>,定时清理内存,保证线程安全的同步锁属性,以及如何增加或删除单个缓存的方法。
1、成员变量
/**
     * Cleaner schedule period. (ms)
     */
//过期时间
    private final static long PERIOD = 60 * 1000;

    /**
     * Cache container.
     */
//缓存容器
    private final static ConcurrentHashMap<String, CacheWrapper<String>> CACHE_CONTAINER = new ConcurrentHashMap<>();

    private final Timer timer;

    /**
     * Lock.
     */
//同步锁
    private final Lock lock = new ReentrantLock();
2、构造方法与成员方法
 public InMemoryCacheStore() {
        // Run a cache store cleaner
        timer = new Timer();
        timer.scheduleAtFixedRate(new CacheExpiryCleaner(), 0, PERIOD);
    }

    @Override
    Optional<CacheWrapper<String>> getInternal(String key) {
        return Optional.ofNullable(CACHE_CONTAINER.get(key));
    }

    @Override
    void putInternal(String key, CacheWrapper<String> cacheWrapper) {
        Assert.hasText(key, "Cache key must not be blank");
        Assert.notNull(cacheWrapper, "Cache wrapper must not be null");

        // Put the cache wrapper
        CacheWrapper<String> putCacheWrapper = CACHE_CONTAINER.put(key, cacheWrapper);

        log.debug("Put [{}] cache result: [{}], original cache wrapper: [{}]", key, putCacheWrapper, cacheWrapper);
    }

    @Override
    Boolean putInternalIfAbsent(String key, CacheWrapper<String> cacheWrapper) {
        Assert.hasText(key, "Cache key must not be blank");
        Assert.notNull(cacheWrapper, "Cache wrapper must not be null");
        lock.lock();
        try {
            // Get the value before
            Optional<String> valueOptional = get(key);

            if (valueOptional.isPresent()) {
                log.warn("Failed to put the cache, because the key: [{}] has been present already", key);
                return false;
            }

            // Put the cache wrapper
            putInternal(key, cacheWrapper);
            log.debug("Put successfully");
            return true;
        } finally {
            lock.unlock();
        }
    }

    @Override
    public void delete(String key) {
        Assert.hasText(key, "Cache key must not be blank");

        CACHE_CONTAINER.remove(key);
        log.debug("Removed key: [{}]", key);
    }

    @PreDestroy
    public void preDestroy() {
        log.debug("Cancelling all timer tasks");
        timer.cancel();
        clear();
    }

    private void clear() {
        CACHE_CONTAINER.clear();
    }

    /**
     * Cache cleaner.
     *
     * @author johnniang
     * @date 03/28/19
     */
    private class CacheExpiryCleaner extends TimerTask {

        @Override
        public void run() {
            CACHE_CONTAINER.keySet().forEach(key -> {
                if (!InMemoryCacheStore.this.get(key).isPresent()) {
                    log.debug("Deleted the cache: [{}] for expiration", key);
                }
            });
        }
    }


 1910
1910


 被折叠的 条评论
为什么被折叠?
被折叠的 条评论
为什么被折叠?
 到【灌水乐园】发言


