


提示:文章写完后,目录可以自动生成,如何生成可参考右边的帮助文档
提示:这里可以添加本文要记录的大概内容:
Vue.js是一种流行的JavaScript框架,用于构建交互式的Web界面。在Vue.js中,自定义指令允许开发者直接操作DOM元素,并将特定的行为绑定到DOM元素上。Vue.js提供了一些内置的指令(如v-if、v-for等),同时也允许开发者创建自己的自定义指令。
提示:以下是本篇文章正文内容,下面案例可供参考
一、全局自定义指令
链接: Vue.js 自定义指令中bind和unbind方法何时调用以及如何与生命周期函数(mounted/destroyed)相关
示例:pandas 是基于NumPy 的一种工具,该工具是为了解决数据分析任务而创建的。
二、自定义指令的生命周期
自定义指令有5个生命周期(也叫作钩子函数)分别是bind ,inserted,update,componentUpdate,unbind
- bind 只调用一次,指令第一次绑定到元素时候调用,用这个钩子可以定义一个绑定时执行一次的初始化动作。
- inserted:被绑定的元素插入父节点的时候调用(父节点存在即可调用,不必存在document中)
- update: 被绑定与元素所在模板更新时调用,而且无论绑定值是否有变化,通过比较更新前后的绑定值,忽略不必要的模板更新
- componentUpdate :被绑定的元素所在模板完成一次更新更新周期的时候调用
- unbind: 只调用一次,指令月元素解绑的时候调用
<!DOCTYPE html>
<html>
<head>
    <meta charset="UTF-8">
    <meta name="viewport" content="initial-scale=1.0,maximum-scale=1.0">
    <title>Title</title>
    <script src="js/vue.js"></script>
</head>
<body>
   <div id="app">
       <span v-hello="color3">{{message}}</span>
       <button @click="add"> 点击开始加1</button>
       <button onclick="jiebang()">解绑</button>
   </div>
</body>
<script>
    function jiebang(){
        app.$destroy();
    }
    Vue.directive("hello",{
        bind:function(el,bingind,vnode){
            el.style["color"] = bingind.value;
            console.log("1-bind");
        },
        inserted:function(){
            console.log("2-insert");
        },
        update:function(){
            console.log("3-update");
        },
        componentUpdated:function(){
            console.log('4 - componentUpdated');
        },
        unbind:function(){
            console.log('5 - unbind');
        }
    })
    var app = new Vue({
        el:"#app",
        data:{
            message:10,
            color3:"red"
        },
        methods:{
            add:function(){
                this.message++;
            }
        }
    })
</script>
</html>
三、自定义指令中的bind方法
在Vue.js中,自定义指令中的bind方法在指令第一次绑定到元素时调用。它接收四个参数:
– el:指令所绑定的元素,可以通过el访问DOM元素的属性和方法。
– binding:与指令关联的对象。可以通过binding.value访问指令的值。
– vnode:Vue编译生成的虚拟节点。
– oldVnode:上一个虚拟节点,仅在update和componentUpdated钩子中可用。
下面是一个简单的例子,展示了bind方法的使用:
      app.directive("hello",function(el,binding,vnode){
        el.style["color"]= binding.value;
     })
在 Vue.js 中,如果你定义一个指令而没有指定 inserted 或 bind,Vue 会隐式地将其视为你在 bind 钩子中定义了指令的行为。所以,你的代码实际上等同于:
app.directive("hello", {
  bind: function(el, binding, vnode) {
    el.style["color"] = binding.value;
  }
});
在上面的例子中,我们创建了一个名为”hello”的自定义指令。当该指令绑定到元素上时,bind方法会被调用,并将绑定的值应用到元素的颜色上。
<span v-hello="'red'">{{message}}</span>
四、全局自定义指令
1.vue2全局
文件结构


根目录下建立directives文件夹,在里面建立index.js
在 directive/index.js 代码如下(示例):
import Focus from './Focus'
import copy from './copy';
import op from './ceshi';

const directives = {  //汇总自定义指令
  Focus,//聚焦指令
  copy,
  op
}

export default {  //导出自定义指令
  install(app) {// 以安装的方式插到app中
    Object.keys(directives).forEach((key) => {    // 遍历directives对象的key
      app.directive(key, directives[key])  // 将每个directive注册到app中
    }),
      //单个直接
      app.directive("hello", function (el, binding, vnode) {
        el.style["color"] = binding.value;
      })

  }
}
在 Focus.js 代码
export default {

 // 当绑定元素和指令之间的绑定关系建立时立即调用
 bind:  (el,binding,vNode) =>{
    // 更新元素的背景颜色为红色
    el.style.background =  binding.value ||'yellow';

    // 添加鼠标指针样式
    el.style.cursor = 'pointer';

    // 添加鼠标进入事件监听器
    el.addEventListener('mouseenter', function () {
      el.style.color = 'aquamarine';
    });

    // 添加鼠标离开事件监听器
    el.addEventListener('mouseleave', function () {
      el.style.color = ''; // 恢复默认颜色
    });
  },
  unbind:function(el){
    // app.$destroy()
    el.style.background = 'red';
    // el.removeAttribute('v-op');
}
  }
在main.js 全局 (注意路径名字!)
import Directives from './directive'

Vue.use(Directives)
全局定义后,页面指令的使用方式,v-指令名=“指令方法”,指令方法可以是函数也可以是对象,
例如v-Focus="'red'" 或者 v-Focus 没有 binding:与指令关联的对象,使用默认样式
<div class="main_right_parms_title" v-Focus="'red'" @click="reElement">巡检视频</div>
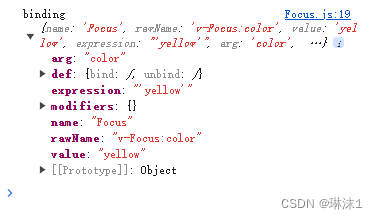
v-Focus:color=“‘yellow’” 第一个 arg 参数名 value 为 参数值 ,如果是函数 需要binding.value() 来执行这个函数,而不是只获取它的值。
 )
)
2.vue3 - vite
vue3中 自定义指令周期函数与vue2不同 ,其他一致,使用vue提供install来供我们开发新的插件及全局注册组件等
在 Focus.js 代码 代码如下(示例):
export default {
    beforeMount(el, binding) {
      // 获取传递的参数
      const arg = binding.arg //从这里获取参数名,也就是第一个color
      const value = binding.value //从这里获取参数值,也就是第二个color
      console.log('binding',binding);

      // 将参数保存在指令上下文中
      el._directiveContext = { arg, value }
      el.style.backgroundColor = value || '#f00' //DOM操作,设置背景颜色
    },
    updated(el, binding) {
      // 获取更新后的参数
      const value = binding.value //更新后的参数值
      el.style.backgroundColor = value //更新DOM
    }
  }
在vue页面使用,指令如下:
  <p v-highlight>这段文本会高亮显示,不传参</p>
  <p v-highlight:color="'yellow'">
    这段文本会高亮显示,用来演示动态传参,第一个color是参,第二个color是值
  </p>
3.vue3 - vite - ts
根目录下建立directives文件夹,在里面建立index.js
在 directive/index.js 代码如下(示例):
//  directive/index.js
import { App } from 'vue'
import Focus from './Focus'

const directivesList :any= {  //汇总自定义指令
    Focus,//聚焦指令
  }

const directives = {
  install: function (app: App<Element>) {
      Object.keys(directivesList).forEach(key => {
          // 注册自定义指令
          app.directive(key, directivesList[key]);
      });
  }
};

export default directives;
在 Focus.js内
import type { Directive, DirectiveBinding } from "vue";

interface ElType extends HTMLElement {
  // 扩展了 HTMLElement 接口的属性
  copyData: string | number;
  __handleClick__: any;
}

const  Focus :Directive= {
  mounted (el :ElType ,binding :DirectiveBinding) {
    console.log('red', el)
    el.style.background = 'yellow'
  }
}
export default  Focus
总结 与 封装指令
v-bind指令基本用法: https://blog.csdn.net/qq_41196217/article/details/117253289
Vue自定义指令封装: https://blog.csdn.net/zyplll/article/details/111937608
元素平滑上升: https://blog.csdn.net/weixin_44340123/article/details/134662489
Vue3+TypeScript封装常用自定义: https://blog.csdn.net/qq_42365152/article/details/124633877
提示:这里对文章进行总结:
防抖
<button v-debounce="{fn: handleClick, event: 'click', delay: 2100}">点击试试</button>
// debounce.js
  const debounce = {

    mounted(el, binding) {
      // 至少需要回调函数以及监听事件类型
      if (typeof binding.value.fn !== 'function' || !binding.value.event) return;
      let delay = 200; // 默认延迟时间
      el.timer = null;
      el.handler = function() {
        if (el.timer) {
          clearTimeout(el.timer);
          el.timer = null;
        };
        el.timer = setTimeout(() => {
          binding.value.fn.apply(this, arguments)
          el.timer = null;
        }, binding.value.delay || delay);
      }
      el.addEventListener(binding.value.event, el.handler)
    },
    // 元素卸载前也记得清理定时器并且移除监听事件
    beforeUnmount(el, binding) {
      if (el.timer) {
        clearTimeout(el.timer);
        el.timer = null;
      }
      el.removeEventListener(binding.value.event, el.handler)
    }
  }
  export default debounce;


 737
737

 被折叠的 条评论
为什么被折叠?
被折叠的 条评论
为什么被折叠?
 到【灌水乐园】发言


