


前言
最近准备用typescript写点东西,但是关于typescript的东西只是理论看过一些,最近的一次实践还是去年这个时候,当时我在携程实习,公司用的就是typescript。之后,自己也写了大大小小的项目或者demo,使用的都是javascript。刚好最近论文查重过了,时间暂时充裕了起来,就准备练习一下typescript和scss。实现的效果也很简单
代码放在了gitee上,仓库地址是ts-demo: vue2+typescript+scss入门练手项目(gitee.com),感兴趣的掘友可以看看源代码。
实现思路
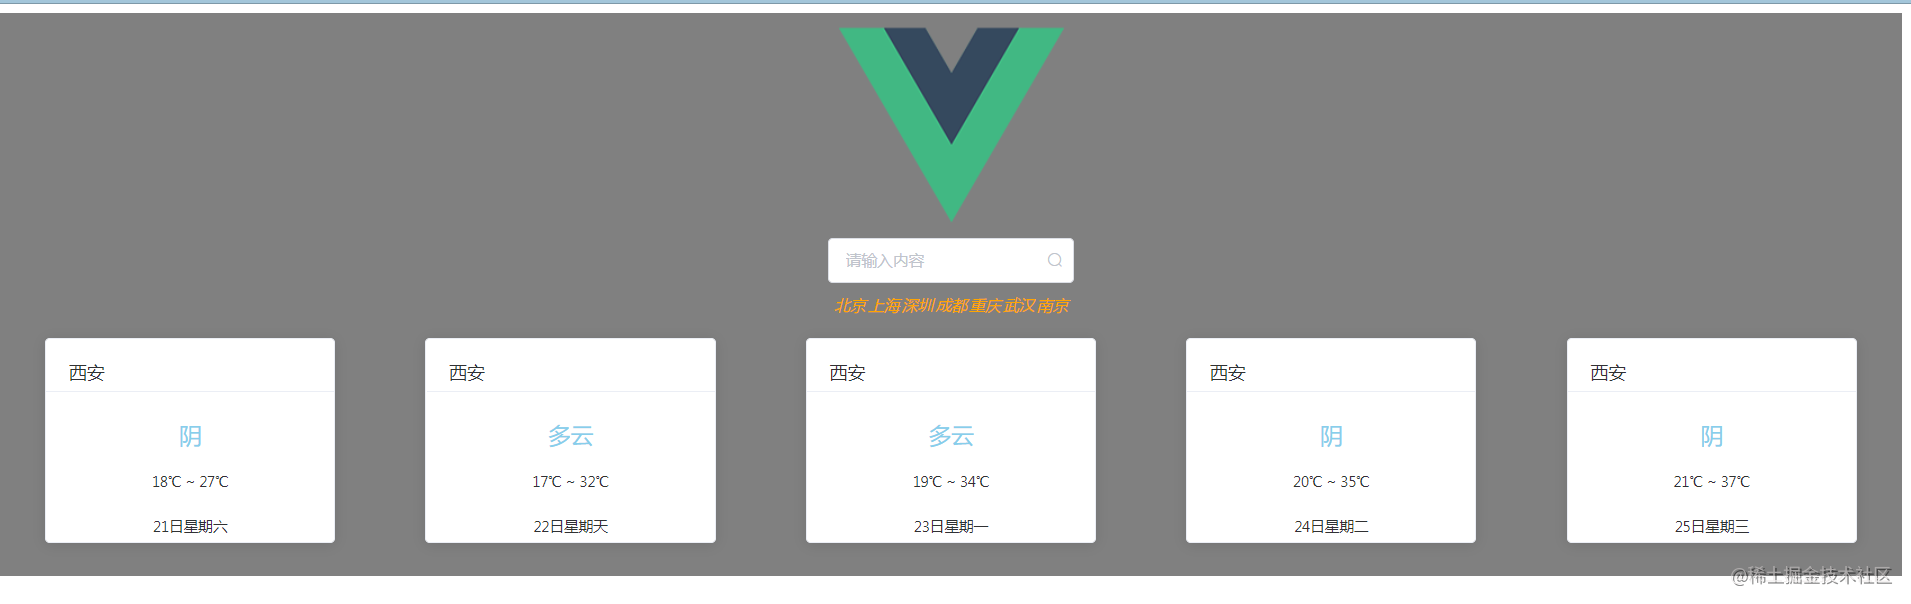
整体的实现思路比较简单,页面也只有一个,包含三部分,搜索框、热门城市和天气预报,组件库用的是ElementUI。
搜索框
searchBox.vue
<template>
  <div id="search">
    <el-input
      placeholder="请输入内容"
      suffix-icon="el-icon-search"
      v-model="city"
      @change="enter"
      @input="edit"
    >
    </el-input>
  </div>
</template>

<script lang="ts">
import { Vue, Component, Emit } from "vue-property-decorator";

@Component({
  components: {},
})
export default class searchBox extends Vue {
  city = "";

  @Emit("sendCity")
  enter(value: string): string {
    //在输入框失去焦点或用户按下回车时触发(会导致一些bug!!!)
    console.log("按下回车,搜索地是:" + value);
    return value;
  }

  edit(value: string | number): void {
    console.log("正在输入中......" + value);
  }
}
</script>
这里不写@component注解,会导致组件中的数据和处理方法不是响应式的,刚开始写的时候根本没有意识到这个问题,点击页面中的输入框el-input组件根本没反应,一直觉得是逻辑或者element有问题,后来查了资料才知道是@component没有写。searchBox子组件需要把自己的数据传给weather组件,两个组件为兄弟关系,通信的话可以借助父组件Home组件。在ts中,组件间的数据传递,通过@Emit,子组件将数据发送出去,父组件通过函数接收,而父组件与子组件通信,通过@Prop。
Home.vue
<template>
  <div class="home">
    <img alt="Vue logo" src="../assets/logo.png" />
    <searchBox @sendCity="sendCity" />
    <popularCity @popularCity="clickCity" />
    <weather :searchCity="city" :popularCity="city" />
  </div>
</template>

<script lang="ts">
import { Component, Vue } from "vue-property-decorator";
import searchBox from "@/components/searchBox.vue";
import popularCity from "@/components/popularCity.vue";
import weather from "@/components/weather.vue";

@Component({
  components: {
    searchBox,
    popularCity,
    weather,
  },
})
export default class Home extends Vue {
  city = "";

  sendCity(city: string): void {
    //搜索框组件向home组件传值
    this.city = city;
  }

  clickCity(city: string): void {
    //热门城市传值
    this.city = city;
  }
}
</script>
热门城市
<template>
  <div id="city">
    <div v-for="(item, index) in message" :key="index">
      <el-button class="box-city" type="text" @click="clickCity(item)">{{
        item
      }}</el-button>
    </div>
  </div>
</template>

<script lang="ts">
import { Vue, Component, Emit } from "vue-property-decorator";

@Component({
  components: {},
})
export default class searchBox extends Vue {
  message = ["北京", "上海", "深圳", "成都", "重庆", "武汉", "南京"];

  @Emit("popularCity")
  clickCity(city: string): string {
    console.log("点击热门城市:" + city);
    return city;
  }
}
</script>

<style lang="scss" scoped>
@import "../style/index.scss";
#city {
  width: 40%;
  @include box-row-flex(center);

  .box-city {
    width: 10%;
    font-style: italic;
    color: $text-color;
    font-size: $font-size;
  }
}
</style>
这个没有什么好说的,主要就是进行了scss的一些尝试,比如@mixin
天气
weather.vue
<template>
  <div id="weather">
    <div v-for="(item, index) in weatherArr" :key="index">
      <el-card class="box-card">
        <div slot="header" class="clearfix">
          <span>{{ city }}</span>
        </div>
        <div class="content">
          <div class="type">{{ item.type }}</div>
          <div class="temp">
            {{ item.low | temperatureFilter }} ~
            {{ item.high | temperatureFilter }}
          </div>
          <div class="time">{{ item.date }}</div>
        </div>
      </el-card>
    </div>
  </div>
</template>

<script lang="ts">
import weather from "../interface/IWeather";
import getWeather from "../utils/getWeather";
import { Vue, Component, Prop, Watch } from "vue-property-decorator";

@Component({
  components: {},
  filters: {
    //过滤器
    temperatureFilter: (value: string): string => {
      return value.substring(2);
    },
  },
})
export default class searchBox extends Vue {
  @Prop({
    type: String,
    default: "",
  })
  searchCity!: string;

  city = "西安";
  weatherArr: Array<weather> = [];

  @Watch("searchCity")
  async handleWatch(value: string): Promise<void> {
    console.log("搜索框或热门城市传入的地区是:" + value);

    const res = await getWeather(value);
    console.log(res);
    if (res.status == 1000) {
      this.city = value;
      this.weatherArr.length = 0; //清空当前数组存入的数据
      this.weatherArr.push(...res.weather);
    } else if (res.status == 1002) {
      this.$message({
        message: res.desc as string,
        type: "error",
      });
    }
  }

  async created(): Promise<void> {
    const res = await getWeather("西安");
    if (res.status == 1000) {
      this.weatherArr.push(...res.weather);
    } else if (res.status == 1002) {
      this.$message({
        message: res.desc as string,
        type: "error",
      });
    }

    console.log(res);
  }
}
</script>
这里是整个demo的核心,负责接收其他组件的数据,发送请求,获取天气数据。
先来说一下其他组件传递数据,上面说了父子组件通信通过@Prop,这里用了@Watch检测数据变化,如果点击了某个热门城市或者搜索框按下回车键,会发送数据到这部分,数据来了就通过axios发送请求,获取天气数据。这里关于发送网络请求的部分,进行了封装。
同时,根据接口的返回数据写interface,这里为了展示数据(同时为了根据不同的返回码status来提示不同的消息),创建接口IWeather,主要用来抽象天气数据,IFiveWeather用来抽象接口返回形式(接口的代码就不在此展示)
getWeather.ts
import axios from "axios";

//获取某地的天气
async function getWeather(city: string): Promise<IFiveWeather> {
  const weatherArr: IFiveWeather = {
    status: 0,
    weather: [],
  };
  try {
    const res = await axios.get(
      `http://wthrcdn.etouch.cn/weather_mini?city=${city}`
    );

    const status: number = res.data.status;

    switch (status) {
      //输入城市错误的返回码
      case 1002:
        weatherArr.status = 1002;
        weatherArr.desc = res.data.desc;
        weatherArr.weather = [];
        break;
      //数据返回成功
      case 1000:
        weatherArr.status = 1000;
        weatherArr.weather.push(...res.data.data.forecast);
    }
  } catch (error) {
    console.log("天气接口出错啦:" + error);
  }

  return weatherArr;
}

export default getWeather;
资源
Sass世界上最成熟、稳定和强大的CSS扩展语言 | Sass中文网
页面参考地址:简单的天气预报界面


 1567
1567


 被折叠的 条评论
为什么被折叠?
被折叠的 条评论
为什么被折叠?
 到【灌水乐园】发言


