


文章目录
PNG文件转YUV
前言:本次实验选用了PNG转YUV,做的过程十分煎熬…主要原因是PNG的IDAT数据块的解码部分没有自己手写轮子,直接调用的Python的zlib库,所以每个像素解压缩出来的数据分布完全没有概念,而且第一次选的图片还是带
α
\alpha
α通道的…所以这一次的实验代码并不具备很好的鲁棒性,仅供本实验使用,引用从慎!
PNG文件格式
这一部分的介绍可以看我之前写的PNG格式文件分析
YUV文件格式
什么是YUV格式文件?
YUV是指亮度参量和色度参量分开表示的像素格式,其中Y表示亮度信号(Luma),也就是灰度值,U和V表示的是色度信号。通常来说,人们一般指的YUV格式既是YCbCr格式,YCbCr格式有很多中采样格式,如4:4:4,4:2:2,4:2:0和4:1:1等。
YUV采样
色度通道的采样率可以低于亮度通道,而不会显著降低感知质量。
4:4:4 表示完全取样。
4:2:2 表示2:1的水平取样,垂直完全采样。
4:2:0 表示2:1的水平取样,垂直2:1采样。
4:1:1 表示4:1的水平取样,垂直完全采样。
本实验中所采用的格式为4:2:0采样,下面重点介绍该采样格式。
YUV 4:2:0
每四个Y信号共用一对UV信号。

在存储该采样格式的YUV文件时,首先存储每一个像素的Y值,然后存储UV值,在这里,UV有两种存储方式:YUV420sp和YUV420p。
下面是YUV420sp的存储格式:
这是YUV420p的存储格式:
可以看到,YUV420sp中的UV分量是交织存储的,本次实验中我们采用YUV420sp的存储方式。
RGB转YUV
我们一般得到的都是图像的原始RGB信息,那么如何将RGB信号转换成YUV信号?
我们这里直接给出数字RGB转换成YUV的公式:(BT.601标准)
Y
=
16
+
0.257
∗
R
+
0.504
∗
G
+
0.098
∗
B
Y = 16 + 0.257 * R + 0.504 * G+ 0.098 * B
Y=16+0.257∗R+0.504∗G+0.098∗B
C
b
=
128
−
0.148
∗
R
−
0.291
∗
G
+
0.439
∗
B
Cb = 128 - 0.148 * R - 0.291 * G+ 0.439 * B
Cb=128−0.148∗R−0.291∗G+0.439∗B
C
r
=
128
+
0.439
∗
R
−
0.368
∗
G
−
0.071
∗
B
Cr = 128 + 0.439 * R - 0.368 * G - 0.071 * B
Cr=128+0.439∗R−0.368∗G−0.071∗B
由此我们就可以实现RGB到YUV的转换。
实验过程
获取PNG文件信息
我们可以通过运行以下代码获取文件的基本数据块信息:
#include <iostream>
#include <fstream>
#include <cstdio>
#include <vector>
#include <map>
#include <set>
#define uchar unsigned char

using namespace std;

const string path = "test.png";
map<string, vector<int> > mp;
set <string> ancillary_chunk;

struct FileHeader
{
    uchar head[8];
    void GetHead(ifstream &in) {
        in.read((char *)head, 8);
    }
    void Print() {
        for (auto i : head) cout << (int) i << ' ';
        cout << endl;
    }
}file_header;

struct Chunks
{
    unsigned int length = 0;
    uchar type[4];
    string c_type = "";
    uchar *data;
    uchar CRC[4];
    void GetChunk(ifstream & in) {
        uchar * buffer = new uchar[4];
        in.read((char *)buffer, 4);
        for (int i = 0;i < 4;i ++)
            length = (length << 8) + buffer[i];
        in.read((char *)type, 4);
        if (length) {
            data = new uchar[length];
            in.read((char*)data, length);
        }
        in.read((char *)CRC, 4);
        for (auto i : type) c_type += (int)i;
        return ;
    }
}chunk;

int main()
{
    ifstream in(path, ios :: binary);
    file_header.GetHead(in);
    int pos = 0;
    while (true) {
        Chunks tmp;
        tmp.GetChunk(in);
        mp[tmp.c_type].push_back(pos);
        pos ++;
        if (tmp.c_type == "IEND") break;
        if (tmp.c_type != "IDAT" && tmp.c_type != "IHDR" && tmp.c_type != "PLTE") ancillary_chunk.insert(tmp.c_type);
        delete(tmp.data);
    }
    cout << "All Chunks" << endl;
    for (auto &i : mp) {
        cout << "Chunk Type :" << i.first  << endl;
    }
    cout << "Ancillary Chunks" << endl;
    for (auto &i : ancillary_chunk) cout << i << endl;
}
我们选取其中的一个PNG文件来展示结果:
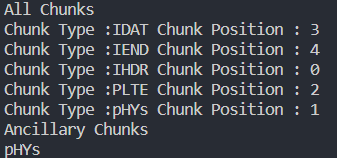
我们可以得到该文件的数据块组成。
获取IHDR信息
我们通过添加以下代码来实现:
struct iHDR
{
    unsigned int width, height;
    unsigned char bit_depth, color_type, compression_method;
    unsigned char filter_method, interlace_method;
    void GetIHDR(unsigned char* buffer)
    {
        for( int i = 0; i < 4; ++ i ) { width = (width << 8) + buffer[i]; }
        for( int i = 0; i < 4; ++ i ) { height = (height << 8) + buffer[i + 4]; }
        int pos = 8;
        for(auto i : {&bit_depth, &color_type, &compression_method, &filter_method, &interlace_method})
            *i = buffer[pos ++];
    }
    void Print()
    {
        cout << width << " " << height << endl;
        for( auto i : {bit_depth, color_type, compression_method, filter_method, interlace_method})
            cout << (int)i << " ";
        cout << endl;
    }
}ihdr;
在主程序中,添加以下代码:
//获取IHDR信息
ihdr.GetIHDR(v[position].data);
ihdr.Print();
还是选取一张图片我们来看一下结果:
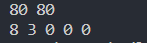
根据PNG的格式定义,我们可以得到以下信息:
| 名称 | 取值 |
|---|---|
| width | 80 |
| height | 80 |
| Bit depth | 8 |
| ColorType | 3,带有调色板 |
| Compression method | 0 ,deflate压缩算法 |
| Filter method | 0,即滤波方法 0 |
| Interlace method | 0,非隔行扫描 |
获取PLTE调色板信息
添加如下代码:
struct pLTE
{
    int r, g, b;
    static pLTE * GetPLET(uchar* inBuffer) {
        int plte_size = 1 << ihdr.bit_depth;
        pLTE* plte = new pLTE[plte_size];
        int pos = 0;
        for (int i = 0;i < plte_size;i ++) {
            for (auto j : {&plte[i].r, &plte[i].g, &plte[i].b}) {
                *j = inBuffer[pos ++];
            }
        }
        return plte;
    }
    void Print() {
        for (auto i : {r, g, b}) cout << i << ' ';
        cout << endl;
        return ;
    }
}*plte;
即可获取调色板信息
获取IDAT信息
在代码中添加如下定义:
void TranslateIDAT(ofstream& out, uchar* buffer, int bufferLength)
{
    out.write((char*)buffer, bufferLength);
    return ;
}

void OutputIDAT()
{
    ifstream in(out_path, ios :: binary);
    if (in.is_open()) return ;
    ofstream out(out_path, ios :: binary);
    for (auto &i : mp["IDAT"]) TranslateIDAT(out, v[i].data, v[i].length);
    return ;
}
通过调用OutputIDAT即可获取。
对IDAT数据块进行解压缩
PNG的IDAT数据块实际是经过压缩的,这里由于并不清楚压缩算法,所以直接采用Python的zlib库进行解压缩。
编写的Python部分代码为:
import zlib
list_dec = []
f = open('C:\\Users\\sdlwq\\Desktop\\Github\\Data-Compression\\Work\\PNG2YUV\\out.idat', 'rb')
data = f.read()
new_data = zlib.decompress(data)
fp = open('in.idat','wb')
fp.write(new_data)
fp.close()
print('done')
即可完成解码工作。
将解压缩的IDAT数据进行转换
添加如下代码:
void png2yuv(string out_yuv_path, uchar* buffer, uint buffer_length)
{
    unsigned char* y, * u, * v;
    int width = ihdr.width, height = ihdr.height;
    int y_size = width * height;
    int uv_size = y_size / 4;
    cout << y_size << ' ' << uv_size << endl;
    y = new unsigned char[y_size];
    u = new unsigned char[uv_size];
    v = new unsigned char[uv_size];
    int uv_pos = 0, y_pos = 0;
    for( int i = 0; i < buffer_length; ++ i )
    {
        if((i + 1) % (width + 1) == 0) continue;
        int r, g, b; auto plte_tmp = plte[buffer[i]];
        r = plte_tmp.r, g = plte_tmp.g, b = plte_tmp.b; //先从调色板转换成为真彩
        int h = i / (width + 1 ), w = i % (width + 1);
        //转换成为4:2:0的YUV文件
        y[y_pos ++] = ((66 * r + 129 * g + 25 * b + 128) >> 8) + 16;
        if((h & 1) || (w & 1)) continue;
        u[uv_pos] = ((-38 * r - 74 * g + 112 * b + 128) >> 8) + 128;
        v[uv_pos ++] =  ((112 * r - 94 * g - 18 * b + 128) >> 8) + 128;
    }
    cout << y_pos << ' ' << uv_pos << endl;
    ofstream out(out_yuv_path, ios::binary);
    out.write((char*)y, y_size);
    out.write((char*)u, uv_size); out.write((char*)v, uv_size);
    out.close();
    for(auto i : {&y, &u, &v}) delete[] *i;
    cout << "ok" << endl;
    return ;
}
在主函数中,添加如下语句:
    // 解压缩IDAT后进行转换
    in.open(in_path, ios :: binary);
    cout << "Ok" << endl;
    in.seekg(0, ios :: end);
    int length = in.tellg();
    cout << length << endl;
    in.seekg(0, ios :: beg);
    uchar* data_buffer = new uchar[length];
    in.read((char*)data_buffer, length);
    png2yuv(out_yuv, data_buffer, length);
    return 0;
最后的完整代码如下所示:
#include <iostream>
#include <fstream>
#include <cstdio>
#include <vector>
#include <map>
#include <set>
#define uchar unsigned char
#define uint unsigned int

using namespace std;

struct FileHeader
{
    uchar head[8];
    void GetHead(ifstream &in) {
        in.read((char *)head, 8);
    }
    void Print() {
        for (auto i : head) cout << (int) i << ' ';
        cout << endl;
    }
}file_header;

struct Chunks
{
    unsigned int length = 0;
    char type[4];
    string c_type = "";
    unsigned char *data;
    unsigned char CRC[4];
    void GetChunk( ifstream &in )
    {
        unsigned char* buffer = new unsigned char[4];
        in.read((char*)buffer,4);
        for( int i = 0; i < 4; ++ i ) { length = (length << 8) + buffer[i]; }
        in.read(type,4);
        if( length != 0 ) {
            data = new unsigned char[length];
            in.read((char*)data, length);
        }
        in.read((char*)CRC,4);
        for( auto i : type ) c_type += (int)i;
        return;
    }
};

const string path = "Panda80.png";
const string out_path = "out.idat";
const string in_path = "in.idat";
const string out_yuv = "out4.yuv";

map<string, vector<int> > mp;
set <string> ancillary_chunk;
vector<Chunks> v;

struct iHDR
{
    unsigned int width, height;
    unsigned char bit_depth, color_type, compression_method;
    unsigned char filter_method, interlace_method;
    void GetIHDR(unsigned char* buffer)
    {
        for( int i = 0; i < 4; ++ i ) { width = (width << 8) + buffer[i]; }
        for( int i = 0; i < 4; ++ i ) { height = (height << 8) + buffer[i + 4]; }
        int pos = 8;
        for(auto i : {&bit_depth, &color_type, &compression_method, &filter_method, &interlace_method})
            *i = buffer[pos ++];
    }
    void Print()
    {
        cout << width << " " << height << endl;
        for( auto i : {bit_depth, color_type, compression_method, filter_method, interlace_method})
            cout << (int)i << " ";
        cout << endl;
    }
}ihdr;

void TranslateIDAT(ofstream& out, uchar* buffer, int bufferLength)
{
    out.write((char*)buffer, bufferLength);
    return ;
}

void OutputIDAT()
{
    ifstream in(out_path, ios :: binary);
    if (in.is_open()) return ;
    ofstream out(out_path, ios :: binary);
    for (auto &i : mp["IDAT"]) TranslateIDAT(out, v[i].data, v[i].length);
    return ;
}

struct pLTE
{
    int r, g, b;
    static pLTE * GetPLET(uchar* inBuffer) {
        int plte_size = 1 << ihdr.bit_depth;
        pLTE* plte = new pLTE[plte_size];
        int pos = 0;
        for (int i = 0;i < plte_size;i ++) {
            for (auto j : {&plte[i].r, &plte[i].g, &plte[i].b}) {
                *j = inBuffer[pos ++];
            }
        }
        return plte;
    }
    void Print() {
        for (auto i : {r, g, b}) cout << i << ' ';
        cout << endl;
        return ;
    }
}*plte;

void png2yuv(string out_yuv_path, uchar* buffer, uint buffer_length)
{
    unsigned char* y, * u, * v;
    int width = ihdr.width, height = ihdr.height;
    int y_size = width * height;
    int uv_size = y_size / 4;
    cout << y_size << ' ' << uv_size << endl;
    y = new unsigned char[y_size];
    u = new unsigned char[uv_size];
    v = new unsigned char[uv_size];
    int uv_pos = 0, y_pos = 0;
    for( int i = 0; i < buffer_length; ++ i )
    {
        if((i + 1) % (width + 1) == 0) continue;
        int r, g, b; auto plte_tmp = plte[buffer[i]];
        r = plte_tmp.r, g = plte_tmp.g, b = plte_tmp.b;
        int h = i / (width + 1 ), w = i % (width + 1);
        y[y_pos ++] = ((66 * r + 129 * g + 25 * b + 128) >> 8) + 16;
        if((h & 1) || (w & 1)) continue;
        u[uv_pos] = ((-38 * r - 74 * g + 112 * b + 128) >> 8) + 128;
        v[uv_pos ++] =  ((112 * r - 94 * g - 18 * b + 128) >> 8) + 128;
    }
    cout << y_pos << ' ' << uv_pos << endl;
    ofstream out(out_yuv_path, ios::binary);
    out.write((char*)y, y_size);
    out.write((char*)u, uv_size); out.write((char*)v, uv_size);
    out.close();
    for(auto i : {&y, &u, &v}) delete[] *i;
    cout << "ok" << endl;
    return ;
}

int main()
{
    ifstream in(path, ios :: binary);
    file_header.GetHead(in);
    int pos = -1;
    while (true) {
        Chunks tmp;
        tmp.GetChunk(in);
        v.push_back(tmp); pos ++;
        mp[tmp.c_type].push_back(pos);
        if (tmp.c_type == "IEND") break;
        if (tmp.c_type != "IDAT" && tmp.c_type != "IHDR" && tmp.c_type != "PLTE") ancillary_chunk.insert(tmp.c_type);
    }
    in.close();
    cout << "All Chunks" << endl;
    for (auto &i : mp) {
        cout << "Chunk Type :" << i.first << " Chunk Position : ";
        auto &v = i.second;
        for (auto &j : v) cout << j << ' ';
        cout << endl;
    }
    cout << "Ancillary Chunks" << endl;
    for (auto &i : ancillary_chunk) cout << i << endl;
    int position = mp["IHDR"][0];
    //获取IHDR信息
    ihdr.GetIHDR(v[position].data);
    ihdr.Print();
    //获取IDAT信息
    OutputIDAT();
    position = mp["PLTE"][0];
    plte = pLTE::GetPLET(v[position].data);
    cout << "OK" << endl;

    // 解压缩IDAT后进行转换
    in.open(in_path, ios :: binary);
    cout << "Ok" << endl;
    in.seekg(0, ios :: end);
    int length = in.tellg();
    cout << length << endl;
    in.seekg(0, ios :: beg);
    uchar* data_buffer = new uchar[length];
    in.read((char*)data_buffer, length);
    png2yuv(out_yuv, data_buffer, length);
    return 0;
}
import zlib
list_dec = []
f = open('C:\\Users\\sdlwq\\Desktop\\Github\\Data-Compression\\Work\\PNG2YUV\\out.idat', 'rb')
data = f.read()
new_data = zlib.decompress(data)
fp = open('in.idat','wb')
fp.write(new_data)
fp.close()
print('done')
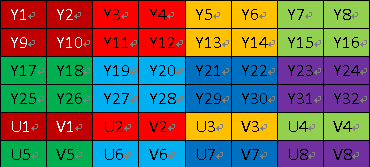
原始PNG图像:

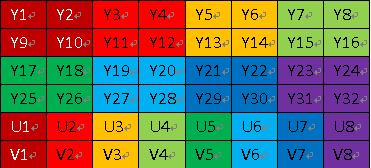
转换出的YUV图像:
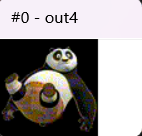
效果还是比较好的。
多个YUV合成
我们把四幅PNG图片转换成YUV格式,然后每一个YUV文件重复50次,合成一个可播放的200帧YUV视频。
编写的代码如下所示:
#include <iostream>
#include <fstream>
#include <cstdio>
#include <vector>
#include <map>
#include <set>
#define uchar unsigned char
#define uint unsigned int

using namespace std;

const string path1 = "out1.yuv";
const string path2 = "out2.yuv";
const string path3 = "out3.yuv";
const string path4 = "out4.yuv";
const string out_yuv_path = "ans.yuv";

int main()
{
    uchar* outputYuv = NULL;
    ifstream in1(path1, ios :: binary);
    ifstream in2(path2, ios :: binary);
    ifstream in3(path3, ios :: binary);
    ifstream in4(path4, ios :: binary);

    int length = 0, len1 = 0, len2 = 0, len3 = 0, len4 = 0;
    in1.seekg(0, ios :: end);
    len1 += in1.tellg();
    length += len1;
    in1.seekg(0, ios :: beg);

    in2.seekg(0, ios :: end);
    len2 += in2.tellg();
    length += len2;
    in2.seekg(0, ios :: beg);

    in3.seekg(0, ios :: end);
    len3 += in3.tellg();
    length += len3;
    in3.seekg(0, ios :: beg);

    in4.seekg(0, ios :: end);
    len4 += in4.tellg();
    length += len4;
    in4.seekg(0, ios :: beg);

    outputYuv = new uchar[length * 50];
    uchar* data_buffer = new uchar[len1];
    in1.read((char*)data_buffer, len1);
    for (int i = 0;i < 50;i ++) {
        for (int j = 0;j < len1;j ++) {
            outputYuv[j + i * len1] = data_buffer[j];
        }
    }
    in2.read((char*)data_buffer, len2);
    for (int i = 0;i < 50;i ++) {
        for (int j = 0;j < len2;j ++) {
            outputYuv[j + (i + 50) * len2] = data_buffer[j];
        }
    }
    in3.read((char*)data_buffer, len3);
    for (int i = 0;i < 50;i ++) {
        for (int j = 0;j < len4;j ++) {
            outputYuv[j + (i + 100) * len3] = data_buffer[j];
        }
    }
    in4.read((char*)data_buffer, len4);
    for (int i = 0;i < 50;i ++) {
        for (int j = 0;j < len3;j ++) {
            outputYuv[j + (i + 150) * len4] = data_buffer[j];
        }
    }
    ofstream out(out_yuv_path, ios :: binary);
    out.write((char*)outputYuv, 50 * length);
    delete [] data_buffer;
    delete [] outputYuv;
    return 0;
}
最后合成的视频如下:

PS:选的图片太小了,没法再加入姓名了QAQ
csdn不吃YUV的文件,于是用ffmpeg转成了gif(感谢sdx老师)
ffmpeg的指令如下:
ffmpeg -video_size 80x80 -i ans.yuv -y ans.gif


 1368
1368


 被折叠的 条评论
为什么被折叠?
被折叠的 条评论
为什么被折叠?
 到【灌水乐园】发言


