


SSM框架整合进阶案例详解
此案例的初衷,是在之前基础案例整合的基础之上,对使用SSM框架开发JavaWeb项目,所做的一个实战演练!
1、数据库设计
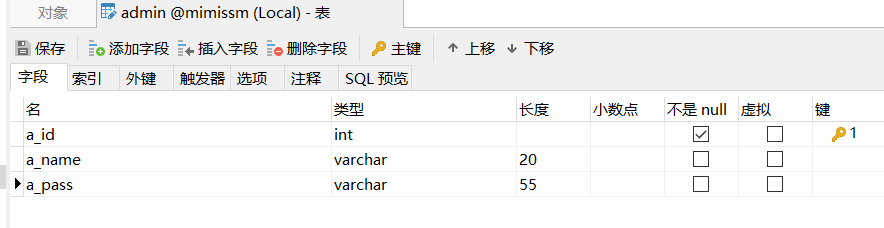
- 管理员表admin
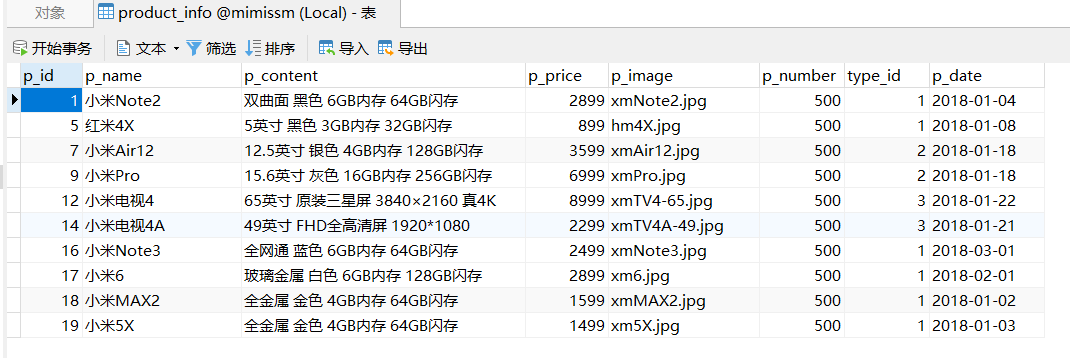
- 商品信息表product_info

- 商品类型表product_type


2、配置文件
注意:执行这步操作之前,初始化项目工作已经完成
2.1 导入相关依赖
<!-- 集中定义依赖版本号 -->
<properties>
    <spring.version>5.2.5.RELEASE</spring.version>
    <mybatis.version>3.5.7</mybatis.version>
    <mybatis.spring.version>2.0.6</mybatis.spring.version>
    <mybatis.paginator.version>1.2.15</mybatis.paginator.version>
    <slf4j.version>1.6.4</slf4j.version>
    <pagehelper.version>5.1.2</pagehelper.version>
    <jackson.version>2.9.6</jackson.version>
    <servlet-api.version>3.0.1</servlet-api.version>
    <jsp-api.version>2.0</jsp-api.version>
    <mysql.version>8.0.21</mysql.version>
    <c3p0.version>0.9.5.5</c3p0.version>
    <jstl.version>1.2</jstl.version>
    <junit.version>4.12</junit.version>
    <lombok.version>1.18.20</lombok.version>
</properties>

<dependencies>
    <!-- Mybatis -->
    <dependency>
        <groupId>org.mybatis</groupId>
        <artifactId>mybatis</artifactId>
        <version>${mybatis.version}</version>
    </dependency>
    <dependency>
        <groupId>org.mybatis</groupId>
        <artifactId>mybatis-spring</artifactId>
        <version>${mybatis.spring.version}</version>
    </dependency>

    <!--Spring-->
    <dependency>
        <groupId>org.springframework</groupId>
        <artifactId>spring-webmvc</artifactId>
        <version>${spring.version}</version>
    </dependency>
    <dependency>
        <groupId>org.springframework</groupId>
        <artifactId>spring-jdbc</artifactId>
        <version>${spring.version}</version>
    </dependency>

    <!-- spring -->
    <dependency>
        <groupId>org.springframework</groupId>
        <artifactId>spring-context</artifactId>
        <version>${spring.version}</version>
    </dependency>
    <dependency>
        <groupId>org.springframework</groupId>
        <artifactId>spring-beans</artifactId>
        <version>${spring.version}</version>
    </dependency>
    <dependency>
        <groupId>org.springframework</groupId>
        <artifactId>spring-aspects</artifactId>
        <version>${spring.version}</version>
    </dependency>
    <dependency>
        <groupId>org.springframework</groupId>
        <artifactId>spring-jms</artifactId>
        <version>${spring.version}</version>
    </dependency>
    <dependency>
        <groupId>org.springframework</groupId>
        <artifactId>spring-context-support</artifactId>
        <version>${spring.version}</version>
    </dependency>
    <dependency>
        <groupId>org.springframework</groupId>
        <artifactId>spring-test</artifactId>
        <version>${spring.version}</version>
    </dependency>

    <dependency>
        <groupId>com.github.miemiedev</groupId>
        <artifactId>mybatis-paginator</artifactId>
        <version>${mybatis.paginator.version}</version>
    </dependency>
    <dependency>
        <groupId>com.github.pagehelper</groupId>
        <artifactId>pagehelper</artifactId>
        <version>${pagehelper.version}</version>
    </dependency>

    <!-- Jackson Json处理工具包 -->
    <dependency>
        <groupId>com.fasterxml.jackson.core</groupId>
        <artifactId>jackson-databind</artifactId>
        <version>${jackson.version}</version>
    </dependency>

    <!--文件异步上传使用-->
    <dependency>
        <groupId>commons-io</groupId>
        <artifactId>commons-io</artifactId>
        <version>2.4</version>
    </dependency>
    <dependency>
        <groupId>commons-fileupload</groupId>
        <artifactId>commons-fileupload</artifactId>
        <version>1.3.1</version>
    </dependency>

    <dependency>
        <groupId>org.json</groupId>
        <artifactId>json</artifactId>
        <version>20170516</version>
    </dependency>

    <dependency>
        <groupId>javax.servlet</groupId>
        <artifactId>javax.servlet-api</artifactId>
        <version>${servlet-api.version}</version>
    </dependency>

    <dependency>
        <groupId>javax.servlet</groupId>
        <artifactId>jsp-api</artifactId>
        <version>${jsp-api.version}</version>
    </dependency>
    <!-- JSP相关 -->
    <dependency>
        <groupId>jstl</groupId>
        <artifactId>jstl</artifactId>
        <version>${jstl.version}</version>
    </dependency>
    <!-- MySql -->
    <dependency>
        <groupId>mysql</groupId>
        <artifactId>mysql-connector-java</artifactId>
        <version>${mysql.version}</version>
    </dependency>

    <!--数据库连接池:c3p0-->
    <dependency>
        <groupId>com.mchange</groupId>
        <artifactId>c3p0</artifactId>
        <version>${c3p0.version}</version>
    </dependency>

    <!-- junit -->
    <dependency>
        <groupId>junit</groupId>
        <artifactId>junit</artifactId>
        <version>${junit.version}</version>
    </dependency>

    <dependency>
        <groupId>org.projectlombok</groupId>
        <artifactId>lombok</artifactId>
        <version>${lombok.version}</version>
    </dependency>

</dependencies>

<!--静态资源导出问题,识别所有的配置文件-->
<!--  在build中配置resources,来防止我们资源导出失败的问题  -->
<build>
    <resources>
        <resource>
            <directory>src/main/resources</directory>
            <includes>
                <include>**/*.properties</include>
                <include>**/*.xml</include>
            </includes>
            <filtering>false</filtering>
        </resource>
        <resource>
            <directory>src/main/java</directory>
            <includes>
                <include>**/*.properties</include>
                <include>**/*.xml</include>
            </includes>
            <filtering>false</filtering>
        </resource>
    </resources>
    <!-- 插件配置 -->
    <plugins>
        <plugin>
            <groupId>org.apache.maven.plugins</groupId>
            <artifactId>maven-compiler-plugin</artifactId>
            <configuration>
                <source>1.8</source>
                <target>1.8</target>
                <encoding>UTF-8</encoding>
            </configuration>
        </plugin>
    </plugins>
</build>
接下来在该位置添加如下配置文件
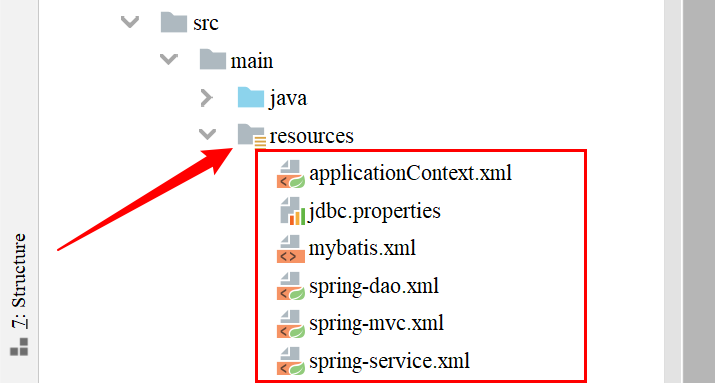
2.2 jdbc.properties
jdbc.driver=com.mysql.cj.jdbc.Driver
jdbc.url=jdbc:mysql://localhost:3306/mimissm?useSSL=false&serverTimezone=Asia/Shanghai&allowPublicKeyRetrieval=true
jdbc.username=root
jdbc.password=mc123456
2.3 mybatis-config.xml
<?xml version="1.0" encoding="UTF-8" ?>
<!DOCTYPE configuration PUBLIC "-//mybatis.org//DTD Config 3.0//EN"
        "http://mybatis.org/dtd/mybatis-3-config.dtd">
<configuration>

    <settings>
        <setting name="logImpl" value="STDOUT_LOGGING"/>
    </settings>
    <!--分页插件的配置-->
    <plugins>
        <plugin interceptor="com.github.pagehelper.PageInterceptor"></plugin>
    </plugins>

</configuration>
2.4 spring-dao.xml
<?xml version="1.0" encoding="UTF-8"?>
<beans xmlns="http://www.springframework.org/schema/beans"
       xmlns:xsi="http://www.w3.org/2001/XMLSchema-instance"
       xmlns:context="http://www.springframework.org/schema/context"
       xsi:schemaLocation="http://www.springframework.org/schema/beans
                           http://www.springframework.org/schema/beans/spring-beans.xsd
                           http://www.springframework.org/schema/context
                           http://www.springframework.org/schema/context/spring-context.xsd">

    <!--读取jdbc.properties属性文件-->
    <context:property-placeholder location="classpath:jdbc.properties"/>


    <!--创建数据源-->
    <bean id="dataSource" class="com.mchange.v2.c3p0.ComboPooledDataSource">
        <property name="driverClass" value="${jdbc.driver}"/>
        <property name="jdbcUrl" value="${jdbc.url}"/>
        <property name="user" value="${jdbc.username}"/>
        <property name="password" value="${jdbc.password}"/>

        <!-- c3p0连接池的私有属性-->
        <property name="maxPoolSize" value="30"/>
        <property name="minPoolSize" value="10"/>
        <!--关闭连接后不自动commit -->
        <property name="autoCommitOnClose" value="false"/>
        <!--获取连接超时时间-->
        <property name="checkoutTimeout" value="10000"/>
        <!--当获取连按失败重试次数-->
        <property name="acquireRetryAttempts" value="2"/>

    </bean>

    <!--创建SqlSessionFactoryBean-->
    <bean class="org.mybatis.spring.SqlSessionFactoryBean">
        <!--配置数据源-->
        <property name="dataSource" ref="dataSource"/>
        <!--配置MyBatis的核心配置文件-->
        <property name="configLocation" value="classpath:mybatis.xml"/>
        <!--配置实体类,起别名-->
        <property name="typeAliasesPackage" value="com.mc.pojo"/>
    </bean>

    <!--配置mapper文件的扫描器-->
    <bean class="org.mybatis.spring.mapper.MapperScannerConfigurer">
        <property name="basePackage" value="com.mc.mapper"/>
    </bean>
</beans>
2.5 spring-service.xml
<?xml version="1.0" encoding="UTF-8"?>
<beans xmlns="http://www.springframework.org/schema/beans"
       xmlns:xsi="http://www.w3.org/2001/XMLSchema-instance"
       xmlns:context="http://www.springframework.org/schema/context" xmlns:tx="http://www.springframework.org/schema/tx"
       xmlns:aop="http://www.springframework.org/schema/aop" xmlns:jdbc="http://www.springframework.org/schema/jdbc"
       xsi:schemaLocation="http://www.springframework.org/schema/beans
                           http://www.springframework.org/schema/beans/spring-beans.xsd
                           http://www.springframework.org/schema/context
                           http://www.springframework.org/schema/context/spring-context.xsd http://www.springframework.org/schema/tx http://www.springframework.org/schema/tx/spring-tx.xsd http://www.springframework.org/schema/aop https://www.springframework.org/schema/aop/spring-aop.xsd http://www.springframework.org/schema/jdbc http://www.springframework.org/schema/jdbc/spring-jdbc.xsd">

    <!--设置业务逻辑层的包扫描器,目的是在指定的路径下,使用@Service注解的类, spring负责创建对象,并添加依赖-->
    <context:component-scan base-package="com.mc.service"/>
    <!--设置事务管理器-->
    <bean id="transactionManager" class="org.springframework.jdbc.datasource.DataSourceTransactionManager">
        <property name="dataSource" ref="dataSource"/>
    </bean>
    <!--添加事务的切面-->
    <tx:advice id="interceptor" transaction-manager="transactionManager">
        <tx:attributes>
            <tx:method name="*select*" read-only="true"/>
            <tx:method name="*find*" read-only="true"/>
            <tx:method name="*search*" read-only="true"/>
            <tx:method name="*get*" read-only="true"/>
            <tx:method name="*insert*" propagation="REQUIRED"/>
            <tx:method name="*add*" propagation="REQUIRED"/>
            <tx:method name="*save*" propagation="REQUIRED"/>
            <tx:method name="*delete*" propagation="REQUIRED"/>
            <tx:method name="*remove*" propagation="REQUIRED"/>
            <tx:method name="*clear*" propagation="REQUIRED"/>
            <tx:method name="*update*" propagation="REQUIRED"/>
            <tx:method name="*modify*" propagation="REQUIRED"/>
            <tx:method name="*change*" propagation="REQUIRED"/>
            <tx:method name="*" propagation="SUPPORTS"/>
        </tx:attributes>
    </tx:advice>
    <!--完成切面和切入点的织入-->
    <aop:config>
        <aop:pointcut id="pointCut" expression="execution(* com.mc.service.*.*(..))"/>
        <aop:advisor advice-ref="interceptor" pointcut-ref="pointCut"/>
    </aop:config>
</beans>
2.6 spring-mvc.xml
<?xml version="1.0" encoding="UTF-8"?>
<beans xmlns="http://www.springframework.org/schema/beans"
       xmlns:xsi="http://www.w3.org/2001/XMLSchema-instance"
       xmlns:context="http://www.springframework.org/schema/context"
       xmlns:mvc="http://www.springframework.org/schema/mvc"
       xsi:schemaLocation="http://www.springframework.org/schema/beans
                           http://www.springframework.org/schema/beans/spring-beans.xsd
                           http://www.springframework.org/schema/context
                           http://www.springframework.org/schema/context/spring-context.xsd
                           http://www.springframework.org/schema/mvc
                           http://www.springframework.org/schema/mvc/spring-mvc.xsd">

    <!--设置包扫描器 -->
    <context:component-scan base-package="com.mc.controller"/>

    <!--设置视图解析器-->
    <bean class="org.springframework.web.servlet.view.InternalResourceViewResolver" id="viewResolver">
        <!--前缀-->
        <property name="prefix" value="/admin/"/>
        <!--后缀-->
        <property name="suffix" value=".jsp"/>
    </bean>

    <!--设置文件上传的核心组件-->
    <bean id="multipartResolver" class="org.springframework.web.multipart.commons.CommonsMultipartResolver">
        <!--请求的编码格式,必须和jsp的pageEncoding属性一致,以便正确读取表单的内容,默认为ISO-8859-1 -->
        <property name="defaultEncoding" value="utf-8"/>
        <!-- 上传文件大小上限,单位为字节(10485760=10M ) -->
        <property name="maxUploadSize" value="10485760"/>
        <property name="maxInMemorySize" value="40960"/>
    </bean>

    <!--设置注解驱动-->
    <mvc:annotation-driven/>

</beans>
2.7 applicationContext.xml
<?xml version="1.0" encoding="UTF-8"?>
<beans xmlns="http://www.springframework.org/schema/beans"
       xmlns:xsi="http://www.w3.org/2001/XMLSchema-instance"
       xsi:schemaLocation="http://www.springframework.org/schema/beans
                           https://www.springframework.org/schema/beans/spring-beans.xsd">

    <import resource="classpath:spring-dao.xml"/>
    <import resource="classpath:spring-service.xml"/>
    <import resource="classpath:spring-mvc.xml"/>

</beans>
接下来在以下位置,修改web.xml配置文件
2.8 web.xml
<?xml version="1.0" encoding="UTF-8"?>
<web-app xmlns="http://xmlns.jcp.org/xml/ns/javaee"
         xmlns:xsi="http://www.w3.org/2001/XMLSchema-instance"
         xsi:schemaLocation="http://xmlns.jcp.org/xml/ns/javaee
                             http://xmlns.jcp.org/xml/ns/javaee/web-app_4_0.xsd"
         version="4.0">

    <!--添加字符编码过滤器-->
    <filter>
        <filter-name>encodingFilter</filter-name>
        <filter-class>org.springframework.web.filter.CharacterEncodingFilter</filter-class>
        <init-param>
            <param-name>encoding</param-name>
            <param-value>UTF-8</param-value>
        </init-param>
        <init-param>
            <param-name>forceRequestEncoding</param-name>
            <param-value>true</param-value>
        </init-param>
        <init-param>
            <param-name>forceResponseEncoding</param-name>
            <param-value>true</param-value>
        </init-param>
    </filter>
    <filter-mapping>
        <filter-name>encodingFilter</filter-name>
        <url-pattern>/*</url-pattern>
    </filter-mapping>

    <!--注册SpringMVC框架,请求分发器,前端控制器-->
    <!--配置DispatchServlet:这个是SpringMVC的核心,请求分发器,前端控制器-->
    <servlet>
        <servlet-name>springmvc</servlet-name>
        <servlet-class>org.springframework.web.servlet.DispatcherServlet</servlet-class>
        <!--DispatchServlet要绑定(关联)一个springmvc的配置文件:【servlet-name】-servlet.xml-->
        <init-param>
            <param-name>contextConfigLocation</param-name>
            <param-value>classpath:spring-mvc.xml</param-value>
        </init-param>
        <!--启动级别-1-->
        <load-on-startup>1</load-on-startup>
    </servlet>
    <!--
        /admin/login.action
        /admin/main.jsp
    -->
    <servlet-mapping>
        <servlet-name>springmvc</servlet-name>
        <url-pattern>*.action</url-pattern>
    </servlet-mapping>

    <!--注册Spring框架-->
    <listener>
        <listener-class>org.springframework.web.context.ContextLoaderListener</listener-class>
    </listener>
    <context-param>
        <param-name>contextConfigLocation</param-name>
        <param-value>classpath:spring-*.xml</param-value>
    </context-param>

    <!--Session-->
    <session-config>
        <session-timeout>15</session-timeout>
    </session-config>
</web-app>
3、jsp页面设计
3.1 登录页面

<%@ page language="java" contentType="text/html; charset=UTF-8"
pageEncoding="UTF-8"%>
<!DOCTYPE html>
<html>
<head>
<meta charset="UTF-8">
<link rel="stylesheet" href="${pageContext.request.contextPath}/css/bootstrap.css" />
<link rel="stylesheet" href="${pageContext.request.contextPath}/css/login.css" />
<script type="text/javascript" src="${pageContext.request.contextPath}/js/jquery-3.3.1.js"></script>
<script type="text/javascript" src="${pageContext.request.contextPath}/js/bootstrap.js"></script>
<title></title>
</head>
<body>
<div id="login">
<div id="top">
<img src="${pageContext.request.contextPath}/images/cloud.jpg" /><span>LOGIN</span>
</div>
<div id="bottom">
<form action="${pageContext.request.contextPath}/admin/login.action" method="post">
<table border="0px" id="table">
<tr>
<td class="td1">用户名:</td>
<td><input type="text" value="admin" placeholder="Username" class="td2" name="name"></td>
</tr>
<tr>
<td></td>
<td><span id="nameerr"></span></td>
</tr>
<tr>
<td class="td1">密码:</td>
<td><input type="password" value="admin" placeholder="Password" class="td2" name="pwd"></td>
</tr>
<tr>
<td></td>
<td><span id="pwderr"></span></td>
</tr>
<tr>
<td></td>
<td><input type="submit" value="登录" class="td3">
<a href="${pageContext.request.contextPath}/regist.jsp"><input type="button" value="注册" class="td3 "></a>
</td>
</tr>
</table>
</form>
${errmsg}
</div>
</div>
</body>
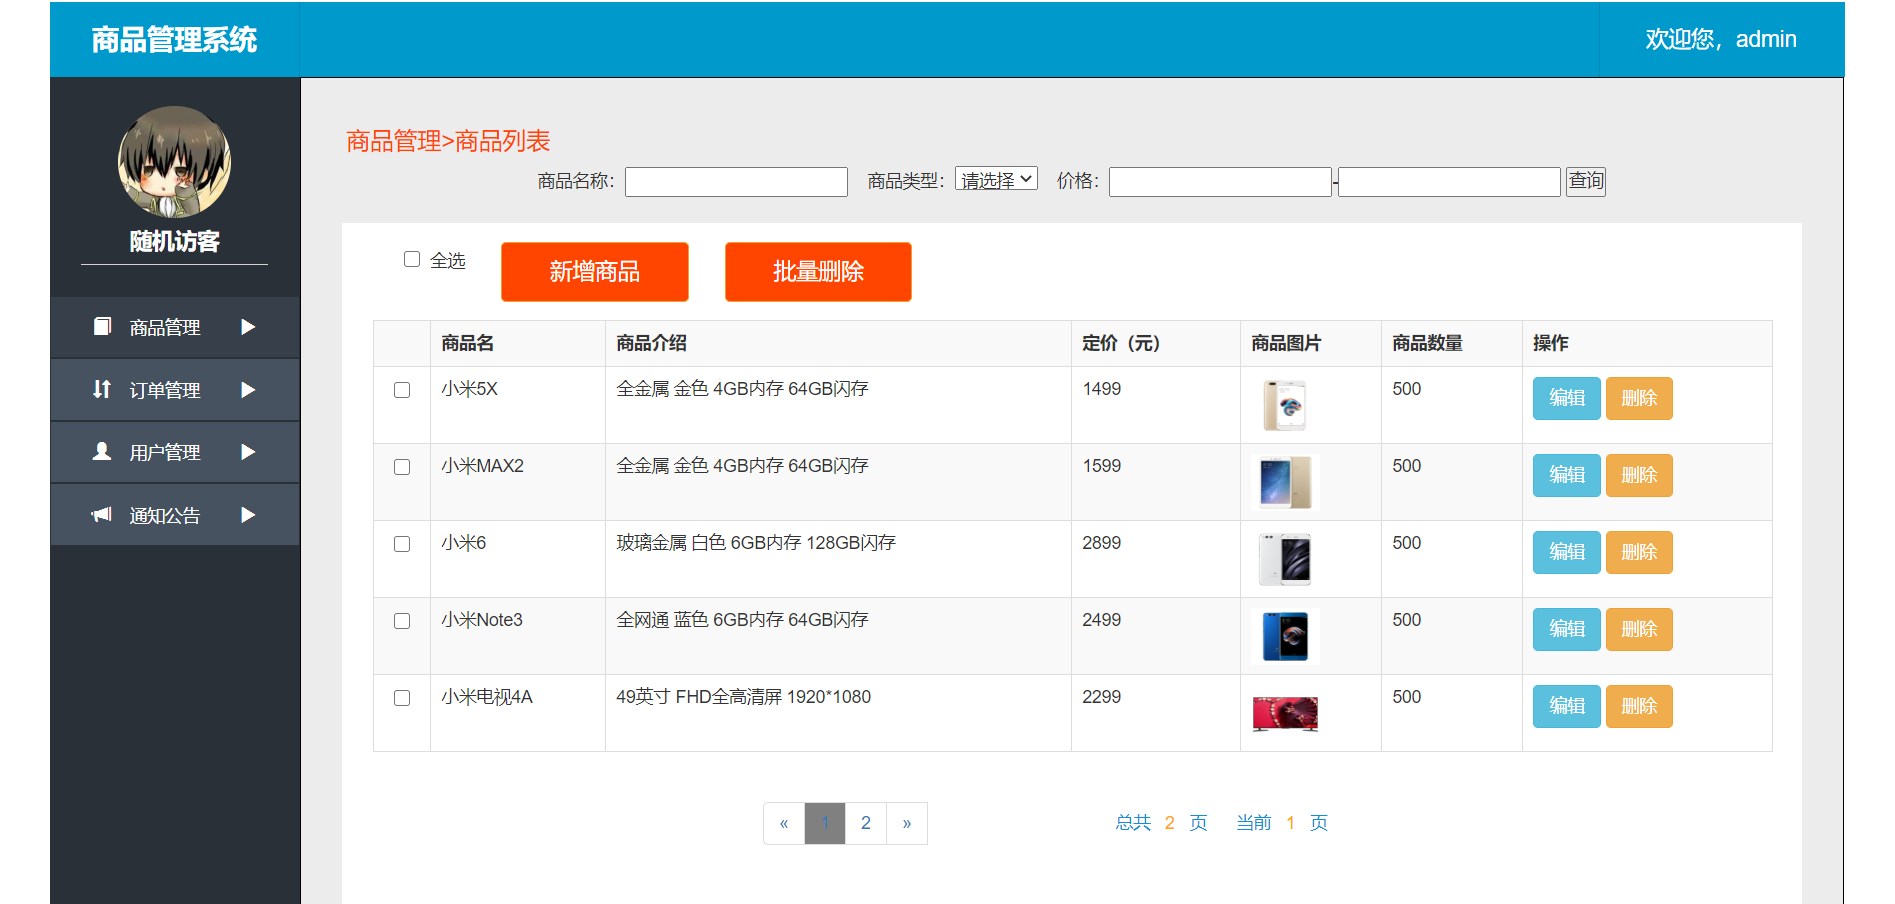
</html>3.2 首页

<%@ page language="java" contentType="text/html; charset=UTF-8"
pageEncoding="UTF-8"%>
<!DOCTYPE html>
<html>
<head>
<meta charset="UTF-8">
<link rel="stylesheet" href="${pageContext.request.contextPath}/css/bootstrap.css" />
<link rel="stylesheet" href="${pageContext.request.contextPath}/css/index.css" />
<script type="text/javascript" src="${pageContext.request.contextPath}/js/jquery-3.3.1.js"></script>
<script type="text/javascript" src="${pageContext.request.contextPath}/js/bootstrap.js"></script>
<title></title>
<%--<link href="${pageContext.request.contextPath}/css/main.css" rel="stylesheet" >--%>
<style type="text/css">
</style>
</head>
<body>
<!--整体部分-->
<div id="all">
<!--上部分-->
<div id="top">
<div id="top1">
<span>商品管理系统</span>
</div>
<div id="top2"></div>
<div id="top3">
<span>欢迎您,${admin.aName}</span>
</div>
</div>
<!--下部分-->
<div id="bottom">
<!--下部分左边-->
<div id="bleft">
<div id="ltop">
<div id="lts">
<img src="${pageContext.request.contextPath}/images/logo.jpg" /><br />
<p style="text-align: center;">随机访客</p>
</div>
</div>
<div id="lbottom">
<ul>
<a href="${pageContext.request.contextPath}/prod/split.action" target="myright" >
<li class="two"><span class="glyphicon glyphicon-book" style="color: white;"></span> 商品管理 <span class="glyphicon glyphicon-play" style="color: white;"></span> </li>
</a>
<a href="${pageContext.request.contextPath}/admin/err.jsp" target="myright">
<li class="one"><span class="glyphicon glyphicon-sort" style="color: white;"></span> 订单管理 <span class="glyphicon glyphicon-play" style="color: white;"></span> </li>
</a>
<a href="${pageContext.request.contextPath}/admin/err.jsp" target="myright">
<li class="one"><span class="glyphicon glyphicon-user" style="color: white;"></span> 用户管理 <span class="glyphicon glyphicon-play" style="color: white;"></span> </li>
</a>
<a href="${pageContext.request.contextPath}/admin/err.jsp" target="myright">
<li class="one"><span class="glyphicon glyphicon-bullhorn" style="color: white"></span> 通知公告 <span class="glyphicon glyphicon-play" style="color: white;"></span> </li>
</a>
</ul>
</div>
</div>
<!--下部分右边-->
<div id="bright">
<iframe frameborder="0" scrolling="no" name="myright" width="1235px" height="700px" ></iframe>
</div>
</div>
</div>
</body>
</html>3.3 商品详情页
<%@ page contentType="text/html;charset=UTF-8" language="java" %>
<%@page import="java.util.*" %>
<%@taglib prefix="c" uri="http://java.sun.com/jsp/jstl/core" %>
<!DOCTYPE html>
<html>
<head>
<meta charset="UTF-8">
<script type="text/javascript">
if ("${msg}" != "") {
alert("${msg}");
}
</script>
<c:remove var="msg"></c:remove>
<link rel="stylesheet" href="${pageContext.request.contextPath}/css/bootstrap.css"/>
<link rel="stylesheet" href="${pageContext.request.contextPath}/css/bright.css"/>
<link rel="stylesheet" href="${pageContext.request.contextPath}/css/addBook.css"/>
<script type="text/javascript" src="${pageContext.request.contextPath}/js/jquery-3.3.1.js"></script>
<script type="text/javascript" src="${pageContext.request.contextPath}/js/bootstrap.js"></script>
<title></title>
</head>
<script type="text/javascript">
function allClick() {
//取得全选复选框的选中 未选中状态
var ischeck = $("#all").prop("checked");
//将此状态赋值给每个商品列表里的复选框
$("input[name='ck']").each(function () {
this.checked = ischeck;
});
}
//单个复选框点击改变全选复选框功能实现
function ckClick() {
//取得所有name=ck的被选中的复选框
var length = $("input[name='ck']:checked").length;
//取得所有name=ck的复选框
var len = $("input[name='ck']").length;
//进行对比,改变全选复选框的状态
if (len == length) {
$("#all").prop("checked", true);
} else {
$("#all").prop("checked", false);
}
}
</script>
<body>
<div id="brall">
<div id="nav">
<p>商品管理>商品列表</p>
</div>
<div id="condition" style="text-align: center">
<form id="myform">
商品名称:<input name="pname" id="pname">
商品类型:<select name="typeid" id="typeid">
<option value="-1">请选择</option>
<c:forEach items="${typeList}" var="pt">
<option value="${pt.typeId}">${pt.typeName}</option>
</c:forEach>
</select>
价格:<input name="lprice" id="lprice">-<input name="hprice" id="hprice">
<input type="button" value="查询" onclick="condition()">
</form>
</div>
<br>
<div id="table">
<c:choose>
<c:when test="${p_info.list.size()!=0}">
<div id="top">
<input type="checkbox" id="all" onclick="allClick()" style="margin-left: 50px"> 全选
<a href="${pageContext.request.contextPath}/admin/addproduct.jsp">
<input type="button" class="btn btn-warning" id="btn1"
value="新增商品">
</a>
<input type="button" class="btn btn-warning" id="btn1"
value="批量删除" onclick="deleteBatch(${p_info.pageNum})">
</div>
<!--显示分页后的商品-->
<div id="middle">
<table class="table table-bordered table-striped">
<tr>
<th></th>
<th>商品名</th>
<th>商品介绍</th>
<th>定价(元)</th>
<th>商品图片</th>
<th>商品数量</th>
<th>操作</th>
</tr>
<c:forEach items="${p_info.list}" var="p">
<tr>
<td valign="center" align="center"><input type="checkbox" name="ck" id="ck"
value="${p.pId}" onclick="ckClick()"></td>
<td>${p.pName}</td>
<td>${p.pContent}</td>
<td>${p.pPrice}</td>
<td><img width="55px" height="45px"
src="${pageContext.request.contextPath}/image_big/${p.pImage}"></td>
<td>${p.pNumber}</td>
<%--<td><a href="${pageContext.request.contextPath}/admin/product?flag=delete&pid=${p.pId}" onclick="return confirm('确定删除吗?')">删除</a>--%>
<%-- <a href="${pageContext.request.contextPath}/admin/product?flag=one&pid=${p.pId}">修改</a></td>--%>
<td>
<button type="button" class="btn btn-info "
onclick="one(${p.pId},${p_info.pageNum})">编辑
</button>
<button type="button" class="btn btn-warning" id="mydel"
onclick="del(${p.pId},${p_info.pageNum})">删除
</button>
</td>
</tr>
</c:forEach>
</table>
<!--分页栏-->
<div id="bottom">
<div>
<nav aria-label="..." style="text-align:center;">
<ul class="pagination">
<li>
<%-- <a href="${pageContext.request.contextPath}/prod/split.action?page=${p_info.prePage}" aria-label="Previous">--%>
<a href="javascript:ajaxsplit(${p_info.prePage})" aria-label="Previous">
<span aria-hidden="true">«</span></a>
</li>
<c:forEach begin="1" end="${p_info.pages}" var="i">
<c:if test="${p_info.pageNum==i}">
<li>
<%-- <a href="${pageContext.request.contextPath}/prod/split.action?page=${i}" style="background-color: grey">${i}</a>--%>
<a href="javascript:ajaxsplit(${i})"
style="background-color: grey">${i}</a>
</li>
</c:if>
<c:if test="${p_info.pageNum!=i}">
<li>
<%-- <a href="${pageContext.request.contextPath}/prod/split.action?page=${i}">${i}</a>--%>
<a href="javascript:ajaxsplit(${i})">${i}</a>
</li>
</c:if>
</c:forEach>
<li>
<%-- <a href="${pageContext.request.contextPath}/prod/split.action?page=1" aria-label="Next">--%>
<a href="javascript:ajaxsplit(${p_info.nextPage})" aria-label="Next">
<span aria-hidden="true">»</span></a>
</li>
<li style=" margin-left:150px;color: #0e90d2;height: 35px; line-height: 35px;">总共 <font
style="color:orange;">${p_info.pages}</font> 页
<c:if test="${p_info.pageNum!=0}">
当前 <font
style="color:orange;">${p_info.pageNum}</font> 页
</c:if>
<c:if test="${p_info.pageNum==0}">
当前 <font
style="color:orange;">1</font> 页
</c:if>
</li>
</ul>
</nav>
</div>
</div>
</div>
</c:when>
<c:otherwise>
<div>
<h2 style="width:1200px; text-align: center;color: orangered;margin-top: 100px">暂时没有符合条件的商品!</h2>
</div>
</c:otherwise>
</c:choose>
</div>
</div>
<!--编辑的模式对话框-->
<div class="modal fade" id="myModal" tabindex="-1" role="dialog" aria-labelledby="myModalLabel" aria-hidden="true">
<div class="modal-dialog">
<div class="modal-content">
<div class="modal-header">
<button type="button" class="close" data-dismiss="modal" aria-hidden="true">×</button>
<h4 class="modal-title" id="myModalLabel">新增商品</h4>
</div>
<div class="modal-body" id="addTD">
<form action="${pageContext.request.contextPath}/admin/product?flag=save" enctype="multipart/form-data"
method="post" id="myform">
<table>
<tr>
<td class="one">商品名称</td>
<td><input type="text" name="pname" class="two" class="form-control"></td>
</tr>
<!--错误提示-->
<tr class="three">
<td class="four"></td>
<td><span id="pnameerr"></span></td>
</tr>
<tr>
<td class="one">商品介绍</td>
<td><input type="text" name="pcontent" class="two" class="form-control"></td>
</tr>
<!--错误提示-->
<tr class="three">
<td class="four"></td>
<td><span id="pcontenterr"></span></td>
</tr>
<tr>
<td class="one">定价</td>
<td><input type="number" name="pprice" class="two" class="form-control"></td>
</tr>
<!--错误提示-->
<tr class="three">
<td class="four"></td>
<td><span id="priceerr"></span></td>
</tr>
<tr>
<td class="one">图片介绍</td>
<td><input type="file" name="pimage" class="form-control"></td>
</tr>
<tr class="three">
<td class="four"></td>
<td><span></span></td>
</tr>
<tr>
<td class="one">总数量</td>
<td><input type="number" name="pnumber" class="two" class="form-control"></td>
</tr>
<!--错误提示-->
<tr class="three">
<td class="four"></td>
<td><span id="numerr"></span></td>
</tr>
<tr>
<td class="one">类别</td>
<td>
<select name="typeid" class="form-control">
<c:forEach items="${typeList}" var="type">
<option value="${type.typeId}">${type.typeName}</option>
</c:forEach>
</select>
</td>
</tr>
<!--错误提示-->
<tr class="three">
<td class="four"></td>
<td><span></span></td>
</tr>
<tr>
<td>
<input type="submit" class="btn btn-success" value="提交" class="btn btn-success">
</td>
<td>
<button type="button" class="btn btn-info" data-dismiss="modal">取消</button>
</td>
</tr>
</table>
</form>
</div>
</div>
<!-- /.modal-content -->
</div>
<!-- /.modal -->
</div>
</body>
<!--弹出新增模式对话框-->
<script type="text/javascript">
$(function () {
$(".btn-info").on("click", function () {
//浏览不关,第二次打开时要清空
$("#myModal").modal("hide");
});
//新增学生非空判断
$(".btn-success").on("click", function () {
$("#myModal").modal("hide");
});
});
</script>
<script type="text/javascript">
function mysubmit() {
$("#myform").submit();
}
//批量删除
function deleteBatch(page) {
// 取出查询条件
var pname = $("#pname").val();
var typeid = $("#typeid").val();
var lprice = $("#lprice").val();
var hprice = $("#hprice").val();
//得到所有选中复选框的对象,根据其长度判断是否有选中商品
var cks = $("input[name='ck']:checked");
// 如果有选中的商品,则获取其value的值,进行字符串拼接
if (cks.length == 0) {
alert("请选择将要删除的商品!");
} else {
var str = "";
var pid = "";
if (confirm("您确定要删除" + cks.length + "条商品吗?")) {
//进行提交商品Id的字符串的拼接
$.each(cks, function () {
pid = $(this).val(); // 每一个被选中商品的id
if (pid != null) { //进行非空判断,避免出错
str += pid + ",";
}
});
$.ajax({
url: "${pageContext.request.contextPath}/prod/deleteBatch.action",
data: {
"pids": str,
"page": page,
"pname": pname,
"typeid": typeid,
"lprice": lprice,
"hprice": hprice
},
type: "post",
dataType: "text",
success: function (msg) {
alert(msg);//弹删除是否成功
$("#table").load("http://localhost:8080/admin/product.jsp #table");
}
});
}
}
}
//单个删除
function del(pid, page) {
// 取出查询条件
var pname = $("#pname").val();
var typeid = $("#typeid").val();
var lprice = $("#lprice").val();
var hprice = $("#hprice").val();
// 弹框提示
if (confirm("您确定删除吗?")) {
$.ajax({
url: "${pageContext.request.contextPath}/prod/delete.action",
data: {
"pid": pid,
"page": page,
"pname": pname,
"typeid": typeid,
"lprice": lprice,
"hprice": hprice
},
type: "post",
dataType: "text",
success: function (msg) {
alert(msg);//弹删除是否成功
$("#table").load("http://localhost:8080/admin/product.jsp #table");
}
});
}
}
// 查询一个,编辑功能使用,做信息回显
function one(pid, page) {
// 取出查询条件
var pname = $("#pname").val();
var typeid = $("#typeid").val();
var lprice = $("#lprice").val();
var hprice = $("#hprice").val();
// 向服务器提交请求,传递商品id
var str = "?pid=" + pid + "&page=" + page + "&pname=" + pname + "&typeid=" + typeid + "&lprice=" + lprice + "&hprice=" + hprice;
location.href = "${pageContext.request.contextPath}/prod/one.action" + str;
}
</script>
<!--分页的AJAX实现-->
<script type="text/javascript">
function ajaxsplit(page) {
// 取出查询条件
var pname = $("#pname").val();
var typeid = $("#typeid").val();
var lprice = $("#lprice").val();
var hprice = $("#hprice").val();
// 向服务发出ajax请求,请示page页中的所有数据,在当前页面上局部刷新显示
$.ajax({
type: "post",
url: "${pageContext.request.contextPath}/prod/ajaxsplit.action",
data: {
"page": page,
"pname": pname,
"typeid": typeid,
"lprice": lprice,
"hprice": hprice
},
success: function () {
//重新加载显示分页数据的容器
$("#table").load("http://localhost:8080/admin/product.jsp #table");
},
error: function (e) {
alert(e.message);
}
});
}
function condition() {
// 取出查询条件
var pname = $("#pname").val();
var typeid = $("#typeid").val();
var lprice = $("#lprice").val();
var hprice = $("#hprice").val();
$.ajax({
url: "${pageContext.request.contextPath}/prod/ajaxsplit.action",
type: "post",
data: {
"pname": pname,
"typeid": typeid,
"lprice": lprice,
"hprice": hprice
},
success: function () {
// 刷新显示数据的容器
$("#table").load("http://localhost:8080/admin/product.jsp #table");
}
});
}
</script>
</html>4、功能实现
参照下图,创建封装不同功能代码的包
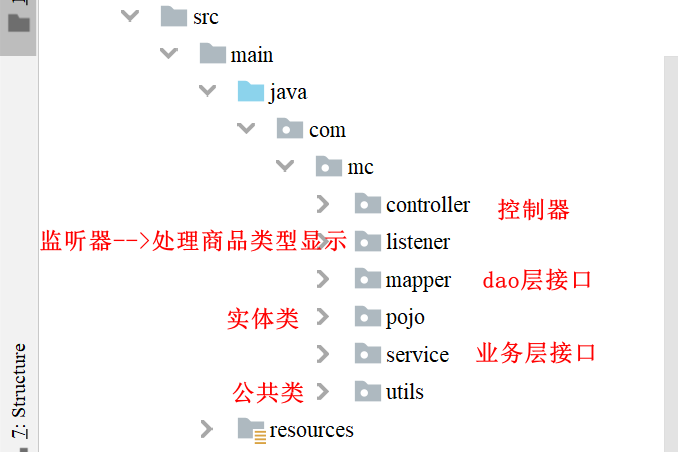
所有功能实现的流程可参照下图:

说明:
- 所有功能,不论简单还是复杂,代码编写流程都是一样
- 对登录功能编写流程做详细介绍,其余增删改查等基本功能参照登录功能编写
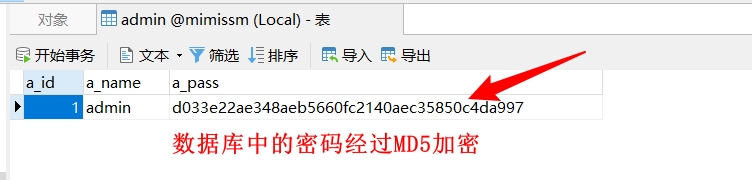
- 密码加密<------>MD5加密
- 复杂条件下的数据处理
- 异步图片上传及回显
4.1 登录功能
第一步:在jsp页面的action位置先用#代填,controller层编写完毕后,在将正确路径填入

第二步:编写controller层
访问路径中有.action,是因为在web.xml配置文件中设置了路径拦截
@Controller
@RequestMapping("/admin")
public class AdminController {
    // 切记:在所有的界面层,一定会有业务逻辑层的对象
    // 实现登录判断,并做相应跳转
    //创建业务逻辑层的对象
    @Autowired
    private AdminService adminService;

    @RequestMapping("/login")
    public String login(String name, String pwd, Model model) {
        Admin admin = adminService.login(name, pwd);
        if (admin != null) {    // 登录成功
            model.addAttribute("admin", admin);
            return "main";
        } else { // 登录失败
            model.addAttribute("errmsg", "用户名或密码不正确!");
            return "login";
        }
    }
}
第三步:编写service层接口
public interface AdminService {
    // 完成登录判断
    public Admin login(String name, String pwd);
}
第四步:编写serviceImpl接口实现类
@Service
public class AdminServiceImpl implements AdminService {

    // 在业务逻辑层中,一定会有数据访问层的
    @Autowired
    private AdminMapper adminMapper;

    @Override
    public Admin login(String name, String pwd) {

        // 根据传入的用户名,到DB中查询相应用户对象
        Admin admin = adminMapper.selectByUserName(name);
        if (admin != null) {
            // 如果查询到用户对象,再进行密码的比对,注意密码是密文
            /*分析:
                admin.getaPass() ==> d033e22ae348aeb5660fc2140aec35850c4da997
                pwd ==> admin
                在进行密码对比时,要将传入的pwd进行md5加密,再与数据库中查到的对象的密码进行对比
             */
            if (MD5Util.getMD5(pwd).equals(admin.getaPass())) {
                return admin;
            }
        }
        return null;
    }
}
第五步:编写mapper接口
public interface AdminMapper {
    Admin selectByUserName(String name);
}
第六步:编写mapper.xml文件
<?xml version="1.0" encoding="UTF-8" ?>
<!DOCTYPE mapper PUBLIC "-//mybatis.org//DTD Mapper 3.0//EN" "http://mybatis.org/dtd/mybatis-3-mapper.dtd" >
<mapper namespace="com.mc.mapper.AdminMapper" >
  <resultMap id="BaseResultMap" type="com.mc.pojo.Admin" >
    <id column="a_id" property="aId" jdbcType="INTEGER" />
    <result column="a_name" property="aName" jdbcType="VARCHAR" />
    <result column="a_pass" property="aPass" jdbcType="VARCHAR" />
  </resultMap>

  <sql id="Base_Column_List" >
    a_id, a_name, a_pass
  </sql>

  <select id="selectByUserName" resultMap="BaseResultMap" parameterType="java.lang.String" >
    select
    <include refid="Base_Column_List" />
    from admin
    where a_name = #{name,jdbcType=INTEGER}
  </select>

</mapper>
4.2 密码加密实现-----MD5加密
- MD5(message-digest algorithm 5)信息摘要算法
- 它的长度一般是32位的16进制数字符串(如81dc9bdb52d04dc20036dbd8313ed055)
- 由于系统密码明文存储容易被黑客盗取
- 应用:注册时,将密码进行md5加密,存到数据库中,防止可以看到数据库数据的人恶意篡改。
- 登录时,将密码进行md5加密,与存储在数据库中加密过的密码进行比对
- md5不可逆,即没有对应的算法,从产生的md5值逆向得到原始数据
在实际的开发中,编写一个加密的公共类即可
public class MD5Util {

    public final static String getMD5(String str) {
        try {
            MessageDigest md = MessageDigest.getInstance("SHA");//创建具有指定算法名称的摘要
            md.update(str.getBytes());                    //使用指定的字节数组更新摘要
            byte mdBytes[] = md.digest();                 //进行哈希计算并返回一个字节数组

            String hash = "";
            for (int i = 0; i < mdBytes.length; i++) {           //循环字节数组
                int temp;
                if (mdBytes[i] < 0)                          //如果有小于0的字节,则转换为正数
                    temp = 256 + mdBytes[i];
                else
                    temp = mdBytes[i];
                if (temp < 16)
                    hash += "0";
                hash += Integer.toString(temp, 16);         //将字节转换为16进制后,转换为字符串
            }
            return hash;
        } catch (NoSuchAlgorithmException e) {
            e.printStackTrace();
        }
        return null;
    }
}
4.3 复杂条件下的数据处理
4.3.1 复杂条件情况说明:
- 商品数据列表展示的时候,在获取商品列表信息时,根据商品id(有自增属性)先对商品进行降序排序,这样做可以保证第一条数据的商品id永远是最大的,方便在新增商品时,在数据回显列表中及时查看数据是否添加成功(在select语句的最后添加order by p_id desc)
- 数据分页显示时,无论是简单条件的分页,还是复杂条件下的分页,最重要且相同的一个步骤还是将查询到的结果集放到PageInfo中(PageInfo pageInfo = new PageInfo<>(list);),让该分页插件自己实现数据结果集的分页显示(返回的是return pageInfo;)
- 批量删除商品数据(一次删除多条数据信息)
- 根据商品名称,商品类型,价格区间,页码等条件查询商品的结果集(依旧分页显示)

4.3.2 普通分页
只需要传入起始页码和每页要显示的数据条数
// select * from product_info limit 起始记录数=((当前页-1)*每页的条数),每页取几条
// select* from product_info limit 10,5
@Override
public PageInfo splitPage(int pageNum, int pageSize) {
    // 分页插件使用PageHelper工具类完成分页设置
    PageHelper.startPage(pageNum, pageSize);

    // 进行PageInfo的数据封装
    // 进行有条件的查询操作,必须要创建ProductInfoExample对象
    ProductInfoExample example = new ProductInfoExample();
    //设置排序,按主键降序排序
    // select * from product_info order by p_id desc
    example.setOrderByClause("p_id desc");
    // 设置完排序后,取集合,切记切记:一定在取集合之前,设置PageHelper.startPage(pageNum, pageSize);
    List<ProductInfo> list = pmapper.selectByExample(example);
    //将查到的集合封装进pageInfo
    PageInfo<ProductInfo> pageInfo = new PageInfo<>(list);
    return pageInfo;
}
4.3.3 多条件查询获得数据结果集
第一步:多这几个查询条件进行封装,将其转换成可new的对象
public class ProductInfoVo {
    //封装所有页面上的查询条件
    private String pname; // 商品名称
    private Integer typeid; // 商品类型
    private Integer lprice; // 最低价格
    private Integer hprice; // 最高价格
    private Integer page = 1; //设置页码

    public String getPname() {
        return pname;
    }

    public void setPname(String pname) {
        this.pname = pname;
    }

    public Integer getTypeid() {
        return typeid;
    }

    public void setTypeid(Integer typeid) {
        this.typeid = typeid;
    }

    public Integer getLprice() {
        return lprice;
    }

    public void setLprice(Integer lprice) {
        this.lprice = lprice;
    }

    public Integer getHprice() {
        return hprice;
    }

    public void setHprice(Integer hprice) {
        this.hprice = hprice;
    }

    public Integer getPage() {
        return page;
    }

    public void setPage(Integer page) {
        this.page = page;
    }
}这里使用了ajax技术,来传递参数,并将响应结果进行回显
function condition() {
    // 取出查询条件
    var pname = $("#pname").val();
    var typeid = $("#typeid").val();
    var lprice = $("#lprice").val();
    var hprice = $("#hprice").val();
    $.ajax({
    url: "${pageContext.request.contextPath}/prod/ajaxsplit.action",
    type: "post",
    data: {
    "pname": pname,
    "typeid": typeid,
    "lprice": lprice,
    "hprice": hprice
    },
    success: function () {
    // 刷新显示数据的容器
    $("#table").load("http://localhost:8080/admin/product.jsp #table");
    }
    });
}
第三步:在controller中接收参数,并根据其值进行数据查询
页面传递过来的参数自动用ProductInfoVo进行了封装(如果单独想要哪个参数,直接用get方法就可以得到)
直接调用pmapper.selectCondition(vo),该方法返回的数据集合就是多条件查询后的结果集
@Override
public List<ProductInfo> selectCondition(ProductInfoVo vo) {
    return pmapper.selectCondition(vo);
}
4.3.4 多条件查询接口selectCondition的SQL实现
<?xml version="1.0" encoding="UTF-8" ?>
<!DOCTYPE mapper PUBLIC "-//mybatis.org//DTD Mapper 3.0//EN" "http://mybatis.org/dtd/mybatis-3-mapper.dtd" >
<mapper namespace="com.mc.mapper.ProductInfoMapper">
<resultMap id="BaseResultMap" type="com.mc.pojo.ProductInfo">
<id column="p_id" property="pId" jdbcType="INTEGER"/>
<result column="p_name" property="pName" jdbcType="VARCHAR"/>
<result column="p_content" property="pContent" jdbcType="VARCHAR"/>
<result column="p_price" property="pPrice" jdbcType="INTEGER"/>
<result column="p_image" property="pImage" jdbcType="VARCHAR"/>
<result column="p_number" property="pNumber" jdbcType="INTEGER"/>
<result column="type_id" property="typeId" jdbcType="INTEGER"/>
<result column="p_date" property="pDate" jdbcType="DATE"/>
</resultMap>
<sql id="Base_Column_List">
p_id, p_name, p_content, p_price, p_image, p_number, type_id, p_date
</sql>
<!--
多条件查询商品
List<ProductInfo> selectCondition(ProductInfoVo vo);
-->
<select id="selectCondition" parameterType="com.mc.pojo.vo.ProductInfoVo" resultMap="BaseResultMap">
select <include refid="Base_Column_List"></include>
from product_info
<!--拼接条件-->
<where>
<!--商品名称不为空,拼接商品名称模糊查询-->
<if test="pname != null and pname != ''">
and p_name like '%${pname}%'
</if>
<!--商品名称不为空,拼接商品类型的查询条件-->
<if test="typeid != null and typeid != -1">
and type_id = #{typeid}
</if>
<!--如果最低价格不为空,最高价格为空,则查询大于最低价格的所有商品-->
<if test="(lprice != null and lprice != '') and (hprice == null or hprice == '')">
and p_price >= #{lprice}
</if>
<!--如果最高价格不为空,最低价格为空,则查询小于最高价格的所有商品-->
<if test="(hprice != null and hprice != '') and (lprice == null or lprice == '')">
and p_price <= #{hprice}
</if>
<!--如果最高和最低价格都不为空,则查询介于最高价格和最低价格之间的所有商品-->
<if test="(hprice != null and hprice != '') and (lprice != null and lprice != '')">
and p_price between #{lprice} and #{hprice}
</if>
</where>
order by p_id desc
</select>
</mapper>4.3.5 多条件查询后数据的分页显示
与普通分页类似,只是起始页码是从前端传递的多条件参数中得到
@Override
public PageInfo<ProductInfo> splitPageVo(ProductInfoVo vo, int pageSize) {
    //切记切记:在取集合之前,使用分页插件一定要先设置当前页和每页的个数,即PageHelper.startPage()属性
    PageHelper.startPage(vo.getPage(), pageSize);
    //取集合
    List<ProductInfo> list=pmapper.selectCondition(vo);

    return new PageInfo<>(list);
}
4.3.6 批量删除
第一步:从jsp页面传递参数,这次传递的是一个存放要删除商品id的数组
//批量删除
function deleteBatch(page) {
    // 取出查询条件
    var pname = $("#pname").val();
    var typeid = $("#typeid").val();
    var lprice = $("#lprice").val();
    var hprice = $("#hprice").val();
    //得到所有选中复选框的对象,根据其长度判断是否有选中商品
    var cks = $("input[name='ck']:checked");
    // 如果有选中的商品,则获取其value的值,进行字符串拼接
    if (cks.length == 0) {
    	alert("请选择将要删除的商品!");
    } else {
        var str = "";
        var pid = "";
        if (confirm("您确定要删除" + cks.length + "条商品吗?")) {
            //进行提交商品Id的字符串的拼接
            $.each(cks, function () {
            pid = $(this).val();  // 每一个被选中商品的id
            if (pid != null) { //进行非空判断,避免出错
            	str += pid + ",";
            }
    	});

        $.ajax({
            url: "${pageContext.request.contextPath}/prod/deleteBatch.action",
            data: {
                "pids": str,
                "page": page,
                "pname": pname,
                "typeid": typeid,
                "lprice": lprice,
                "hprice": hprice
            },
            type: "post",
            dataType: "text",
            success: function (msg) {
                alert(msg);//弹删除是否成功
                $("#table").load("http://localhost:8080/admin/product.jsp #table");
                }
            });
        }
    }
}
……
最后一步:mapper.xml中SQL语句编写实现
<?xml version="1.0" encoding="UTF-8" ?>
<!DOCTYPE mapper PUBLIC "-//mybatis.org//DTD Mapper 3.0//EN" "http://mybatis.org/dtd/mybatis-3-mapper.dtd" >
<mapper namespace="com.mc.mapper.ProductInfoMapper">
    <resultMap id="BaseResultMap" type="com.mc.pojo.ProductInfo">
        <id column="p_id" property="pId" jdbcType="INTEGER"/>
        <result column="p_name" property="pName" jdbcType="VARCHAR"/>
        <result column="p_content" property="pContent" jdbcType="VARCHAR"/>
        <result column="p_price" property="pPrice" jdbcType="INTEGER"/>
        <result column="p_image" property="pImage" jdbcType="VARCHAR"/>
        <result column="p_number" property="pNumber" jdbcType="INTEGER"/>
        <result column="type_id" property="typeId" jdbcType="INTEGER"/>
        <result column="p_date" property="pDate" jdbcType="DATE"/>
    </resultMap>

    <sql id="Base_Column_List">
        p_id, p_name, p_content, p_price, p_image, p_number, type_id, p_date
    </sql>
	<!--
        批量删除商品的功能
        int deleteBatch(String[] pids); 1,4,5
    -->
    <delete id="deleteBatch">
        delete from product_info where p_id in
        <foreach collection="array" item="pid" separator=","
                 open="(" close=")">
            #{pid}
        </foreach>
    </delete>
</mapper>
4.4 异步图片上传及回显
4.4.1 再次强调,需要导入依赖
<!--文件异步上传使用-->
<dependency>
    <groupId>commons-io</groupId>
    <artifactId>commons-io</artifactId>
    <version>2.4</version>
</dependency>
<dependency>
    <groupId>commons-fileupload</groupId>
    <artifactId>commons-fileupload</artifactId>
    <version>1.3.1</version>
</dependency>
4.4.2 jsp页面
- form表单的位置
<div id="imgDiv">
    <img src="/image_big/${prod.pImage}" width="100px" height="100px">
</div>
<input type="file" id="pimage" name="pimage" onchange="fileChange()">- fileChange()函数
<script type="text/javascript">
    function fileChange(){//注意:此处不能使用jQuery中的change事件,因此仅触发一次,因此使用标签的:onchange属性

        $.ajaxFileUpload({
            url: '/prod/ajaxImg.action',//用于文件上传的服务器端请求地址
            secureuri: false,//一般设置为false
            fileElementId: 'pimage',//文件上传控件的id属性  <input type="file" id="pimage" name="pimage" />
            dataType: 'json',//返回值类型 一般设置为json
            success: function(obj){ //服务器成功响应处理函数
                $("#imgDiv").empty();  //清空原有数据
                //创建img 标签对象
                var imgObj = $("<img>");
                //给img标签对象追加属性
                imgObj.attr("src","/image_big/"+obj.imgurl);
                imgObj.attr("width","100px");
                imgObj.attr("height","100px");
                //将图片img标签追加到imgDiv末尾
                $("#imgDiv").append(imgObj);
                //将图片的名称(从服务端返回的JSON中取得)赋值给文件本框
                //$("#imgName").html(data.imgName);
            },
            error: function (e)//服务器响应失败处理函数
            {
                alert(e.message);
            }
        });
    }
</script>
4.4.3 在controller中做处理
// 异步Ajax文件上传处理
@ResponseBody
@RequestMapping("/ajaxImg")
public Object ajaxImg(MultipartFile pimage, HttpServletRequest request) {
    // 提取生成取文件名UUID+上传图片的后缀.jpg .png
    saveFileName = FileNameUtil.getUUIDFileName() + FileNameUtil.getFileType(pimage.getOriginalFilename());
    //得到项目中图片存储的路径
    try {
        String path = request.getServletContext().getRealPath("/image_big");
        //转存 D:\IntelliJ IDEA\IdeaProjects\MimiSSM\web\image_big\mkxmk.jpg
        pimage.transferTo(new File(path + File.separator + saveFileName));
    } catch (Exception e) {
        e.printStackTrace();
    }
    //为了在客户端显示图片,要将存储的文件名回传下去,由于是自定义的上传插件,所以此处要手工处理JSON
    //返回客户端JSON对象,封装图片的路径,为了在页面实现立即回显
    JSONObject object = new JSONObject();
    object.put("imgurl", saveFileName);
    //切记切记:JSON对象一定要toString()回到客户端
    return object.toString();
}


 244
244


 被折叠的 条评论
为什么被折叠?
被折叠的 条评论
为什么被折叠?
 到【灌水乐园】发言


