


一:Pod的状态和探针:
https://kubernetes.io/zh/docs/concepts/workloads/pods/pod-lifecycle/

Pod状态 (phase)


创建 pod 需要的阶段?
1、 当用户创建 pod 时,首先请求给 apiserver,apiserver 把创建请求的状态保存在 etcd 中;
2、 接下来 apiserver 会请求 调度器 scheduler 来完成调度,如果调度成功,会把调度的结果(如调度到哪个节点上了,运行在哪个节点上了,把它更新到 etcd 的 pod 资源状态中)保存在 etcd 中;
3、 一旦存到 etcd 中并且完成更新以后,如调度到 A机器上,那么 A 节点上的 kubelet 通过 apiserver 当中的状态变化知道有一些任务被执行了,所以此时此 kubelet 会拿到用户创建时所提交的清单,这个清单 会在当前节点上运行或者启动这个 pod;
4、如果创建成功或者失败会有一个当前状态,当前这个状态会发给 apiserver,apiserver 在存到 etcd 中;
在这个过程中,etcd和 apiserver 一直在打交道,不停的交互,scheduler 也参与其中,负责调度 pod 到合适的node 节点上,这个就是 pod 的创建过程
pod 在整个生命周期中有非常多的用户行为:
1、初始化容器完成初始化
2、主容器启动后可以做启动后钩子
3、主容器结束前可以做结束前钩子
4、在主容器运行中可以做一些健康检测,如 livenessprobe,readnessprobe
Pod资源限制
资源限制
Kubernetes通过cgroups限制容器的CPU和内存等计算资源,包括
requests(请求,调度器保证调度到资源充足的Node上)
limits(上限)一般不允许超过
spec.containers[].resources.limits.cpu:CPU上限,可以短暂超过,容器也不会被停止
spec.containers[].resources.limits.memory:内存上限,不可以超过;如果超过,容器可能会被停止或调度到其他资源充足的机器上
spec.containers[].resources.requests.cpu:CPU请求,可以超过
spec.containers[].resources.requests.memory:内存请求,可以超过;但如果超过,容器可能会在Node内存不足时清理
比如nginx容器请求30%的CPU和56MB的内存,但限制最多只用50%的CPU和128MB的内存:
apiVersion: v1
kind: Pod
metadata:
  labels:
    app: nginx
  name: nginx
spec:
  containers:
    - image: nginx
      name: nginx
      resources:
        requests:
          cpu: "300m"
          memory: "56Mi"
        limits:
          cpu: "500m"
          memory: "128Mi"
注意,CPU的单位是milicpu,500mcpu=0.5cpu;而内存的单位则包括E, P, T, G, M, K, Ei, Pi, Ti, Gi, Mi, Ki等。
限制网络带宽
可以通过给Pod增加
kubernetes.io/ingress-bandwidth和kubernetes.io/egress-bandwidth这两个annotation来限制Pod的网络带宽
apiVersion: v1
kind: Pod
metadata:
  name: qos
  annotations:
    kubernetes.io/ingress-bandwidth: 3M
    kubernetes.io/egress-bandwidth: 4M
spec:
  containers:
  - name: iperf3
    image: networkstatic/iperf3
    command:
    - iperf3
    - -s
仅kubenet支持限制带宽
目前只有kubenet网络插件支持限制网络带宽,其他CNI网络插件暂不支持这个功能。
kubenet的网络带宽限制其实是通过tc来实现的
# setup qdisc (only once)
tc qdisc add dev cbr0 root handle 1: htb default 30
# download rate
tc class add dev cbr0 parent 1: classid 1:2 htb rate 3Mbit
tc filter add dev cbr0 protocol ip parent 1:0 prio 1 u32 match ip dst 10.1.0.3/32 flowid 1:2
# upload rate
tc class add dev cbr0 parent 1: classid 1:3 htb rate 4Mbit
tc filter add dev cbr0 protocol ip parent 1:0 prio 1 u32 match ip src 10.1.0.3/32 flowid 1:3
二、 pod 重启策略(restartPolicy)
Pod 的重启策略(RestartPolicy)应用于 Pod 内的所有容器,并且仅在 Pod 所处的 Node 上由kubelet 进行判断和重启操作。当某个容器异常退出或者健康检查失败时,kubelet 将根据RestartPolicy 的设置来进行相应的操作。
Pod 的重启策略包括 Always、OnFailure 和 Never,默认值为 Always。
Always:当容器失败时,由 kubelet 自动重启该容器。
OnFailure:当容器终止运行且退出码不为 0 时,由 kubelet 自动重启该容器。
Never:不论容器运行状态如何,kubelet 都不会重启该容器。
apiVersion: v1
kind: Pod
metadata:
 name: demo-pod
 namespace: default
 labels:
 app: myapp
spec:
 restartPolicy: Always     #默认即为 Always
 containers:
 - name: tomcat-pod-java
 ports:
 - containerPort: 8080
 image: tomcat:8.5-jre8-alpine
 imagePullPolicy: IfNotPresent
Init 容器区别、作用
1、Init 容器不支持 Readiness,因为它们必须在 Pod 就绪之前运行完成
2、每个 Init 容器必须运行成功,下一个才能够运行
3、如果 Pod 的 Init 容器失败,Kubernetes 会不断地重启该 Pod,直到 Init 容器成功为止,
然而,如果 Pod 对应的 restartPolicy 值为 Never,它不会重新启动。
定义一个初始化容器,用来修改主容器的 pod 主机的内核参数
三、 容器生命周期钩子
容器生命周期钩子(Container Lifecycle Hooks)监听容器生命周期的特定事件,并在事件发生时执行已注册的回调函数。支持两种钩子:
postStart: 容器启动后执行,注意由于是异步执行,它无法保证一定在ENTRYPOINT之后运行。如果失败,容器会被杀死,并根据RestartPolicy决定是否重启
preStop:容器停止前执行,常用于资源清理。如果失败,容器同样也会被杀死
而钩子的回调函数支持两种方式:
- exec:在容器内执行命令
- httpGet:向指定URL发起GET请求
postStart和preStop钩子示例:
apiVersion: v1
kind: Pod
metadata:
  name: lifecycle-demo
spec:
  containers:
  - name: lifecycle-demo-container
    image: nginx
    lifecycle:
      postStart:
        exec:
          command: ["/bin/sh", "-c", "echo Hello from the postStart handler > /usr/share/message"]
      preStop:
        exec:
          command: ["/usr/sbin/nginx","-s","quit"]

或者
httpGet:
 host: monitor.com
 path: /waring
 port: 8080
 scheme: HTTP
二. Pod探针:
探针简介
探针 是由 kubelet 对容器执行的定期诊断,以保证Pod的状态始终处于运行状态,要执行诊断,kubelet 调用由容器实现的Handler,
1. 探针三种类型的处理程序
探针是由每一个 Node 上的 kubelet 对容器执行的定期诊断。要执行诊断,kubelet 调用由容器实现的 Handler。有三种类型的处理程序:
ExecAction:在容器内执行指定命令。如果命令退出时返回码为0则认为诊断成功。TCPSocketAction:对指定容器端口的IP地址进行 TCP 检查。如端口打开,则诊断被认为是成功的。HTTPGetAction:对指定的端口和路径上的容器的IP地址执行HTTPGet请求。如果响应的状态码大于等于 200 且小于400,则诊断被认为是成功的
每次探测都将获得以下三种结果之一:
成功:容器通过了诊断。
失败:容器未通过诊断。
未知:诊断失败,因此不会采取任何行动
2. 探针类型

区别:readinessProbe 检测成功之后,主容器才能宣布对外能够正常访问,否则状态都是 Failure。而 livenessProbe 跟随着容器的整个生命周期,会循环检测容器中的资源是否可用
startupProbe: 指示容器中的应用是否已经启动。如果提供了启动探测(startup probe),则禁用所有其他探测,直到它成功为止。如果启动探测失败,kubelet 将杀死容器,容器服从其重启策略进行重启。如果容器没有提供启动探测,则默认状态为成功Success。

3.探针其他配置
https://kubernetes.io/zh/docs/tasks/configure-pod-container/configure-liveness-readiness-startup-probes/
探针有很多配置字段,可以使用这些字段精确的控制存活和就绪检测的行为

4. pod重启策略restartPolicy
PodSpec 中有一个 restartPolicy 字段,可能的值为 Always、OnFailure 和 Never。默认为 Always。
Always表示一旦不管以何种方式终止运行,kubelet都将重启;OnFailure表示只有Pod以非0退出码退出才重启;Nerver表示不再重启该Pod。
restartPolicy适用于 Pod 中的所有容器。restartPolicy 仅指通过同一节点上的 kubelet 重新启动容器。失败的容器由 kubelet 以五分钟为上限的指数退避延迟(10秒,20秒,40秒…)重新启动,并在成功执行十分钟后重置。如 Pod 文档中所述,一旦pod绑定到一个节点,Pod 将永远不会重新绑定到另一个节点。
例如
containers:
- name: magedu-tomcat-app1-container
  image: harbor.magedu.local/magedu/tomcat-app1:v1
  #command: ["/apps/tomcat/bin/run_tomcat.sh"]
  #imagePullPolicy: IfNotPresent
  imagePullPolicy: Always
  ports:
  - containerPort: 8080
    protocol: TCP
    name: http
  env:
  - name: "password"
    value: "123456"
  - name: "age"
    value: "18"
  resources:
    limits:
      cpu: 1
      memory: "512Mi"
    requests:
    #使用率50%
      cpu: 500m
      memory: "512Mi"
restartPolicy: Always

5. 存活(liveness)和就绪(readiness)探针的使用场景
如果容器中的进程能够在遇到问题或不健康的情况下自行崩溃,则不一定需要存活探针;kubelet 将根据 Pod 的restartPolicy 自动执行正确的操作。
如果你希望容器在探测失败时被杀死并重新启动,那么请指定一个存活探针,并指定restartPolicy 为 Always 或 OnFailure。
如果要仅在探测成功时才开始向 Pod 发送流量,请指定就绪探针。在这种情况下,就绪探针可能与存活探针相同,但是 spec 中的就绪探针的存在意味着 Pod 将在没有接收到任何流量的情况下启动,并且只有在探针探测成功后才开始接收流量。
6. 探针配置检测
[root@k8s-master lifecycle]# pwd
/root/k8s_practice/lifecycle
[root@k8s-master lifecycle]# cat readinessProbe-httpget.yaml
apiVersion: v1
kind: Pod
metadata:
  name: readiness-httpdget-pod
  namespace: default
  labels:
    test: readiness-httpdget
spec:
  containers:
  - name: readiness-httpget
    image: registry.cn-beijing.aliyuncs.com/google_registry/nginx:1.17
    imagePullPolicy: IfNotPresent
    readinessProbe:
      httpGet:
        path: /index1.html
        port: 80
      initialDelaySeconds: 5  #容器启动完成后,kubelet在执行第一次探测前应该等待 5 秒。默认是 0 秒,最小值是 0。
      periodSeconds: 3  #指定 kubelet 每隔 3 秒执行一次存活探测。默认是 10 秒。最小值是 1
探针示例
1. HttpGetAction
对指定的端口和路径上的容器的IP地址执行 HTTPGet 请求。如果响应的状态码大于等于 200 且小于400,则诊断被认为是成功的
就绪检测
例子:

httpGet 探测方式有如下可选的控制字段:
scheme: 用于连接 host 的协议,默认为 HTTP。
host:要连接的主机名,默认为 Pod IP,可以在 http request head 中设置 host 头部。
port:容器上要访问端口号或名称。
path:http 服务器上的访问 URI。
httpHeaders:自定义 HTTP 请求 headers,HTTP 允许重复 headers。

例子:
就绪检测 nginx 的 index1.html 存在否,存在的话,就绪检测通过
apiVersion: v1
kind: Pod
metadata:
  name: readiness-httpget-pod
  namespace: default
spec:
  containers:
  - name: readiness-httpget-container
    image: wangyanglinux/myapp:v1
    imagePullPolicy: IfNotPresent
    readinessProbe:		# 就绪检测
      httpGet:			# httpGet 检测方案
        port: 80		# 端口 80
        path: /index.html	# 请求文件
      initialDelaySeconds: 1	# 初始化检测的延时,容器启动 1 之后再开始检测
      periodSeconds: 3		# 重试的检测时间
发现一直卡在哪儿----没有index.html文件
[root@k8s-master01 ~]# kubectl get pod
NAME                    READY   STATUS    RESTARTS   AGE
readiness-httpget-pod   0/1     Running   0          12s


# 查看日志信息,显示 HTTP 请求状态码为 404
[root@k8s-master01 ~]# kubectl describe pod readiness-httpget-pod
Type     Reason     Age                   From                            Message
----     ------     ----                  ----                            -------
Warning  Unhealthy  75s (x22 over 2m18s)  kubelet, localhost.localdomain  Readiness probe failed: HTTP probe failed with statuscode: 404
手动进入容器,添加 index1.html 之后,就为Running
存活检测
每隔一段时间(3s),检测 nginx 中的 index1.html 能否被访问,如果不能访问,就重启容器
apiVersion: v1
kind: Pod
metadata:
  name: liveness-httpget-pod
  namespace: default
spec:
  containers:
  - name: liveness-httpget-container
    image: wangyanglinux/myapp:v1
    imagePullPolicy: IfNotPresent
    ports:
    - name: http
      containerPort: 80
    livenessProbe:
      httpGet:
        port: http				# http 和 80 等价
        path: /index1.html
      initialDelaySeconds: 1
      periodSeconds: 3
      timeoutSeconds: 10		# 最大超时时间
cat nginx.yaml
#apiVersion: extensions/v1beta1
apiVersion: apps/v1
kind: Deployment
metadata:
  name: nginx-deployment
spec:
  replicas: 1
  selector:
    matchLabels: #rs or deployment
      app: ng-deploy-80
    #matchExpressions:
    # - {key: app, operator: In, values: [ng-deploy-80,ng-rs-81]}
  template:
    metadata:
      labels:
        app: ng-deploy-80
    spec:
      containers:
      - name: ng-deploy-80
        image: nginx:1.17.5
        ports:
        - containerPort: 80
        #readinessProbe:
        livenessProbe:
          httpGet:
            #path: /monitor/monitor.html
            path: /index.html
            port: 80
          initialDelaySeconds: 5
          periodSeconds: 3
          timeoutSeconds: 5
          successThreshold: 1
          failureThreshold: 3

 ---
 apiVersion: v1
 kind: Service
 metadata:
   name: ng-deploy-80
 spec:
   ports:
   - name: http
     port: 81
     targetPort: 80
     nodePort: 30012
     protocol: TCP
   type: NodePort
   selector:
     app: ng-deploy-80

2. ExecAction
在容器内执行指定命令。如果命令退出时返回码为 0 则认为诊断成功
存活检测
pod 创建,容器初始化完成后,创建文件后休眠 60 秒后删除该文件,存活检测在容器创建后延时 1s 进行检测,重试时间间隔 3s
apiVersion: v1
kind: Pod
metadata:
  name: liveness-exec-pod
  namespace: default
spec:
  containers:
  - name: liveness-exec-container
    image: busybox
    imagePullPolicy: IfNotPresent
    # 创建一个文件,休眠 60s,然后把该文件删除
    command: ["/bin/sh","-c","touch /temp/live ; sleep 60 ; rm -rf /temp/live; sleep 3600"]
    livenessProbe:		# 存活检测
      exec:
        # 检测该文件是还存在, 如果存在,返回值为 0
        command: ["test","-e","/temp/live"]
      initialDelaySeconds: 1	# 容器启动后延时 1s 再开始检测
      periodSeconds: 3			# 每隔 3s 检测一次
容器启动时会创建 /temp/live 文件,60s 之后删除该文件。当 livenessProbe 发现文件不存在,就会重启容器,重启后的容器 60秒之后又会删除 /temp/live 文件,所以容器不断被重启

docker pull redis

cat redis.yaml
#apiVersion: extensions/v1beta1
apiVersion: apps/v1
kind: Deployment
metadata:
  name: redis-deployment
spec:
  replicas: 1
  selector:
    matchLabels: #rs or deployment
      app: redis-deploy-6379
    #matchExpressions:
    # - {key: app, operator: In, values: [redis-deploy-6379,ng-rs-81]}
  template:
    metadata:
      labels:
        app: redis-deploy-6379
    spec:
      containers:
      - name: redis-deploy-6379
        image: redis
        ports:
        - containerPort: 6379
        livenessProbe:
        #readinessProbe:
          exec:
            command:
            #- /apps/redis/bin/redis-cli
            #进入,并推出redis
            - /usr/local/bin/redis-cli
            - quit
            initialDelaySeconds: 5
            periodSeconds: 3
            timeoutSeconds: 5
            successThreshold: 1
            failureThreshold: 3

---
apiVersion: v1
kind: Service
metadata:
  name: redis-deploy-6379
spec:
  ports:
  - name: http
    port: 6379
    targetPort: 6379
    nodePort: 40016
    protocol: TCP
  type: NodePort
  selector:
    app: redis-deploy-6379
如果端口检测连续超过指定的三次都没有通过,则Pod状态如下

3. TCPSocketAction
对指定容器端口的IP地址进行 TCP 检查。如端口打开,则诊断被认为是成功的。
存活检测
创建一个 pod,镜像文件是 nginx,存活检测镜像容器中的 nginx(80),使用 tcp 连接,端口指定8080,当探测结果失败时(不可访问),重启容器
apiVersion: v1
kind: Pod
metadata:
  name: liveness-tcp-pod
  namespace: default
spec:
  containers:
  - name: liveness-tcp-container
    image: wangyanglinux/myapp:v1
    imagePullPolicy: IfNotPresent
    livenessProbe:
      initialDelaySeconds: 1
      timeoutSeconds: 5
      periodSeconds: 3
      tcpSocket:
        port: 8080		# nginx 是 80 端口
 cat nginx.yaml
#apiVersion: extensions/v1beta1
apiVersion: apps/v1
kind: Deployment
metadata:
  name: nginx-deployment
spec:
  replicas: 1
  selector:
    matchLabels: #rs or deployment
      app: ng-deploy-80
    #matchExpressions:
    # - {key: app, operator: In, values: [ng-deploy-80,ng-rs-81]}
  template:
    metadata:
      labels:
        app: ng-deploy-80
    spec:
      containers:
      - name: ng-deploy-80
        image: nginx:1.17.5
        ports:
        - containerPort: 80
          livenessProbe:
          #readinessProbe:
            tcpSocket:
              port: 80
              #port: 8080
              initialDelaySeconds: 5
              periodSeconds: 3
              timeoutSeconds: 5
              successThreshold: 1
              failureThreshold: 3

---
apiVersion: v1
kind: Service
metadata:
  name: ng-deploy-80
spec:
  ports:
  - name: http
    port: 81
    targetPort: 80
    nodePort: 40012
    protocol: TCP
  type: NodePort s
  elector:
    app: ng-deploy-80
三. 手动调整pod数量
在高峰期间需要扩容,低峰缩容(节省成本)
kubectl scale 对运行在k8s 环境中的pod 数量进行扩容(增加)或缩容(减小)。
- 改yaml文件改replicas数量
- 在dashboard改deployment的pdo值
- 通过kubectl scale命令
kubectl scale deployment linux39-tomcat-app1-deployment --replicas=3 -n linux - 通过kubectl edit
kubectl edit deployment linux39-tomcat-app1-deployment -n linux
永久配置:改ymal文件
当前pod数量:
kubectl get deployment -n linux

查看命令使用帮助
kubectl --help | grep scale

kubectl scale --help

执行扩容/缩容
kubectl scale deployment/linux-tomcat-app1-deployment --replicas=2 -n linux

验证手动扩容结果
kubectl get deployment -n linux
四. HPA自动伸缩pod数量
kubectl autoscale 自动控制在k8s集群中运行的pod数量(水平自动伸缩),需要提前设置pod范围及触发条件
k8s从1.1版本开始增加了名称为HPA(Horizontal Pod Autoscaler)的控制器,用于实现基于pod中资源(CPU/Memory)利用率进行对pod的自动扩缩容功能的实现,早期的版本只能基于Heapster组件实现对CPU利用率做为触发条件,
但是在k8s 1.11版本开始使用Metrices Server完成数据采集,然后将采集到的数据通过API(Aggregated API,汇总API),例如metrics.k8s.io,custom.metrics.k8s.ioexternal.metrics.k8s.io,然后再把数据提供给HPA控制器进行查询,以实现基于某个资源利用率对pod进行扩缩容的目的。
控制管理器默认每隔15s(可以通过–horizontal-pod-autoscaler-sync-period修改)查询metrics的资源

使用情况

支持以下三种metrics类型:
	->预定义metrics(比如Pod的CPU)以利用率的方式计算
	->自定义的Pod metrics,以原始值(raw value)的方式计算
	->自定义的object metrics

支持两种metrics查询方式:
	->Heapster
	->自定义的REST API

支持多metrics

1. 准备metrics-server:
使用metrics-server作为HPA数据源。
https://github.com/kubernetes-incubator/metrics-server
clone代码:
git clone https://github.com/kubernetes-incubator/metrics-server.git

cd metrics-server/
准备image:
测试系统自带的指标数据:
curl http://localhost:8080/apis/metrics.k8s.io/v1beta1/nodes
curl http://localhost:8080/apis/metrics.k8s.io/v1beta1/pods

测试指标数据:
kubectl top
kubectl top nodes
报错如下
Error from server (NotFound): the server could not find the requested resource (get services http:heapster:)

解决方案
	#google镜像仓库
docker pull k8s.gcr.io/metrics-server-amd64:v0.3.5
	#阿里云镜像仓库
docker pull registry.cn-hangzhou.aliyuncs.com/google_containers/metrics-server-amd64:v0.3.5

或者
docker tag k8s.gcr.io/metrics-server-amd64:v0.3.5 harbor.magedu.net/baseimages/metrics- server-amd64:v0.3.5
docker push harbor.qcqu.net/baseimages/metrics-server-amd64:v0.3.5
修改yaml文件:
pwd
/root/metrics-server

cat deploy/1.8+/metrics-server-deployment.yaml
---
apiVersion: v1
kind: ServiceAccount
metadata:
  name: metrics-server
  namespace: kube-system

---
apiVersion: extensions/v1beta1
kind: Deployment
metadata:
  name: metrics-server
  namespace: kube-system
  labels:
    k8s-app: metrics-server
spec:
  selector:
    matchLabels: k8s-app:
      metrics-server
    template:
      metadata:
        name: metrics-server
        labels:
          k8s-app: metrics-server
      spec:
        serviceAccountName: metrics-server
        volumes:
        # mount in tmp so we can safely use from-scratch images and/or read-only containers
        - name: tmp-dir
          emptyDir: {} containers:
        - name: metrics-server
          image: harbor.magedu.net/baseimages/metrics-server-amd64:v0.3.3 #本地harbor
          imagePullPolicy: Always
          volumeMounts:
          - name: tmp-dir
            mountPath: /tmp
创建metrics-server服务
kubectl apply -f deploy/1.8+/
验证metrics-server pod

修改controller-manager启动参数
kubectl top nodes
验证metrics-server 是否采集到pod数据:
kubectl top pods -n linux
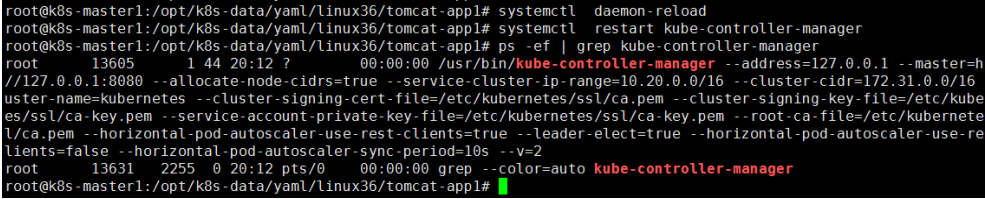
修改controller-manager启动参数
kube-controller-manager --help | grep horizontal-pod-autoscaler-sync-period
定义pod数量水平伸缩的间隔周期,默认15秒
	--horizontal-pod-autoscaler-sync-period duration


vim /etc/systemd/system/kube-controller-manager.service
[Unit]
Description=Kubernetes Controller Manager
Documentation=https://github.com/GoogleCloudPlatform/kubernetes

[Service]
ExecStart=/usr/bin/kube-controller-manager \
  --address=127.0.0.1 \
  --master=http://127.0.0.1:8080 \
  --allocate-node-cidrs=true \
  --service-cluster-ip-range=10.20.0.0/16 \
  --cluster-cidr=172.31.0.0/16 \
  --cluster-name=kubernetes \
  --cluster-signing-cert-file=/etc/kubernetes/ssl/ca.pem \
  --cluster-signing-key-file=/etc/kubernetes/ssl/ca-key.pem \
  --service-account-private-key-file=/etc/kubernetes/ssl/ca-key.pem \
  --root-ca-file=/etc/kubernetes/ssl/ca.pem \
  --horizontal-pod-autoscaler-use-rest-clients=true \ --leader-elect=true \
  --horizontal-pod-autoscaler-use-rest-clients=true \ #是否使用其他客户端数据
  --horizontal-pod-autoscaler-sync-period=10s \ #可选项目,定义数据采集周期间隔时间
  --v=2 Restart=on-failure RestartSec=5

[Install]
WantedBy=multi-user.target
重启controller-manager
2. 通过命令配置扩缩容
kubectl autoscale deployment/linux36-nginx-deployment --min=2 --max=10 --cpu-percent=80 -n linux


验证信息:
kubectl describe deployment/linux36-nginx-deployment -n linux
	desired 最终期望处于READY状态的副本数
	updated 当前完成更新的副本数
	total 总计副本数
	available 当前可用的副本数
	unavailable 不可用副本数

3. yaml文件中定义扩缩容配置(HPA)
pwd
/opt/k8s-data/yaml/linux36/tomcat-app1

cat tomcat-app1.yaml
kind: Deployment
apiVersion: extensions/v1beta1
metadata:
  labels:
    app: linux36-tomcat-app1-deployment-label
    name: linux36-tomcat-app1-deployment
    namespace: linux36
spec:
  replicas: 1
  selector:
    matchLabels:
      app: linux36-tomcat-app1-selector
  template:
    metadata:
      labels:
        app: linux36-tomcat-app1-selector
    spec:
      containers:
      - name: linux36-tomcat-app1-container
        image: harbor.magedu.net/linux36/tomcat-app1:2019-08-02_11_02_30
        #command: ["/apps/tomcat/bin/run_tomcat.sh"]
        #imagePullPolicy: IfNotPresent
        imagePullPolicy: Always
        ports:
        - containerPort: 8080
          protocol: TCP
          name: http
        #env:
        #- name: "password"
        #  value: "123456"
        #- name: "age"
        #  value: "18"
        #resources:
        # limits:
        # cpu: 4
        # memory: 4Gi
        # requests:
        # cpu: 2
        # memory: 4Gi
        volumeMounts:
        - name: linux36-images
          mountPath: /data/tomcat/webapps/myapp/images
          readOnly: false
        - name: linux36-static
          mountPath: /data/tomcat/webapps/myapp/static readOnly: false
      volumes:
      - name: linux36-images
        nfs:
          server: 192.168.7.108
          path: /data/linux36/images
      - name: linux36-static
        nfs:
          server: 192.168.7.108
          path: /data/linux36/static

---
kind: Service
apiVersion: v1
metadata:
  labels:
      app: linux36-tomcat-app1-service-label
    name: linux36-tomcat-app1-service
    namespace: linux36
  spec:
    type: NodePort
    ports:
    - name: http
      port: 80
      protocol: TCP
      targetPort: 8080
      nodePort: 30003
    selector:
    app: linux36-tomcat-app1-selector

---
apiVersion: autoscaling/v2beta1 #定义API版本
kind: HorizontalPodAutoscaler #对象类型
metadata: #定义对象元数据
  namespace: linux36 #创建后隶属的namespace
  name: linux36-tomcat-app1-podautoscaler #对象名称
  labels: 这样的label标签
    app: linux36-tomcat-app1 #自定义的label名称
    version: v2beta1 #自定义的api版本
spec: #定义对象具体信息
  scaleTargetRef: #定义水平伸缩的目标对象,Deployment、ReplicationController/ReplicaSet
    apiVersion: apps/v1
    #API版本,HorizontalPodAutoscaler.spec.scaleTargetRef.apiVersion
    kind: Deployment #目标对象类型为deployment
    name: linux36-tomcat-app1-deployment #deployment 的具体名称
  minReplicas: 2 #最小pod数
  maxReplicas: 5 #最大pod数
  metrics: #调用metrics数据定义
  - type: Resource #类型为资源
    resource: #定义资源
      name: cpu #资源名称为cpu
      targetAverageUtilization: 80 #CPU使用率
  - type: Resource #类型为资源
    resource: #定义资源
      name: memory #资源名称为memory
      targetAverageValue: 1024Mi #memory使用率
验证HPA
kubctl get hpa -n namespace

验证扩容、缩容效果

4、helm方式创建HAP
参考:https://blog.csdn.net/zyx1260168395/article/details/109792398
配置自动扩缩容
先手动扩容至5个,验证在空闲时间是否会自动缩容、将pod扩容至5个

空闲一段时间,验证是否会对容器扩缩容
kubectl get hpa -n linux36

kubectl describe hpa linux36- tomcat-app1-podautoscaler -n linux36


 5246
5246


 被折叠的 条评论
为什么被折叠?
被折叠的 条评论
为什么被折叠?
 到【灌水乐园】发言


