


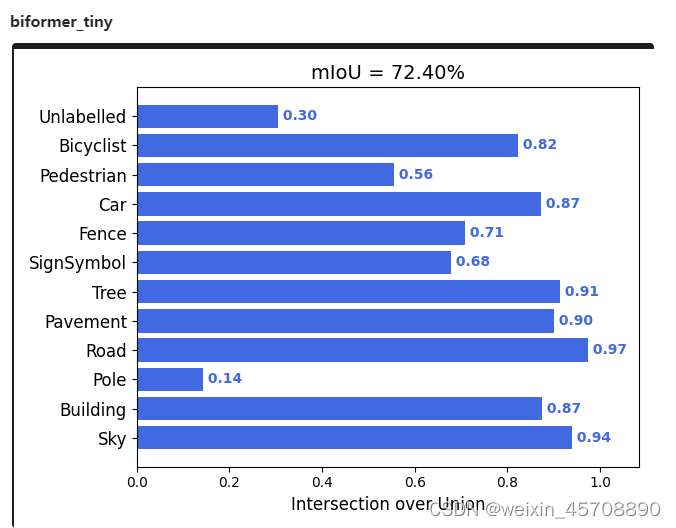
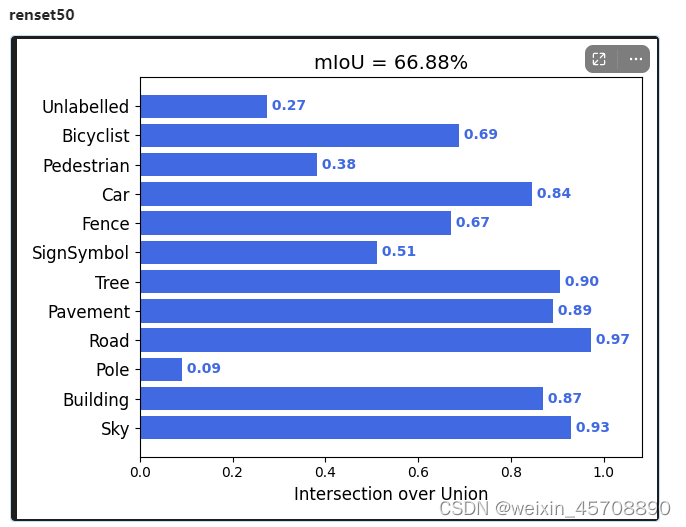
 文章介绍了使用Pytorch实现SegNet和Unet语义分割模型的过程,包括网络参数选择、编码器-解码器结构以及训练细节。在512*512的输入尺寸下,经过100个epoch的训练,SegNet的预测结果存在较多噪点,性能逊于Unet。ResNet-Unet和Biformer_tiny版本的Unet表现出更高的IoU指标,分别为66%和72.4%,显示了更好的分割效果。
1.数据来源:
https://github.com/alexgkendall/SegNet-Tutorial
2.网络参数选择
 https://blog.csdn.net/weixin_44791964/article/details/108866828
输入尺寸:512*512
Epoch:100
损失函数:CEloss
pytorch实现segnet:
import torch
import torch.nn as nn
import torch.nn.functional as F
# from collections import OrderedDict
#Encoder模块

class Encoder(nn.Module):
    def __init__(self):
        super(Encoder,self).__init__()
        #前13层是VGG16的前13层,分为5个stage
        #因为在下采样时要保存最大池化层的索引, 方便起见, 池化层不写在stage中
        self.stage_1 = nn.Sequential(
            nn.Conv2d(3, 64, kernel_size=3, stride=1, padding=1),
            nn.BatchNorm2d(64),
            nn.ReLU(),
            nn.Conv2d(64, 64, kernel_size=3, stride=1, padding=1),
            nn.BatchNorm2d(64),
            nn.ReLU(),
        )

        self.stage_2 = nn.Sequential(
            nn.Conv2d(64, 128, kernel_size=3, stride=1, padding=1),
            nn.BatchNorm2d(128),
            nn.ReLU(),
            nn.Conv2d(128, 128, kernel_size=3, stride=1, padding=1),
            nn.BatchNorm2d(128),
            nn.ReLU(),
        )

        self.stage_3 = nn.Sequential(
            nn.Conv2d(128, 256, kernel_size=3, stride=1, padding=1),
            nn.BatchNorm2d(256),
            nn.ReLU(),
            nn.Conv2d(256, 256, kernel_size=3, stride=1, padding=1),
            nn.BatchNorm2d(256),
            nn.ReLU(),
            nn.Conv2d(256, 256, kernel_size=3, stride=1, padding=1),
            nn.BatchNorm2d(256),
            nn.ReLU(),
        )

        self.stage_4 = nn.Sequential(
            nn.Conv2d(256, 512, kernel_size=3, stride=1, padding=1),
            nn.BatchNorm2d(512),
            nn.ReLU(),
            nn.Conv2d(512, 512, kernel_size=3, stride=1, padding=1),
            nn.BatchNorm2d(512),
            nn.ReLU(),
            nn.Conv2d(512, 512, kernel_size=3, stride=1, padding=1),
            nn.BatchNorm2d(512),
            nn.ReLU(),
        )

        self.stage_5 = nn.Sequential(
            nn.Conv2d(512, 512, kernel_size=3, stride=1, padding=1),
            nn.BatchNorm2d(512),
            nn.ReLU(),
            nn.Conv2d(512, 512, kernel_size=3, stride=1, padding=1),
            nn.BatchNorm2d(512),
            nn.ReLU(),
            nn.Conv2d(512, 512, kernel_size=3, stride=1, padding=1),
            nn.BatchNorm2d(512),
            nn.ReLU(),
        )

    def forward(self, x):
        #用来保存各层的池化索引
        pool_indices = []
        x = x.float()

        x = self.stage_1(x)
        #pool_indice_1保留了第一个池化层的索引
        x, pool_indice_1 = nn.MaxPool2d( 2, stride=2, return_indices=True)(x)
        pool_indices.append(pool_indice_1)

        x = self.stage_2(x)
        x, pool_indice_2 = nn.MaxPool2d(2, stride=2, return_indices=True)(x)
        pool_indices.append(pool_indice_2)

        x = self.stage_3(x)
        x, pool_indice_3 = nn.MaxPool2d(2, stride=2, return_indices=True)(x)
        pool_indices.append(pool_indice_3)

        x = self.stage_4(x)
        x, pool_indice_4 = nn.MaxPool2d(2, stride=2, return_indices=True)(x)
        pool_indices.append(pool_indice_4)

        x = self.stage_5(x)
        x, pool_indice_5 = nn.MaxPool2d(2, stride=2, return_indices=True)(x)
        pool_indices.append(pool_indice_5)

        return x, pool_indices


#SegNet网络, Encoder-Decoder
class SegNet(nn.Module):
    def __init__(self, num_classes):
        super(SegNet, self).__init__()
        #加载Encoder
        self.encoder = Encoder()
       #上采样 从下往上, 1->2->3->4->5
        self.upsample_1 = nn.Sequential(
            nn.Conv2d(512, 512, kernel_size=3, stride=1, padding=1),
            nn.BatchNorm2d(512),
            nn.ReLU(),
            nn.Conv2d(512, 512, kernel_size=3, stride=1, padding=1),
            nn.BatchNorm2d(512),
            nn.ReLU(),
            nn.Conv2d(512, 512, kernel_size=3, stride=1, padding=1),
            nn.BatchNorm2d(512),
            nn.ReLU(),
        )

        self.upsample_2 = nn.Sequential(
            nn.Conv2d(512, 512, kernel_size=3, stride=1, padding=1),
            nn.BatchNorm2d(512),
            nn.ReLU(),
            nn.Conv2d(512, 512, kernel_size=3, stride=1, padding=1),
            nn.BatchNorm2d(512),
            nn.ReLU(),
            nn.Conv2d(512, 256, kernel_size=3, stride=1, padding=1),
            nn.BatchNorm2d(256),
            nn.ReLU(),
        )

        self.upsample_3 = nn.Sequential(
            nn.Conv2d(256, 256, kernel_size=3, stride=1, padding=1),
            nn.BatchNorm2d(256),
            nn.ReLU(),
            nn.Conv2d(256, 256, kernel_size=3, stride=1, padding=1),
            nn.BatchNorm2d(256),
            nn.ReLU(),
            nn.Conv2d(256, 128, kernel_size=3, stride=1, padding=1),
            nn.BatchNorm2d(128),
            nn.ReLU(),
        )

        self.upsample_4 = nn.Sequential(
            nn.Conv2d(128, 128, kernel_size=3, stride=1, padding=1),
            nn.BatchNorm2d(128),
            nn.ReLU(),
            nn.Conv2d(128, 64, kernel_size=3, stride=1, padding=1),
            nn.BatchNorm2d(64),
            nn.ReLU(),
        )

        self.upsample_5 = nn.Sequential(
            nn.Conv2d(64, 64, kernel_size=3, stride=1, padding=1),
            nn.BatchNorm2d(64),
            nn.ReLU(),
            nn.Conv2d(64, num_classes, kernel_size=3, stride=1, padding=1),
        )

    def forward(self, x):
        x, pool_indices = self.encoder(x)

        #池化索引上采样
        x = nn.MaxUnpool2d(2, 2, padding=0)(x, pool_indices[4])
        x = self.upsample_1(x)

        x = nn.MaxUnpool2d(2, 2, padding=0)(x, pool_indices[3])
        x = self.upsample_2(x)

        x = nn.MaxUnpool2d(2, 2, padding=0)(x, pool_indices[2])
        x = self.upsample_3(x)

        x = nn.MaxUnpool2d(2, 2, padding=0)(x, pool_indices[1])
        x = self.upsample_4(x)

        x = nn.MaxUnpool2d(2, 2, padding=0)(x, pool_indices[0])
        x = self.upsample_5(x)

        return x
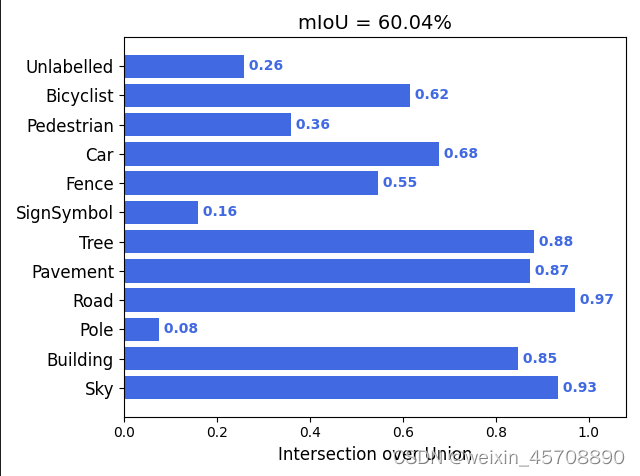
3.网络结果:
各类iou指标:
预测结果:


4.总结:
预测会出现许多噪点,效果不太好,上述指标是在val上的结果,论文上指标好像是50几左右,整体来说还是unet比较扛一点,
用resnet_unet的miou都达到66%miou,
Biformer_tiny版本的unet更达到了72.4%的Miou。(参数量比rensnet_unet少一倍)


 6127
6127

 被折叠的 条评论
为什么被折叠?
被折叠的 条评论
为什么被折叠?
 到【灌水乐园】发言


