


 SegNet是2015年提出的语义分割网络,针对FCN的不足,通过保存池化索引实现精细的上采样。它采用编码器-解码器结构,编码器由VGG16的前13层构成,解码器通过池化索引恢复分辨率。与FCN的反卷积不同,SegNet利用最大池化索引进行上采样,减少了参数量并提高了分割精度。模型在CamVid数据集上进行了复现并展示了一定的分割效果。
SegNet手稿最早是在2015年12月投出,和FCN属于同时期作品。稍晚于FCN,既然属于后来者,又是与FCN同属于语义分割网络,SegNet论文中做出了许多与FCN网络的对比论述。
《SegNet: A Deep Convolutional Encoder-Decoder Architecture for Image Segmentation》
目录
SegNet
设计动机
作者认为,FCN网络的分割结果鼓舞人心,但是,池化和下采样过程降低了特征图的分辨率,损失了一定信息,会得到较为粗糙的结果。因此,作者设计了SegNet来将低分辨率的特征映射到输入分辨率,以提升像素级的分类。
其次,在当时,FCN网络算是比较大的模型,在编码层有134M参数,而在解码层却只有0.5M参数,作者觉得FCN在上采样上做的不好,同时也觉得模型太大,难以训练。
于是,作者设计了一个端到端的、编码器(encoder)网络中每个编码器都被逐步连接到解码器(decoder)网络中的SegNet。这种想法很简单,也就是保存多个尺度上提取到的特征和全局的上下文信息,为上采样时提供更多的可用信息,从而保留更多高频细节,实现精细的分割。
网络结构
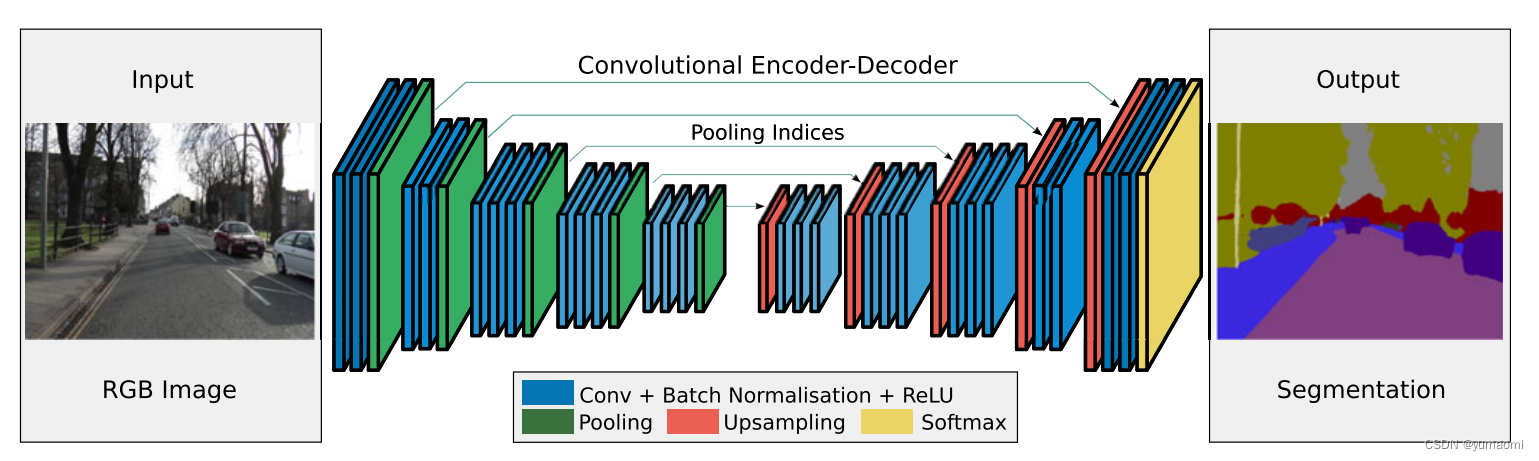
上文中提到,SegNet使用了Encoder-Decoder网络结构,每一个Encoder层对应一个Decoder层,最后一层是一个Softmax分类器,用于像素点分类。
其中,Encoder网络由VGG16的前13层组成,恰好是去掉了VGG16的最后三层全连接层。这会比较方便,因为可以用训练好的VGG16的网络参数来初始化SegNet。同时,作者提到,解码层的参数量只有14.7M,相比134M的FCN,只有十分之一的参数量。
编码层的架构是VGG16的前13层,比较简单,通过叠加卷积-批标准化-ReLu激活一套操作来提取特征,随后用一个核为2步长为2的MaxPool来降采样,并实现输入图像的平移不变性。但是呢,这种池化和降采样操作,会造成特征映射时的分辨率损失,当层数越深,特征图分辨率就越低,再上采样就难以恢复到原图那么精细的程度。因此,作者在编码器这一模块中做了一些工作。
Pool indices
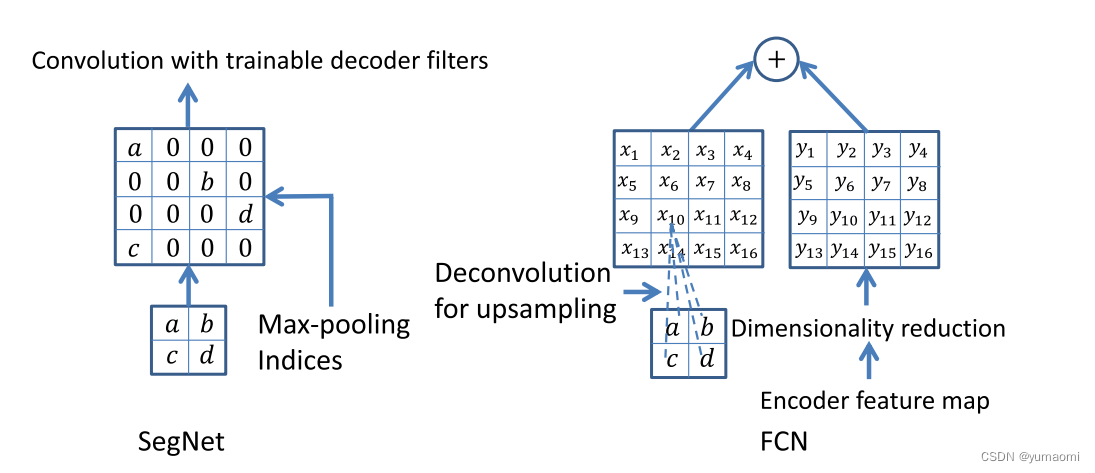
为了保留降采样过程中的一些重要信息,作者提出了一种在编码器特征图中捕获和存储边界信息的方法-保存池化层索引(图1中的pooling indices)。这与FCN中和Unet中的跳跃连接不同,一个是叠加相同维度的编码层和解码层的特征图,一个是通过保存对应维度的池化层索引来帮助图像重建。
在上采样的操作上,SegNet与FCN不同。SegNet根据保留的pooling indices对特征进行映射,这一步不需要进行学习,然后后接一个可以训练的解码滤波器(其实就是几个卷积层)。而FCN是通过Deconvolution(反卷积)操作来实现。
SegNet上采样过程中,通过池化索引来映射特征,再输入可训练的多通道解码滤波器中进行卷积,增强其稀疏特征。
结果
模型复现
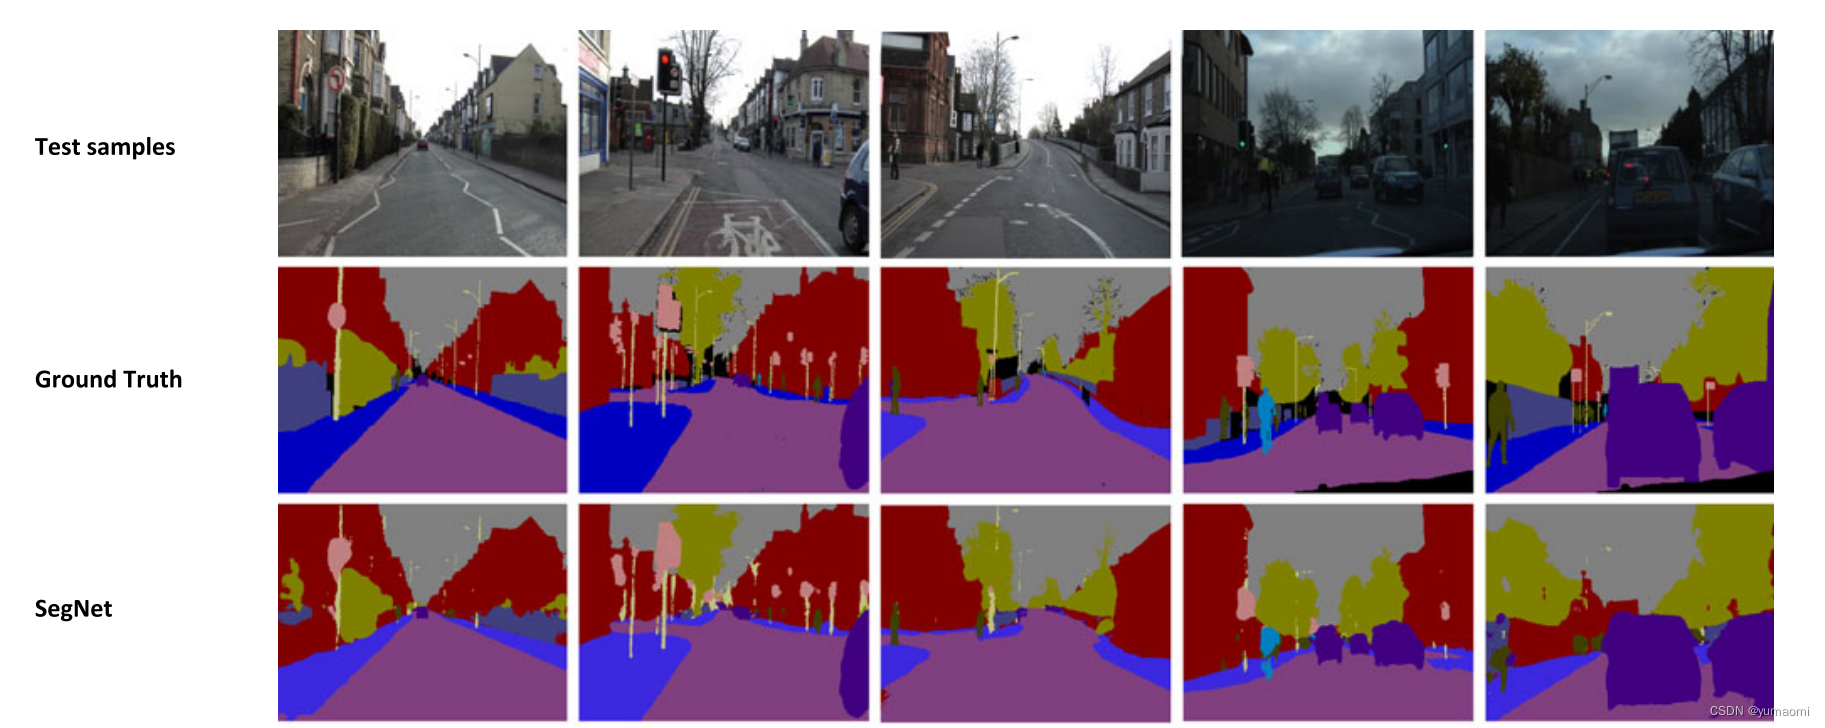
本文将在CamVid数据集上复现SegNet模型。
数据集构建
先导入一些乱七八糟的库。
# 导入库
import os
os.environ['CUDA_VISIBLE_DEVICES'] = '0'

import torch
import torch.nn as nn
import torch.optim as optim
import torch.nn.functional as F
from torch import optim
from torch.utils.data import Dataset, DataLoader, random_split
from tqdm import tqdm
import warnings
warnings.filterwarnings("ignore")
import os.path as osp
import matplotlib.pyplot as plt
from PIL import Image
import numpy as np
import albumentations as A
from albumentations.pytorch.transforms import ToTensorV2
Dataset类
Camvid有32个类。这里的数据增强用了albumentations库,可以通过pip安装。原因是pytorch库总是实现不了标签和图像的同时增强,有点奇怪。图像和label都统一缩放到[448,448]。
torch.manual_seed(17)
# 自定义数据集CamVidDataset
class CamVidDataset(torch.utils.data.Dataset):
    """CamVid Dataset. Read images, apply augmentation and preprocessing transformations.

    Args:
        images_dir (str): path to images folder
        masks_dir (str): path to segmentation masks folder
        class_values (list): values of classes to extract from segmentation mask
        augmentation (albumentations.Compose): data transfromation pipeline
            (e.g. flip, scale, etc.)
        preprocessing (albumentations.Compose): data preprocessing
            (e.g. noralization, shape manipulation, etc.)
    """

    def __init__(self, images_dir, masks_dir):
        self.transform = A.Compose([
            A.Resize(448, 448),
            A.HorizontalFlip(),
            A.VerticalFlip(),
            A.Normalize(),
            ToTensorV2(),
        ])
        self.ids = os.listdir(images_dir)
        self.images_fps = [os.path.join(images_dir, image_id) for image_id in self.ids]
        self.masks_fps = [os.path.join(masks_dir, image_id) for image_id in self.ids]


    def __getitem__(self, i):
        # read data
        image = np.array(Image.open(self.images_fps[i]).convert('RGB'))
        mask = np.array( Image.open(self.masks_fps[i]).convert('RGB'))
        image = self.transform(image=image,mask=mask)

        return image['image'], image['mask'][:,:,0]

    def __len__(self):
        return len(self.ids)


# 设置数据集路径
DATA_DIR = r'dataset\camvid' # 根据自己的路径来设置
x_train_dir = os.path.join(DATA_DIR, 'train_images')
y_train_dir = os.path.join(DATA_DIR, 'train_labels')
x_valid_dir = os.path.join(DATA_DIR, 'valid_images')
y_valid_dir = os.path.join(DATA_DIR, 'valid_labels')


train_dataset = CamVidDataset(
    x_train_dir,
    y_train_dir,
)
val_dataset = CamVidDataset(
    x_valid_dir,
    y_valid_dir,
)

train_loader = DataLoader(train_dataset, batch_size=8, shuffle=True)
val_loader = DataLoader(val_dataset, batch_size=8, shuffle=True)
创建数据集和dataloader
# 设置数据集路径
DATA_DIR = r'dataset\camvid' # 根据自己的路径来设置
x_train_dir = os.path.join(DATA_DIR, 'train_images')
y_train_dir = os.path.join(DATA_DIR, 'train_labels')
x_valid_dir = os.path.join(DATA_DIR, 'valid_images')
y_valid_dir = os.path.join(DATA_DIR, 'valid_labels')


train_dataset = CamVidDataset(
    x_train_dir,
    y_train_dir,
)
val_dataset = CamVidDataset(
    x_valid_dir,
    y_valid_dir,
)

train_loader = DataLoader(train_dataset, batch_size=8, shuffle=True)
val_loader = DataLoader(val_dataset, batch_size=8, shuffle=True)
可以查看一下数据增强的结果
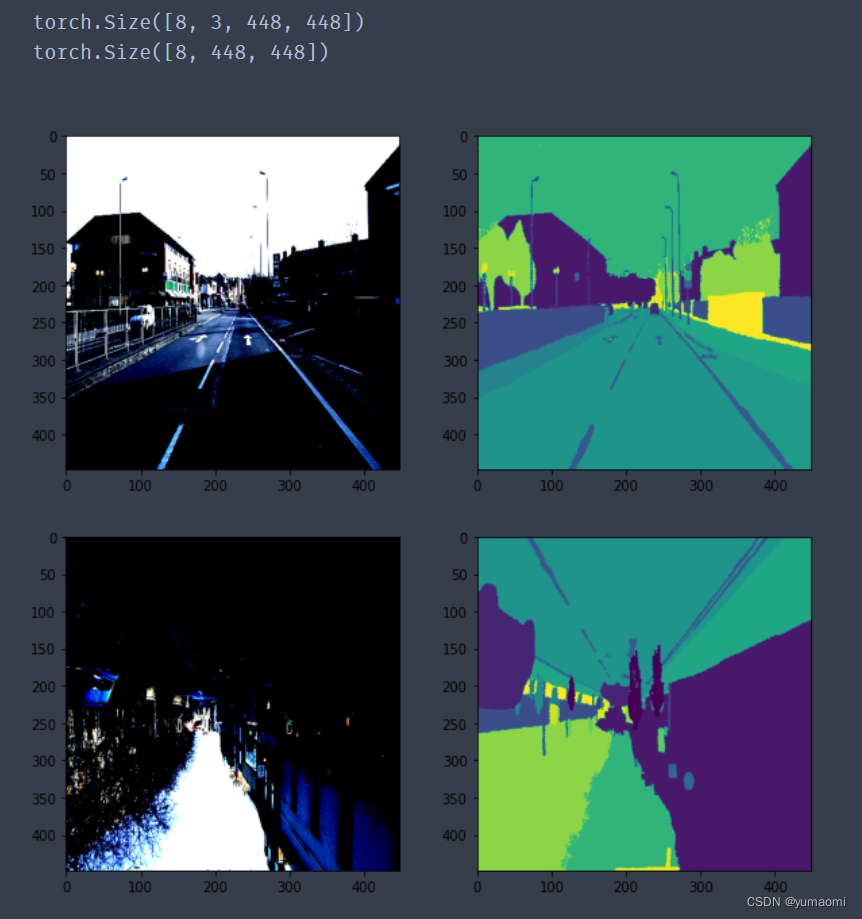
for index, (img, label) in enumerate(train_loader):
    print(img.shape)
    print(label.shape)

    plt.figure(figsize=(10,10))
    plt.subplot(221)
    plt.imshow((img[0,:,:,:].moveaxis(0,2)))
    plt.subplot(222)
    plt.imshow(label[0,:,:])

    plt.subplot(223)
    plt.imshow((img[6,:,:,:].moveaxis(0,2)))
    plt.subplot(224)
    plt.imshow(label[6,:,:])

    plt.show()
    if index==0:
        break
(图像增强中做了Normalize以后,图像的颜色会变得稍微有点奇怪)但至少我们得到了数据和标签同时增强的结果。
模型构建
为了方便起见,模型分为Encoder和SegNet两部分来构建。
#Encoder模块

class Encoder(nn.Module):
    def __init__(self):
        super(Encoder,self).__init__()
        #前13层是VGG16的前13层,分为5个stage
        #因为在下采样时要保存最大池化层的索引, 方便起见, 池化层不写在stage中
        self.stage_1 = nn.Sequential(
            nn.Conv2d(3, 64, kernel_size=3, stride=1, padding=1),
            nn.BatchNorm2d(64),
            nn.ReLU(),
            nn.Conv2d(64, 64, kernel_size=3, stride=1, padding=1),
            nn.BatchNorm2d(64),
            nn.ReLU(),
        )

        self.stage_2 = nn.Sequential(
            nn.Conv2d(64, 128, kernel_size=3, stride=1, padding=1),
            nn.BatchNorm2d(128),
            nn.ReLU(),
            nn.Conv2d(128, 128, kernel_size=3, stride=1, padding=1),
            nn.BatchNorm2d(128),
            nn.ReLU(),
        )

        self.stage_3 = nn.Sequential(
            nn.Conv2d(128, 256, kernel_size=3, stride=1, padding=1),
            nn.BatchNorm2d(256),
            nn.ReLU(),
            nn.Conv2d(256, 256, kernel_size=3, stride=1, padding=1),
            nn.BatchNorm2d(256),
            nn.ReLU(),
            nn.Conv2d(256, 256, kernel_size=3, stride=1, padding=1),
            nn.BatchNorm2d(256),
            nn.ReLU(),
        )

        self.stage_4 = nn.Sequential(
            nn.Conv2d(256, 512, kernel_size=3, stride=1, padding=1),
            nn.BatchNorm2d(512),
            nn.ReLU(),
            nn.Conv2d(512, 512, kernel_size=3, stride=1, padding=1),
            nn.BatchNorm2d(512),
            nn.ReLU(),
            nn.Conv2d(512, 512, kernel_size=3, stride=1, padding=1),
            nn.BatchNorm2d(512),
            nn.ReLU(),
        )

        self.stage_5 = nn.Sequential(
            nn.Conv2d(512, 512, kernel_size=3, stride=1, padding=1),
            nn.BatchNorm2d(512),
            nn.ReLU(),
            nn.Conv2d(512, 512, kernel_size=3, stride=1, padding=1),
            nn.BatchNorm2d(512),
            nn.ReLU(),
            nn.Conv2d(512, 512, kernel_size=3, stride=1, padding=1),
            nn.BatchNorm2d(512),
            nn.ReLU(),
        )

    def forward(self, x):
        #用来保存各层的池化索引
        pool_indices = []
        x = x.float()

        x = self.stage_1(x)
        #pool_indice_1保留了第一个池化层的索引
        x, pool_indice_1 = nn.MaxPool2d( 2, stride=2, return_indices=True)(x)
        pool_indices.append(pool_indice_1)

        x = self.stage_2(x)
        x, pool_indice_2 = nn.MaxPool2d(2, stride=2, return_indices=True)(x)
        pool_indices.append(pool_indice_2)

        x = self.stage_3(x)
        x, pool_indice_3 = nn.MaxPool2d(2, stride=2, return_indices=True)(x)
        pool_indices.append(pool_indice_3)

        x = self.stage_4(x)
        x, pool_indice_4 = nn.MaxPool2d(2, stride=2, return_indices=True)(x)
        pool_indices.append(pool_indice_4)

        x = self.stage_5(x)
        x, pool_indice_5 = nn.MaxPool2d(2, stride=2, return_indices=True)(x)
        pool_indices.append(pool_indice_5)

        return x, pool_indices


#SegNet网络, Encoder-Decoder
class SegNet(nn.Module):
    def __init__(self, num_classes):
        super(SegNet, self).__init__()
        #加载Encoder
        self.encoder = Encoder()
       #上采样 从下往上, 1->2->3->4->5
        self.upsample_1 = nn.Sequential(
            nn.Conv2d(512, 512, kernel_size=3, stride=1, padding=1),
            nn.BatchNorm2d(512),
            nn.ReLU(),
            nn.Conv2d(512, 512, kernel_size=3, stride=1, padding=1),
            nn.BatchNorm2d(512),
            nn.ReLU(),
            nn.Conv2d(512, 512, kernel_size=3, stride=1, padding=1),
            nn.BatchNorm2d(512),
            nn.ReLU(),
        )

        self.upsample_2 = nn.Sequential(
            nn.Conv2d(512, 512, kernel_size=3, stride=1, padding=1),
            nn.BatchNorm2d(512),
            nn.ReLU(),
            nn.Conv2d(512, 512, kernel_size=3, stride=1, padding=1),
            nn.BatchNorm2d(512),
            nn.ReLU(),
            nn.Conv2d(512, 256, kernel_size=3, stride=1, padding=1),
            nn.BatchNorm2d(256),
            nn.ReLU(),
        )

        self.upsample_3 = nn.Sequential(
            nn.Conv2d(256, 256, kernel_size=3, stride=1, padding=1),
            nn.BatchNorm2d(256),
            nn.ReLU(),
            nn.Conv2d(256, 256, kernel_size=3, stride=1, padding=1),
            nn.BatchNorm2d(256),
            nn.ReLU(),
            nn.Conv2d(256, 128, kernel_size=3, stride=1, padding=1),
            nn.BatchNorm2d(128),
            nn.ReLU(),
        )

        self.upsample_4 = nn.Sequential(
            nn.Conv2d(128, 128, kernel_size=3, stride=1, padding=1),
            nn.BatchNorm2d(128),
            nn.ReLU(),
            nn.Conv2d(128, 64, kernel_size=3, stride=1, padding=1),
            nn.BatchNorm2d(64),
            nn.ReLU(),
        )

        self.upsample_5 = nn.Sequential(
            nn.Conv2d(64, 64, kernel_size=3, stride=1, padding=1),
            nn.BatchNorm2d(64),
            nn.ReLU(),
            nn.Conv2d(64, num_classes, kernel_size=3, stride=1, padding=1),
        )

    def forward(self, x):
        x, pool_indices = self.encoder(x)

        #池化索引上采样
        x = nn.MaxUnpool2d(2, 2, padding=0)(x, pool_indices[4])
        x = self.upsample_1(x)

        x = nn.MaxUnpool2d(2, 2, padding=0)(x, pool_indices[3])
        x = self.upsample_2(x)

        x = nn.MaxUnpool2d(2, 2, padding=0)(x, pool_indices[2])
        x = self.upsample_3(x)

        x = nn.MaxUnpool2d(2, 2, padding=0)(x, pool_indices[1])
        x = self.upsample_4(x)

        x = nn.MaxUnpool2d(2, 2, padding=0)(x, pool_indices[0])
        x = self.upsample_5(x)

        return x
模型训练
#载入预训练权重, 500M还挺大的 下载地址:https://download.pytorch.org/models/vgg16_bn-6c64b313.pth
model = SegNet(32+1).cuda()
model.load_state_dict(torch.load(r"checkpoints/vgg16_bn-6c64b313.pth"),strict=False)

from d2l import torch as d2l
#损失函数选用多分类交叉熵损失函数
lossf = nn.CrossEntropyLoss()
#选用adam优化器来训练
optimizer = optim.SGD(model.parameters(),lr=0.1)
#训练50轮
epochs_num = 50
重写了一下d2l库的train函数,适应我们的数据集。
def train_ch13(net, train_iter, test_iter, loss, trainer, num_epochs,
               devices=d2l.try_all_gpus()):
    timer, num_batches = d2l.Timer(), len(train_iter)
    animator = d2l.Animator(xlabel='epoch', xlim=[1, num_epochs], ylim=[0, 1],
                            legend=['train loss', 'train acc', 'test acc'])
    net = nn.DataParallel(net, device_ids=devices).to(devices[0])
    for epoch in range(num_epochs):
        # Sum of training loss, sum of training accuracy, no. of examples,
        # no. of predictions
        metric = d2l.Accumulator(4)
        for i, (features, labels) in enumerate(train_iter):
            timer.start()
            l, acc = d2l.train_batch_ch13(
                net, features, labels.long(), loss, trainer, devices)
            metric.add(l, acc, labels.shape[0], labels.numel())
            timer.stop()
            if (i + 1) % (num_batches // 5) == 0 or i == num_batches - 1:
                animator.add(epoch + (i + 1) / num_batches,
                             (metric[0] / metric[2], metric[1] / metric[3],
                              None))
        test_acc = d2l.evaluate_accuracy_gpu(net, test_iter)
        animator.add(epoch + 1, (None, None, test_acc))
    print(f'loss {metric[0] / metric[2]:.3f}, train acc '
          f'{metric[1] / metric[3]:.3f}, test acc {test_acc:.3f}')
    print(f'{metric[2] * num_epochs / timer.sum():.1f} examples/sec on '
          f'{str(devices)}')
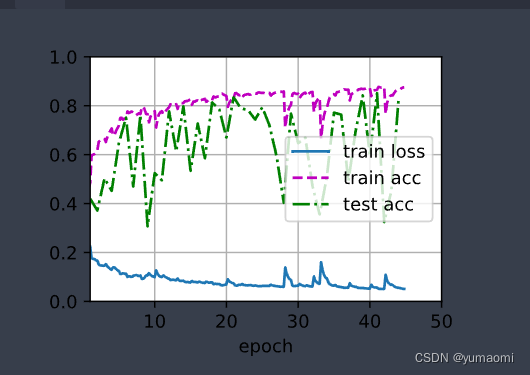
开始训练
train_ch13(model, train_loader, val_loader, lossf, optimizer, epochs_num)模型训练结果如下,测试集的准确率在83%附近。
总结
SegNet使用了Encoder-Decoder结构,对比FCN网络,SegNet模型更小,而在上采样的特征恢复中,使用池化索引来恢复图像的分辨率,获得比较精细的分割结果。


 1万+
1万+

 被折叠的 条评论
为什么被折叠?
被折叠的 条评论
为什么被折叠?
 到【灌水乐园】发言


