


 本文提供了丰富的iOS开发技巧,包括检测蜂窝移动网络状态、判断WiFi开启、实现侧滑事件、自定义导航栏、生成二维码等实用功能,以及系统设置跳转、屏幕截图等常见需求的解决方案。
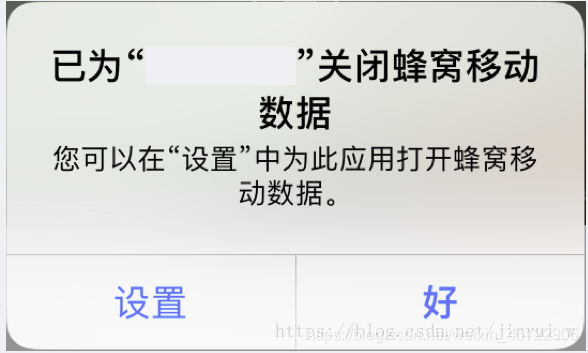
iOS开发检测是否关闭了某个APP的蜂窝移动网络
//https://www.jianshu.com/p/e48d3e438377保活
1.判断开启蜂窝
方法1:(APP启动时就开始监听)
CTCellularData *cellularData = [[CTCellularData alloc] init];
// 状态发生变化时调用
cellularData.cellularDataRestrictionDidUpdateNotifier = ^(CTCellularDataRestrictedState restrictedState) {
    switch (restrictedState) {
        case kCTCellularDataRestrictedStateUnknown:
            NSLog(@"蜂窝移动网络状态:未知");
            break;
        case kCTCellularDataRestricted:
            NSLog(@"蜂窝移动网络状态:关闭");
            break;
        case kCTCellularDataNotRestricted:
            NSLog(@"蜂窝移动网络状态:开启");
            break;

        default:
            break;
    }
};


// 方法2:(在需要用到的地方获取)
#pragma mark 获取蜂窝移动数据限制状态
/*
 kCTCellularDataRestrictedStateUnknown, // 未知
 kCTCellularDataRestricted,             // 关闭
 kCTCellularDataNotRestricted           // 开启
 */
+ (CTCellularDataRestrictedState)getCellularDataRestrictionState {
    CTCellularData *cellularData = [[CTCellularData alloc] init];
    CTCellularDataRestrictedState restrictedState = cellularData.restrictedState;
    return restrictedState;
}
//两种方法的比较
//方法1:蜂窝移动数据状态发生变化时会触发这个方法。关闭时状态为kCTCellularDataRestricted,开始时状态为kCTCellularDataNotRestricted。这里有一点要注意:测试时发现,当改变其他应用的蜂窝移动数据状态时,也会触发这个应用的此方法。
//方法2:无论此应用的蜂窝移动数据是开启或关闭状态,此方法获取到的状态一直是
//说明:此方法只是用于获取某个应用的蜂窝移动数据的开启/关闭状态,与是否连接WiFi无关。
判断设备WiFi是否打开
1.判断是否开启
- (BOOL) isWiFiEnabled {
    NSCountedSet * cset = [NSCountedSet alloc] init];
    struct ifaddrs *interfaces;
    if( ! getifaddrs(&interfaces) ) {
      for( struct ifaddrs *interface = interfaces; interface; interface = interface->ifa_next) {
      if ( (interface->ifa_flags & IFF_UP) == IFF_UP ) {
        [cset addObject:[NSString stringWithUTF8String:interface->ifa_name]];
            }
        }
    }
return [cset countForObject:@"awdl0"] > 1 ? YES : NO;
}
2.提示开启
  dispatch_after(dispatch_time(DISPATCH_TIME_NOW, (int64_t)(3 * NSEC_PER_SEC)), dispatch_get_main_queue(), ^{
  BOOL isWIFI = [self isWiFiEnabled];
  if (!isWIFI) {//如果WiFi没有打开,作出弹窗提示
     static dispatch_once_t onceToken;
     dispatch_once(&onceToken, ^{
     //自己封装的一个AlertView
     [self showWIFTRemendWithTittle:@"打开wifi提高定位准确度,以便司机更快接到您。" Tittle1:@"是否现在开启?" okTittle:@"开启" isHide:NO];

            });
        }
    });
iOS代码里面的系统设置
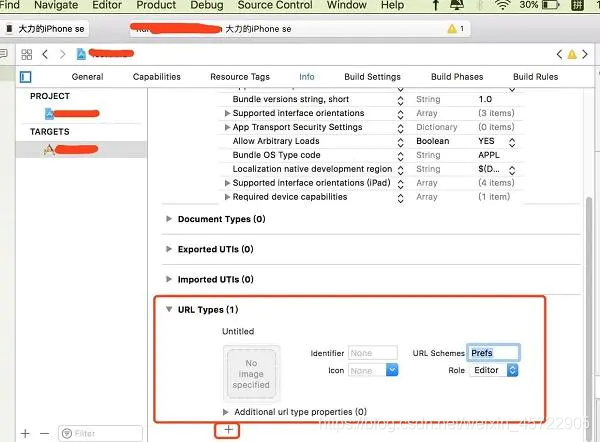
1.跳转手机系统设置需要先在项目里添加,跳转标识,操作步骤下图:
 2、一些常用的设置里的位置:
新url_Scheme列表 prefs:在iOS10 中改成了Prefs:
电池电量 Prefs:root=BATTERY_USAGE
通用设置 Prefs:root=General
存储空间 Prefs:root=General&path=STORAGE_ICLOUD_USAGE/DEVICE_STORAGE
蜂窝数据 Prefs:root=MOBILE_DATA_SETTINGS_ID
Wi-Fi 设置 Prefs:root=WIFI
蓝牙设置 Prefs:root=Bluetooth
定位设置 Prefs:root=Privacy&path=LOCATION
辅助功能 Prefs:root=General&path=ACCESSIBILITY
关于手机 Prefs:root=General&path=About
键盘设置 Prefs:root=General&path=Keyboard
显示设置 Prefs:root=DISPLAY
声音设置 Prefs:root=Sounds
App Store 设置 Prefs:root=STORE
墙纸设置 Prefs:root=Wallpaper
打开电话 Mobilephone://
世界时钟 Clock-worldclock://
闹钟 Clock-alarm://
秒表 Clock-stopwatch://
倒计时 Clock-timer://
打开相册 Photos://
3.代码演示
- (void)openGeneral {

NSURL *url = [NSURL URLWithString:@"Prefs:root=General"];

if ([[UIApplication sharedApplication] canOpenURL:url]) {

// 系统小于10的时候,打开Wi-Fi界面

[[UIApplication sharedApplication] openURL:url];

} else {

// 系统大于10的时候直接打开当前App的设置界面

[[UIApplication sharedApplication] openURL:[NSURL URLWithString:UIApplicationOpenSettingsURLString] options:@{} completionHandler:nil];

}

}
设置UITable侧滑事件
- (NSArray<UITableViewRowAction *> *)tableView:(UITableView *)tableView editActionsForRowAtIndexPath:(NSIndexPath *)indexPath {


    //添加一个删除按钮
    UITableViewRowAction *deleteAction = [UITableViewRowAction rowActionWithStyle:UITableViewRowActionStyleDestructive title:@"删除" handler:^(UITableViewRowAction * _Nonnull action, NSIndexPath * _Nonnull indexPath) {

    }];

    //添加一个置顶按钮
    UITableViewRowAction *topAction = [UITableViewRowAction rowActionWithStyle:UITableViewRowActionStyleDestructive title:@"置顶" handler:^(UITableViewRowAction * _Nonnull action, NSIndexPath * _Nonnull indexPath) {

    }];
    topAction.backgroundColor = [UIColor blueColor];

    //添加一个编辑按钮
    UITableViewRowAction *editAction = [UITableViewRowAction rowActionWithStyle:UITableViewRowActionStyleDestructive title:@"修改" handler:^(UITableViewRowAction * _Nonnull action, NSIndexPath * _Nonnull indexPath) {

    }];
    editAction.backgroundColor = [UIColor greenColor];

    return @[deleteAction, topAction, editAction];

}
自定义页眉保存Button
UIButton *editButton=[UIButton buttonWithType:UIButtonTypeCustom];
    [editButton setTitle:@"  保存  " forState:UIControlStateNormal];
    editButton.backgroundColor=RGB_COLOR(@"#46cab8",1);
    editButton.layer.cornerRadius = 3;

    [editButton addTarget:self action:@selector(commitButtonClick:) forControlEvents:UIControlEventTouchUpInside];
    UIBarButtonItem *item=[[UIBarButtonItem alloc]initWithCustomView:editButton];
    self.navigationItem.rightBarButtonItem=item;
Cell的进入UIImageView
  UIImageView *enter=[[UIImageView alloc]initWithFrame:CGRectMake(Main_Screen_Width-30, 10, 10, 15)];
    enter.image=[UIImage imageNamed:@"enter_choose_icon"];
    [cell.contentView addSubview:enter];
自定义UISwith
cell.customButton=[SWButton buttonWithType:UIButtonTypeCustom];
                cell.customButton.frame=CGRectMake(Main_Screen_Width-70, 13, 60, 30);
                cell.customButton.indexPath=indexPath;
                if(um.getmsg.boolValue){
                     [cell.customButton setBackgroundImage:[UIImage imageNamed:@"switch_selected_icon"] forState:UIControlStateNormal];
                }else{
                     [cell.customButton setBackgroundImage:[UIImage imageNamed:@"switch_uncheck_icon"] forState:UIControlStateNormal];
                }

                [cell.customButton addTarget:self action:@selector(customBtn:) forControlEvents:UIControlEventTouchUpInside];

                  [cell.contentView addSubview:cell.customButton];
UILable分颜色
  NSString *str=[NSString stringWithFormat:@"%@(%ld)", room.name, (long)userArray.count];
        NSArray *strarray=[str componentsSeparatedByString:@"("];
        NSRange grayRange=[str rangeOfString:strarray[1]];
        NSMutableAttributedString *grayStr=[[NSMutableAttributedString alloc]initWithString:str];
        [grayStr addAttribute:NSForegroundColorAttributeName value:[UIColor lightGrayColor] range:grayRange];
        cell.textLabel.attributedText=grayStr;
UITableView侧滑删除
- (NSArray<UITableViewRowAction *> *)tableView:(UITableView *)tableView editActionsForRowAtIndexPath:(NSIndexPath *)indexPath {


    //添加一个删除按钮
    UITableViewRowAction *deleteAction = [UITableViewRowAction rowActionWithStyle:UITableViewRowActionStyleDestructive title:@"删除" handler:^(UITableViewRowAction * _Nonnull action, NSIndexPath * _Nonnull indexPath) {

    }];

    //添加一个置顶按钮
    UITableViewRowAction *topAction = [UITableViewRowAction rowActionWithStyle:UITableViewRowActionStyleDestructive title:@"置顶" handler:^(UITableViewRowAction * _Nonnull action, NSIndexPath * _Nonnull indexPath) {

    }];
    topAction.backgroundColor = [UIColor blueColor];

    //添加一个编辑按钮
    UITableViewRowAction *editAction = [UITableViewRowAction rowActionWithStyle:UITableViewRowActionStyleDestructive title:@"修改" handler:^(UITableViewRowAction * _Nonnull action, NSIndexPath * _Nonnull indexPath) {

    }];
    editAction.backgroundColor = [UIColor greenColor];

    return @[deleteAction, topAction, editAction];

}


原文链接:[https://blog.csdn.net/xmy0010/article/details/53743](https://blog.csdn.net/xmy0010/article/details/53743)
可以移动的UIButton
_backbtn=[UIButton buttonWithType:UIButtonTypeCustom];
    [_backbtn setBackgroundImage:[UIImage imageNamed:@"xcx_return_icon"] forState:UIControlStateNormal];
    _backbtn.frame=CGRectMake(25, self.view.bottom-60, 30, 30);
    [_backbtn addTarget:self action:@selector(webViewBack) forControlEvents:UIControlEventTouchUpInside];
    UIPanGestureRecognizer *pan=[[UIPanGestureRecognizer alloc]initWithTarget:self action:@selector(handlePan:)];
    //开启图片控件的用户交互
    [_backbtn setUserInteractionEnabled:YES];
    [_backbtn addGestureRecognizer:pan];
-(void)handlePan:(UIPanGestureRecognizer *)rec{
    CGFloat KWidth = [UIScreen mainScreen].bounds.size.width;
    CGFloat KHeight = [UIScreen mainScreen].bounds.size.height;
     //返回在横坐标上、纵坐标上拖动了多少像素
    CGPoint point=[rec translationInView:self];
   // NSLog(@"%f,%f",point.x,point.y);

    CGFloat centerX = rec.view.center.x+point.x;
    CGFloat centerY = rec.view.center.y+point.y;
    CGFloat viewHalfH = rec.view.frame.size.height/2;
    CGFloat viewhalfW = rec.view.frame.size.width/2;
    //确定特殊的centerY
    if (centerY - viewHalfH < 0 ) {
    centerY = viewHalfH;
    }
    if (centerY + viewHalfH > KHeight ) {
        centerY = KHeight - viewHalfH;
    }
    //确定特殊的centerX
    if (centerX - viewhalfW < 0){
         centerX = viewhalfW;
    }
    if (centerX + viewhalfW > KWidth){
     centerX = KWidth - viewhalfW;
      }
     rec.view.center=CGPointMake(centerX, centerY);
     //拖动完之后,每次都要用setTranslation:方法制0这样才不至于不受控制般滑动出视图
     [rec setTranslation:CGPointMake(0, 0) inView:self];
}
添加边框
_backgroundView.image = [UIImage imageWithColor:RGBCOLOR(34, 34, 34) cornerRadius:5];
iOS 导航栏的正确显示与隐藏
第一种

-注意这里一定要用动画的方式隐藏导航栏,这样在使用滑动返回手势的时候效果最好,和上面动图一致.这样做有一个缺点就是在切换tabBar的时候有一个导航栏向上消失的动画.

- (void)viewWillAppear:(BOOL)animated {

[super viewWillAppear:animated];

[self.navigationController setNavigationBarHidden:YES animated:YES];

}

- (void)viewWillDisappear:(BOOL)animated {

[super viewWillDisappear:animated];

[self.navigationController setNavigationBarHidden:NO animated:YES];

}

第二种

设置self为导航控制器的代理,实现代理方法,在将要显示控制器中设置导航栏隐藏和显示,使用这种方式不仅完美切合滑动返回手势,同时也解决了切换tabBar的时候,导航栏动态隐藏的问题.

@interface WLHomePageController ()@end

@implementation WLHomePageController

#pragma mark - lifeCycle

- (void)viewDidLoad {

[super viewDidLoad];

// 设置导航控制器的代理为self

self.navigationController.delegate = self;

}

#pragma mark - UINavigationControllerDelegate

// 将要显示控制器

- (void)navigationController:(UINavigationController *)navigationController willShowViewController:(UIViewController *)viewController animated:(BOOL)animated {

// 判断要显示的控制器是否是自己

BOOL isShowHomePage = [viewController isKindOfClass:[self class]];

[self.navigationController setNavigationBarHidden:isShowHomePage animated:YES];

}


作者:cw0925
链接:https://www.jianshu.com/p/0d8d802778f5
来源:简书
著作权归作者所有。商业转载请联系作者获得授权,非商业转载请注明出处。
导航栏设置
UINavigationBar *navigationBar = self.navigationController.navigationBar;
    [navigationBar setBackgroundImage:[UIImage imageNamed:@"whitea.png"]
                       forBarPosition:UIBarPositionAny
                           barMetrics:UIBarMetricsDefault];
    [navigationBar setShadowImage:[UIImage new]];
    self.navigationController.navigationBar.barTintColor = [UIColor whiteColor];
自定义搜索
UINavigationBar *navigationBar = self.navigationController.navigationBar;
    [navigationBar setBackgroundImage:[UIImage imageNamed:@"whitea.png"]
                       forBarPosition:UIBarPositionAny
                           barMetrics:UIBarMetricsDefault];
    [navigationBar setShadowImage:[UIImage new]];
    self.navigationController.navigationBar.barTintColor = [UIColor whiteColor];

    UIView* view = [[UIView alloc] initWithFrame:CGRectMake(0, 0, Main_Screen_Width, 50)];
    view.backgroundColor = [UIColor whiteColor];
    // view.backgroundColor = [UIColor blueColor];
    UIView *searchImg=[[UIView alloc]initWithFrame:CGRectMake(30, 10, 50, 40)];
    UIImageView *Img=[[UIImageView alloc]initWithFrame:CGRectMake(15,12,15,15)];
    Img.image=[UIImage imageNamed:@"retrieve_search_icon"];
    [searchImg addSubview:Img];
    self.searchInput = [[UITextField alloc] initWithFrame:CGRectMake(30, 0, Main_Screen_Width - Img.right - 15, 40)];
    self.searchInput.leftView=searchImg;
    self.searchInput.leftViewMode=UITextFieldViewModeAlways;


    self.searchInput.backgroundColor = [UIColor whiteColor];
    self.searchInput.placeholder = @" 搜索";
    self.searchInput.font = [UIFont systemFontOfSize:15];
    self.searchInput.layer.borderColor = [UIColor colorFromHexCode:@"#DCDCDC"].CGColor;
    self.searchInput.backgroundColor=RGB_COLOR(@"#f5f5f5", 1) ;
    self.searchInput.layer.cornerRadius =20;
    self.searchInput.clipsToBounds = YES;
    self.searchInput.clearButtonMode = UITextFieldViewModeWhileEditing;
    [self.searchInput addTarget:self action:@selector(textFieldChanged:) forControlEvents:UIControlEventEditingChanged];

    [view addSubview:self.searchInput];

    [self.view addSubview:view];
enterUIImage
  UIImageView *enter=[[UIImageView alloc]initWithFrame:CGRectMake(Main_Screen_Width-30, 13, 10, 15)];
                    enter.image=[UIImage imageNamed:@"enter_choose_icon"];
                    [cell.contentView addSubview:enter];
隐藏导航栏下划线
- (UIImageView *)findNavBarBottomLine:(UIView *)view{
    if ([view isKindOfClass:[UIImageView class]]&&view.bounds.size.height<1) {
        return (UIImageView *)view;
    }
    for (UIView *subView in view.subviews) {
        UIImageView *imageView=[self findNavBarBottomLine:subView];
        if (imageView) {
            return imageView;
        }
    }
    return nil;
}
自定义Alert弹窗框
  if(!self.alterView){
                self.alterView=[[UIView alloc]init];
                self.alterView.frame=CGRectMake(0, 0, self.view.frame.size.width, self.view.frame.size.height);
                self.alterView.backgroundColor=RGB_COLOR(@"#000000",0.5);

                //男
                UIButton *qxbtn=[UIButton buttonWithType:UIButtonTypeCustom];
                [qxbtn setTitle:@"男" forState:UIControlStateNormal];
                [qxbtn setTitleColor:RGB_COLOR(@"#000000", 1) forState:UIControlStateNormal];

                qxbtn.frame=CGRectMake(0, self.view.frame.size.height-185,self.view.frame.size.width, 70);
                [qxbtn setBackgroundColor:[UIColor whiteColor]];
                qxbtn.layer.borderColor = RGB_COLOR(@"#eeeeee", 1).CGColor;
                qxbtn.layer.borderWidth = 1;
                qxbtn.layer.cornerRadius = 10;
                [qxbtn addTarget:self action:@selector(sexMan) forControlEvents:UIControlEventTouchUpInside];
                [self.alterView addSubview:qxbtn];
                //女
                UIButton *qrbtn=[UIButton buttonWithType:UIButtonTypeCustom];
                [qrbtn setTitle:@"女" forState:UIControlStateNormal];
                [qrbtn setTitleColor:RGB_COLOR(@"#000000", 1) forState:UIControlStateNormal];

                qrbtn.frame=CGRectMake(0,self.view.frame.size.height-125, self.view.frame.size.width, 60);

                [qrbtn setBackgroundColor:[UIColor whiteColor]];
                qrbtn.layer.borderColor = RGB_COLOR(@"#eeeeee", 1).CGColor;
                qrbtn.layer.borderWidth = 1;
                [qrbtn addTarget:self action:@selector(sexWoman) forControlEvents:UIControlEventTouchUpInside];
                [self.alterView addSubview:qrbtn];
                //取消
                UIButton *qbtn=[UIButton buttonWithType:UIButtonTypeCustom];
                [qbtn setTitle:@"取消" forState:UIControlStateNormal];
                [qbtn setTitleColor:RGB_COLOR(@"#000000", 1) forState:UIControlStateNormal];

                qbtn.frame=CGRectMake(0, self.view.frame.size.height-60,self.view.frame.size.width, 60);
                [qbtn setBackgroundColor:[UIColor whiteColor]];
                qbtn.layer.borderColor = RGB_COLOR(@"#eeeeee", 1).CGColor;
                qbtn.layer.borderWidth = 1;
                qbtn.layer.cornerRadius = 5;
                [qbtn addTarget:self action:@selector(quexiaoAction) forControlEvents:UIControlEventTouchUpInside];
                [self.alterView addSubview:qbtn];
                [self.view addSubview: self.alterView];
            }
设置选择角设置圆角
 BOOL    topLeft     = NO;
        BOOL    topRight    = NO;
        BOOL    bottomLeft  = NO;
        BOOL    bottomRight = NO;
        if (index == 0||index == self.destructiveButtonIndex) {
            topLeft     = YES;
            topRight    = YES;
        }
        if (index == self.buttonTitles.count - 1 || index == self.destructiveButtonIndex - 1) {
            bottomLeft  = YES;
            bottomRight = YES;
        }


  button = [button roundCornersOnTopLeft:topLeft topRight:topRight bottomLeft:bottomLeft bottomRight:bottomRight radius:10.0];
UIView添加阴影
- (void)viewDidLoad {
    [super viewDidLoad];
    [self addShadowToView:_floatView withColor:[UIColor blackColor]];
}

/// 添加四边阴影效果
- (void)addShadowToView:(UIView *)theView withColor:(UIColor *)theColor {
    // 阴影颜色
    theView.layer.shadowColor = theColor.CGColor;
    // 阴影偏移,默认(0, -3)
    theView.layer.shadowOffset = CGSizeMake(0,0);
    // 阴影透明度,默认0
    theView.layer.shadowOpacity = 0.5;
    // 阴影半径,默认3
    theView.layer.shadowRadius = 5;
}
/// 添加单边阴影效果
- (void)addShadowToView:(UIView *)theView withColor:(UIColor *)theColor {
    theView.layer.shadowColor = theColor.CGColor;
    theView.layer.shadowOffset = CGSizeMake(0,0);
    theView.layer.shadowOpacity = 0.5;
    theView.layer.shadowRadius = 5;
    // 单边阴影 顶边
    float shadowPathWidth = theView.layer.shadowRadius;
    CGRect shadowRect = CGRectMake(0, 0-shadowPathWidth/2.0, theView.bounds.size.width, shadowPathWidth);
    UIBezierPath *path = [UIBezierPath bezierPathWithRect:shadowRect];
    theView.layer.shadowPath = path.CGPath;
}
用颜色代替图片
_backgroundView.image = [UIImage imageWithColor:RGB_COLOR(@"#ffffff", 1) cornerRadius:5];
导航栏改成透明
[self.navigationController.navigationBar setBackgroundImage:[UIImage new] forBarMetrics:UIBarMetricsDefault];

    self.navigationController.navigationBar.shadowImage = [UIImage new];
自定义导航栏
- (void)setTitleViewWithTarget:(UIViewController *)target title:(NSString *)title
{
    if (title.length > 10) {
        title = [[title substringToIndex:10] stringByAppendingString:@"..."];
    }
    UILabel *titleView = [[UILabel alloc] initWithFrame:CGRectMake(0, 0, 100, 44)];
    titleView.text = title;
    titleView.textColor = [UIColor whiteColor];
    titleView.font = [UIFont boldSystemFontOfSize:17];
    titleView.textAlignment = NSTextAlignmentCenter;
    target.navigationItem.titleView = titleView;
}
- (void)setLeftNaviBarWithTarget:(UIViewController *)target action:(SEL)action
{
    UIButton *backBtn = [[UIButton alloc] initWithFrame:CGRectMake(0, 0, 50, 44)];
    [backBtn setBackgroundColor:[UIColor clearColor]];
    [backBtn setImage:[UIImage imageNamed:@"head_return_h"] forState:UIControlStateNormal];
    [backBtn setTitle:@"" forState:UIControlStateNormal];
    [backBtn setTitleColor:[UIColor whiteColor] forState:UIControlStateNormal];
    [backBtn.titleLabel setFont:[UIFont systemFontOfSize:17]];
    [backBtn addTarget:target action:action forControlEvents:UIControlEventTouchUpInside];
    [backBtn setImageEdgeInsets:UIEdgeInsetsMake(0, -10, 0, 0)];

    UIBarButtonItem *leftBarBtnItem = [[UIBarButtonItem alloc] initWithCustomView:backBtn];
    target.navigationItem.leftBarButtonItem = leftBarBtnItem;
}
- (void)setRightNaviBarWithTarget:(UIViewController *)target action:(SEL)action image:(NSString *)image title:(NSString *)title
{
    UIButton *backBtn = [[UIButton alloc] initWithFrame:CGRectMake(0, 0, 60, 44)];
    [backBtn setBackgroundColor:[UIColor clearColor]];
    [backBtn addTarget:target action:action forControlEvents:UIControlEventTouchUpInside];

    if (image) [backBtn setImage:[UIImage imageNamed:image] forState:UIControlStateNormal];
    if (image && title) [backBtn setImageEdgeInsets:UIEdgeInsetsMake(0, -10, 0, 0)];

    if (title)
    {
        backBtn.frame = CGRectMake(0, 0, 70, 44);
        [backBtn setTitle:title forState:UIControlStateNormal];
        [backBtn setTitleColor:[UIColor whiteColor] forState:UIControlStateNormal];
        [backBtn.titleLabel setFont:[UIFont systemFontOfSize:17]];
    }

    UIBarButtonItem *rightBarBtnItem = [[UIBarButtonItem alloc] initWithCustomView:backBtn];
    target.navigationItem.rightBarButtonItem = rightBarBtnItem;
}
根据文字确定UILable宽度
- (CGSize)sizeWithFont:(UIFont *)font maxWidth:(CGFloat)width maxNumberLines:(int)num
{
    CGSize size = CGSizeZero;

    if (num > 0)
    {
        CGFloat tmpHeight = ceilf(font.lineHeight * num);
        size = [self sizeWithFont:font
                constrainedToSize:CGSizeMake(width, tmpHeight)
                    lineBreakMode:NSLineBreakByTruncatingTail];
    }
    else if (num == 0)
    {
        size = [self sizeWithFont:font maxWidth:width maxNumberLines:-10];
    }
    else if (num < 0)
    {
        num = num*-1;
        int i = 1;
        CGFloat h1, h2;

        do {
            size = [self sizeWithFont:font maxWidth:width maxNumberLines:num*i];
            h1 = size.height;
            h2 = ceilf(font.lineHeight*num*i++);
        } while (h1 >= h2);
    }

    size.width = ceilf(size.width);
    size.height = ceilf(size.height);

    return size;
}
使用RGB设置颜色
#define RGB_COLOR(_STR_,a) ([UIColor colorWithRed:[[NSString stringWithFormat:@"%lu", strtoul([[_STR_ substringWithRange:NSMakeRange(1, 2)] UTF8String], 0, 16)] intValue] / 255.0 green:[[NSString stringWithFormat:@"%lu", strtoul([[_STR_ substringWithRange:NSMakeRange(3, 2)] UTF8String], 0, 16)] intValue] / 255.0 blue:[[NSString stringWithFormat:@"%lu", strtoul([[_STR_ substringWithRange:NSMakeRange(5, 2)] UTF8String], 0, 16)] intValue] / 255.0 alpha:a])
取消cell下划线
Cell.selectionStyle = UITableViewCellSelectionStyleNone;
TableView如何刷新指定的cell 或section
一个section刷新
NSIndexSet *indexSet=[[NSIndexSet alloc]initWithIndex:2];
[tableview reloadSections:indexSet withRowAnimation:UITableViewRowAnimationAutomatic];
一个cell刷新
NSIndexPath *indexPath=[NSIndexPath indexPathForRow:3 inSection:0];
[tableView reloadRowsAtIndexPaths:[NSArray arrayWithObjects:indexPath,nil] withRowAnimation:UITableViewRowAnimationNone];
设置navigationBar背景颜色
 [self.navigationController.navigationBar setShadowImage:[[UIImage alloc]init]];

    [self.navigationController.navigationBar.layer.sublayers.firstObject addSublayer:[self gradientLayer]];
- (CAGradientLayer *)gradientLayer

{

    CAGradientLayer *gradientLayer = [[CAGradientLayer alloc]init];

    gradientLayer.backgroundColor = [UIColor whiteColor].CGColor;

    gradientLayer.frame = CGRectMake(0, 0, self.navigationController.navigationBar.bounds.size.width, 20 + self.navigationController.navigationBar.bounds.size.height);

    return gradientLayer;

}
随机颜色
#define UICOLOR_RANDOM [UIColor colorWithRed:(arc4random()%255)/255.0 green:(arc4random()%255)/255.0 blue:(arc4random()%255)/255.0 alpha:1.0]
//配置返回按钮的颜色和大小
//调用就行了

 (void)configBarButtonItemAppearance {
    UIBarButtonItem *barItem = [UIBarButtonItem appearance];
    NSMutableDictionary *textAttrs = [NSMutableDictionary dictionary];
    textAttrs[NSForegroundColorAttributeName] = [UIColor blackColor];
    [barItem setTitleTextAttributes:textAttrs forState:UIControlStateNormal];
}
生成二维码
+ (UIImage *)createNonInterpolatedUIImageFormForString:(NSString *)string withSize:(CGFloat)size {
    // 1.创建过滤器 -- 苹果没有将这个字符定义为常量
    CIFilter *filter = [CIFilter filterWithName:@"CIQRCodeGenerator"];

    // 2.过滤器恢复默认设置
    [filter setDefaults];

    // 3.给过滤器添加数据(正则表达式/帐号和密码) -- 通过KVC设置过滤器,只能设置NSData类型
    NSString *dataString = string;
    NSData *data = [dataString dataUsingEncoding:NSUTF8StringEncoding];
    [filter setValue:data forKeyPath:@"inputMessage"];

    // 4.获取输出的二维码
   CIImage *image = [filter outputImage];

    // 5.显示二维码

    CGRect extent = CGRectIntegral(image.extent);
    CGFloat scale = MIN(size/CGRectGetWidth(extent), size/CGRectGetHeight(extent));

    // 1.创建bitmap;
    size_t width = CGRectGetWidth(extent) * scale;
    size_t height = CGRectGetHeight(extent) * scale;
    CGColorSpaceRef cs = CGColorSpaceCreateDeviceGray();
    CGContextRef bitmapRef = CGBitmapContextCreate(nil, width, height, 8, 0, cs, (CGBitmapInfo)kCGImageAlphaNone);
    CIContext *context = [CIContext contextWithOptions:nil];
    CGImageRef bitmapImage = [context createCGImage:image fromRect:extent];
    CGContextSetInterpolationQuality(bitmapRef, kCGInterpolationNone);
    CGContextScaleCTM(bitmapRef, scale, scale);
    CGContextDrawImage(bitmapRef, extent, bitmapImage);

    // 2.保存bitmap到图片
    CGImageRef scaledImage = CGBitmapContextCreateImage(bitmapRef);
    CGContextRelease(bitmapRef);
    CGImageRelease(bitmapImage);
    return [UIImage imageWithCGImage:scaledImage];
}
设置tableVIew header不固定
//设置header不动

- (void)scrollViewDidScroll:(UIScrollView *)scrollView {
    if (scrollView == tableView)//tableView
    {
        CGFloat sectionHeaderHeight = 21;//heanderView高度
        if (scrollView.contentOffset.y<=sectionHeaderHeight&&scrollView.contentOffset.y>=0) {
            scrollView.contentInset = UIEdgeInsetsMake(-scrollView.contentOffset.y, 0, 0, 0);
        } else if (scrollView.contentOffset.y>=sectionHeaderHeight) {
            scrollView.contentInset = UIEdgeInsetsMake(-sectionHeaderHeight, 0, 0, 0);
        }
    }
}
iOS 屏幕截图总结
1.按屏幕截图,即全屏截图
- (void)doScreenShot{
    // 开启图片上下文
    UIGraphicsBeginImageContextWithOptions(self.view.bounds.size, NO, 0);
    // 获取当前上下文
    CGContextRef ctx = UIGraphicsGetCurrentContext();
    // 截图:实际是把layer上面的东西绘制到上下文中
    [self.view.layer renderInContext:ctx];
    //iOS7+ 推荐使用的方法,代替上述方法
    // [self.view drawViewHierarchyInRect:self.view.frame afterScreenUpdates:YES];
    // 获取截图
    UIImage *image = UIGraphicsGetImageFromCurrentImageContext();
    // 关闭图片上下文
    UIGraphicsEndImageContext();
    // 保存相册
    UIImageWriteToSavedPhotosAlbum(image, NULL, NULL, NULL);
}
2.按内容截屏,即截全图
- (void)screenShots{
    UICollectionView *shadowView = self.collectionView;
    // 开启图片上下文
    UIGraphicsBeginImageContextWithOptions(shadowView.contentSize, NO, 0.f);
    // 保存现在视图的位置偏移信息
    CGPoint saveContentOffset = shadowView.contentOffset;
    // 保存现在视图的frame信息
    CGRect saveFrame = shadowView.frame;
    // 把要截图的视图偏移量设置为0
    shadowView.contentOffset = CGPointZero;
    // 设置要截图的视图的frame为内容尺寸大小
    shadowView.frame = CGRectMake(0, 0, shadowView.contentSize.width, shadowView.contentSize.height);
    // 获取当前上下文
    CGContextRef ctx = UIGraphicsGetCurrentContext();
    // 截图:实际是把layer上面的东西绘制到上下文中
    [shadowView.layer renderInContext:ctx];
    //iOS7+ 推荐使用的方法,代替上述方法
    // [shadowView drawViewHierarchyInRect:shadowView.frame afterScreenUpdates:YES];
    // 获取截图
    UIImage *image = UIGraphicsGetImageFromCurrentImageContext();
    // 关闭图片上下文
    UIGraphicsEndImageContext();
    // 将视图的偏移量设置回原来的状态
    shadowView.contentOffset = saveContentOffset;
    // 将视图的frame信息设置回原来的状态
    shadowView.frame = saveFrame;
    // 保存相册
    UIImageWriteToSavedPhotosAlbum(image, NULL, NULL, NULL);
}
3.视频截图
// 需要导入AVFoundation头文件
#import <AVFoundation/AVFoundation.h>
// videoURL 视频的URL地址;frameTime 要截取的视频图片帧数
+ (UIImage *)imageWithVideo:(NSURL *)videoURL withVideoCaptureFrame:(NSInteger)frameTime{
    // 根据视频的URL创建AVURLAsset
    AVURLAsset *asset = [[AVURLAsset alloc] initWithURL:videoURL options:nil];
    // 根据AVURLAsset创建AVAssetImageGenerator对象
    AVAssetImageGenerator *gen = [[AVAssetImageGenerator alloc] initWithAsset:asset];
    gen.appliesPreferredTrackTransform = YES;
    // 定义获取第几帧处的视频截图
    // CMTime halfSecond = CMTimeMake(1, 2); //0.5秒
    CMTime time = CMTimeMake(frameTime, 10);
    CMTime actualTime;
    NSError *error = nil;
    // 尝试获取time处的视频截图(实际截屏的时间点保存在actualTime变量中)
    CGImageRef image = [gen copyCGImageAtTime:time actualTime:&actualTime error:&error];
    if (error == nil) {
        // 将CGImageRef转换为UIImage
        UIImage *thumb = [[UIImage alloc] initWithCGImage:image];
        CGImageRelease(image);
        return thumb;
    }else{
        NSLog(@"对视频截图时出现错误: %@", error);
        return nil;
    }
}


 1万+
1万+

 被折叠的 条评论
为什么被折叠?
被折叠的 条评论
为什么被折叠?
 到【灌水乐园】发言


