


Android UI布局
线性布局
整个页面的分布情况是,水平1:1;1:1是设置的,而没有设置是水平的还是垂直的,就默认是水平的。
帧布局

相对布局
表格布局
TableLayout称为表格布局,和HTML中table标签类似,将子元素分配到行或列中,但TableLayout没有边框,一个TableLayout由多个TableRow组成,每个TableRow中可以有0或者多个单元格。每个单元格都是一个View,单元格的索引从0开始。可以通过android:layout_span实现合并单元格,但不支持跨行合并。也可以通过android:layout_column指定组件要显示在哪个单元格位置,从而跳过一些单元格。
< TableLayout>:表格布局元素标签
android:stretchColumns:该属性用来设置某列宽度为自动拉伸,列的索引从0开始。
< TableRow>:行元素标签。
android:layout_span:该属性用来设置合并单元格。
android:gravity:设置此组件中的内容在组件中的位置。可选的值有:top、bottom、left、right、center_vertical 、fill_vertical 、center_horizontal 、fill_horizontal 、center、 fill、 clip_vertical,可以多选,用“| ”分开。
android:layout_column:该属性设置组件显示在哪个单元格中。
(注:clip_vertical和clip_horizonal, 这两个对齐方式应用于当图片大小大于手机屏幕时,对图片的裁剪方式,如果gravity为top,就裁剪底部,否则,裁剪顶部,其他的情况类似。 )
网格布局
线性布局
线性布局
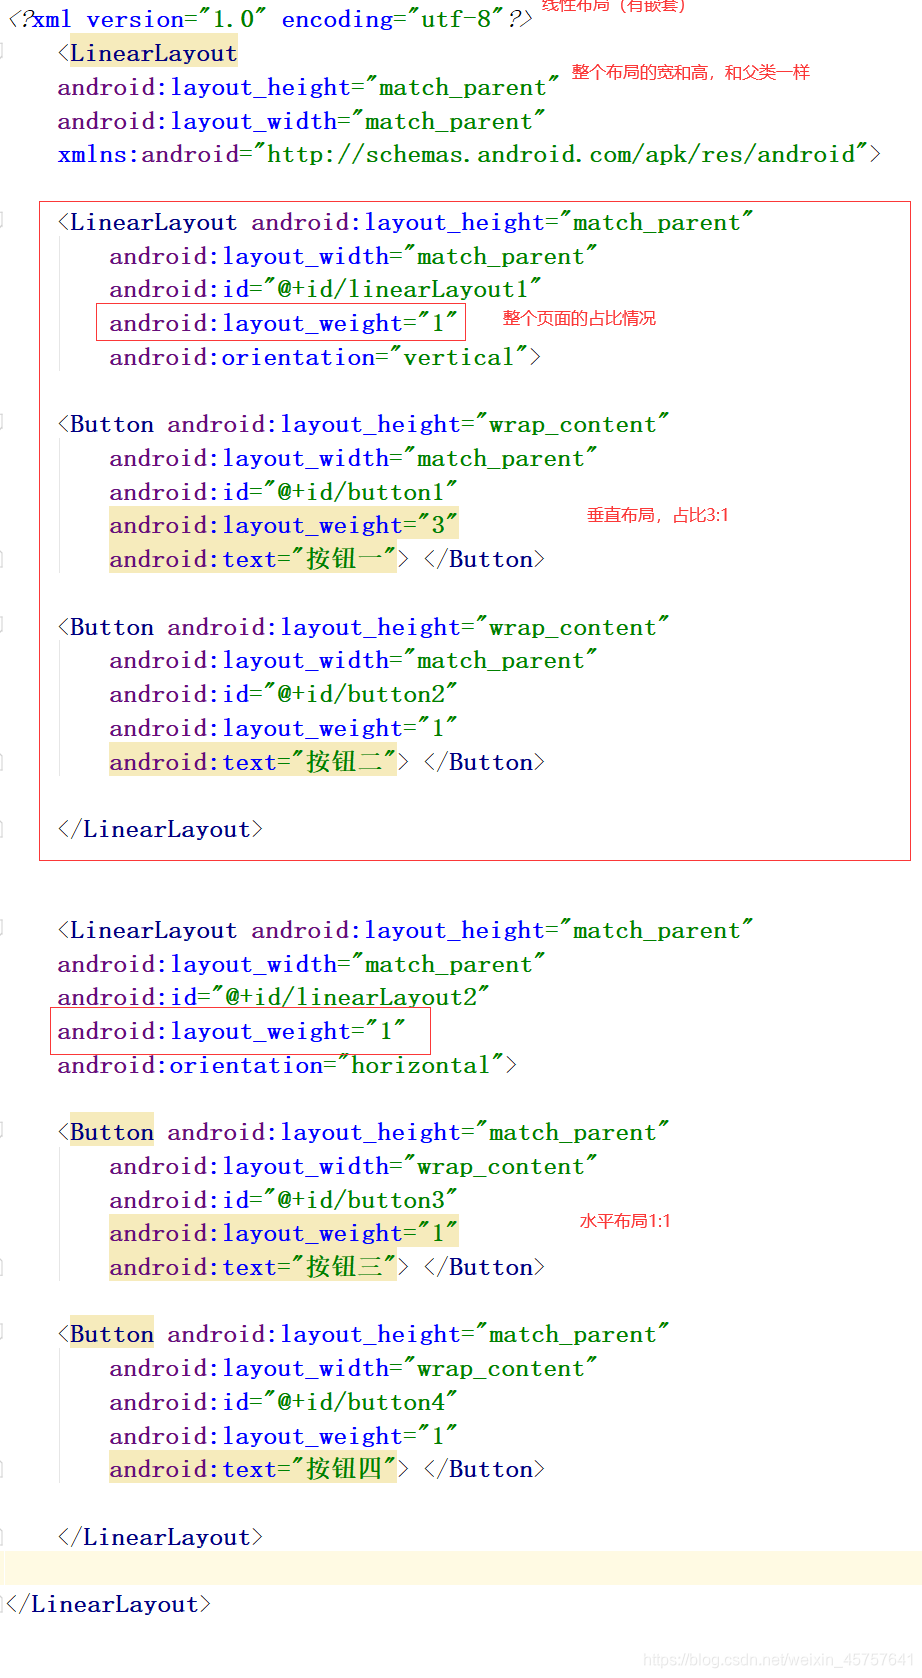
<LinearLayout
android:layout_height="match_parent"
android:layout_width="match_parent"
xmlns:android="http://schemas.android.com/apk/res/android">
<LinearLayout android:layout_height="match_parent"
android:layout_width="match_parent"
android:id="@+id/linearLayout1"
android:layout_weight="1"
android:orientation="vertical">
<Button android:layout_height="wrap_content"
android:layout_width="match_parent"
android:id="@+id/button1"
android:layout_weight="3"
android:text="按钮一"> </Button>
<Button android:layout_height="wrap_content"
android:layout_width="match_parent"
android:id="@+id/button2"
android:layout_weight="1"
android:text="按钮二"> </Button>
</LinearLayout>
<LinearLayout android:layout_height="match_parent"
android:layout_width="match_parent"
android:id="@+id/linearLayout2"
android:layout_weight="5"
android:orientation="horizontal">
<Button android:layout_height="match_parent"
android:layout_width="wrap_content"
android:id="@+id/button3"
android:layout_weight="1"
android:text="按钮三"> </Button>
<Button android:layout_height="match_parent"
android:layout_width="wrap_content"
android:id="@+id/button4"
android:layout_weight="1"
android:text="按钮四"> </Button>
</LinearLayout>
</LinearLayout>
帧布局
帧布局
    <FrameLayout
    android:layout_height="match_parent"
    android:layout_width="match_parent"
    xmlns:android="http://schemas.android.com/apk/res/android">

    <Button android:layout_height="wrap_content"
        android:layout_width="wrap_content"
        android:text="按钮(首先添加)"/>

    <TextView android:layout_height="wrap_content"
        android:layout_width="match_parent"
        android:text="文本视图"
        android:textColor="@android:color/black"
        android:id="@+id/textView1"> </TextView>

</FrameLayout>
相对布局
相对布局
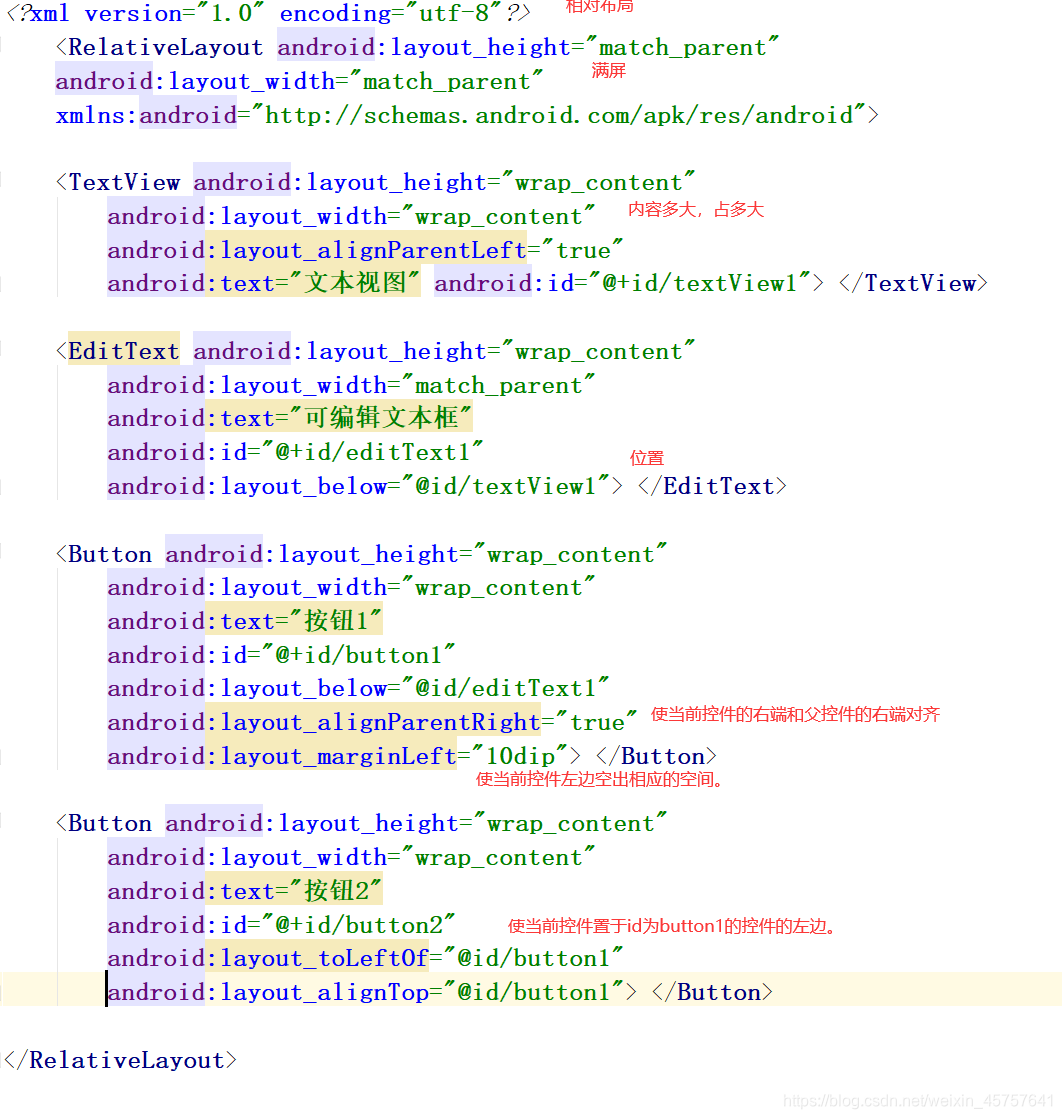
<RelativeLayout android:layout_height="match_parent"
android:layout_width="match_parent"
xmlns:android="http://schemas.android.com/apk/res/android">
<TextView android:layout_height="wrap_content"
android:layout_width="wrap_content"
android:layout_alignParentLeft="true"
android:text="文本视图" android:id="@+id/textView1"> </TextView>
<EditText android:layout_height="wrap_content"
android:layout_width="match_parent"
android:text="可编辑文本框"
android:id="@+id/editText1"
android:layout_below="@id/textView1"> </EditText>
<Button android:layout_height="wrap_content"
android:layout_width="wrap_content"
android:text="按钮1"
android:id="@+id/button1"
android:layout_below="@id/editText1"
android:layout_alignParentRight="true"
android:layout_marginLeft="10dip"> </Button>
<Button android:layout_height="wrap_content"
android:layout_width="wrap_content"
android:text="按钮2"
android:id="@+id/button2"
android:layout_toLeftOf="@id/button1"
android:layout_alignTop="@id/button1"> </Button>
</RelativeLayout>
表格布局
表格布局
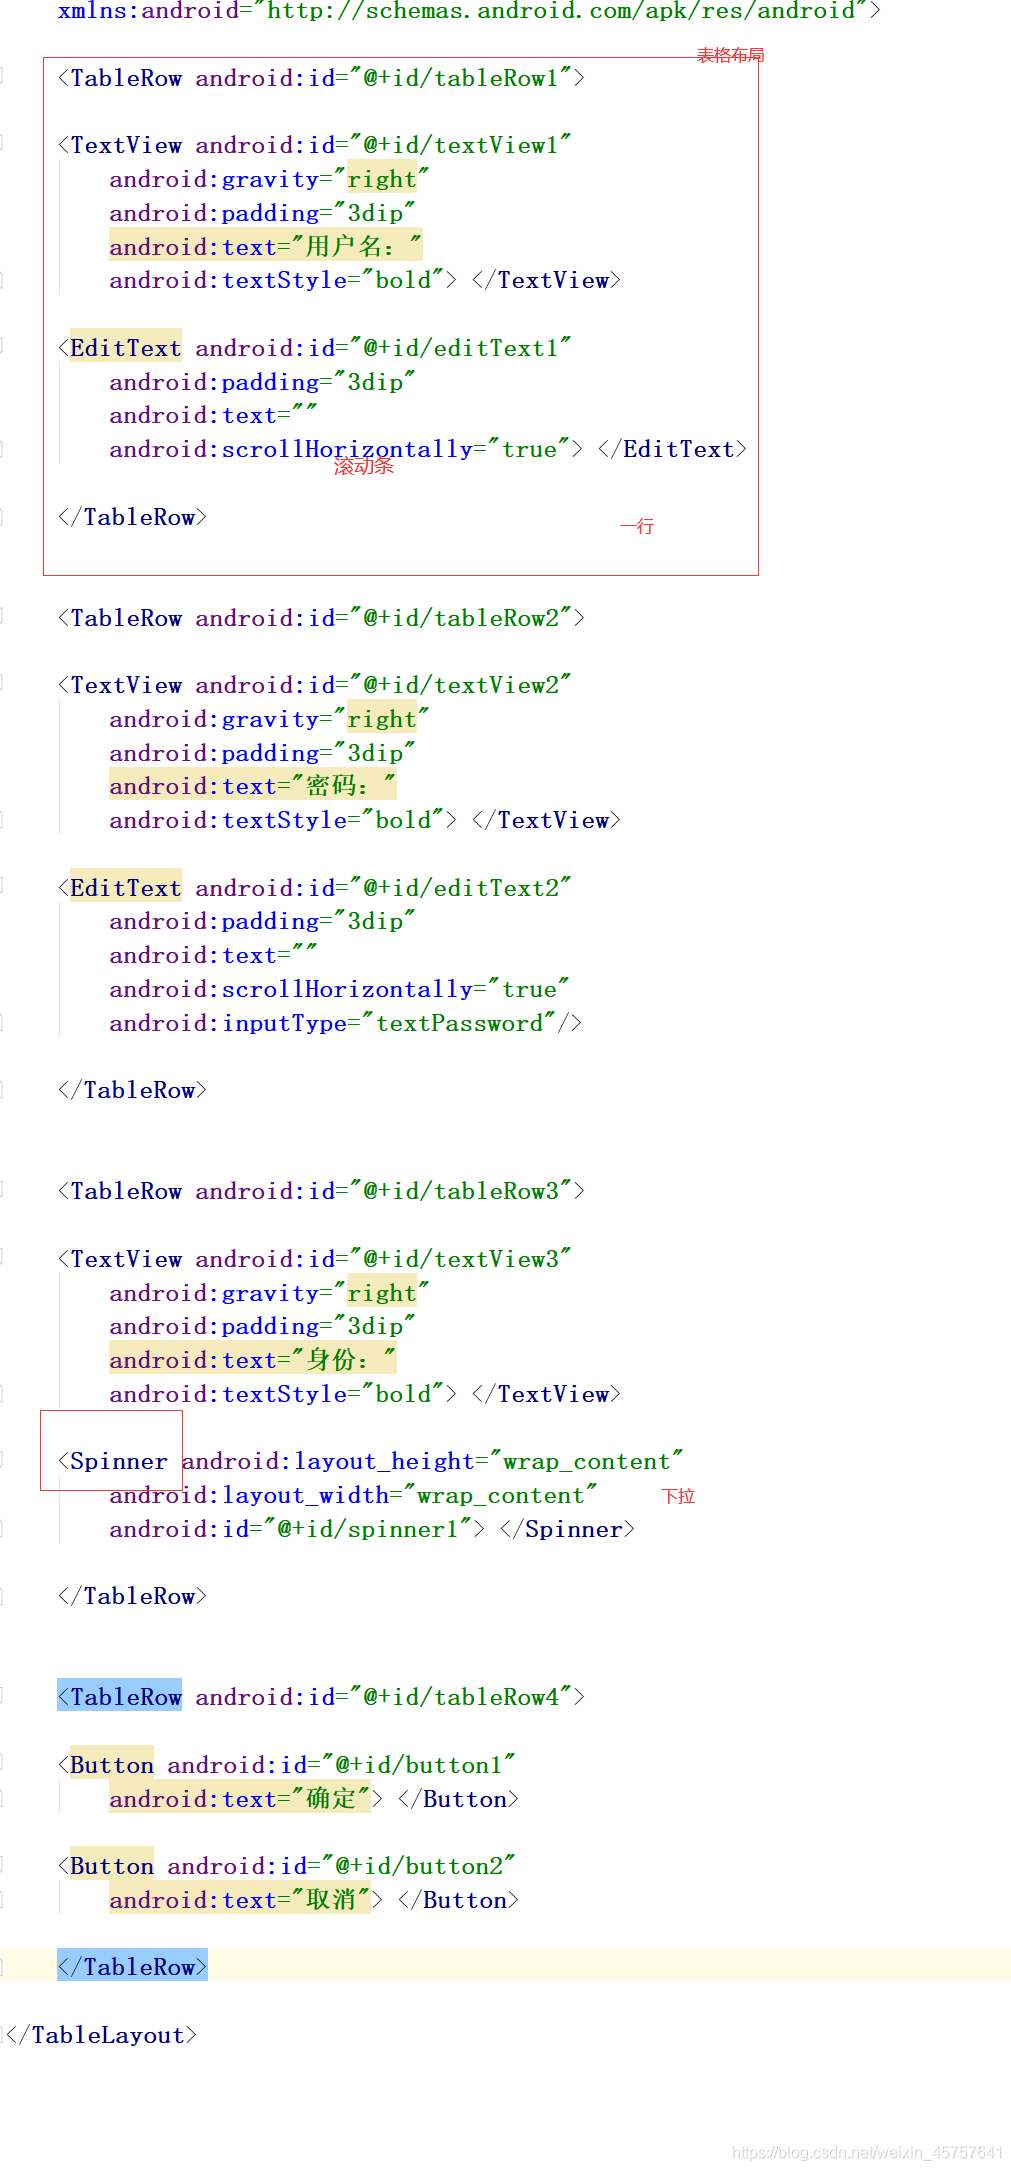
<TableLayout android:layout_height="match_parent"
android:layout_width="match_parent"
xmlns:android="http://schemas.android.com/apk/res/android">
<TableRow android:id="@+id/tableRow1">
<TextView android:id="@+id/textView1"
android:gravity="right"
android:padding="3dip"
android:text="用户名:"
android:textStyle="bold"> </TextView>
<EditText android:id="@+id/editText1"
android:padding="3dip"
android:text=""
android:scrollHorizontally="true"> </EditText>
</TableRow>
<TableRow android:id="@+id/tableRow2">
<TextView android:id="@+id/textView2"
android:gravity="right"
android:padding="3dip"
android:text="密码:"
android:textStyle="bold"> </TextView>
<EditText android:id="@+id/editText2"
android:padding="3dip"
android:text=""
android:scrollHorizontally="true"
android:inputType="textPassword"/>
</TableRow>
<TableRow android:id="@+id/tableRow3">
<TextView android:id="@+id/textView3"
android:gravity="right"
android:padding="3dip"
android:text="身份:"
android:textStyle="bold"> </TextView>
<Spinner android:layout_height="wrap_content"
android:layout_width="wrap_content"
android:id="@+id/spinner1"> </Spinner>
</TableRow>
<TableRow android:id="@+id/tableRow4">
<Button android:id="@+id/button1"
android:text="确定"> </Button>
<Button android:id="@+id/button2"
android:text="取消"> </Button>
</TableRow>
</TableLayout>
网格布局
网格布局
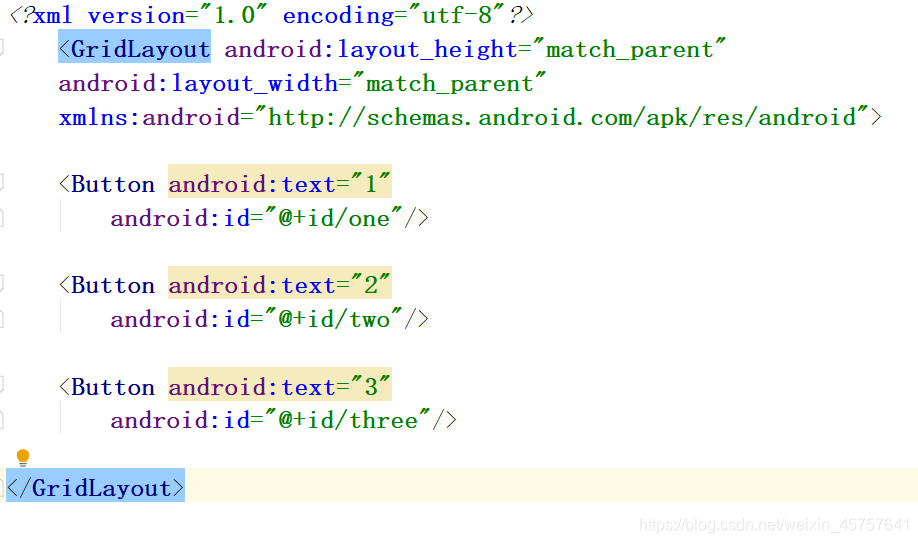
<GridLayout android:layout_height="match_parent"
android:layout_width="match_parent"
xmlns:android="http://schemas.android.com/apk/res/android">
<Button android:text="1"
android:id="@+id/one"/>
<Button android:text="2"
android:id="@+id/two"/>
<Button android:text="3"
android:id="@+id/three"/>
</GridLayout>
分割线
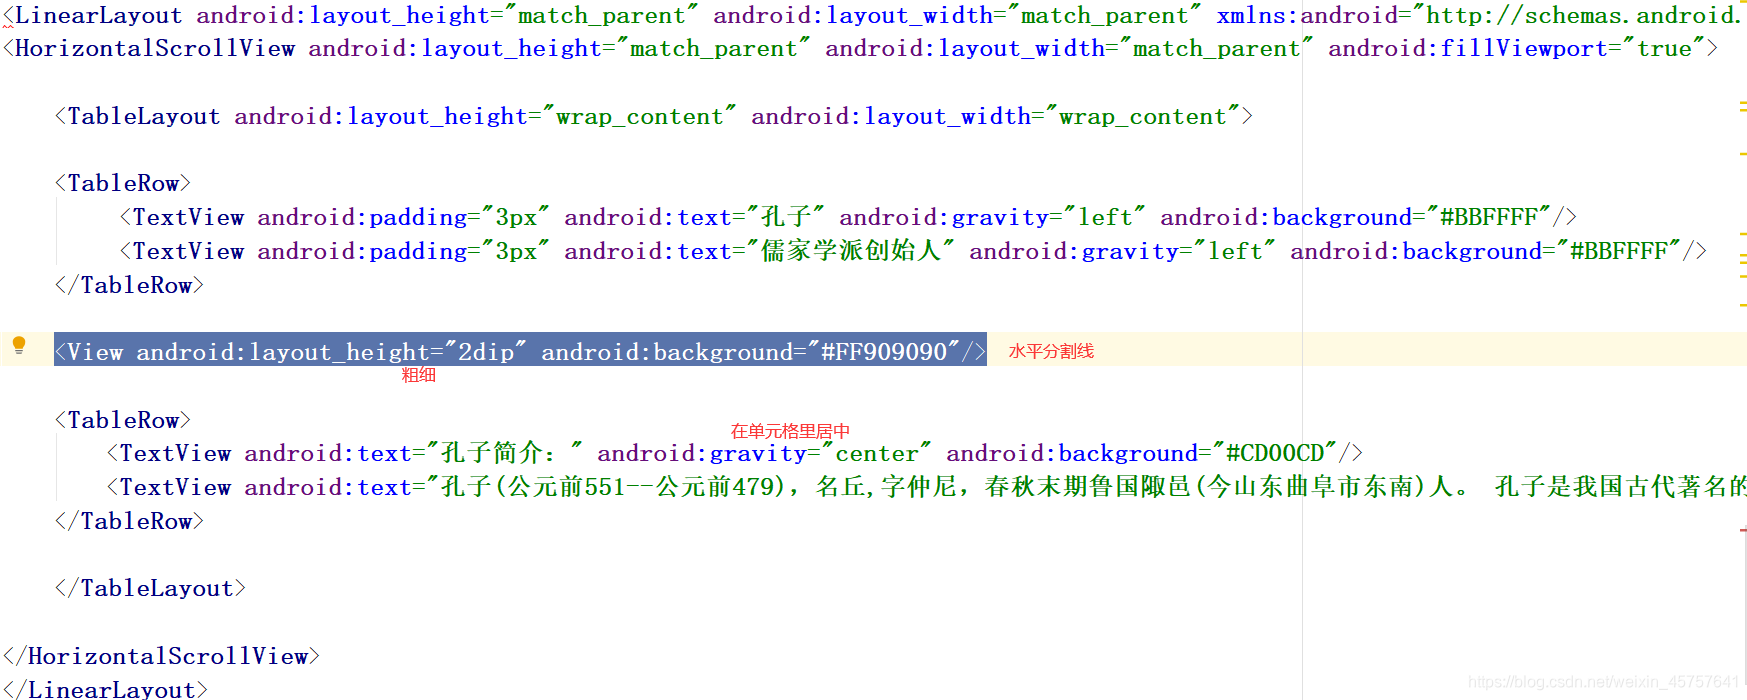
代码:
<View android:layout_height="2dip" android:background="#FF909090"/>
让按钮里的内容左对齐
android:gravity="center_vertical"
使用代码完成自定义布局
public class MainActivity extends AppCompatActivity {
    RelativeLayout relativeLayout;
    @Override
    protected void onCreate(Bundle savedInstanceState) {
        super.onCreate(savedInstanceState);
        setContentView(R.layout.activity_main);
            //获取activity_main.xml中id为layout1的liearLayout对象
        relativeLayout = (RelativeLayout)this.findViewById(R.id.layout1);

            //声明一个TextView对象.
        TextView txtFont = new TextView(this);
            //声明ViewGroup.LayoutParams对象
            //设置布局参数对象的宽度
            //设置布局参数对象的高度
       ViewGroup.LayoutParams layoutParams = new ViewGroup.LayoutParams(
                ViewGroup.LayoutParams.MATCH_PARENT,
                ViewGroup.LayoutParams.WRAP_CONTENT);
            //将txtFont以layoutParams对象指定宽度和高度布局
        txtFont.setLayoutParams(layoutParams);
            //设置txtFont上面显示的文字
        txtFont.setText("通过代码实现布局示例1");
            //设置字体颜色为黑色
        txtFont.setTextColor(Color.BLACK);
            //将txtFont添加到liearLayout布局上
        relativeLayout.addView(txtFont);
        }
    }
首先呢,有一个布局,在activity_main.xml里,相对布局。
<?xml version="1.0" encoding="utf-8"?>
<RelativeLayout android:id="@+id/layout1"
android:layout_height="match_parent"
android:layout_width="match_parent"
xmlns:android="http://schemas.android.com/apk/res/android">
</RelativeLayout>


 1840
1840


 被折叠的 条评论
为什么被折叠?
被折叠的 条评论
为什么被折叠?
 到【灌水乐园】发言


