


DStream操作实战
1 SparkStreaming接受socket数据,实现单词计数WordCount
1、 架构图

2、 实现流程
第一步:创建maven工程并导入jar包
<properties>
        <scala.version>2.11.8</scala.version>
        <spark.version>2.2.0</spark.version>
    </properties>
    <dependencies>
        <dependency>
            <groupId>org.scala-lang</groupId>
            <artifactId>scala-library</artifactId>
            <version>${scala.version}</version>
        </dependency>
        <dependency>
            <groupId>org.apache.spark</groupId>
            <artifactId>spark-core_2.11</artifactId>
            <version>${spark.version}</version>
        </dependency>
        <dependency>
            <groupId>org.apache.spark</groupId>
            <artifactId>spark-sql_2.11</artifactId>
            <version>${spark.version}</version>
        </dependency>
        <!-- https://mvnrepository.com/artifact/org.apache.spark/spark-streaming -->
        <dependency>
            <groupId>org.apache.spark</groupId>
            <artifactId>spark-streaming_2.11</artifactId>
            <version>2.2.0</version>
        </dependency>
        <dependency>
            <groupId>org.apache.hadoop</groupId>
            <artifactId>hadoop-client</artifactId>
            <version>2.7.5</version>
        </dependency>

        <dependency>
            <groupId>org.apache.spark</groupId>
            <artifactId>spark-hive_2.11</artifactId>
            <version>2.2.0</version>
        </dependency>

        <dependency>
            <groupId>mysql</groupId>
            <artifactId>mysql-connector-java</artifactId>
            <version>5.1.38</version>
        </dependency>

    </dependencies>
    <build>
        <sourceDirectory>src/main/scala</sourceDirectory>
        <testSourceDirectory>src/test/scala</testSourceDirectory>
        <plugins>
            <plugin>
                <groupId>org.apache.maven.plugins</groupId>
                <artifactId>maven-compiler-plugin</artifactId>
                <version>3.0</version>
                <configuration>
                    <source>1.8</source>
                    <target>1.8</target>
                    <encoding>UTF-8</encoding>
                    <!--    <verbal>true</verbal>-->
                </configuration>
            </plugin>
            <plugin>
                <groupId>net.alchim31.maven</groupId>
                <artifactId>scala-maven-plugin</artifactId>
                <version>3.2.0</version>
                <executions>
                    <execution>
                        <goals>
                            <goal>compile</goal>
                            <goal>testCompile</goal>
                        </goals>
                        <configuration>
                            <args>
                                <arg>-dependencyfile</arg>
                                <arg>${project.build.directory}/.scala_dependencies</arg>
                            </args>
                        </configuration>
                    </execution>
                </executions>
            </plugin>
            <plugin>
                <groupId>org.apache.maven.plugins</groupId>
                <artifactId>maven-shade-plugin</artifactId>
                <version>3.1.1</version>
                <executions>
                    <execution>
                        <phase>package</phase>
                        <goals>
                            <goal>shade</goal>
                        </goals>
                        <configuration>
                            <filters>
                                <filter>
                                    <artifact>*:*</artifact>
                                    <excludes>
                                        <exclude>META-INF/*.SF</exclude>
                                        <exclude>META-INF/*.DSA</exclude>
                                        <exclude>META-INF/*.RSA</exclude>
                                    </excludes>
                                </filter>
                            </filters>
                            <transformers>
                                <transformer implementation="org.apache.maven.plugins.shade.resource.ManifestResourceTransformer">
                                    <mainClass></mainClass>
                                </transformer>
                            </transformers>
                        </configuration>
                    </execution>
                </executions>
            </plugin>
        </plugins>
    </build>
如果依赖包下载不了,翻墙下
第二步:node01服务器安装并启动生产者
首先在linux服务器上用YUM安装nc工具,nc命令是netcat命令的简称,它是用来设置路由器。我们可以利用它向某个端口发送数据。
node01服务器执行以下命令安装socket客户端工具,模拟发送数据
yum -y install nc
第三步:通过netcat工具向指定的端口发送数据
node01服务器执行以下命令,向指定的端口9999发送数据
nc -lk 9999
第四步:开发sparkStreaming程序,统计单词出现的次数
package cn.test.spark

import org.apache.spark.streaming.dstream.{DStream, ReceiverInputDStream}
import org.apache.spark.streaming.{Seconds, StreamingContext}
import org.apache.spark.{SparkConf, SparkContext}

/**
  * sparkStreming流式处理接受socket数据,实现单词统计
  */
object  SparkStreamingTCP {

  def main(args: Array[String]): Unit = {
    //配置sparkConf参数
    val sparkConf: SparkConf = new SparkConf().setAppName("SparkStreamingTCP").setMaster("local[2]")
    //构建sparkContext对象
    val sc: SparkContext = new SparkContext(sparkConf)
    //设置日志输出级别
    sc.setLogLevel("WARN")
    //构建StreamingContext对象,每个批处理的时间间隔
    val scc: StreamingContext = new StreamingContext(sc,Seconds(5))
    //注册一个监听的IP地址和端口  用来收集数据
    val lines: ReceiverInputDStream[String] = scc.socketTextStream("192.168.200.160",9999)
    //切分每一行记录
    val words: DStream[String] = lines.flatMap(_.split(" "))
    //每个单词记为1
    val wordAndOne: DStream[(String, Int)] = words.map((_,1))
    //分组聚合
    val result: DStream[(String, Int)] = wordAndOne.reduceByKey(_+_)
    //打印数据
    result.print()
    scc.start()
    scc.awaitTermination()
  }
}
由于使用的是本地模式"local[2]"所以可以直接在本地运行该程序
注意:要指定并行度,如在本地运行设置setMaster(“local[2]”),相当于启动两个线程,一个给receiver,一个给computer。如果是在集群中运行,必须要求集群中可用core数大于1。
3、执行查看效果
(1)先执行nc -lk 9999
(2)然后在执行以上代码
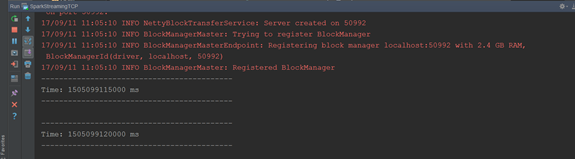
(3)不断的在(1)中输入不同的单词,观察IDEA控制台输出

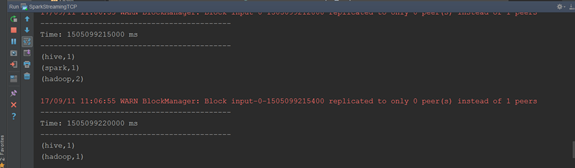
现象:sparkStreaming每隔5s计算一次当前5s内的数据,然后将每个批次的数据输出。
sparkStreaming数据源
Spark Streaming原生支持一些不同的数据源。一些“核心”数据源已经被打包到Spark Streaming 的 Maven 工件中,而其他的一些则可以通过 spark-streaming-kafka 等附加工件获取。每个接收器都以 Spark 执行器程序中一个长期运行的任务的形式运行,因此会占据分配给应用的 CPU 核心。此外,我们还需要有可用的 CPU 核心来处理数据。这意味着如果要运行多个接收器,就必须至少有和接收器数目相同的核心数,还要加上用来完成计算所需要的核心数。例如,如果我们想要在流计算应用中运行 10 个接收器,那么至少需要为应用分配 11 个 CPU 核心。所以如果在本地模式运行,不要使用local或者local[1]
1、文件数据源
Socket数据流前面的例子已经看到过。
文件数据流:能够读取所有HDFS API兼容的文件系统文件,通过fileStream方法进行读取
streamingContext.fileStream[KeyClass, ValueClass, InputFormatClass](dataDirectory)
Spark Streaming 将会监控 dataDirectory 目录并不断处理移动进来的文件,记住目前不支持嵌套目录。
- 文件需要有相同的数据格式
- 文件进入 dataDirectory的方式需要通过移动或者重命名来实现。
- 一旦文件移动进目录,则不能再修改,即便修改了也不会读取新数据。
如果文件比较简单,则可以使用 streamingContext.textFileStream(dataDirectory)方法来读取文件。文件流不需要接收器,不需要单独分配CPU核。
Hdfs读取实例:
提前需要在HDFS上建好目录。
import org.apache.spark.streaming.dstream.DStream
import org.apache.spark.{SparkConf, SparkContext}
import org.apache.spark.streaming.{Seconds, StreamingContext}

object StreamingFile {

  def updateFunc(newValues:Seq[Int],runnintCount:Option[Int]):Option[Int] = {
    val finalResult = runnintCount.getOrElse(0) + newValues.sum
    Option(finalResult)
  }
  def main(args: Array[String]): Unit = {
    //设置sparkConf配置
    val sparkConf: SparkConf = new SparkConf().setAppName("streamingFile").setMaster("local[2]")
    //通过sparkConf得到sparkContext
    val sparkContext = new SparkContext(sparkConf)
    //设置日志输出级别
    sparkContext.setLogLevel("WARN")
    //通过sparkContext得到streamingContext
    val streamingContext = new StreamingContext(sparkContext,Seconds(5))
    //设置sparkStreaming保存目录
    streamingContext.checkpoint("./hdfs-data")
    //读取hdfs某一个目录下的所有的文件
    val fileStream: DStream[String] = streamingContext.textFileStream("hdfs://node01:8020/stream-data")
    //文件内容按照空格进行切分
    val words: DStream[String] = fileStream.flatMap(x => x.split(" "))
    //每个单词记作为1
    val wordAndOne: DStream[(String, Int)] = words.map(x => (x,1))
    //更新每个单词的状态,传入一个我们自定义的updateFunction
    val key: DStream[(String, Int)] = wordAndOne.updateStateByKey(updateFunc)
    key.print()

    streamingContext.start()

    streamingContext.awaitTermination()

  }
}
2、自定义数据源
如果已经存在的数据源满足不了我们的要求,我们还可以自定义sparkStreaming的数据源进行数据的采集处理
通过继承Receiver,并实现onStart、onStop方法来自定义数据源采集。
需求:自定义数据源,接收socket收据,并统计每个单词出现的次数
自定义数据源示例代码如下
class CustomReceiver(host: String, port: Int)
  extends Receiver[String](StorageLevel.MEMORY_AND_DISK_2) with Logging {

  def onStart() {
    // Start the thread that receives data over a connection
    new Thread("Socket Receiver") {
      override def run() { receive() }
    }.start()
  }

  def onStop() {
    // There is nothing much to do as the thread calling receive()
    // is designed to stop by itself if isStopped() returns false
  }

  /** Create a socket connection and receive data until receiver is stopped */
  private def receive() {
    var socket: Socket = null
    var userInput: String = null
    try {
      // Connect to host:port
      socket = new Socket(host, port)
      // Until stopped or connection broken continue reading
      val reader = new BufferedReader(
        new InputStreamReader(socket.getInputStream(), StandardCharsets.UTF_8))
      userInput = reader.readLine()
      while(!isStopped && userInput != null) {
        store(userInput)
        userInput = reader.readLine()
      }
      reader.close()
      socket.close()

      // Restart in an attempt to connect again when server is active again
      restart("Trying to connect again")
    } catch {
      case e: java.net.ConnectException =>
        // restart if could not connect to server
        restart("Error connecting to " + host + ":" + port, e)
      case t: Throwable =>
        // restart if there is any other error
        restart("Error receiving data", t)
    }
  }
}
可以通过streamingContext.receiverStream()
来使用自定义的数据采集源
val customReceiverStream = ssc.receiverStream(new CustomReceiver(host, port))
val words = lines.flatMap(_.split(" "))
完整代码执行如下
import java.io.{BufferedReader, InputStreamReader}
import java.net.Socket
import java.nio.charset.StandardCharsets
import org.apache.spark.SparkConf
import org.apache.spark.storage.StorageLevel
import org.apache.spark.streaming.{Seconds, StreamingContext}
import org.apache.spark.streaming.receiver.Receiver

class CustomReceiver (host: String, port: Int) extends Receiver[String](StorageLevel.MEMORY_AND_DISK_2) {
  override def onStart(): Unit = {
    // Start the thread that receives data over a connection
    new Thread("Socket Receiver") {
      override def run() { receive() }
    }.start()
  }
  override def onStop(): Unit = {
    // There is nothing much to do as the thread calling receive()
    // is designed to stop by itself if isStopped() returns false
  }

  /** Create a socket connection and receive data until receiver is stopped */
  private def receive() {
    var socket: Socket = null
    var userInput: String = null
    try {
      // Connect to host:port
      socket = new Socket(host, port)

      // Until stopped or connection broken continue reading
      val reader = new BufferedReader(new InputStreamReader(socket.getInputStream(), StandardCharsets.UTF_8))

      userInput = reader.readLine()
      while(!isStopped && userInput != null) {

        // 传送出来
        store(userInput)

        userInput = reader.readLine()
      }
      reader.close()
      socket.close()

      // Restart in an attempt to connect again when server is active again
      restart("Trying to connect again")
    } catch {
      case e: java.net.ConnectException =>
        // restart if could not connect to server
        restart("Error connecting to " + host + ":" + port, e)
      case t: Throwable =>
        // restart if there is any other error
        restart("Error receiving data", t)
    }
  }
}

object CustomReceiver {
  def main(args: Array[String]) {

    val conf = new SparkConf().setMaster("local[2]").setAppName("NetworkWordCount")
    val ssc = new StreamingContext(conf, Seconds(1))

    // Create a DStream that will connect to hostname:port, like localhost:9999
    val lines = ssc.receiverStream(new CustomReceiver("master01", 9999))

    // Split each line into words
    val words = lines.flatMap(_.split(" "))

    //import org.apache.spark.streaming.StreamingContext._ // not necessary since Spark 1.3
    // Count each word in each batch
    val pairs = words.map(word => (word, 1))
    val wordCounts = pairs.reduceByKey(_ + _)

    // Print the first ten elements of each RDD generated in this DStream to the console
    wordCounts.print()
    ssc.start()             // Start the computation
    ssc.awaitTermination()  // Wait for the computation to terminate
    //ssc.stop()
  }
}
3、RDD队列
测试过程中,可以通过使用streamingContext.queueStream(queueOfRDDs)来创建DStream,每一个推送到这个队列中的RDD,都会作为一个DStream处理。
import org.apache.spark.SparkConf
import org.apache.spark.rdd.RDD
import org.apache.spark.streaming.{Seconds, StreamingContext}
import scala.collection.mutable
object QueueRdd {
  def main(args: Array[String]) {
    val conf = new SparkConf().setMaster("local[2]").setAppName("QueueRdd")
    val ssc = new StreamingContext(conf, Seconds(1))

    // Create the queue through which RDDs can be pushed to
    // a QueueInputDStream
    //创建RDD队列
    val rddQueue = new mutable.SynchronizedQueue[RDD[Int]]()

    // Create the QueueInputDStream and use it do some processing
    // 创建QueueInputDStream
    val inputStream = ssc.queueStream(rddQueue)
    //处理队列中的RDD数据
    val mappedStream = inputStream.map(x => (x % 10, 1))
    val reducedStream = mappedStream.reduceByKey(_ + _)

    //打印结果
    reducedStream.print()

    //启动计算
    ssc.start()

    // Create and push some RDDs into
    for (i <- 1 to 30) {
      rddQueue += ssc.sparkContext.makeRDD(1 to 300, 10)
      Thread.sleep(2000)

      //通过程序停止StreamingContext的运行
      //ssc.stop()
    }
  }
}


 304
304


 被折叠的 条评论
为什么被折叠?
被折叠的 条评论
为什么被折叠?
 到【灌水乐园】发言


