Rsync+inotify实现实时同步
例如:实验部署
前言
一:inotify介绍
-
inotify是一个强大的,细粒度的、异步的文件系统事件控制机制。Linux的内核从2.6.13起,加入了inotify支持,通过inotify可以监控文件系统的中添加、删除、修改、移动等各种操作,利用这个内核接口,第三方软件就可以监控文件系统下文件的各种变化情况,而inotify-tools正式实施监控的软件。
-
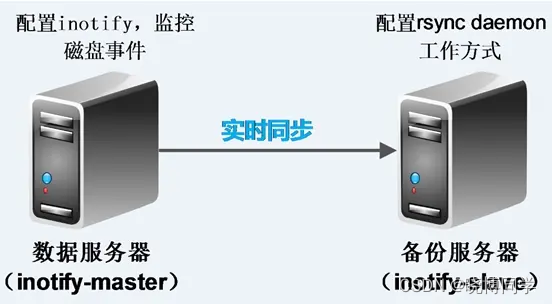
rsync+inotify同步逻辑图

二、环境的部署
1.环境情况:(腾讯云主机)
主机名: 主机ip地址 操作系统
inotify-master (rsync客户端,inotify服务端) 192.168.0.17 centos7.6
inotify-slave (rsync服务端) 192.168.0.12 centos7.6
-
inotify-slave部署 (192.168.0.12)
这里就是部署rsync服务,腾讯云的机器上默认是已经安装的,使用的是 rsync daemon工作模式。 -
检查是否已经安装rsync
代码如下(示例):
[root]# rpm -qa rsync
 rsync-3.0.6-12.el6.x86_64     #这里是已经存在,版本可能不同。
- 新建rsync用户及模块目录并更改其用户组
 ]# useradd rsync -s /sbin/nologin  -M      #添加rsync用户
 ]# mkdir /home/rsync/backup                #创建rsync daemon工作模式的模块目录
 ]# chown rsync.rsync /home/rsync/backup/   #更改模块目录的用户组powershell
- 编写rsync daemon配置文件/etc/rsyncd.conf
]# vim /etc/rsyncd.conf

#工作中指定用户(需要指定用户)
 uid = rsync
 gid = rsync
 #相当于黑洞.出错定位
 use chroot = no
 #有多少个客户端同时传文件
 max connections = 200
 #超时时间
 timeout = 300
 #进程号文件
 pid file = /var/run/rsyncd.pid
 #日志文件
 lock file = /var/run/rsync.lock
 #日志文件
 log file = /var/log/rsyncd.log
 #模块开始
 #这个模块对应的是推送目录
 #模块名称随便起
 [backup]
 #需要同步的目录
 path = /home/rsync/backup
 #表示出现错误忽略错误
 ignore errors
 #表示网络权限可写(本地控制真正可写)
 read only = false
 #这里设置IP或让不让同步
 list = false
 #指定允许的网段
 hosts allow = 192.168.114.101
 #拒绝链接的地址,一下表示没有拒绝的链接。
 hosts deny = 0.0.0.0/32
 #不要动的东西(默认情况)
 #虚拟用户
 auth users = rsync_backup
 #虚拟用户的密码文件
 secrets file = /etc/rsync.password
 #配置文件的结尾
 #rsync_config_______________end
- 配置虚拟用户的密码文件
]# echo "rsync_backup:123456" > /etc/rsync.password 注:rsync_backup为虚拟用户,123456为这个虚拟用户的密码
]# chmod 600 /etc/rsync.password  #为密码文件提权,增加安全性
- 启动rsync 服务
 ]# rsync --daemon   #启动rsync服务
 ]# ps -ef |grep rsync
 root     14871     1  0 14:24 ?        00:00:00 rsync --daemon
 root     14873 14788  0 14:24 pts/0    00:00:00 grep rsync
 ]# netstat -lnutp |grep rsync
 tcp        0      0 0.0.0.0:873                 0.0.0.0:*                   LISTEN      14871/rsync
 tcp        0      0 :::873                      :::*                        LISTEN      14871/rsync
- 通过inotify-master测试推送
inotify-master配置密码文件,测试推送
 ]# echo "123456" > /etc/rsync.password
 ]# chmod 600 /etc/rsync.password
 ]# touch test1.txt
 ]# echo "hello" > test1.txt
 ]# cat test1.txt
   hello
在master进行命令测试
]# rsync -avz test1.txt rsync_backup@192.168.0.12::backup --password-file=/etc/rsync.password
sending incremental file list
test1.txt

sent 76 bytes  received 27 bytes  206.00 bytes/sec
total size is 6  speedup is 0.06
inotify-slave检查:
 ]# ll /home/rsync/backup/
 总用量 4
 -rw-r--r--. 1 rsync rsync 6 8月   9 01:26 test1.txt
 ]# cat /home/rsync/backup/test1.txt
 hello
- inotify-master部署
注:
inotify是rsync客户端安装和执行的
企业场景压力测试200-300个同步限制,受网卡,磁盘,带宽等的制约。
- 下载inotify源码包并编译安装
]# wget http://github.com/downloads/rvoicilas/inotify-tools/inotify-tools-3.14.tar.gz  #下载inotify源码包
..................................
]# tar zxf inotify-tools-3.14.tar.gz
]# cd inotify-tools-3.14
]# ./configure --prefix=/usr/local/inotify #配置inotify,并指定安装路径为/usr/local/inotify
................................
]# make && make install
三、编写监控脚本验证
- 脚本代码情况(参考他人可自行修改)
 ]# cat rsync.sh
 #!/bin/bash
 #para
 host01=192.168.0.12  #inotify-slave的ip地址
 src=/home/rsync/backup        #本地监控的目录master机器得创建
 dst=backup         #inotify-slave的rsync服务的模块名
 user=rsync_backup      #inotify-slave的rsync服务的虚拟用户
 rsync_passfile=/etc/rsync.password   #本地调用rsync服务的密码文件
 inotify_home=/usr/local/inotify    #inotify的安装目录
 #judge
 if [ ! -e "$src" ] \
 || [ ! -e "${rsync_passfile}" ] \
 || [ ! -e "${inotify_home}/bin/inotifywait" ] \
 || [ ! -e "/usr/bin/rsync" ];
 then
 echo "Check File and Folder"
 exit 9
 fi
 ${inotify_home}/bin/inotifywait -mrq --timefmt '%d/%m/%y %H:%M' --format '%T %w%f' -e close_write,delete,create,attrib $src \
 | while read file
 do
 #  rsync -avzP --delete --timeout=100 --password-file=${rsync_passfile} $src $user@$host01::$dst >/dev/null 2>&1
 cd $src && rsync -aruz -R --delete ./  --timeout=100 $user@$host01::$dst --password-file=${rsync_passfile} >/dev/null 2>&1
 done
 exit 0
 [root@inotify-master ~]# sh rsync.sh &
[1] 3982
- 实时同步测试
inotify-master操作:
[root@inotify-master ~]# mkdir -p /home/rsync/backup/
[root@inotify-master ~]# cd /home/rsync/backup/
[root@inotify-master backup]# ll
total 0

[root@inotify-master backup]# for i in $(seq 50);do touch $i.txt;done
[root@inotify-master backup]# ll |wc -l
51
inotify-slave检查
[root@inotify-slave backup]# ls
10.txt  14.txt  18.txt  21.txt  25.txt  29.txt  32.txt  36.txt  3.txt   43.txt  47.txt  50.txt  8.txt
11.txt  15.txt  19.txt  22.txt  26.txt  2.txt   33.txt  37.txt  40.txt  44.txt  48.txt  5.txt   9.txt
12.txt  16.txt  1.txt   23.txt  27.txt  30.txt  34.txt  38.txt  41.txt  45.txt  49.txt  6.txt
13.txt  17.txt  20.txt  24.txt  28.txt  31.txt  35.txt  39.txt  42.txt  46.txt  4.txt   7.txt
这里inotify之inotifywait命令常用参数详解
 ]# cd /usr/local/inotify/
 ]# ./bin/inotifywait --help
 -r|--recursive   Watch directories recursively. #递归查询目录
 -q|--quiet      Print less (only print events). #打印监控事件的信息
 -m|--monitor   Keep listening for events forever.  Without this option, inotifywait will exit after one  event is received.        #始终保持事件监听状态
 --excludei <pattern>  Like --exclude but case insensitive.    #排除文件或目录时,不区分大小写。
 --timefmt <fmt> strftime-compatible format string for use with %T in --format string. #指定时间输出的格式
 --format <fmt>  Print using a specified printf-like format string; read the man page for more details.
 #打印使用指定的输出类似格式字符串
 -e|--event <event1> [ -e|--event <event2> ... ] Listen for specific event(s).  If omitted, all events are  listened for.               #通过此参数可以指定需要监控的事件,如下所示:
 Events:
 access           file or directory contents were read        #文件或目录被读取。
 modify           file or directory contents were written    #文件或目录内容被修改。
 attrib            file or directory attributes changed      #文件或目录属性被改变。
 close            file or directory closed, regardless of read/write mode    #文件或目录封闭,无论读/写模式。
 open            file or directory opened                    #文件或目录被打开。
 moved_to        file or directory moved to watched directory    #文件或目录被移动至另外一个目录。
 move            file or directory moved to or from watched directory    #文件或目录被移动另一个目录或从另一个目录移动至当前目录。
 create           file or directory created within watched directory     #文件或目录被创建在当前目录
 delete           file or directory deleted within watched directory     #文件或目录被删除
 unmount         file system containing file or directory unmounted  #文件系统被卸载
总结
`
例如:以上就是今天的内容,可以解决我们生产中多个机器数据同步的问题,还可以增加nfs进行结合。


 7984
7984


 被折叠的 条评论
为什么被折叠?


