


1、引入MAVEN依赖
<!--AMQP依赖,包含RabbitMQ-->
<dependency>
    <groupId>org.springframework.boot</groupId>
    <artifactId>spring-boot-starter-amqp</artifactId>
</dependency>
2、yml配置
spring:
  rabbitmq:
    host: 192.168.150.101 # 主机名
    port: 5672 # 端口
    virtual-host: / # 虚拟主机
    username: itcast # 用户名
    password: 123321 # 密码
3、发送方代码,利用RabbitTemplate实现消息发送
public class SpringAmqpTest {

    @Autowired
    private RabbitTemplate rabbitTemplate;

    @Test
    public void testSimpleQueue() {
        // 队列名称
        String queueName = "simple.queue";
        // 消息
        String message = "hello, spring amqp!";
        // 发送消息
        rabbitTemplate.convertAndSend(queueName, message);
    }
}
4、消息接收
@Component
public class SpringRabbitListener {
    @RabbitListener(queues = "simple.queue")
    public void listenSimpleQueueMessage(String msg) throws InterruptedException {
        System.out.println("spring 消费者接收到消息:【" + msg + "】");
    }
}
4.1 这次我们循环发送,模拟大量消息堆积现象。
@Test
public void testWorkQueue() throws InterruptedException {
    // 队列名称
    String queueName = "simple.queue";
    // 消息
    String message = "hello, message_";
    for (int i = 0; i < 50; i++) {
        // 发送消息
        rabbitTemplate.convertAndSend(queueName, message + i);
        Thread.sleep(20);
    }
}
4.2 消息接收
@RabbitListener(queues = "simple.queue")
public void listenWorkQueue1(String msg) throws InterruptedException {
    System.out.println("消费者1接收到消息:【" + msg + "】" + LocalTime.now());
    Thread.sleep(20);
}

@RabbitListener(queues = "simple.queue")
public void listenWorkQueue2(String msg) throws InterruptedException {
    System.err.println("消费者2........接收到消息:【" + msg + "】" + LocalTime.now());
    Thread.sleep(200);
}
启动ConsumerApplication后,在执行publisher服务中刚刚编写的发送测试方法testWorkQueue。
可以看到消费者1很快完成了自己的25条消息。消费者2却在缓慢的处理自己的25条消息。
也就是说消息是平均分配给每个消费者,并没有考虑到消费者的处理能力。这样显然是有问题的。
4.3 能者多劳
spring:
  rabbitmq:
    listener:
      simple:
        prefetch: 1 # 每次只能获取一条消息,处理完成才能获取下一个消息
5、声明队列和交换机
@Configuration
public class FanoutConfig {
    /**
     * 声明交换机
     * @return Fanout类型交换机
     */
    @Bean
    public FanoutExchange fanoutExchange(){
        return new FanoutExchange("itcast.fanout");
    }

    /**
     * 第1个队列
     */
    @Bean
    public Queue fanoutQueue1(){
        return new Queue("fanout.queue1");
    }

    /**
     * 绑定队列和交换机
     */
    @Bean
    public Binding bindingQueue1(Queue fanoutQueue1, FanoutExchange fanoutExchange){
        return BindingBuilder.bind(fanoutQueue1).to(fanoutExchange);
    }

    /**
     * 第2个队列
     */
    @Bean
    public Queue fanoutQueue2(){
        return new Queue("fanout.queue2");
    }

    /**
     * 绑定队列和交换机
     */
    @Bean
    public Binding bindingQueue2(Queue fanoutQueue2, FanoutExchange fanoutExchange){
        return BindingBuilder.bind(fanoutQueue2).to(fanoutExchange);
    }
}
5.1 消息发送
@Test
public void testFanoutExchange() {
    // 队列名称
    String exchangeName = "itcast.fanout";
    // 消息
    String message = "hello, everyone!";
    rabbitTemplate.convertAndSend(exchangeName, "", message);
}
5.2 消息接收
/*
*在服务的SpringRabbitListener中添加两个方法,作为消费者:
*/
@RabbitListener(queues = "fanout.queue1")
public void listenFanoutQueue1(String msg) {
    System.out.println("消费者1接收到Fanout消息:【" + msg + "】");
}

@RabbitListener(queues = "fanout.queue2")
public void listenFanoutQueue2(String msg) {
    System.out.println("消费者2接收到Fanout消息:【" + msg + "】");
}
5.3、基于注解声明队列和交换机

属性 key 的应用,发送携带 key 值,只有再交换机携带指定 key 值才可以获取;

/**
*基于@Bean的方式声明队列和交换机比较麻烦,Spring还提供了基于注解方式来声明。
*在consumer的SpringRabbitListener中添加两个消费者,同时基于注解来声明队列和交换机
*/
@RabbitListener(bindings = @QueueBinding(
    value = @Queue(name = "direct.queue1"),
    exchange = @Exchange(name = "itcast.direct", type = ExchangeTypes.DIRECT),
    key = {"red", "blue"}
))
public void listenDirectQueue1(String msg){
    System.out.println("消费者接收到direct.queue1的消息:【" + msg + "】");
}

@RabbitListener(bindings = @QueueBinding(
    value = @Queue(name = "direct.queue2"),
    exchange = @Exchange(name = "itcast.direct", type = ExchangeTypes.DIRECT),
    key = {"red", "yellow"}
))
public void listenDirectQueue2(String msg){
    System.out.println("消费者接收到direct.queue2的消息:【" + msg + "】");
}

/**
*消息发送 携带 key 值
*/
@Test
public void testSendDirectExchange() {
    // 交换机名称
    String exchangeName = "itcast.direct";
    // 消息
    String message = "红色警报!日本乱排核废水,导致海洋生物变异,惊现哥斯拉!";
    // 发送消息
    rabbitTemplate.convertAndSend(exchangeName, "red", message);
}
5.4 Routingkey属性
Routingkey 一般都是有一个或多个单词组成,多个单词之间以”.”分割,例如: item.insert
通配符规则:
#:匹配一个或多个词
*:匹配不多不少恰好1个词
举例:
item.#:能够匹配item.spu.insert 或者 item.spu
item.*:只能匹配item.spu
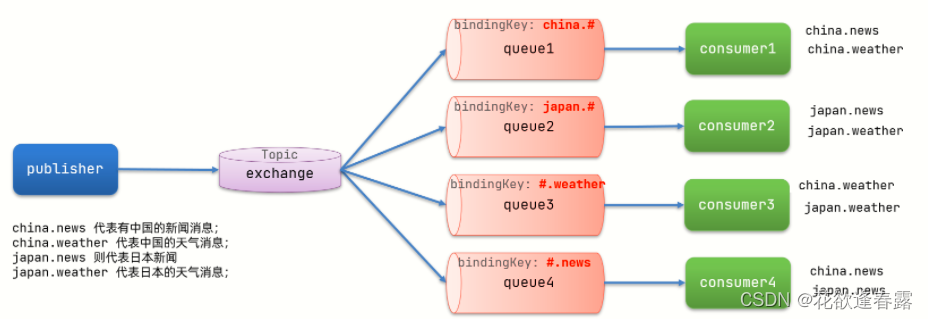
解释:
- Queue1:绑定的是
china.#,因此凡是以china.开头的routing key都会被匹配到。包括china.news和china.weather - Queue2:绑定的是
#.news,因此凡是以.news结尾的routing key都会被匹配。包括china.news和japan.news


 691
691


 被折叠的 条评论
为什么被折叠?
被折叠的 条评论
为什么被折叠?
 到【灌水乐园】发言


