


前言
centos7安装mysql5.7.35
提示:以下是本篇文章正文内容,下面案例可供参考
一、下载安装包tar.gz
直接从mysql官网下载,包名称如下图

下载完先检查系统是否已经安装mariadb(centos自带),如果有将其卸载
[root@master module]# rpm -qa |grep mariadb
mariadb-libs-5.5.68-1.el7.x86_64
[root@master local]# rpm -e --nodeps mariadb-libs-5.5.68-1.el7.x86_64
二、创建安装目录并解压
我创建的目录是在/usr/local/dev/mysql5.7/install
解压安装包到install目录下
tar -zxvf mysql-5.7.35-linux-glibc2.12-x86_64.tar.gz -C ./install/
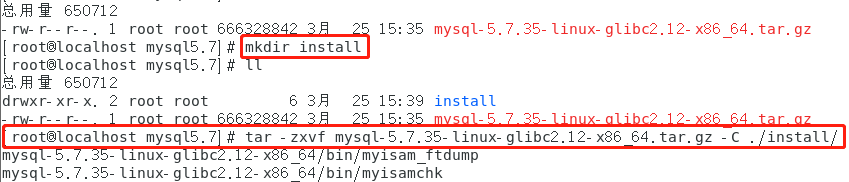
解压后重命名为mysql5.7,
mv ./mysql-5.7.35-linux-glibc2.12-x86_64/ ./mysql5.7
如下图

三、mysql组及用户

[root@master software]# cat /etc/group |grep mysql    #查看是否存在mysql用户组
[root@master software]# cat /etc/passwd |grep mysql   #查看是否存在mysql用户

[root@master software]# groupadd mysql    #新建mysql用户组
[root@master software]# useradd -r -g mysql -d /opt/module/mysql mysql   #新建mysql用户并将其划入mysql组 并设置家目录
将mysql文件归属给mysql用户和mysql用户组
[root@localhost install]# chown -R mysql:mysql /usr/local/dev/mysql5.7/install/mysql5.7/
四、数据目录及配置文件
1.创建data目录用来存放数据文件并授权


my.cnf配置如下
[mysql]
#修改默认字符集
default-character-set=utf8
[mysqld]
basedir=/usr/local/dev/mysql5.7/install/mysql5.7
datadir=/usr/local/dev/mysql5.7/install/mysql5.7/data
port = 3306
#忽略大小写
lower_case_table_names=1
#服务端默认字符集
character-set-server=utf8
#最大连接数
max_connections=2000
#创建数据库时默认数据引擎
default-storage-engine=INNODB
explicit_defaults_for_timestamp=true
2.修改my.cnf文件权限并安装libaio库
[root@localhost install]# chmod 640 /etc/my.cnf
[root@localhost install]# yum -y install libaio
3.配置环境变量,使mysql命令在全局环境下可使用,修改/etc/profile文件或者在/etc/profile.d/目录下新建my_env.sh文件
[root@master etc]# vim /etc/profile.d/my_env.sh
添加如下内容
#MYSQL_HOME
export MYSQL_HOME=/usr/local/dev/mysql5.7/install/mysql5.7
export PATH=$PATH:$MYSQL_HOME/bin
4.将mysql相关配置复制到系统服务目录下,并赋予执行权限
[root@master init.d]# cp /usr/local/dev/mysql5.7/install/mysql5.7/support-files/mysql.server /etc/init.d/mysqld
[root@master init.d]# chmod +x /etc/init.d/mysqld
5.将mysql设置开机自启
chkconfig --add mysqld
chkconfig --list #3 4 5 显示为on/开 若为off/关

#输入下面命令
chkconfig --level 345 mysqld on
6.先使我们之前配置的环境变量生效,初始化数据库
[root@localhost install]# source /etc/profile
[root@localhost install]# mysqld --initialize --user=mysql --basedir=/usr/local/dev/mysql5.7/install/mysql5.7/ --datadir=/usr/local/dev/mysql5.7/install/mysql5.7/data/

7.启动数据库并查看数据库状态
[root@localhost install]# systemctl start mysqld
[root@localhost install]# systemctl status mysqld
● mysqld.service - LSB: start and stop MySQL
   Loaded: loaded (/etc/rc.d/init.d/mysqld; bad; vendor preset: disabled)
   Active: active (running) since 五 2022-03-25 15:58:34 CST; 8s ago
     Docs: man:systemd-sysv-generator(8)
  Process: 12475 ExecStart=/etc/rc.d/init.d/mysqld start (code=exited, status=0/SUCCESS)
    Tasks: 28
   CGroup: /system.slice/mysqld.service
           ├─12493 /bin/sh /usr/local/dev/mysql5.7/install/mysql5.7/bin/mysqld_safe...
           └─12680 /usr/local/dev/mysql5.7/install/mysql5.7/bin/mysqld --basedir=/u...

3月 25 15:58:33 localhost.localdomain systemd[1]: Starting LSB: start and stop My....
3月 25 15:58:33 localhost.localdomain mysqld[12475]: Starting MySQL.Logging to '/....
3月 25 15:58:34 localhost.localdomain mysqld[12475]: SUCCESS!
3月 25 15:58:34 localhost.localdomain systemd[1]: Started LSB: start and stop MySQL.
Hint: Some lines were ellipsized, use -l to show in full.
8.登录mysql客户端并修改密码,并设置允许远程连接

[root@localhost install]# mysql -u root -p
Enter password:
Welcome to the MySQL monitor.  Commands end with ; or \g.
Your MySQL connection id is 2
Server version: 5.7.35

Copyright (c) 2000, 2021, Oracle and/or its affiliates.

Oracle is a registered trademark of Oracle Corporation and/or its
affiliates. Other names may be trademarks of their respective
owners.

Type 'help;' or '\h' for help. Type '\c' to clear the current input statement.

mysql> alter user root@localhost identified by 'root';
Query OK, 0 rows affected (0.00 sec)

mysql> GRANT ALL PRIVILEGES ON *.* TO 'root'@'%' IDENTIFIED BY 'root';
Query OK, 0 rows affected, 1 warning (0.00 sec)

mysql> flush privileges;
Query OK, 0 rows affected (0.00 sec)

mysql> quit;
Bye
五、注意
如果连接错误报MySQL2003,检查防火墙是否关闭
systemctl start firewalld # 开启防火墙
systemctl stop firewalld  # 关闭防火墙
systemctl status firewalld  #检查防火墙状态
开机关闭防火墙及开机自启防火墙
systemctl disable firewalld.service  #关闭开机启动
systemctl enable firewalld.service	#开启开机启动


 212
212


 被折叠的 条评论
为什么被折叠?
被折叠的 条评论
为什么被折叠?
 到【灌水乐园】发言


