


C++
1、函数重载
函数重载大概可以理解为,定义两个名字一模一样,但形参不一样的函数。通过传入参数可以判别具体执行哪一个函数。并且在这两个函数中,理论上可以执行截然不同的程序。
以下是一个简单的demo。
/*
函数重载小实验——写一段代码求两个数或者三个数的平均值
2023.9.7
*/
#include <iostream>

using namespace std;

float average(float ,float ,float);
float average(float ,float);

float average(float a,float b,float c)
{
	return (a+b+c)/3;
}

float average(float a,float b)
{
	return (a+b)/2;
}


int main()
{
	int choice;
	float temp1,temp2,temp3;
	float result;

	cout<<"please choose two or three numbers"<<endl;
	cin >> choice;

	if (choice == 2)
	{
		cout<<"please enter two numbers:"<<endl;
		cin >> temp1 >> temp2;
		result = average(temp1,temp2);
	}
	else if(choice == 3)
	{
		cout<<"please enter three numbers:"<<endl;
		cin >> temp1 >> temp2 >> temp3;
		result = average(temp1,temp2,temp3);
	}
	else {cout<<"your input is wrong!"<<endl;}

	cout<<"please result is:"<<result<<endl;

	return 0;
}
注:cin可以通过enter或tab来分割输入。
2、类
2.1、类的方法和属性
通过class定义一个叫car的类。类里面的变量就叫做属性,函数就叫做方法。
class Car
{
public:
	int num;
	void run();
};
2.2、类的方法的定义
在2.1中,我们声明了类中的有一个叫run的方法,但是具体到run函数里面到底在执行什么,还得再次定义一下。
void Car::run(void)
{
	cout<<"I am running"<<endl;
}
当然,如果类的方法中所实现的内容并不复杂,也大可在声明的时候直接定义了。如下:
class Car
{
public:
	int num;
	void run(){
		cout<<"I am running"<<endl;
	}
};
2.3、构造器和析构器
Ⅰ、类的构造器是指,在实例化这个类之后,程序会先执行一个和类同名的方法。
Ⅱ、类的析构器是指,当类被被使用完毕之后,程序会自动执行一个名字为“类名字前加个~”的方法。
但如果像2.1那样,没有定义构造器和析构器,那程序其实也会去执行构造器和析构器里面的程序的,只是此时的程序为空。
注:实例化是将一个类变成一个实体,一个类可以被无限次实例化。
#include <iostream>

using namespace std;


class Car
{
public:
	int num;
	Car(int);   //构造器可以传输参数
	~Car(void);  //析构器不可以传输参数
	void run();
};

//构造器
Car::Car(int temp)
{
	num = temp;
	cout<<"this car's license number is:"<<num<<endl;
}

//析构器,本代码是在main函数执行结束后才调用析构器方法的。
Car::~Car(void)
{
	cout<<"end."<<endl;
}


void Car::run(void)
{
	cout<<num<<" is running!"<<endl;
}


int main()
{
	class Car mycar(666);    //构造器的参数在实例化的时候就得赋上了
	class Car yourcar(888); //再次实例化一个类对象

	mycar.run();
	yourcar.run();

	return 0;
}
2.4、类的实例化
第一种实例化的方法:
class Car mycar;        //无参数,即便是class Car mycar();也不行
class Car mycar(9);   //当构造器有参数时(假设参数是整形变量)
第二种实例化的方法:
Car mycar;        //无参数
Car mycar(9);    //当构造器有参数时(假设参数是整形变量)
由于第二种方法比较整洁,所以在实际运用中比较常用。那么接下来运用第二种实例化方法再来讲讲构造函数的隐式赋值。
Car mycar = 9;
Car mycar(9);
以上两句代码实现的效果是一样的,形式不同罢了。为了读起来方便,一般还是用Car mycar(9);这样的定义方式。
2.5、基类与子类
基类又称父类,也就说我们可以再定义一个类,继承父类的变量和方法。
#include <iostream>

using namespace std;


//父类
class Car
{
public:
	int num;
	void run();
};

//子类
class MotorCycle:public Car
{
public:
	void hand_brake();
};

//父类的run方法
void Car::run(void)
{
	cout<<"running"<<endl;
}

//子类的hand_brake方法
void MotorCycle::hand_brake(void)
{

	cout<<"notice! I'am using the hand brake!"<<endl;
}


int main()
{
	class MotorCycle my_motor;
	my_motor.run();
	my_motor.hand_brake();

	return 0;
}
2.6、类的public、protected、private继承
public:可以被任何实体访问,也可以被子类访问,以及类的函数成员访问。
protected:不能被类的实体访问,但可以被子类访问,也可以类的函数成员访问。
private:不能被类的实体访问,不可以被子类访问,但可以被类的函数成员访问。
#include <iostream>
using namespace std;

//父类
class Car
{
public:
	int num;
	void run();
protected:
	int test1;
private:
	int test2;
};

//子类
class MotorCycle:public Car
{
public:
	void hand_brake();
};

//父类的run方法
void Car::run(void)
{
	test1 = 1;   //✔ protected可以被类的函数成员访问
	test2 = 2;   //✔ private可以被类的函数成员访问

	cout<<"running"<<endl;
}

//子类的hand_brake方法
void MotorCycle::hand_brake(void)
{
	test1 = 1;   //✔ protected可以被子类的函数成员访问
	//test2 = 2;  × private不可以被子类的函数成员访问

	cout<<"notice! I'am using the hand brake!"<<endl;
}


int main()
{
	class MotorCycle my_motor;
	my_motor.run();
	my_motor.num = 888;    //✔ public可以被实体访问
	//my_motor.test1 = 1;     × protected不可以被实体访问
	//my_motor.test2 = 2;     × private不可以被实体访问
	my_motor.hand_brake();

	return 0;
}
2.7、类的方法的重载
这里其实和第1章中的函数重载是一样的,只不过是类中定义两个名字一样的方法而已。
class Car
{
public:
	void run();
	void run(int);	//定义两个同名的方法,一个有整形形参,一个没有。
};


void Car::run(void)
{

	cout<<"running"<<endl;
}

void Car::run(int temp)
{

	cout<<"speed running"<<endl;
}
2.8、子类方法的覆盖
子类再次声明一个和父类一模一样的方法,用以覆盖父类的方法。但值得注意的是,这里说的覆盖并不完全准确。当我们对父类进行实列化之后,再次调用run方法,执行依旧的父类中的run方法,而不是覆盖之后子类的run。这点从子类的函数成员可以调用父类的run方法也可以看出来。通过以下两段代码希望可以加强各位的理解。
代码一:
//父类
class Car
{
public:
	void run();
};

//子类
class MotorCycle:public Car
{
public:
	void run();
};

//父类的run方法
void Car::run(void)
{
	cout<<"running"<<endl;
}


//子类的run方法。
void MotorCycle::run(void)
{
	car::run();         //子类的函数成员可以直接调用子类的方法
	cout<<"the motorcycle is running"<<endl;
}
代码二:
#include <iostream>

using namespace std;


//父类
class Car
{
public:
	void run();
};

//子类
class MotorCycle:public Car
{
public:
	void run();
};

//父类的run方法
void Car::run(void)
{
	cout<<"the car is running"<<endl;
}


//子类的run方法
void MotorCycle::run(void)
{
	cout<<"the motorcycle is running"<<endl;
}


int main()
{
	Car my_car;
	MotorCycle my_motor;

	my_car.run();   //调用的是父类的run方法
	my_motor.run();  //调用的是子类的run方法

	return 0;
}
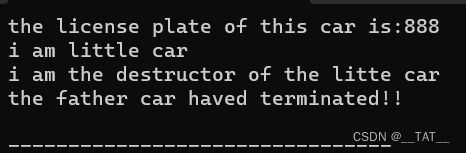
2.9、继承中的构造函数和析构函数
即便是子类继承继承父类,在对子类实例化之后,也是会执行父类的构造器和析构器。但如果父类的构造器中有传入参数,则必须在子类的构造器方法中给父类的构造器传入参数,否则代码报错。
#include <iostream>

using namespace std;

class Car
{
public:
	int temp1;
	Car(int num){       //由于父类的构造器有参数,所以必须在子类中传入
		cout<<"the license plate of this car is:"<<num<<endl;
	}
	~Car(void){
		cout<<"the father car haved terminated!!"<<endl;
	}
};

class Little_car:public Car
{
public:
	Little_car(int num):Car(num){           //注意子类的构造器的传入参数必须和父类构造器的传入参数一样
		cout<<"i am little car"<<endl;
	}
	~Little_car(void){
		cout<<"i am the destructor of the litte car"<<endl;
	}
};


int main()
{
	Little_car mycar(888);

	return 0;
}
输出结果:
2.10、初始化列表
初始化列表,即在执行构造函数的时候,将类的所有属性或部分属性都赋上之值。
最典型的初始化方法:
class Car
{
public:
	int _number1;
	int _number2;

	Car(int num)
	{
		_number1 = 3;
		_number2 = 9;
	}
};
一种比较常用且简洁的初始化方法:
class Car
{
public:
	int _number1;
	int _number2;

	Car(int num):
	_number1(3)
	,_number2(num)
	{
		cout<<"i am the constructor"<<endl;
	}
};
从上面这段代码可以发现,列表初始化的方式和2.9提到的子类调用父类的构造器的方式十分相似。那么下面这段代码则阐明如何同时调用父类的构造器和初始化列表。
class Car    //父类Car
{
public:
	Car(int num):
	{
		cout<<"i am the constructor of the superclass"<<endl;
	}
};

class MotorCycle
{
public:
	MotorCycle(int num):Car(num)       //调用父类的构造器
	,_number1(num)                  //初始化列表
	,_number2(9.9)
	{
		cout<<"the first number is: "<<_number1<<endl;
		cout<<"the second number is: "<<_number2<<endl;
	}

private:
	int _number1;
	float _number2;
};
2.11、类的多继承
#include<iostream>

using namespace std;

class Car            //父类1:小车
{
public:
	Car(void)
	{
		cout<<"i am the constructor of the superclass"<<endl;
	}
	void run(void){
		cout<<"running"<<endl;
	}
};

class Plane             //父类2:飞机
{
public:
	Plane(void){
		cout<<"i can fly"<<endl;
	}

	void fly(void){
		cout<<"flying"<<endl;
	}
protected:
	int _height;
};


class MotorCycle:public Car, public Plane     //继承小车和飞机
{
public:
	MotorCycle(int num)
	{
		_height = num;
		cout<<"i am the motorcycle, i want to fly and run"<<endl;
		cout<<"i reach the  "<<_height<<"  altitude"<<endl;
	}
};

int main()
{
	MotorCycle my_motorcycle(666);

	return 0;
}


 755
755


 被折叠的 条评论
为什么被折叠?
被折叠的 条评论
为什么被折叠?
 到【灌水乐园】发言


