


文章目录
1.入门:
MyBatis-Plus (opens new window)(简称 MP)是一个 MyBatis (opens new window)的增强工具,在 MyBatis 的基础上只做增强不做改变,为简化开发、提高效率而生。
官网:https://mp.baomidou.com/guide/#%E7%89%B9%E6%80%A7
- 引入数据库:
DROP TABLE IF EXISTS user;
CREATE TABLE user
(
	id BIGINT(20) NOT NULL COMMENT '主键ID',
	name VARCHAR(30) NULL DEFAULT NULL COMMENT '姓名',
	age INT(11) NULL DEFAULT NULL COMMENT '年龄',
	email VARCHAR(50) NULL DEFAULT NULL COMMENT '邮箱',
	PRIMARY KEY (id)
);

DELETE FROM user;
INSERT INTO user (id, name, age, email) VALUES
(1, 'Jone', 18, 'test1@baomidou.com'),
(2, 'Jack', 20, 'test2@baomidou.com'),
(3, 'Tom', 28, 'test3@baomidou.com'),
(4, 'Sandy', 21, 'test4@baomidou.com'),
(5, 'Billie', 24, 'test5@baomidou.com');
- 引入依赖
最好Mybatis和Mybatis-Plus的依赖只引入一个
        <dependency>
            <groupId>com.baomidou</groupId>
            <artifactId>mybatis-plus-boot-starter</artifactId>
            <version>3.4.3</version>
        </dependency>
        <dependency>
            <groupId>mysql</groupId>
            <artifactId>mysql-connector-java</artifactId>
        </dependency>
- 编写pojo类和mapper:
public class user {
    @TableId()
    private Long id;
    private String name;
    private Integer age;
    private String email;
}
mapper接口只需要继承BaseMapper接口,利用泛型规定相应的数据类型。
@Repository
public interface UserMapper extends BaseMapper<user> {

}
- 编写测试:
注意我们需要在主启动类上去扫描我们mapper包下的所有接口。
crud方法的参数是一个wrapper,条件构造器,我们这里不用就写null,不然会报错。
@MapperScan("com.wu.admin.mapper")
@SpringBootTest
class Boot03AdminApplicationTests {
    @Autowired
    private UserMapper userMapper;

    @Test
    void contextLoads() {
        List<user> users = userMapper.selectList(null);
        users.forEach(System.out::println);
    }
}
查询成功:

- 总结:
引入了mybatis-plus,我们就不用再写重复的crud,不用再自己写数据库语句,并且基本的crud方法已经给我们写好了
1.1 配置日志
StdOutImpl是默认的日志打印,可以直接使用
mybatis-plus:
  configuration:
    log-impl: org.apache.ibatis.logging.stdout.StdOutImpl
配置后:
可以看到日志的打印

2. CRUD基本操作
1. 插入:
    @Test
    void inseret(){
        user user = new user();
        user.setAge(18);
        user.setName("www");
        user.setEmail("123213213@qq.com");

        int insert = userMapper.insert(user);
        System.out.println(insert);
        System.out.println(user);
    }
注意点:这里我们新建user对象是没有添加id的,

1.1 主键生成策略:
在实体类中的id属性上添加注解 @TableId(type = IdType.ASSIGN_UUID) 可以设置id生成的方式:

AUTO 数据库ID自增,数据库字段一定要是自增的!
INPUT 需要用户自己输入ID,如果没有输入则为空
ASSIGN_ID
ASSIGN_UUID 全局唯一ID,UUID类型的主键
NONE 该类型为未设置主键类型
- ASSIGN_ID:
如果不设置 type 值,默认则使用 IdType.ASSIGN_ID 策略(自 3.3.0 起)。该策略会使用雪花算法自动生成主键 ID,主键类型为 Long 或 String(分别对应 MySQL 的表字段为 BIGINT 和 VARCHAR)。
雪花算法(SnowFlake)是 Twitter 开源的分布式 id 生成算法。其核心思想就是:使用一个 64 bit 的 long 型的数字作为全局唯一 id。在分布式系统中的应用十分广泛,且 ID 引入了时间戳,基本上保持自增的。
- ASSIGN_UUID
如果使用 IdType.ASSIGN_UUID 策略,则会自动生成不含中划线的 UUID 作为主键。主键类型为 String,对应 MySQL 的表字段为 VARCHAR(32)。
2.更新:
可以使用 update 和updateById 方法进行更新的操作
- updateById方法:
    @Test
    void update(){
        user user = new user();
        user.setId(5L);
        user.setAge(18);
        user.setName("w");

        int update = userMapper.updateById(user);
        System.out.println(update);
    }
结果:
发现MP直接为我们实现了动态SQL语句,根据我们传入的参数进行了动态sql
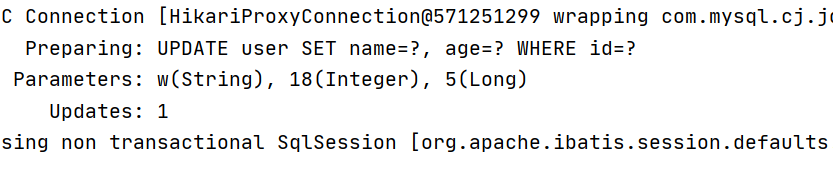
源码:注意两个方法中传入的都是实体类对象

- update方法:
会改变所有字段的值
2.1 自动填充:
创建时间、修改时间!这些个操作一遍都是自动化完成的,我们不希望手动更新!
阿里巴巴开发手册:所有的数据库表:gmt_create、gmt_modified几乎所有的表都要配置上!而且需要自动化!
- 数据库级别(不建议,工作中不允许修改数据库):

- 代码级别:
原理:
1.实现元对象处理器接口:com.baomidou.mybatisplus.core.handlers.MetaObjectHandler
2.注解填充字段 @TableField(… fill = FieldFill.INSERT) 生成器策略部分也可以配置!
修改实体类:
这里建议实体类里的时间类型改为 LocalDateTime
LocalDate 代表日期,LocalTime表示时刻,类似11:23这样的时刻。 LocalDateTime就是前面2个的结合,是java8的新特性。
相比于Date,Date需要使用SimpleDateFormat对时间进行格式化,但SimpleDateFormat是线程不安全的。
添加 @TableField 注解
@ToString
@Data
@AllArgsConstructor
@NoArgsConstructor
public class user {
    @TableId(type = IdType.AUTO)
    private Long id;
    private String name;
    private Integer age;
    private String email;

    // 注意!这里需要标记为填充字段
    @TableField(fill = FieldFill.INSERT)
    private LocalDateTime createTime;
    @TableField(fill = FieldFill.INSERT_UPDATE)
    private LocalDateTime updateTime;
}

自定义实现类:
前面的注解就是一个标注,标注某个属性是需要自动填充的,然后在实现类中定义要填充的值。
一个是实现插入时填充,一个是更新时自动填充
@Slf4j
@Component
public class MyMetaObjectHandler implements MetaObjectHandler {
    @Override
    public void insertFill(MetaObject metaObject) {
        log.info("start insert fill...");
        this.fillStrategy(metaObject,"createTime", LocalDateTime.now());
        //或者
        //this.strictInsertFill(metaObject, "createTime", LocalDateTime.class, LocalDateTime.now());
        this.fillStrategy(metaObject,"updateTime", LocalDateTime.now());
    }

    @Override
    public void updateFill(MetaObject metaObject) {
        log.info("start update fill...");
        this.fillStrategy(metaObject,"updateTime",LocalDateTime.now());
    }
}
注意事项:
1.填充原理是直接给entity的属性设置值!!! 注解则是指定该属性在对应情况下必有值,如果无值则入库会是null
2.MetaObjectHandler提供的默认方法的策略均为:如果属性有值则不覆盖,如果填充值为null则不填充
3.字段必须声明TableField注解,属性fill选择对应策略,该声明告知Mybatis-Plus需要预留注入SQL字段
4.填充处理器MyMetaObjectHandler在 Spring Boot 中需要声明@Component或@Bean注入
5.要想根据注解FieldFill.xxx和字段名以及字段类型来区分必须使用父类的strictInsertFill或者strictUpdateFill方法
6.不需要根据任何来区分可以使用父类的fillStrategy方法
官网地址: https://mp.baomidou.com/guide/auto-fill-metainfo.html
2.2 乐观锁:
乐观锁:无论干什么都不去上锁。相对悲观锁而言,乐观锁假设认为数据一般情况下不会造成冲突,所以在数据进行提交更新的时候,会正式对数据的冲突与否进行检测,如果发现冲突了,则让返回用户错误的信息,让用户决定如何去做。
悲观锁:它指的是对数据被外界(包括本系统当前的其他事务,以及来自外部系统的事务处理)修改持保守态度。因此,在整个数据处理过程中,将数据处于锁定状态。
官网地址:https://mp.baomidou.com/guide/interceptor-optimistic-locker.html
乐观锁实现原理:
- 取出记录时,获取当前version
- 更新时,带上这个version
- 执行更新时, set version = newVersion where version = oldVersion
- 如果version不对,就更新失败
达到的效果:实现线程安全,因为更新时候需要改变version值,如果有两个线程都可以实现更新操作,version值看出是否有线程已经执行了更新操作。
实现方法:
- 在数据库增加相关字段:

- 修改实体类:
    //添加注解标注这是乐观锁
    @Version
    private Integer version;
- 编写配置类:
@EnableTransactionManagement
@MapperScan("com.wu.admin.mapper")
@Configuration
public class OptimisticLockerConfig {
    @Bean
    public MybatisPlusInterceptor mybatisPlusInterceptor() {
        MybatisPlusInterceptor interceptor = new MybatisPlusInterceptor();
        interceptor.addInnerInterceptor(new OptimisticLockerInnerInterceptor());
        return interceptor;
    }
}
4.案例:
模拟两个进程,都进行了更新操作,但我们只需要更新一次,输出证明第二次的更新没有生效,只有第一次更新生效了。
    @Test
    void OptimisticLockerTest(){
        user user = userMapper.selectById(1L);
        user.setName("xczb");
        user.setAge(19);

        user user2 = userMapper.selectById(1L);
        user2.setName("wqj");
        user2.setAge(21);
        userMapper.updateById(user2);

        userMapper.updateById(user);
    }
注:
- 支持的数据类型只有:int,Integer,long,Long,Date,Timestamp,LocalDateTime
- 整数类型下newVersion = oldVersion + 1
- newVersion 会回写到 entity 中
- 仅支持updateById(id) 与 update(entity, wrapper) 方法
- 在 update(entity, wrapper)方法下, wrapper 不能复用!!!
3.查询:
- 批量查询:
    @Test
    void selectByIdS(){
        List<user> users = userMapper.selectBatchIds(Arrays.asList(1,6));
        users.forEach(System.out::println);
    }
结果:

源码:
 /**
     * 查询(根据ID 批量查询)
     *
     * @param idList 主键ID列表(不能为 null 以及 empty)
     */
    List<T> selectBatchIds(@Param(Constants.COLLECTION) Collection<? extends Serializable> idList);
- 条件查询:
这是条件查询的实现方法之一,还可以使用wrapper实现条件查询。
    @Test
    void selectMore(){
        HashMap<String, Object> map = new HashMap<>();
        map.put("name","wqj");
        map.put("age",21);
        List<user> users = userMapper.selectByMap(map);
        users.forEach(System.out::println);
    }
结果:
可以发现where后面直接拼接了map里写的键名

源码:
    /**
     * 查询(根据 columnMap 条件)
     *
     * @param columnMap 表字段 map 对象
     */
    List<T> selectByMap(@Param(Constants.COLUMN_MAP) Map<String, Object> columnMap);
3.1 分页:
分页和乐观锁一样,是属于MP的插件。
- 编写配置类:
因为还配置了乐观锁,所以写在一个配置方法里,其中DbType为指定数据库名称。
@EnableTransactionManagement
@MapperScan("com.wu.admin.mapper")
@Configuration
public class MybatisPlusConfig {
    @Bean
    public MybatisPlusInterceptor mybatisPlusInterceptor() {
        MybatisPlusInterceptor interceptor = new MybatisPlusInterceptor();
        interceptor.addInnerInterceptor(new OptimisticLockerInnerInterceptor());
        interceptor.addInnerInterceptor(new PaginationInnerInterceptor(DbType.MYSQL));
        return interceptor;
    }
}

- 使用分页方法:
    @Test
    void selectAll(){
        Page<user> page = new Page<>(0,2);
        userMapper.selectPage(page,null);
        page.getRecords().forEach(System.out::println);
    }
结果:

4.删除:
基本的删除操作:
    @Test
    void testDelete(){
    	//通过id删除
        userMapper.deleteById(6L);
        //通过id批量删除
        userMapper.deleteBatchIds(Arrays.asList(5L,6L));
        //根据条件删除
        HashMap<String, Object> map = new HashMap<>();
        map.put("name","wyh");
        userMapper.deleteByMap(map);
    }
4.1 逻辑删除:
物理删除:从数据库中直接删除
逻辑删除:数据库中的相关数据没有被移除,而是通过一个变量让它失效
管理员可以查看被删除的数据,类似于回收站
- 添加数据库字段:

- 在实体类属性上添加注解:
@TableLogic
    private Integer deleted;
- 在yaml中添加配置文件,设置没有被删除的标识值为0,删除了的标识值为1
mybatis-plus:
  global-config:
    db-config:
      logic-delete-value: 1
      logic-not-delete-value: 0
- 直接编写删除方法:
    @Test
    void logicDelete(){
        userMapper.deleteById(7L);
    }
可以发现这个时候的删除方法本质上是更新方法:将deleted这个字段的值变为1

再查询发现已经查询不到:

条件构造器Wrapper:
- 条件查询:
不等于 ne()
大于 ge()
大于等于 gt()
小于 le()
小于等于 lt()
    @Test
    public void test1(){
        QueryWrapper<user> wrapper = new QueryWrapper<>();
        wrapper.eq("name","wyh")//查询姓名为wyh的
                .isNotNull("email")//查询邮箱不为空的
                .ge("age",20);//查询age大于20的
        List<user> users = userMapper.selectList(wrapper);
        users.forEach(System.out::println);
    }
- 范围区间:
@Test
    public void test2(){
        QueryWrapper<user> wrapper = new QueryWrapper<>();
        wrapper.between("age",20,25);
        //查询结果数
        Integer integer = userMapper.selectCount(wrapper);
        System.out.println(integer);
    }
- 模糊查询:
notlike:不包含
likeright:t%
likeleft:%t
    @Test
    public void test3(){
        QueryWrapper<user> wrapper = new QueryWrapper<>();
        wrapper.notLike("name","w")
                .likeRight("email","t");
        List<Map<String, Object>> maps = userMapper.selectMaps(wrapper);
        maps.forEach(System.out::println);
    }

- 子查询:
    @Test
    public void test4(){
        QueryWrapper<user> wrapper = new QueryWrapper<>();
        wrapper.inSql("id","select id from user where id<3");
        List<Map<String, Object>> maps = userMapper.selectMaps(wrapper);
        maps.forEach(System.out::println);
    }


 3661
3661


 被折叠的 条评论
为什么被折叠?
被折叠的 条评论
为什么被折叠?
 到【灌水乐园】发言


