


线程安全集合类概述

重点介绍java.util.concurrent.* 下的线程安全集合类,可以发现它们有规律,里面包含三类关键词:Blocking、CopyOnWrite、Concurrent
Blocking 大部分实现基于锁,并提供用来阻塞的方法
CopyOnWrite 之类容器修改开销相对较重
Concurrent 类型的容器
内部很多操作使用 cas 优化,一般可以提供较高吞吐量
弱一致性
遍历时弱一致性,例如,当利用迭代器遍历时,如果容器发生修改,迭代器仍然可以继续进行 遍历,这时内容是旧的
求大小弱一致性,size 操作未必是 100% 准确
读取弱一致性
遍历时如果发生了修改,对于非安全容器来讲,使用 fail-fast 机制也就是让遍历立刻失败,抛出
ConcurrentModificationException,不再继续遍历
ConcurrentHashMap原理
1. JDK 7 HashMap 并发死链
这得用jdk7才有效果,我没有jdk7,就体会一下把
 public static void main(String[] args) {
// 测试 java 7 中哪些数字的 hash 结果相等
        System.out.println("长度为16时,桶下标为1的key");
        for (int i = 0; i < 64; i++) {
            if (hash(i) % 16 == 1) {
                System.out.println(i);
            }
        }
        System.out.println("长度为32时,桶下标为1的key");
        for (int i = 0; i < 64; i++) {
            if (hash(i) % 32 == 1) {
                System.out.println(i);
            }
        }
// 1, 35, 16, 50 当大小为16时,它们在一个桶内
        final HashMap<Integer, Integer> map = new HashMap<Integer, Integer>();
// 放 12 个元素
        map.put(2, null);
        map.put(3, null);
        map.put(4, null);
        map.put(5, null);
        map.put(6, null);
        map.put(7, null);
        map.put(8, null);
        map.put(9, null);
        map.put(10, null);
        map.put(16, null);
        map.put(35, null);
        map.put(1, null);
        System.out.println("扩容前大小[main]:"+map.size());
        new Thread() {
            @Override
            public void run() {
// 放第 13 个元素, 发生扩容
                map.put(50, null);
                System.out.println("扩容后大小[Thread-0]:"+map.size());
            }
        }.start();
        new Thread() {
            @Override
            public void run() {
// 放第 13 个元素, 发生扩容
                map.put(50, null);
                System.out.println("扩容后大小[Thread-1]:"+map.size());
            }
        }.start();
    }
    final static int hash(Object k) {
        int h = 0;
        if (0 != h && k instanceof String) {
            return sun.misc.Hashing.stringHash32((String) k);
        }
        h ^= k.hashCode();
        h ^= (h >>> 20) ^ (h >>> 12);
        return h ^ (h >>> 7) ^ (h >>> 4);
    }
原始链表,格式:[下标] (key,next)
[1] (1,35)->(35,16)->(16,null)
线程 a 执行到 1 处 ,此时局部变量 e 为 (1,35),而局部变量 next 为 (35,16) 线程 a 挂起
线程 b 开始执行
第一次循环
[1] (1,null)
第二次循环
[1] (35,1)->(1,null)
第三次循环
[1] (35,1)->(1,null)
[17] (16,null)
切换回线程 a,此时局部变量 e 和 next 被恢复,引用没变但内容变了:e 的内容被改为 (1,null),而 next 的内
容被改为 (35,1) 并链向 (1,null)
第一次循环
[1] (1,null)
第二次循环,注意这时 e 是 (35,1) 并链向 (1,null) 所以 next 又是 (1,null)
[1] (35,1)->(1,null)
第三次循环,e 是 (1,null),而 next 是 null,但 e 被放入链表头,这样 e.next 变成了 35 (2 处)
[1] (1,35)->(35,1)->(1,35)
已经是死链了
北究其原因,是因为在多线程环境下使用了非线程安全的 map 集合
JDK 8 虽然将扩容算法做了调整,不再将元素加入链表头(而是保持与扩容前一样的顺序),但仍不意味着能够在多线程环境下能够安全扩容,还会出现其它问题(如扩容丢数据)
2. JDK 8 ConcurrentHashMap
重要属性和内部类
// 默认为 0
// 当初始化时, 为 -1
// 当扩容时, 为 -(1 + 扩容线程数)
// 当初始化或扩容完成后,为 下一次的扩容的阈值大小
private transient volatile int sizeCtl;
// 整个 ConcurrentHashMap 就是一个 Node[]
static class Node<K,V> implements Map.Entry<K,V> {}
// hash 表
transient volatile Node<K,V>[] table;
// 扩容时的 新 hash 表
private transient volatile Node<K,V>[] nextTable;
// 扩容时如果某个 bin 迁移完毕, 用 ForwardingNode 作为旧 table bin 的头结点
static final class ForwardingNode<K,V> extends Node<K,V> {}
// 用在 compute 以及 computeIfAbsent 时, 用来占位, 计算完成后替换为普通 Node
static final class ReservationNode<K,V> extends Node<K,V> {}
// 作为 treebin 的头节点, 存储 root 和 first
static final class TreeBin<K,V> extends Node<K,V> {}
// 作为 treebin 的节点, 存储 parent, left, right
static final class TreeNode<K,V> extends Node<K,V> {}
重要方法
// 获取 Node[] 中第 i 个 Node
static final <K,V> Node<K,V> tabAt(Node<K,V>[] tab, int i)
// cas 修改 Node[] 中第 i 个 Node 的值, c 为旧值, v 为新值
static final <K,V> boolean casTabAt(Node<K,V>[] tab, int i, Node<K,V> c, Node<K,V> v)
// 直接修改 Node[] 中第 i 个 Node 的值, v 为新值
static final <K,V> void setTabAt(Node<K,V>[] tab, int i, Node<K,V> v)
北
构造器分析
可以看到实现了懒惰初始化,在构造方法中仅仅计算了 table 的大小,以后在第一次使用时才会真正创建
public ConcurrentHashMap(int initialCapacity, float loadFactor, int concurrencyLevel) {
if (!(loadFactor > 0.0f) || initialCapacity < 0 || concurrencyLevel <= 0)
throw new IllegalArgumentException();
if (initialCapacity < concurrencyLevel) // Use at least as many bins
initialCapacity = concurrencyLevel; // as estimated threads
long size = (long)(1.0 + (long)initialCapacity / loadFactor);
// tableSizeFor 仍然是保证计算的大小是 2^n, 即 16,32,64 ...
int cap = (size >= (long)MAXIMUM_CAPACITY) ?
MAXIMUM_CAPACITY : tableSizeFor((int)size);
this.sizeCtl = cap;
}
get 流程(全程没有加锁)
public V get(Object key) {
Node<K,V>[] tab; Node<K,V> e, p; int n, eh; K ek;
// spread 方法能确保返回结果是正数
int h = spread(key.hashCode());
if ((tab = table) != null && (n = tab.length) > 0 &&
(e = tabAt(tab, (n - 1) & h)) != null) {
// 如果头结点已经是要查找的 key
if ((eh = e.hash) == h) {
if ((ek = e.key) == key || (ek != null && key.equals(ek)))
return e.val;
}
// hash 为负数表示该 bin 在扩容中或是 treebin, 这时调用 find 方法来查找
else if (eh < 0)
return (p = e.find(h, key)) != null ? p.val : null;
// 正常遍历链表, 用 equals 比较
while ((e = e.next) != null) {
if (e.hash == h &&
((ek = e.key) == key || (ek != null && key.equals(ek))))
return e.val;
}
}
return null;
}
put 流程(真是令人头秃)
   public V put(K key, V value) {
return putVal(key, value, false);
}
final V putVal(K key, V value, boolean onlyIfAbsent) {
if (key == null || value == null) throw new NullPointerException();
// 其中 spread 方法会综合高位低位, 具有更好的 hash 性
int hash = spread(key.hashCode());
int binCount = 0;
for (Node<K,V>[] tab = table;;) {
// f 是链表头节点
// fh 是链表头结点的 hash
// i 是链表在 table 中的下标
Node<K,V> f; int n, i, fh;
// 要创建 table
if (tab == null || (n = tab.length) == 0)
// 初始化 table 使用了 cas, 无需 synchronized 创建成功, 进入下一轮循环
tab = initTable();
// 要创建链表头节点
else if ((f = tabAt(tab, i = (n - 1) & hash)) == null) {
// 添加链表头使用了 cas, 无需 synchronized
if (casTabAt(tab, i, null,
new Node<K,V>(hash, key, value, null)))
break;
}
// 帮忙扩容
else if ((fh = f.hash) == MOVED)
// 帮忙之后, 进入下一轮循环
tab = helpTransfer(tab, f);
else {
V oldVal = null;
// 锁住链表头节点
synchronized (f) {
// 再次确认链表头节点没有被移动
if (tabAt(tab, i) == f) {
// 链表
if (fh >= 0) {
binCount = 1;
// 遍历链表
for (Node<K,V> e = f;; ++binCount) {
K ek;
// 找到相同的 key
if (e.hash == hash &&
((ek = e.key) == key ||
(ek != null && key.equals(ek)))) {
oldVal = e.val;
// 更新
if (!onlyIfAbsent)
e.val = value;
break;
}
Node<K,V> pred = e;
// 已经是最后的节点了, 新增 Node, 追加至链表尾
if ((e = e.next) == null) {
pred.next = new Node<K,V>(hash, key,
value, null);
break;
}
}
}
// 红黑树
else if (f instanceof TreeBin) {
Node<K,V> p;
binCount = 2;
// putTreeVal 会看 key 是否已经在树中, 是, 则返回对应的 TreeNode
if ((p = ((TreeBin<K,V>)f).putTreeVal(hash, key,
value)) != null) {
oldVal = p.val;
if (!onlyIfAbsent)
p.val = value;
}
}
}
// 释放链表头节点的锁
}
if (binCount != 0) {
if (binCount >= TREEIFY_THRESHOLD)
// 如果链表长度 >= 树化阈值(8), 进行链表转为红黑树
treeifyBin(tab, i);
if (oldVal != null)
return oldVal;
break;
}
}
}
// 增加 size 计数
addCount(1L, binCount);
return null;
}
private final Node<K,V>[] initTable() {
Node<K,V>[] tab; int sc;
while ((tab = table) == null || tab.length == 0) {
if ((sc = sizeCtl) < 0)
Thread.yield();
// 尝试将 sizeCtl 设置为 -1(表示初始化 table)
else if (U.compareAndSwapInt(this, SIZECTL, sc, -1)) {
// 获得锁, 创建 table, 这时其它线程会在 while() 循环中 yield 直至 table 创建
try {
if ((tab = table) == null || tab.length == 0) {
int n = (sc > 0) ? sc : DEFAULT_CAPACITY;
Node<K,V>[] nt = (Node<K,V>[])new Node<?,?>[n];
table = tab = nt;
sc = n - (n >>> 2);
}
} finally {
sizeCtl = sc;
}
break;
}
}
return tab;
}
// check 是之前 binCount 的个数
private final void addCount(long x, int check) {
CounterCell[] as; long b, s;
if (
// 已经有了 counterCells, 向 cell 累加
(as = counterCells) != null ||
// 还没有, 向 baseCount 累加
!U.compareAndSwapLong(this, BASECOUNT, b = baseCount, s = b + x)
) {
CounterCell a; long v; int m;
boolean uncontended = true;
if (
// 还没有 counterCells
as == null || (m = as.length - 1) < 0 ||
// 还没有 cell
(a = as[ThreadLocalRandom.getProbe() & m]) == null ||
// cell cas 增加计数失败
!(uncontended = U.compareAndSwapLong(a, CELLVALUE, v = a.value, v + x))
) {
// 创建累加单元数组和cell, 累加重试
fullAddCount(x, uncontended);
return;
}
if (check <= 1)
return;
// 获取元素个数
s = sumCount();
}
if (check >= 0) {
Node<K,V>[] tab, nt; int n, sc;
while (s >= (long)(sc = sizeCtl) && (tab = table) != null &&
(n = tab.length) < MAXIMUM_CAPACITY) {
int rs = resizeStamp(n);
if (sc < 0) {
if ((sc >>> RESIZE_STAMP_SHIFT) != rs || sc == rs + 1 ||
sc == rs + MAX_RESIZERS || (nt = nextTable) == null ||
transferIndex <= 0)
break;
// newtable 已经创建了,帮忙扩容
if (U.compareAndSwapInt(this, SIZECTL, sc, sc + 1))
transfer(tab, nt);
}
// 需要扩容,这时 newtable 未创建
else if (U.compareAndSwapInt(this, SIZECTL, sc,
(rs << RESIZE_STAMP_SHIFT) + 2))
transfer(tab, null);
s = sumCount();
}
}
}
size 计算流程
size 计算实际发生在 put,remove 改变集合元素的操作之中
没有竞争发生,向 baseCount 累加计数
有竞争发生,新建 counterCells,向其中的一个 cell 累加计数
counterCells 初始有两个 cell
如果计数竞争比较激烈,会创建新的 cell 来累加计数
public int size() {
long n = sumCount();
return ((n < 0L) ? 0 :
(n > (long)Integer.MAX_VALUE) ? Integer.MAX_VALUE :
(int)n);
}
final long sumCount() {
CounterCell[] as = counterCells; CounterCell a;
// 将 baseCount 计数与所有 cell 计数累加
long sum = baseCount;
if (as != null) {
for (int i = 0; i < as.length; ++i) {
if ((a = as[i]) != null)
sum += a.value;
}
}
return sum;
}
Java 8 数组(Node) +( 链表 Node | 红黑树 TreeNode ) 以下数组简称(table),链表简称(bin)
初始化,使用 cas 来保证并发安全,懒惰初始化 table
树化,当 table.length < 64 时,先尝试扩容,超过 64 时,并且 bin.length > 8 时,会将链表树化,树化过程会用 synchronized 锁住链表头
put,如果该 bin 尚未创建,只需要使用 cas 创建 bin;如果已经有了,锁住链表头进行后续 put 操作,元素添加至 bin 的尾部
get,无锁操作仅需要保证可见性,扩容过程中 get 操作拿到的是 ForwardingNode 它会让 get 操作在新table 进行搜索
扩容,扩容时以 bin 为单位进行,需要对 bin 进行 synchronized,但这时妙的是其它竞争线程也不是无事可做,它们会帮助把其它 bin 进行扩容,扩容时平均只有 1/6 的节点会把复制到新 table 中
size,元素个数保存在 baseCount 中,并发时的个数变动保存在 CounterCell[] 当中。最后统计数量时累加即可
LinkedBlockingQueue 原理
public class LinkedBlockingQueue<E> extends AbstractQueue<E>
implements BlockingQueue<E>, java.io.Serializable {
static class Node<E> {
E item;
/**
* 下列三种情况之一
* - 真正的后继节点
* - 自己, 发生在出队时
* - null, 表示是没有后继节点, 是最后了
*/
Node<E> next;
Node(E x) { item = x; }
}
}
初始化链表 last = head = new Node<E>(null); Dummy 节点用来占位,item 为 null

当一个节点入队 last = last.next = node;
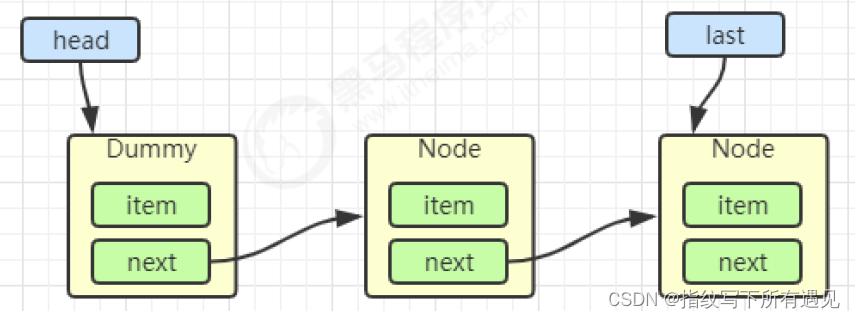
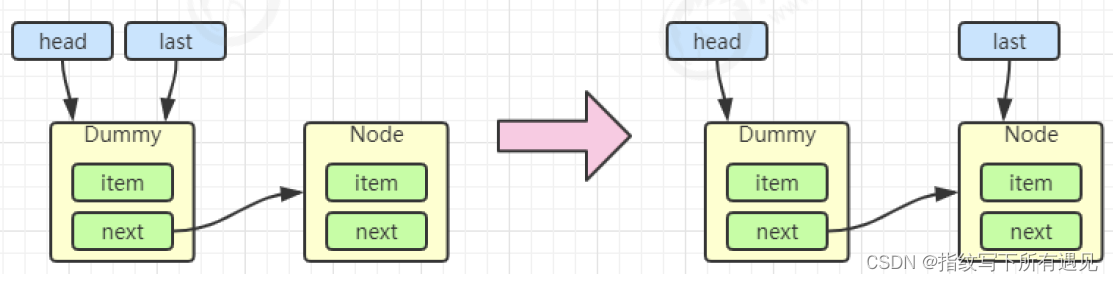 再来一个节点入队 last = last.next = node;
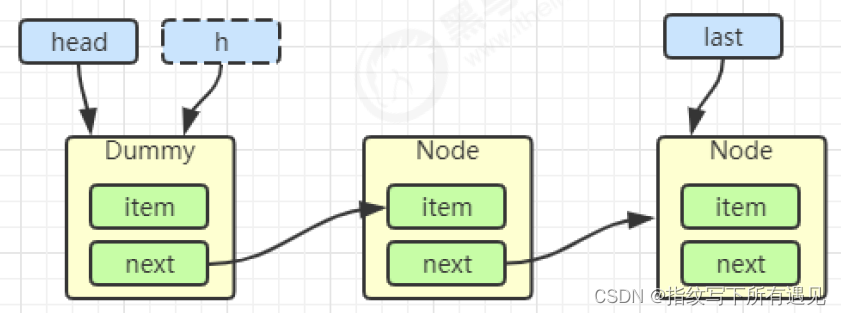
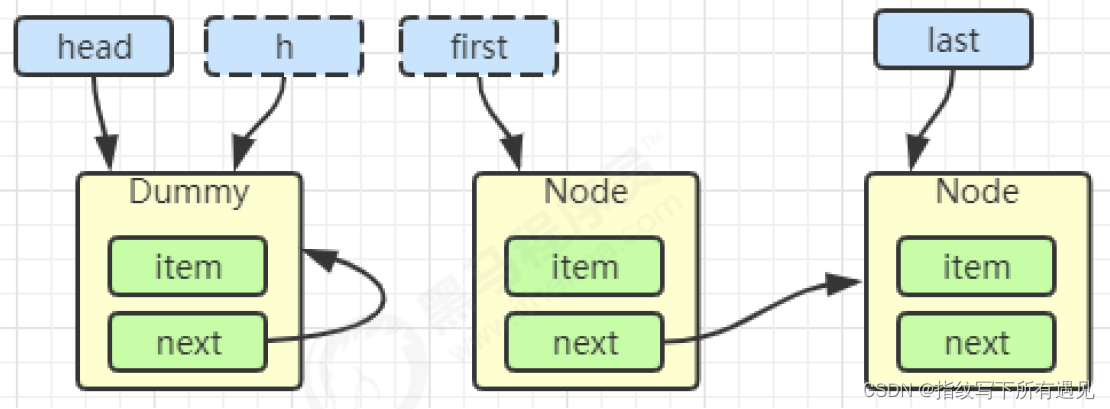
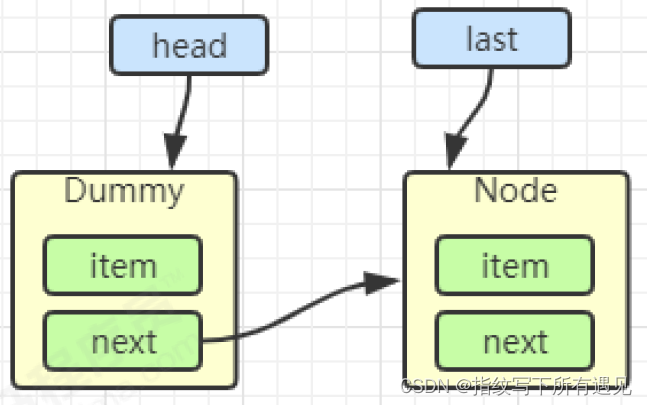
出队
Node<E> h = head;
Node<E> first = h.next;
h.next = h; // help GC
head = first;
E x = first.item;
first.item = null;
return x;
h = head
first = h.next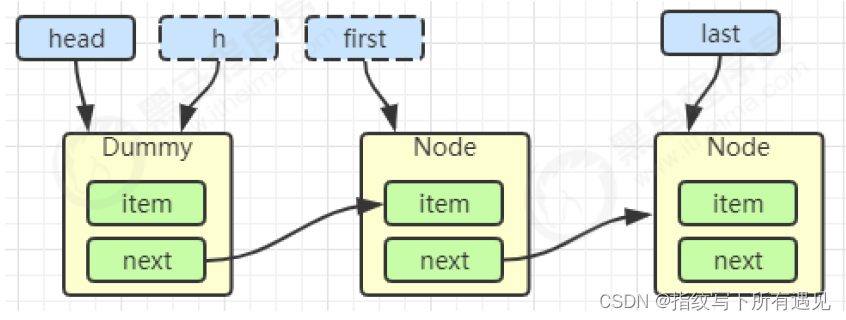
h.next = h
head = first
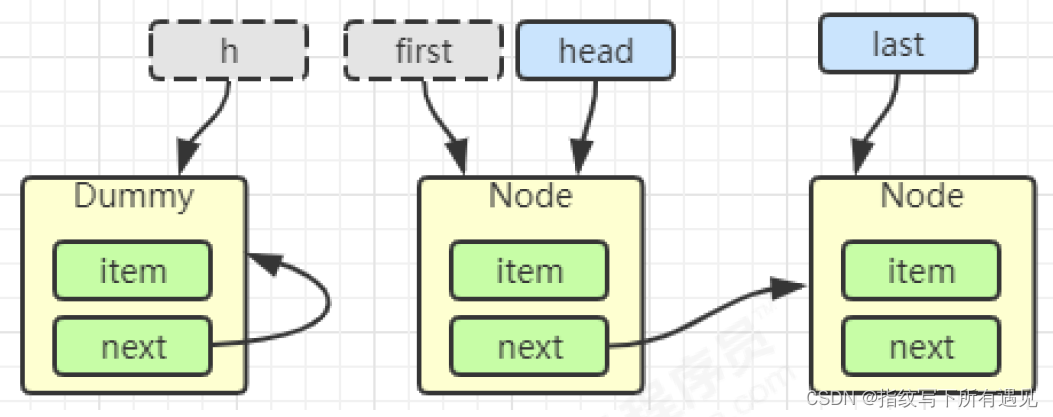
E x = first.item;
first.item = null;
return x;
加锁分析
==高明之处==在于用了两把锁和 dummy 节点
用一把锁,同一时刻,最多只允许有一个线程(生产者或消费者,二选一)执行
用两把锁,同一时刻,可以允许两个线程同时(一个生产者与一个消费者)执行
消费者与消费者线程仍然串行
生产者与生产者线程仍然串行
线程安全分析
当节点总数大于 2 时(包括 dummy 节点),putLock 保证的是 last 节点的线程安全,takeLock 保证的是head 节点的线程安全。两把锁保证了入队和出队没有竞争
当节点总数等于 2 时(即一个 dummy 节点,一个正常节点)这时候,仍然是两把锁锁两个对象,不会竞争
当节点总数等于 1 时(就一个 dummy 节点)这时 take 线程会被 notEmpty 条件阻塞,有竞争,会阻塞
put 操作
public void put(E e) throws InterruptedException {
if (e == null) throw new NullPointerException();
int c = -1;
Node<E> node = new Node<E>(e);
final ReentrantLock putLock = this.putLock;
// count 用来维护元素计数
final AtomicInteger count = this.count;
putLock.lockInterruptibly();
try {
// 满了等待
while (count.get() == capacity) {
// 倒过来读就好: 等待 notFull
notFull.await();
}
// 有空位, 入队且计数加一
enqueue(node);
c = count.getAndIncrement();
// 除了自己 put 以外, 队列还有空位, 由自己叫醒其他 put 线程
if (c + 1 < capacity)
notFull.signal();
} finally {
putLock.unlock();
}
// 如果队列中有一个元素, 叫醒 take 线程
if (c == 0)
// 这里调用的是 notEmpty.signal() 而不是 notEmpty.signalAll() 是为了减少竞争
signalNotEmpty();
}
take 操作
public E take() throws InterruptedException {
E x;
int c = -1;
final AtomicInteger count = this.count;
final ReentrantLock takeLock = this.takeLock;
takeLock.lockInterruptibly();
try {
while (count.get() == 0) {
notEmpty.await();
}
x = dequeue();
c = count.getAndDecrement();
if (c > 1)
notEmpty.signal();
} finally {
takeLock.unlock();
}
// 如果队列中只有一个空位时, 叫醒 put 线程
// 如果有多个线程进行出队, 第一个线程满足 c == capacity, 但后续线程 c < capacity
if (c == capacity)
// 这里调用的是 notFull.signal() 而不是 notFull.signalAll() 是为了减少竞争
signalNotFull()
return x;
}
LinkedBlockingQueue 与 ArrayBlockingQueue 的性能比较
Linked 支持有界,Array 强制有界
Linked 实现是链表,Array 实现是数组
Linked 是懒惰的,而 Array 需要提前初始化 Node 数组
Linked 每次入队会生成新 Node,而 Array 的 Node 是提前创建好的
Linked 两把锁,Array 一把锁


 被折叠的 条评论
为什么被折叠?
被折叠的 条评论
为什么被折叠?
 到【灌水乐园】发言


