


《添加桌面和菜单栏快捷方式》
目录
一、创建桌面快捷方式
1.定义桌面文件夹的目录,在Product.wxs文件的<Fragment>部分定义这个目录;
<Fragment>
    <Directory Id="TARGETDIR" Name="SourceDir">
        <!-- 其他目录定义 -->
        <Directory Id="DesktopFolder" Name="Desktop" />
    </Directory>
</Fragment>
2.在<ComponentGroup>部分,添加一个新的<Component>元素来定义应用程序快捷方式;
<Component Id="DesktopShortcutComponent" Guid="{YOUR-GUID-HERE}">
    <Shortcut Id="DesktopShortcut" Name="YourApp" Target="[INSTALLFOLDER]YourApp.exe" Icon="YourAppIcon" Directory="DesktopFolder" />
</Component>
Name 属性是快捷方式的名称;
Target 属性是快捷方式要启动的目标文件;
Icon 属性是快捷方式的图标(如果有的话);
Directory 属性设置为 DesktopFolder,以便将快捷方式放在桌面上。
Guid码的生成
1.【工具】——【创建GUID】;
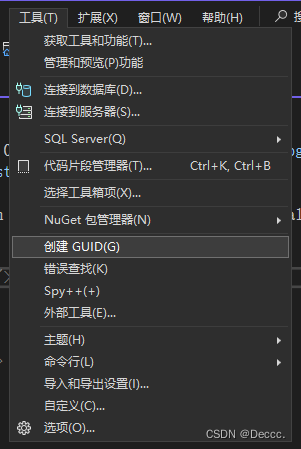
2.有六种GUID格式选择,这里我选择第四种的;
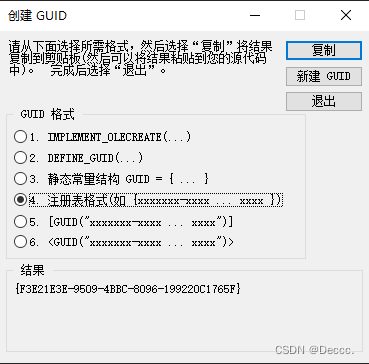
3.新建GUID,然后复制,把它粘贴到对应地方即可。
引用icon图标
ps:可以先在项目的资源文件中添加icon图标,然后在product中引用。
步骤如下:
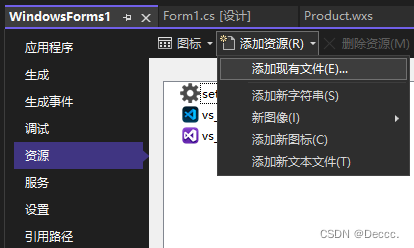
(1)打开winform项目,【项目】——【(项目名称)属性】,找到【资源】,然后【添加资源】,选择【添加现有文件】;
(2)icon图标添加完毕后,打开Product.wxs文件,在<Product>元素中引用;
<Icon Id="Icon名字" SourceFile="$(var.项目名字.ProjectDir)Resources\icon图标名字.ico" />
<Icon Id="YourAppIcon" SourceFile="$(var.YourProject.ProjectDir)Resources\icon.ico" /><!--项目资源-->
(3)最后在 <Component>元素中的修改Icon="Icon名字"对应上Icon的id。
3.在安装清单<Feature>元素中引用这个组件,以确保它会被安装;
<Feature Id="ProductFeature" Title="YourApp" Level="1">
    <ComponentGroupRef Id="ProductComponents" />
    <ComponentRef Id="DesktopShortcutComponent" />
</Feature>
4.此时运行构建WiX项目就会出现以下错误;
ICE验证错误参考:ICE 参考 - Win32 apps | Microsoft Learn

这个错误ICE43表示组件(DesktopShortcutComponent)包含了非广告(non-advertised)的快捷方式。WiX 默认要求组件的 KeyPath 使用注册表项(Registry Key)而不是文件。
解决方法:
在<ComponentGroup>部分,<Component>元素中添加一个RegistryValue元素。
<Component Id="DesktopShortcutComponent" Guid="{YOUR-GUID-HERE}">
    <Shortcut Id="DesktopShortcut" Name="YourApp" Target="[INSTALLFOLDER]YourApp.exe" Icon="YourAppIcon" Directory="DesktopFolder" />

    <!-- 使用注册表项作为 KeyPath -->
    <RegistryValue Root="HKCU" Key="Software\YourCompany\YourApp" Name="Installed" Type="integer" Value="1" KeyPath="yes" />
</Component>
Root 设置为 HKCU(HKEY_CURRENT_USER,当前用户的注册表根键),
Key 设置为注册表项的路径(你可以根据你的需要自定义这个路径),
Name 设置为 Installed,
Type 设置为 integer,
Value 设置为 1,
KeyPath 设置为 yes,以指定这个注册表项作为组件的 KeyPath。
5.解决了ICE43的错误后重新生成WiX项目,其余两个错误没有出现了,该项目就构建成功了。
WiX项目生成文件如下,点击.msi即可安装;

(左边为桌面快捷方式设置的图标,中间为项目设置的图标,右边为控制面板设置的图标)
修改中间和右边的图标可查看:【修改控制面板里的应用程序图标 】

二、添加菜单栏快捷方式
1.定义菜单栏快捷方式的目录,在Product.wxs文件的<Fragment>部分定义这个目录;
	<Fragment>
		<!--安装程序的目录/C盘-->
		<Directory Id="TARGETDIR" Name="SourceDir">
			 <!-- 定义菜单栏快捷方式目录 -->
			<Directory Id="ProgramMenuFolder" Name="Programs"/>
			<Directory Id="ProgramFilesFolder">
				<Directory Id="INSTALLFOLDER" Name="YourAppName" >
				</Directory>
			</Directory>
		</Directory>
	</Fragment>
2.在<ComponentGroup>部分,添加一个新的<Component>元素来定义应用程序快捷方式;
菜单栏快捷方式的GUID码与桌面快捷方式的GUID码不是同一个编码!需要新建GUID!
新建GUID:【Guid码的生成】
<!--菜单栏快捷方式-->
<Component Id="StartMenuShortcutComponent" Guid="{YOUR-GUID-HERE}">
	<Shortcut Id="StartMenuShortcut" Name="YourApp" Target="[INSTALLFOLDER]YourApp.exe" Icon="YourAppIcon" Directory="ProgramMenuFolder" />
	<!-- 使用注册表项作为 KeyPath -->
	<RegistryValue Root="HKCU" Key="Software\YourCompany\YourApp" Name="Installed" Type="integer" Value="1" KeyPath="yes" />
</Component>
Name 属性是快捷方式的名称;
Target 属性是快捷方式要启动的目标文件;
Icon 属性是快捷方式的图标(如果有的话);
Directory 属性设置为 ProgramMenuFolder,以便将快捷方式放在菜单栏上。
要添加一个RegistryValue元素,避免出现ICE错误。
Root 设置为 HKCU(HKEY_CURRENT_USER,当前用户的注册表根键),
Key 设置为注册表项的路径(你可以根据你的需要自定义这个路径),
Name 设置为 Installed,
Type 设置为 integer,
Value 设置为 1,
KeyPath 设置为 yes,以指定这个注册表项作为组件的 KeyPath。
3.在安装清单<Feature>元素中引用这个组件,以确保它会被安装;
<Feature Id="ProductFeature" Title="Your Application" Level="1">
  <ComponentGroupRef Id="ProductComponents" />
  <!-- 添加菜单栏快捷方式的 ComponentRef -->
  <ComponentRef Id="StartMenuShortcutComponent" />
</Feature>
4.【 引用icon图标】,为快捷方式创建icon图标;
<Icon Id="Icon名字" SourceFile="$(var.项目名字.ProjectDir)Resources\icon图标名字.ico" />
<Icon Id="YourAppIcon" SourceFile="$(var.YourProject.ProjectDir)Resources\icon.ico" /><!--菜单栏快捷方式图标-->5.生成WiX项目,成功构建后,点击.msi安装即可。
效果如下图:
上面为控制面板程序图标,中间为桌面快捷方式图标,下面为菜单栏快捷方式图标。
(图标还是尽量保持一致最好)

三、添加卸载快捷方式
1.在<ComponentGroup>部分,添加一个新的<Component>元素来定义卸载程序快捷方式;
新建GUID:【Guid码的生成】
<!--卸载程序快捷方式-->
<Component Id="UninstallShortcutComponent" Guid="{CEFF3B30-0706-4DFC-9D18-1AFF91A38135}">
	<Shortcut Id="UninstallProduct" Name="Uninstall" Target="[SystemFolder]msiexec.exe" Arguments="/x [ProductCode]" Description="Uninstall MyApp." />
	<!-- 使用注册表项作为 KeyPath -->
	<RegistryValue Id="RegUninstallShortcut" Root="HKCU" Key="Software\MyCompany\MyApp_demo" Name="UninstallShortcut" Type="string" Value="" KeyPath="yes" />
</Component>
2.在安装清单<Feature>元素中引用这个组件,以确保它会被安装;
		<Feature Id="ProductFeature" Title="MyApp" Level="1">
			<ComponentGroupRef Id="ProductComponents" />
            <!--其他组件-->
			<ComponentRef Id="UninstallShortcutComponent" /><!--卸载-->
		</Feature>
3.在安装的文件夹下就可以找到对应卸载方式了。

四、快捷方式代码示例
<?xml version="1.0" encoding="UTF-8"?>
<Wix xmlns="http://schemas.microsoft.com/wix/2006/wi">
	<Product Id="*" Name="MyApp" Language="2052" Version="1.0.0.0" Manufacturer="MyAppDemo" UpgradeCode="57415bb9-6494-4410-b381-2adb83574583">
		<Package InstallerVersion="200" Compressed="yes" InstallScope="perMachine" />

		<MajorUpgrade DowngradeErrorMessage="A newer version of [ProductName] is already installed." />
		<MediaTemplate />

		<Feature Id="ProductFeature" Title="MyApp" Level="1">
			<ComponentGroupRef Id="ProductComponents" />
			<ComponentRef Id="ProductComponent" />
			<ComponentRef Id="DesktopShortcutComponent" /><!--桌面-->
			<ComponentRef Id="StartMenuShortcutComponent" /><!--菜单栏-->
			<ComponentRef Id="UninstallShortcutComponent" /><!--卸载-->
		</Feature>

		<!--设置用户UI风格,自定义安装程序-->
		<UI>
			<!--<UIRef Id="WixUI_InstallDir" />--><!--默认UI风格-->
			<UIRef Id="WixUI_Minimal" />
		</UI>
		<!--WIXUI_INSTALLDIR 指定安装目录的默认值,默认情况下将使用 INSTALLFOLDER 作为安装路径-->
		<!--<Property Id="WIXUI_INSTALLDIR" Value="INSTALLFOLDER" />-->
		<!-- 引用图标 -->
		<Icon Id="MyAppIcon" SourceFile="$(var.WindowsForms1.ProjectDir)Resources\vs_code128x128.ico" /> <!--控制面板图标-->
		<Icon Id="MyAppIcon_purple" SourceFile="$(var.WindowsForms1.ProjectDir)Resources\vs_purple.ico" /><!--桌面快捷方式图标-->
		<Icon Id="MyAppIcon_green" SourceFile="$(var.WindowsForms1.ProjectDir)Resources\vs_green.ico" /><!--菜单栏快捷方式图标-->
		<!-- 控制面板引用程序图标 -->
		<Property Id="ARPPRODUCTICON" Value="MyAppIcon" />

	</Product>

	<Fragment>
		<!--安装程序的目录/C盘-->
		<Directory Id="TARGETDIR" Name="SourceDir">
			<!--定义桌面快捷方式-->
			<Directory Id="DesktopFolder" Name="Desktop" />
			 <!-- 定义菜单栏快捷方式 -->
			<Directory Id="ProgramMenuFolder" Name="Programs" >
				<!-- 新目录下创建快捷方式--><!--
				<Directory Id="MyAppMenuFolder" Name="MyAppSetup" />-->
			</Directory>
			<Directory Id="ProgramFilesFolder">
				<Directory Id="INSTALLFOLDER" Name="MyApp" >
				</Directory>
			</Directory>
		</Directory>
	</Fragment>

	<Fragment>
		<ComponentGroup Id="ProductComponents" Directory="INSTALLFOLDER">
			<!-- TODO: Remove the comments around this Component element and the ComponentRef below in order to add resources to this installer. -->
			<!-- <Component Id="ProductComponent"> -->
				<!-- TODO: Insert files, registry keys, and other resources here. -->
			<!-- </Component> -->

			<!--引用的项目名称,对应右键References时添加的项目名称-->
			<Component Id="ProductComponent">
				<File Source="$(var.WindowsForms1.TargetPath)" />
			</Component>

			<!--桌面快捷方式-->
			<Component Id="DesktopShortcutComponent" Guid="{D94CF07F-262D-4A65-84D6-810D5E71B7D5}">
				<Shortcut Id="DesktopShortcut" Name="MyApplication" Target="[INSTALLFOLDER]WindowsForms1.exe" Icon="MyAppIcon_purple" Directory="DesktopFolder" />
				<!-- 使用注册表项作为 KeyPath -->
				<RegistryValue Root="HKCU" Key="Software\MyCompany\MyApp_demo" Name="Installed" Type="integer" Value="1" KeyPath="yes" />
			</Component>

			<!--菜单栏快捷方式-->
			<Component Id="StartMenuShortcutComponent" Guid="{7AFCA2B2-DDA7-4E73-936D-03628E03E894}">
				<Shortcut Id="StartMenuShortcut" Name="MyApplication" Target="[INSTALLFOLDER]WindowsForms1.exe" Icon="MyAppIcon_green" Directory="ProgramMenuFolder" />
				<!-- 使用注册表项作为 KeyPath -->
				<RegistryValue Root="HKCU" Key="Software\MyCompany\MyApp_demo" Name="Installed" Type="integer" Value="1" KeyPath="yes" />
			</Component>

			<!--卸载程序快捷方式-->
			<Component Id="UninstallShortcutComponent" Guid="{CEFF3B30-0706-4DFC-9D18-1AFF91A38135}">
				<Shortcut Id="UninstallProduct" Name="Uninstall" Target="[SystemFolder]msiexec.exe" Arguments="/x [ProductCode]" Description="Uninstall MyApp." />
				<RegistryValue Id="RegUninstallShortcut" Root="HKCU" Key="Software\MyCompany\MyApp_demo" Name="UninstallShortcut" Type="string" Value="" KeyPath="yes" />
			</Component>

		</ComponentGroup>
	</Fragment>
</Wix>
上一篇:VS2022利用WiX Toolset打包winform程序安装包(4)修改控制面板里的应用程序图标


 996
996


 被折叠的 条评论
为什么被折叠?
被折叠的 条评论
为什么被折叠?
 到【灌水乐园】发言


