


提示:原文地址:https://blog.csdn.net/weixin_45928542/article/details/133157996转载请注明出处,非常感谢!
文章目录
前言
最早2019年的时候,我在生产上搭建了一个1主-1从-1仲裁的三节点副本集mongo集群,当时候数据量一天3000w的样子,偶尔会出现主节点宕机现象,后来随着数据量增加(2023年基本7000w左右),频繁出现进程莫名其妙不见的现象;经研究发现mongo副本集集群的方式无法对满足高并发和对大批量数据的负载均衡,为此,我在生产上重新搭建了一个3mongos(路由)-3config(配置)-3shard(分片副本集)模式的分片集群
一、集群设计

集群总共有三台服务器,每台服务器上分别配置一个mongos节点,一个config节点,一个shard节点,三个shard-repl节点等节点
二、搭建环境
虚拟机版本:VMware16
服务器系统版本:Centos 7 64位
mongodb版本[服务器]:mongodb-linux-x86_64-rhel70-6.0.10
mongosh版本[客户端]:mongosh-1.10.6-linux-x64-openssl11.tgz
关闭防火墙:
systemctl status firewalld.service //查看防火墙状态
systemctl stop firewalld.service //关闭防火墙
三、操作步骤
1.官方下载安装mongodb以及mongodb-shell
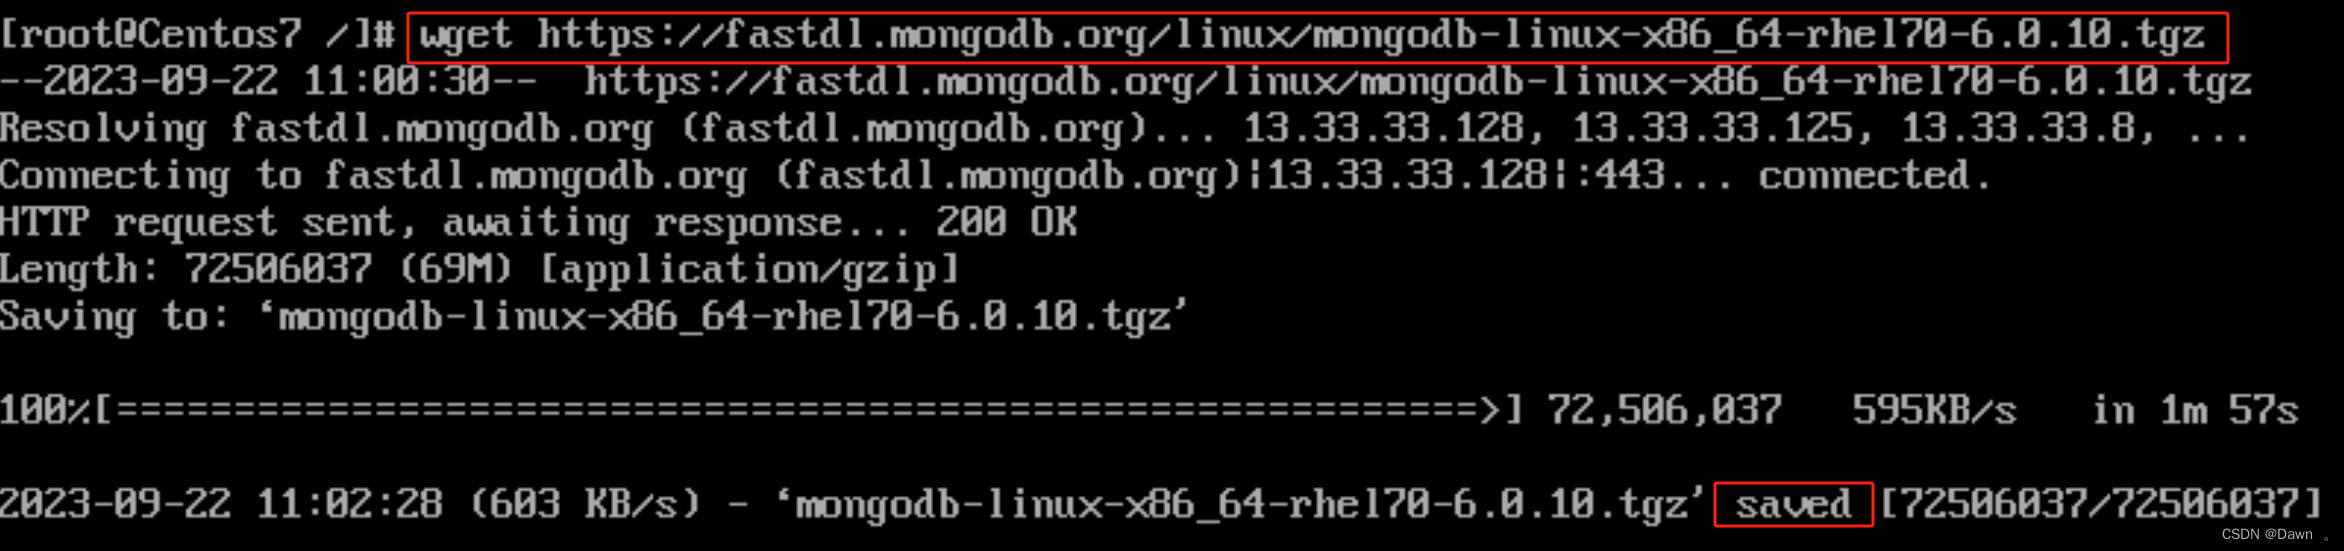
1.1 下载安装mongodb数据库
wget https://fastdl.mongodb.org/linux/mongodb-linux-x86_64-rhel70-6.0.10.tgz
tar xf mongodb-linux-x86_64-rhel70-6.0.10.tgz
mv mongodb-linux-x86_64-rhel70-6.0.10 mongodb-6.0.10
1.2 下载安装mongodb-shell[mongodb数据库客户端连接工具]
wget https://downloads.mongodb.com/compass/mongosh-1.10.6-linux-x64.tgz
cd mongodb[数据库目录]/[新建]mongoshell
tar xf mongosh-1.6.0-linux-x64.tgz
配置静态ip
cd mongodb/mongoshell/bin
./mongosh --port xxxx

2.配置文件
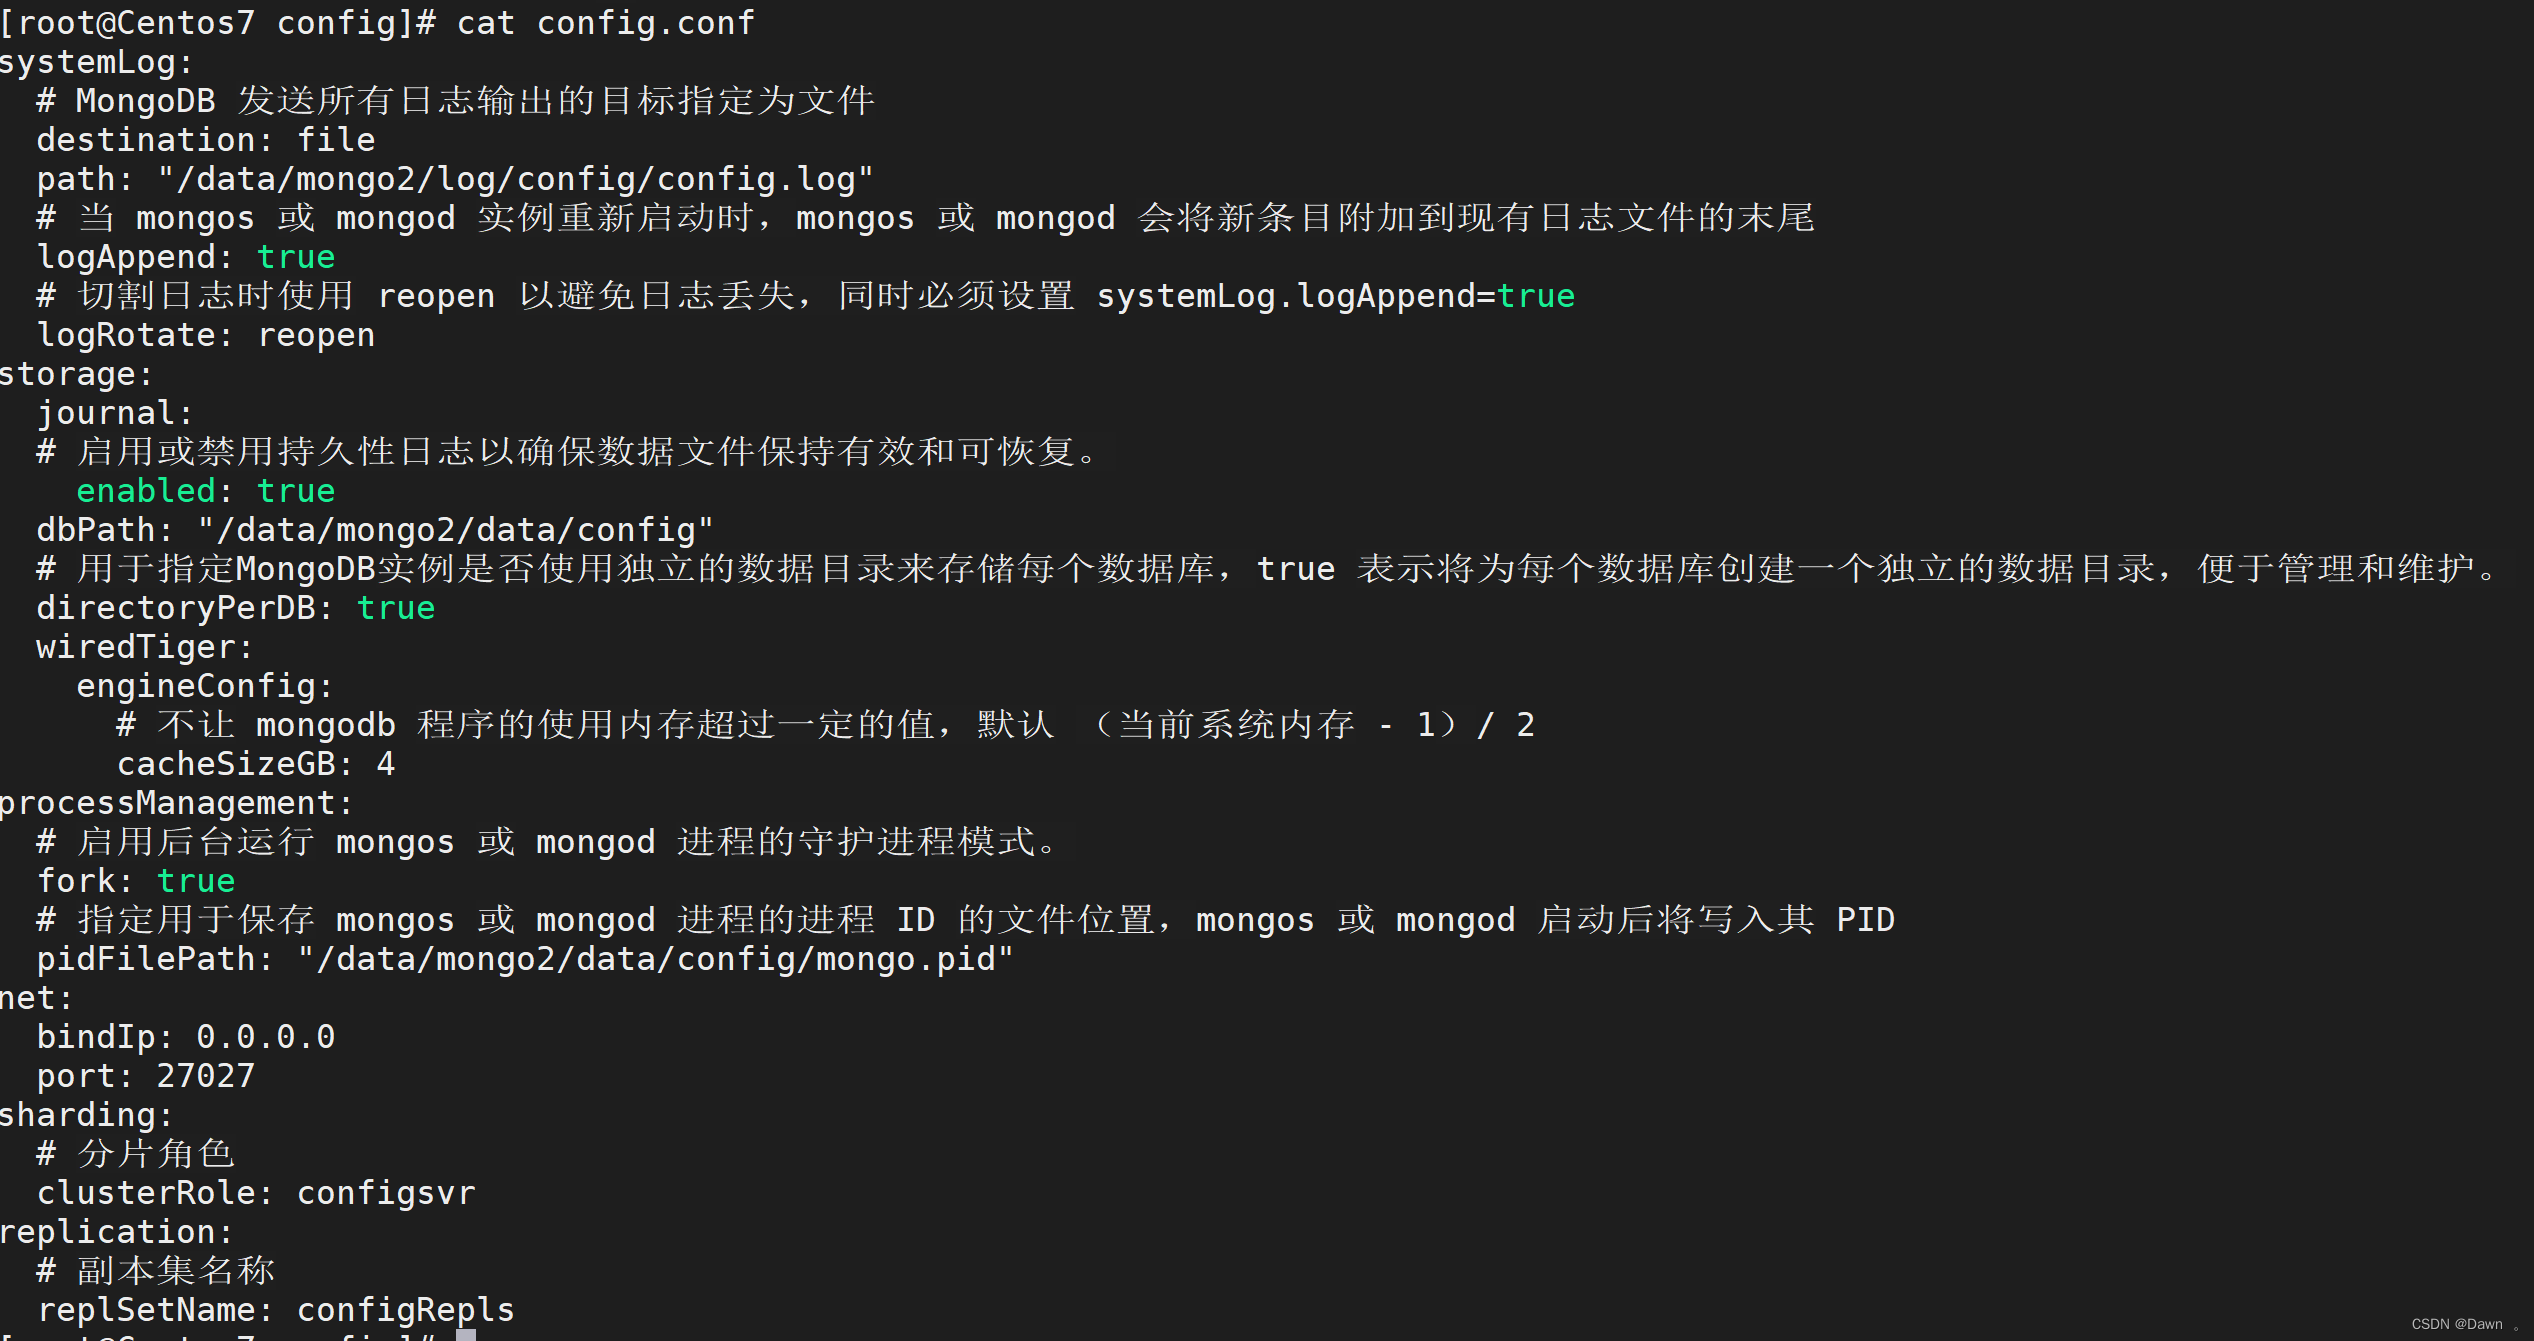
2.1 config配置
192.168.1.58服务器config配置文件

192.168.1.59服务器config配置文件

192.168.1.60服务器config配置文件
2.2 shard配置
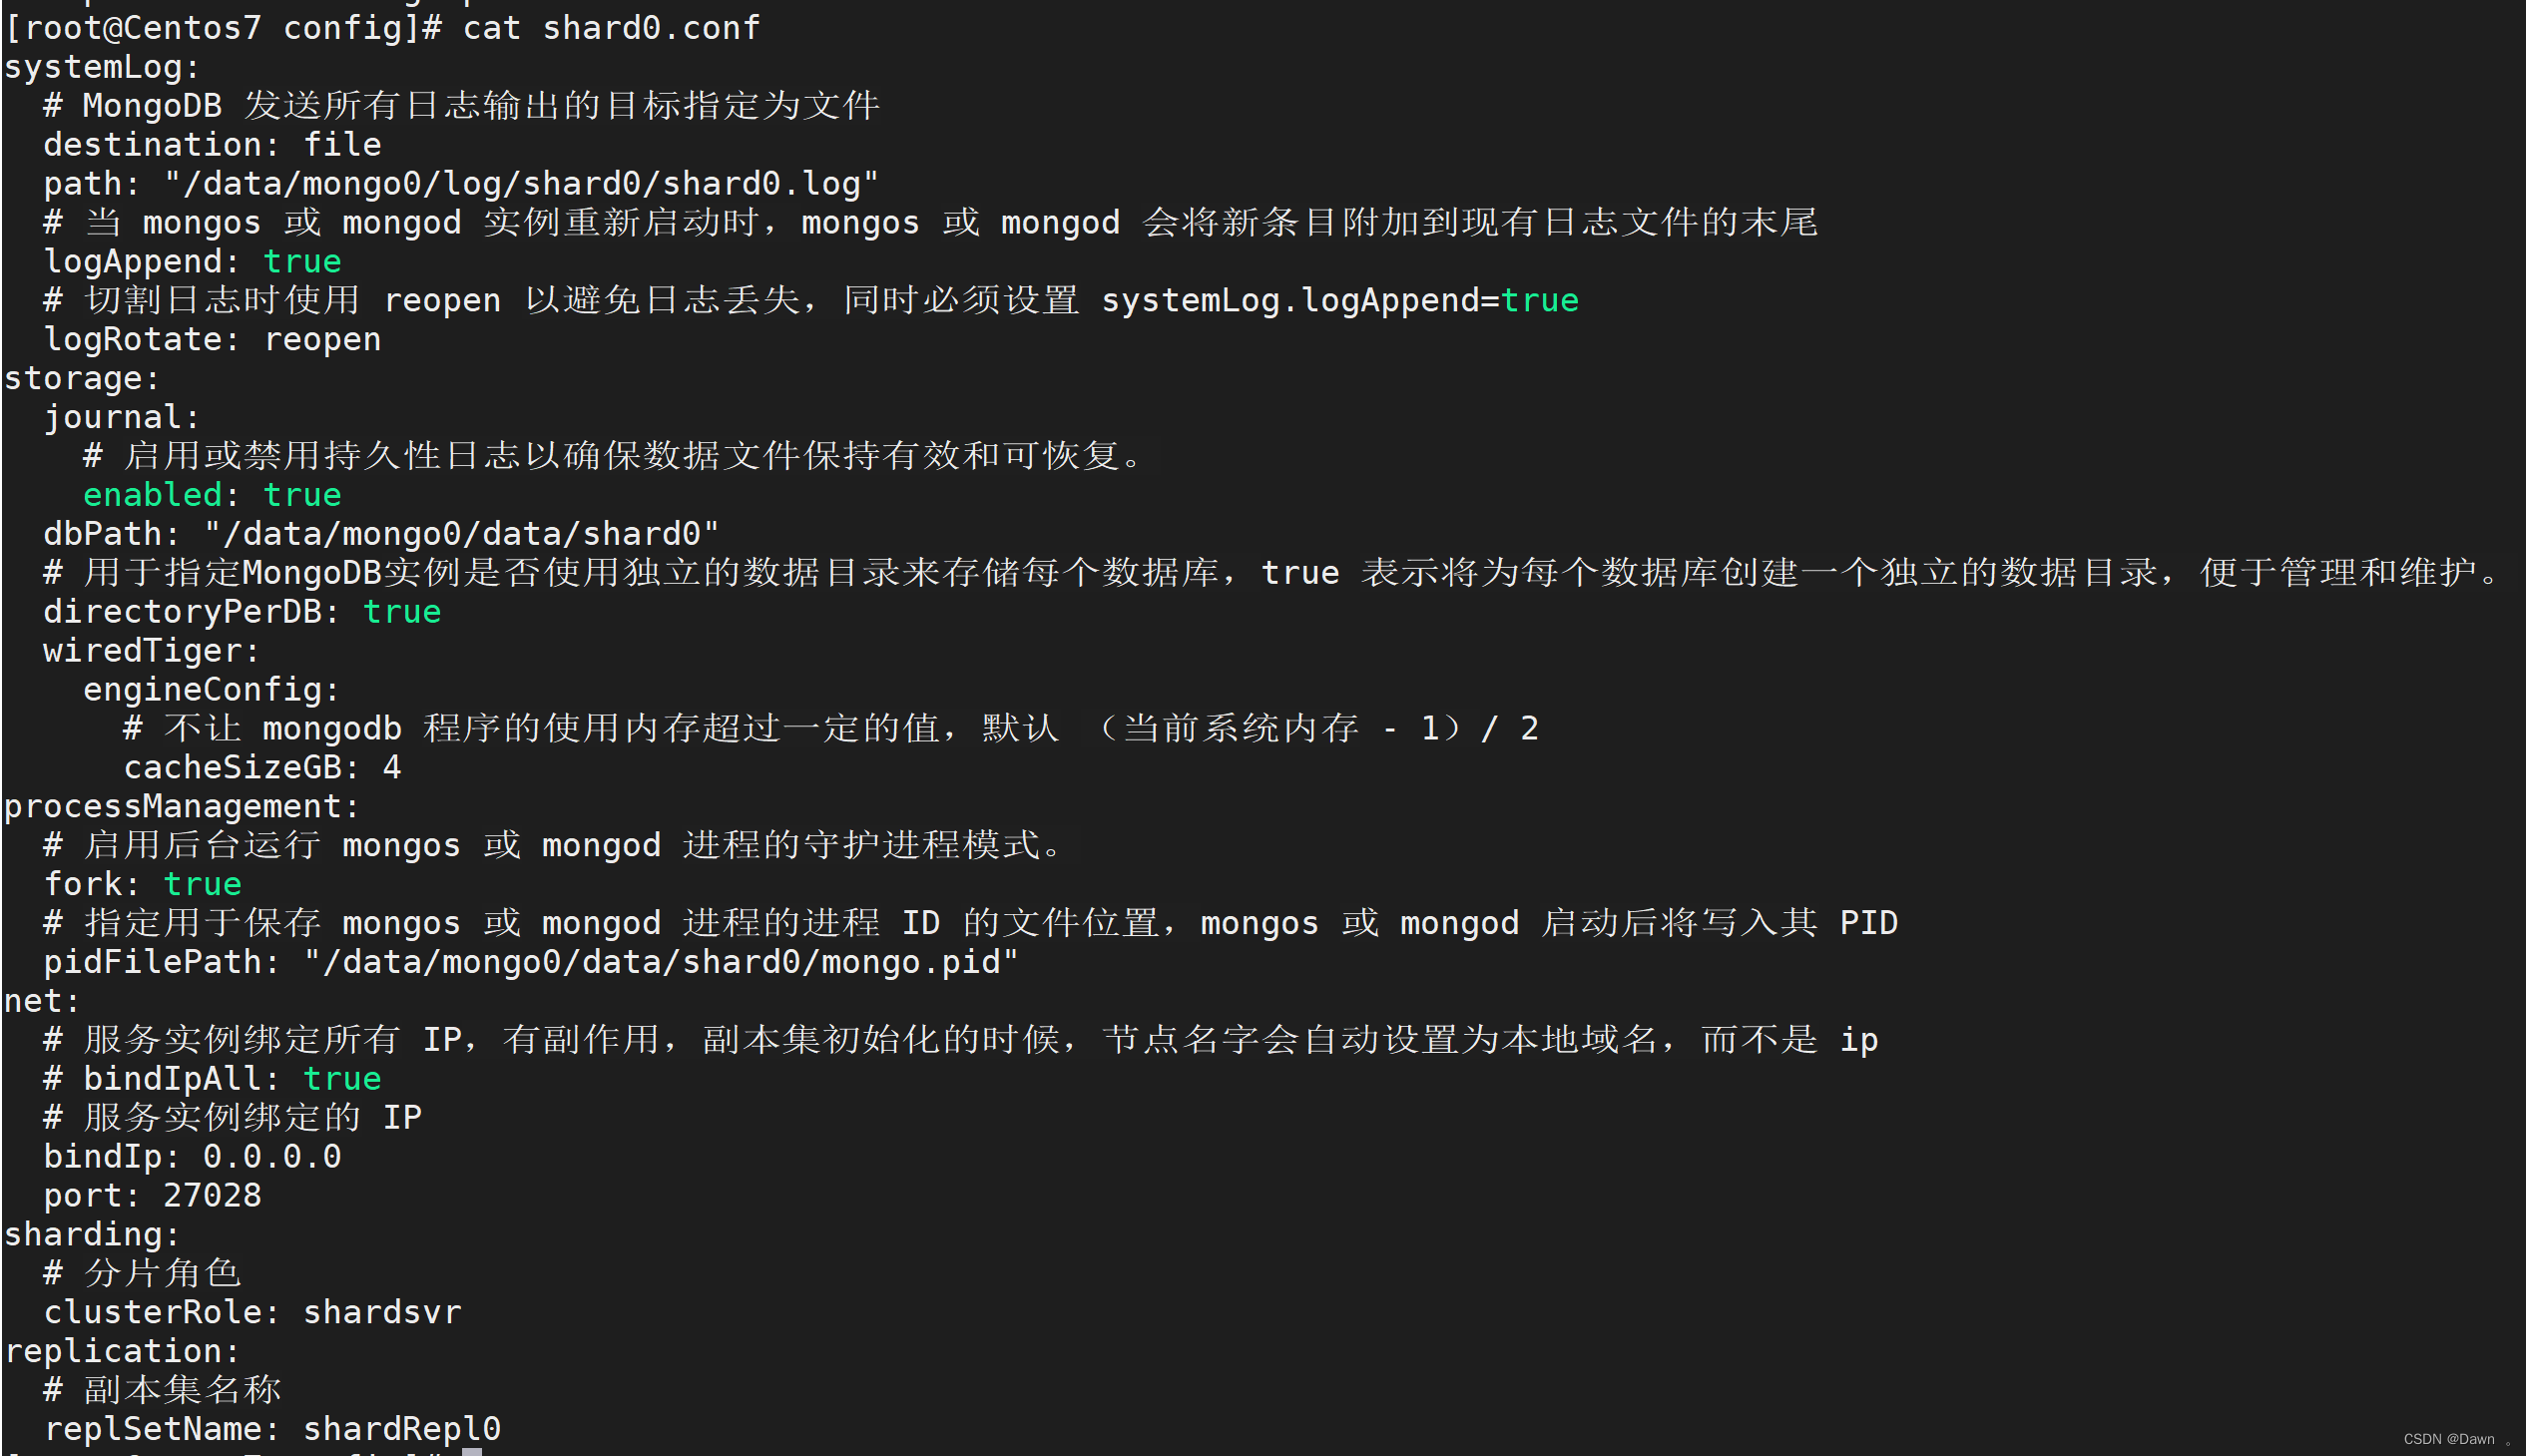
2.2.1 shard0.conf配置文件
192.168.1.58服务器shard0配置文件
192.168.1.59服务器shard0配置文件

192.168.1.60服务器shard0配置文件

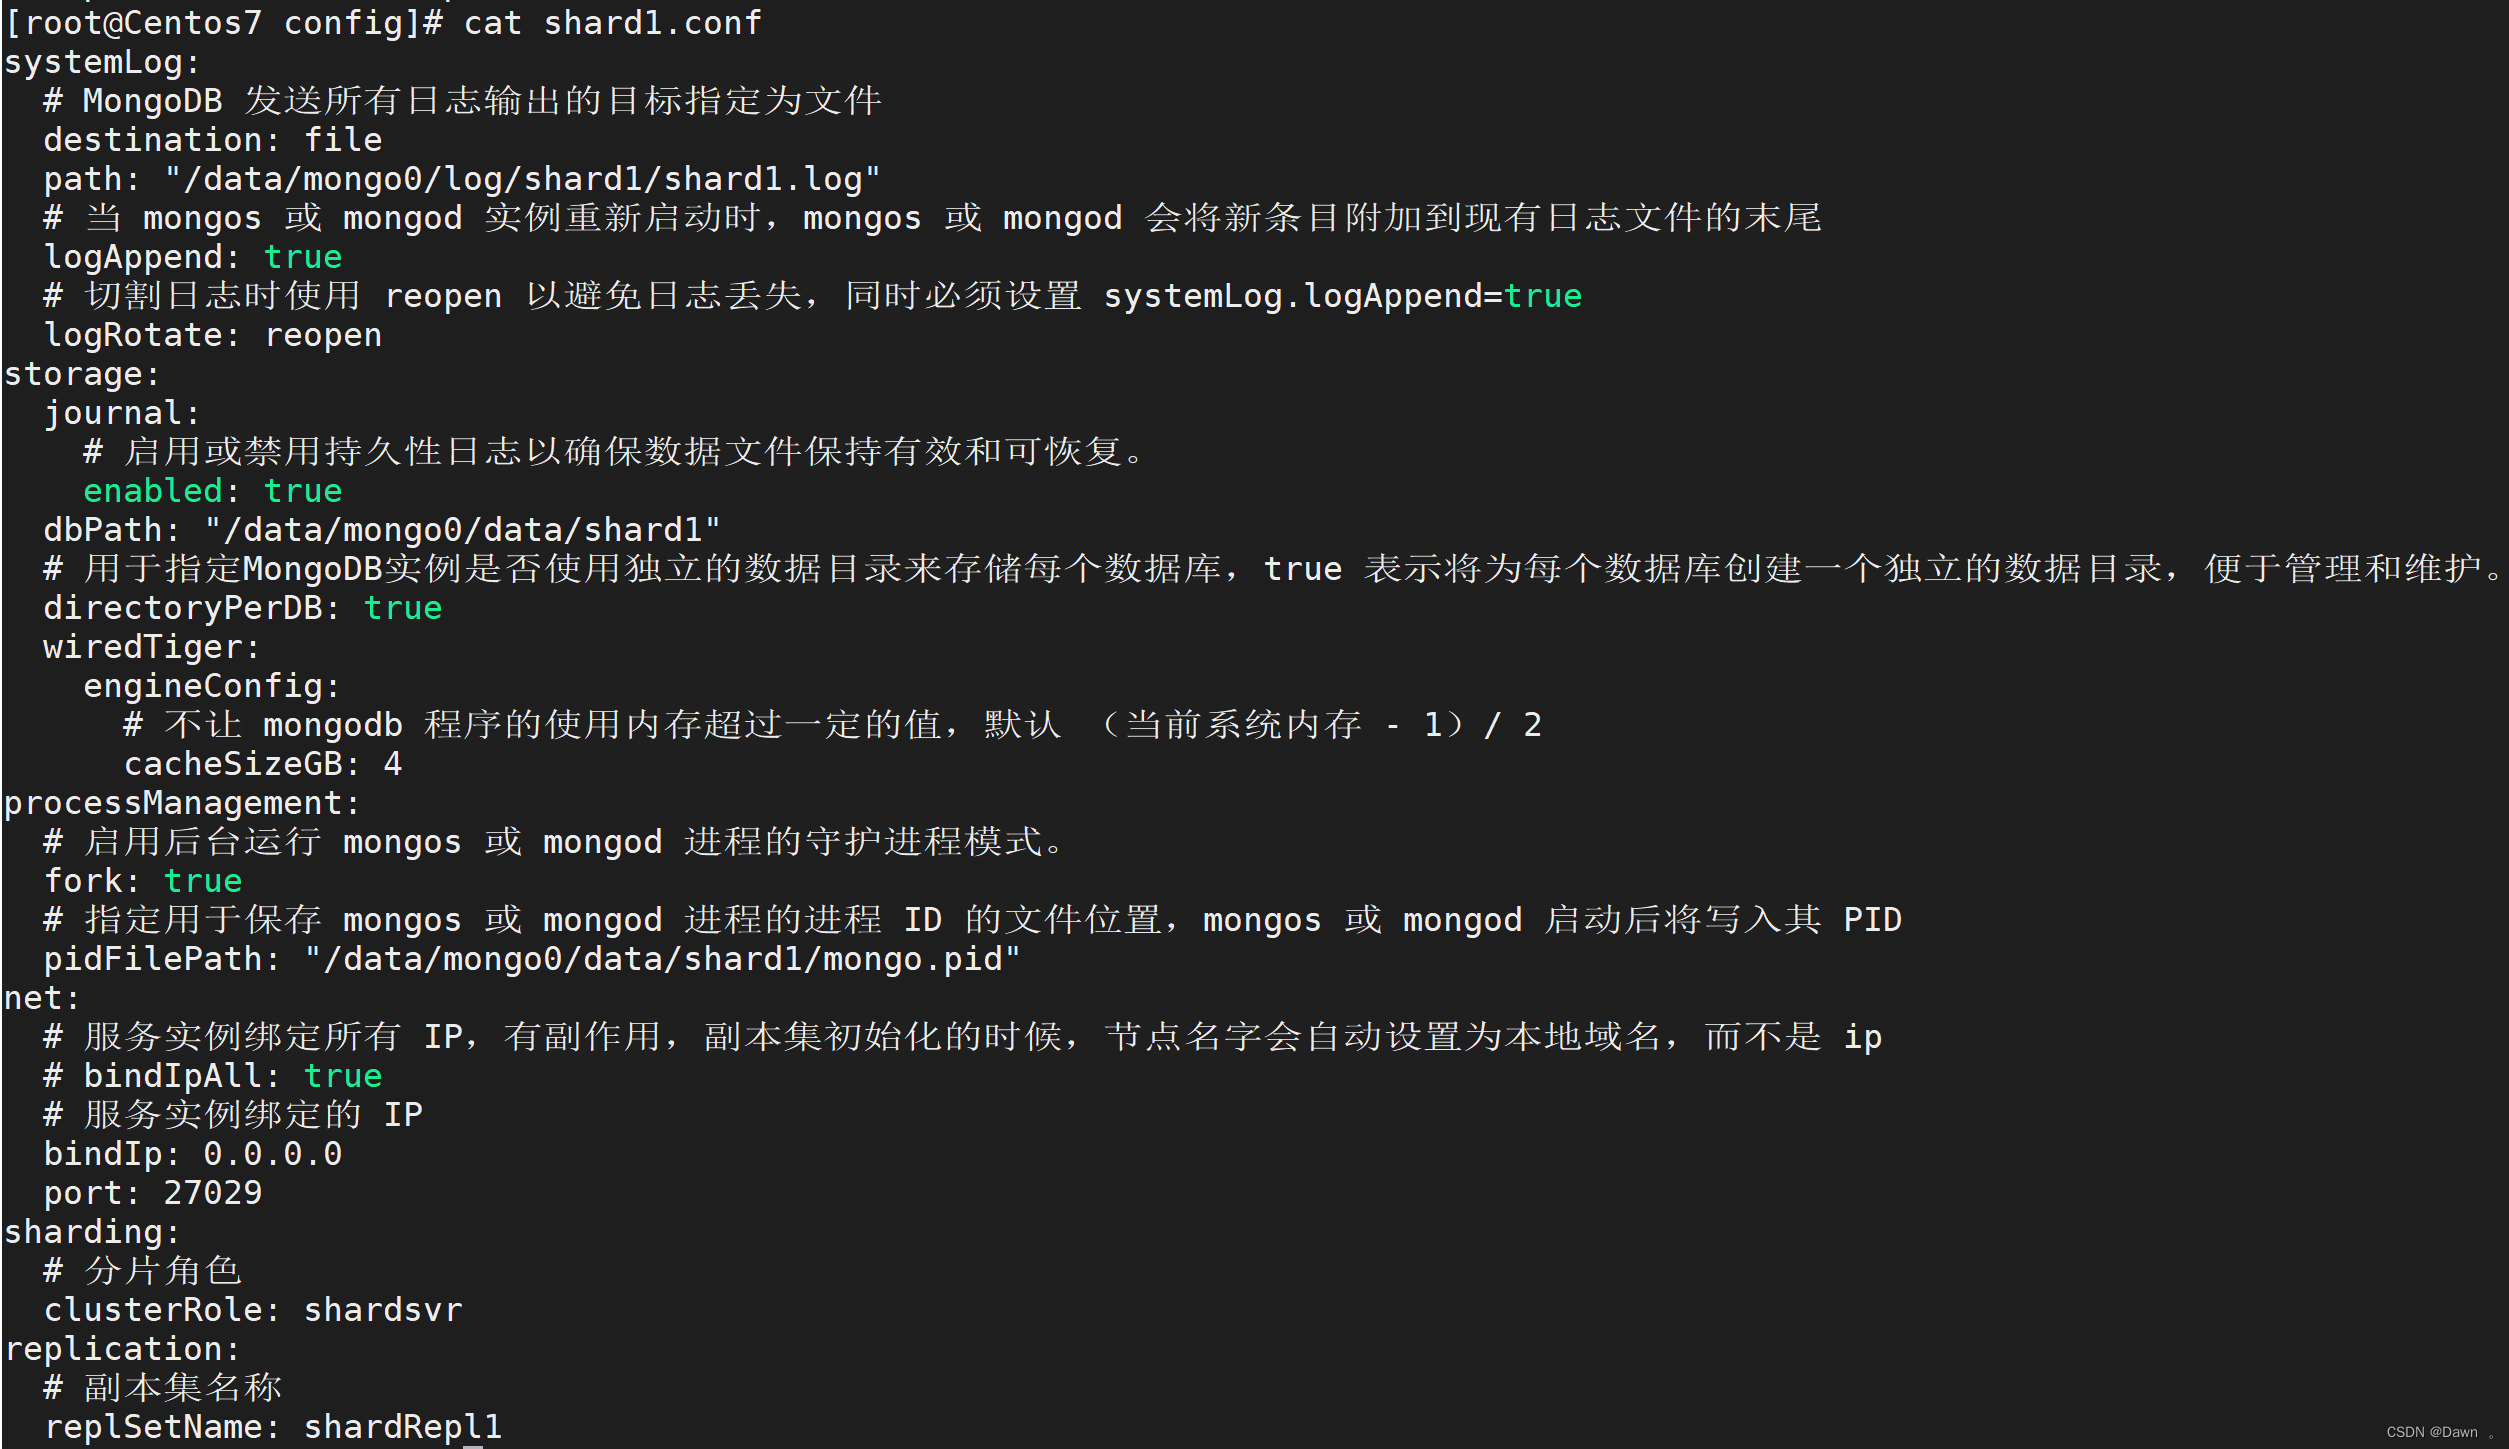
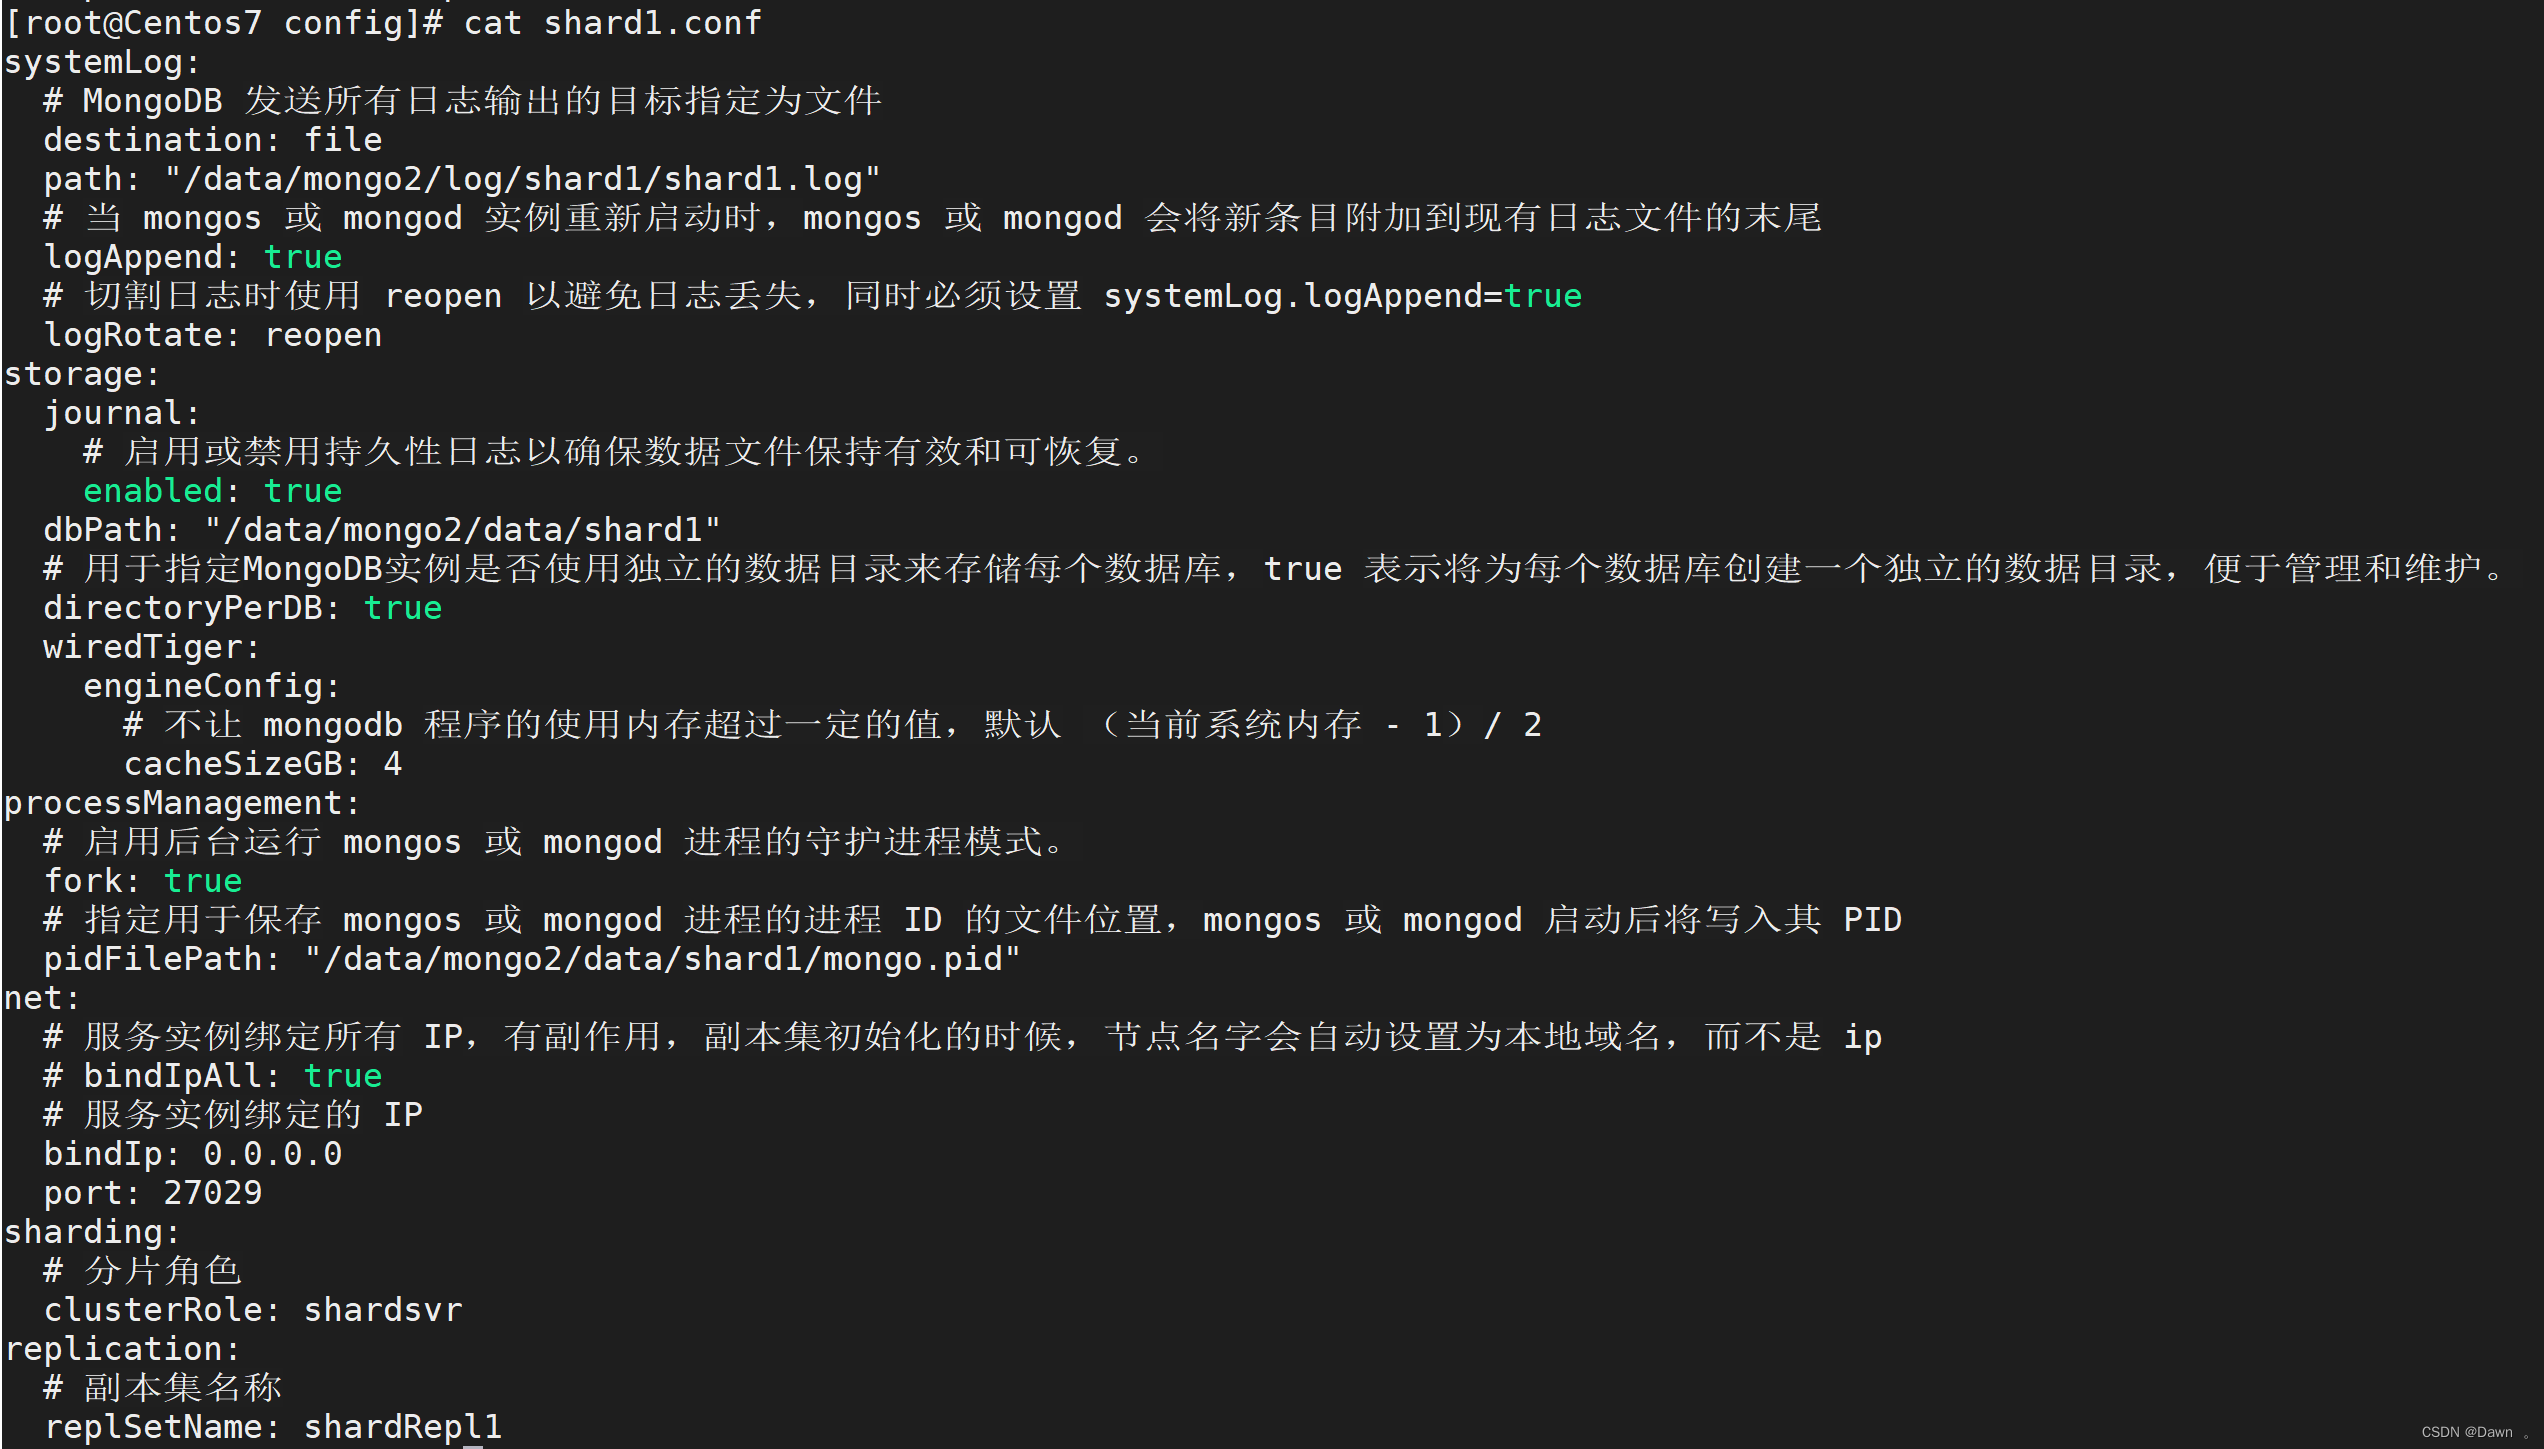
2.2.2 shard1.conf配置文件
192.168.1.58服务器shard1配置文件
192.168.1.59服务器shard1配置文件

192.168.1.60服务器shard1配置文件
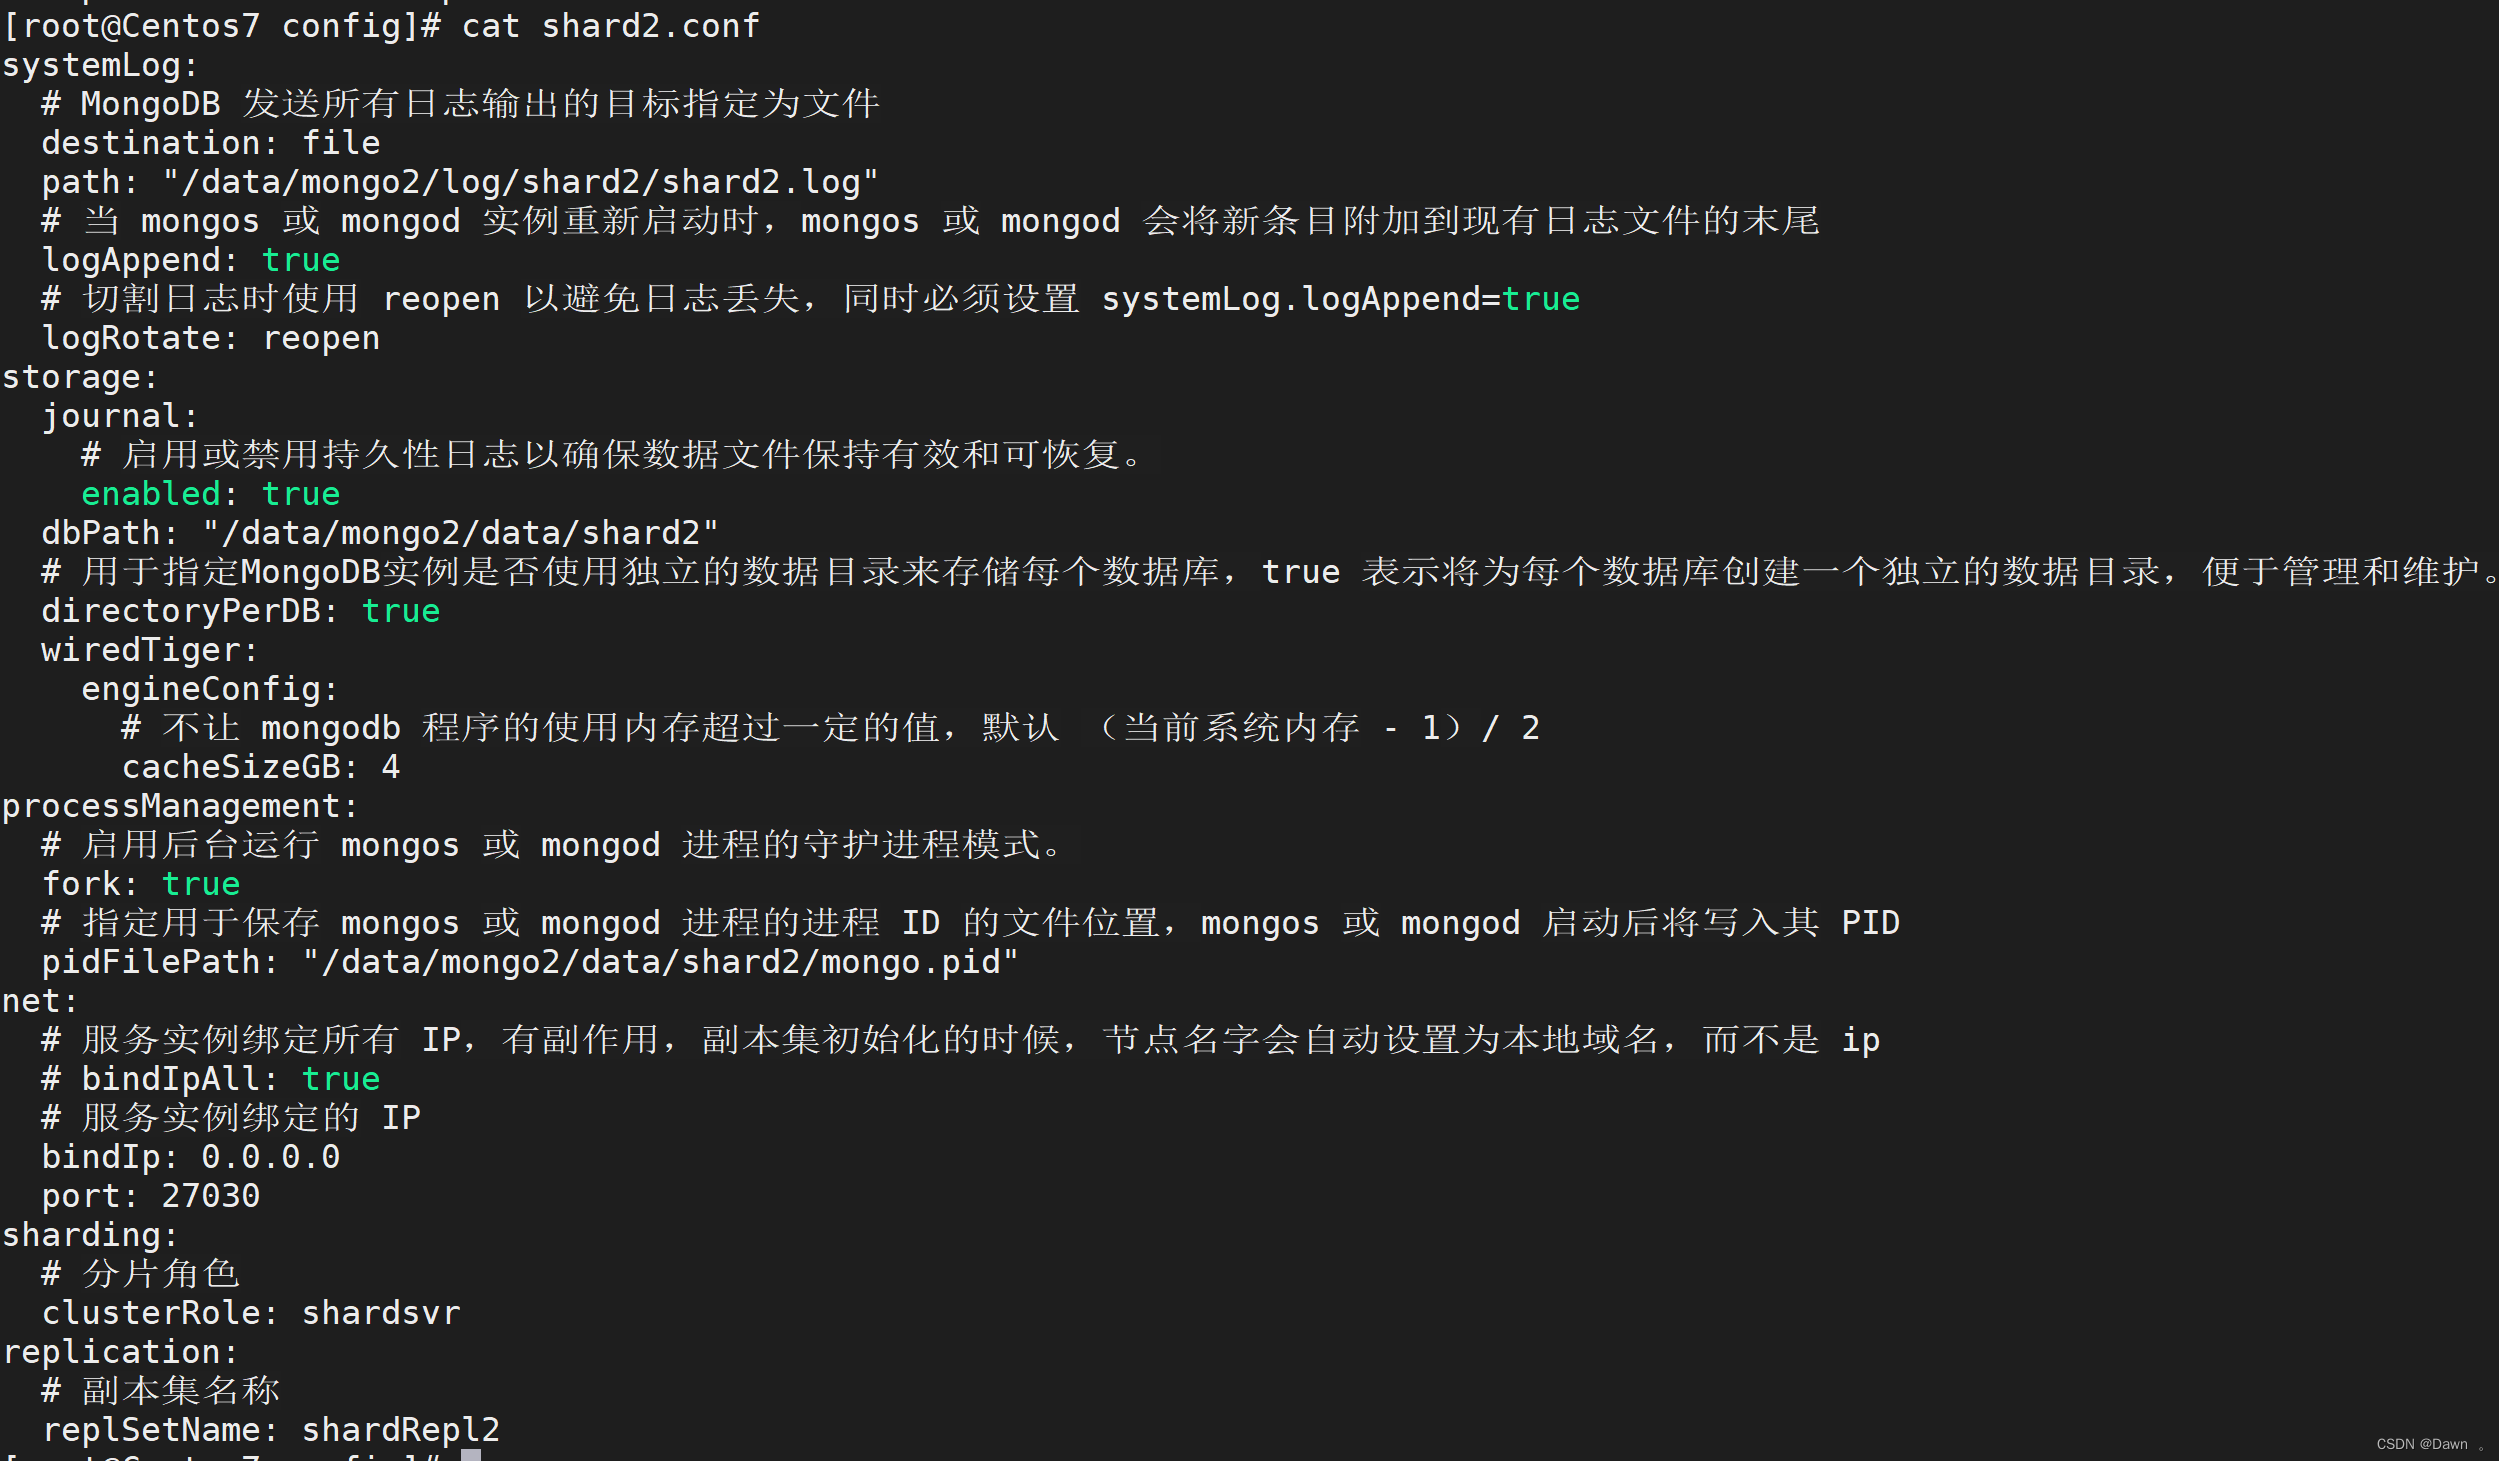
2.2.3 shard2.conf配置文件
192.168.1.58服务器shard2配置文件

192.168.1.59服务器shard2配置文件
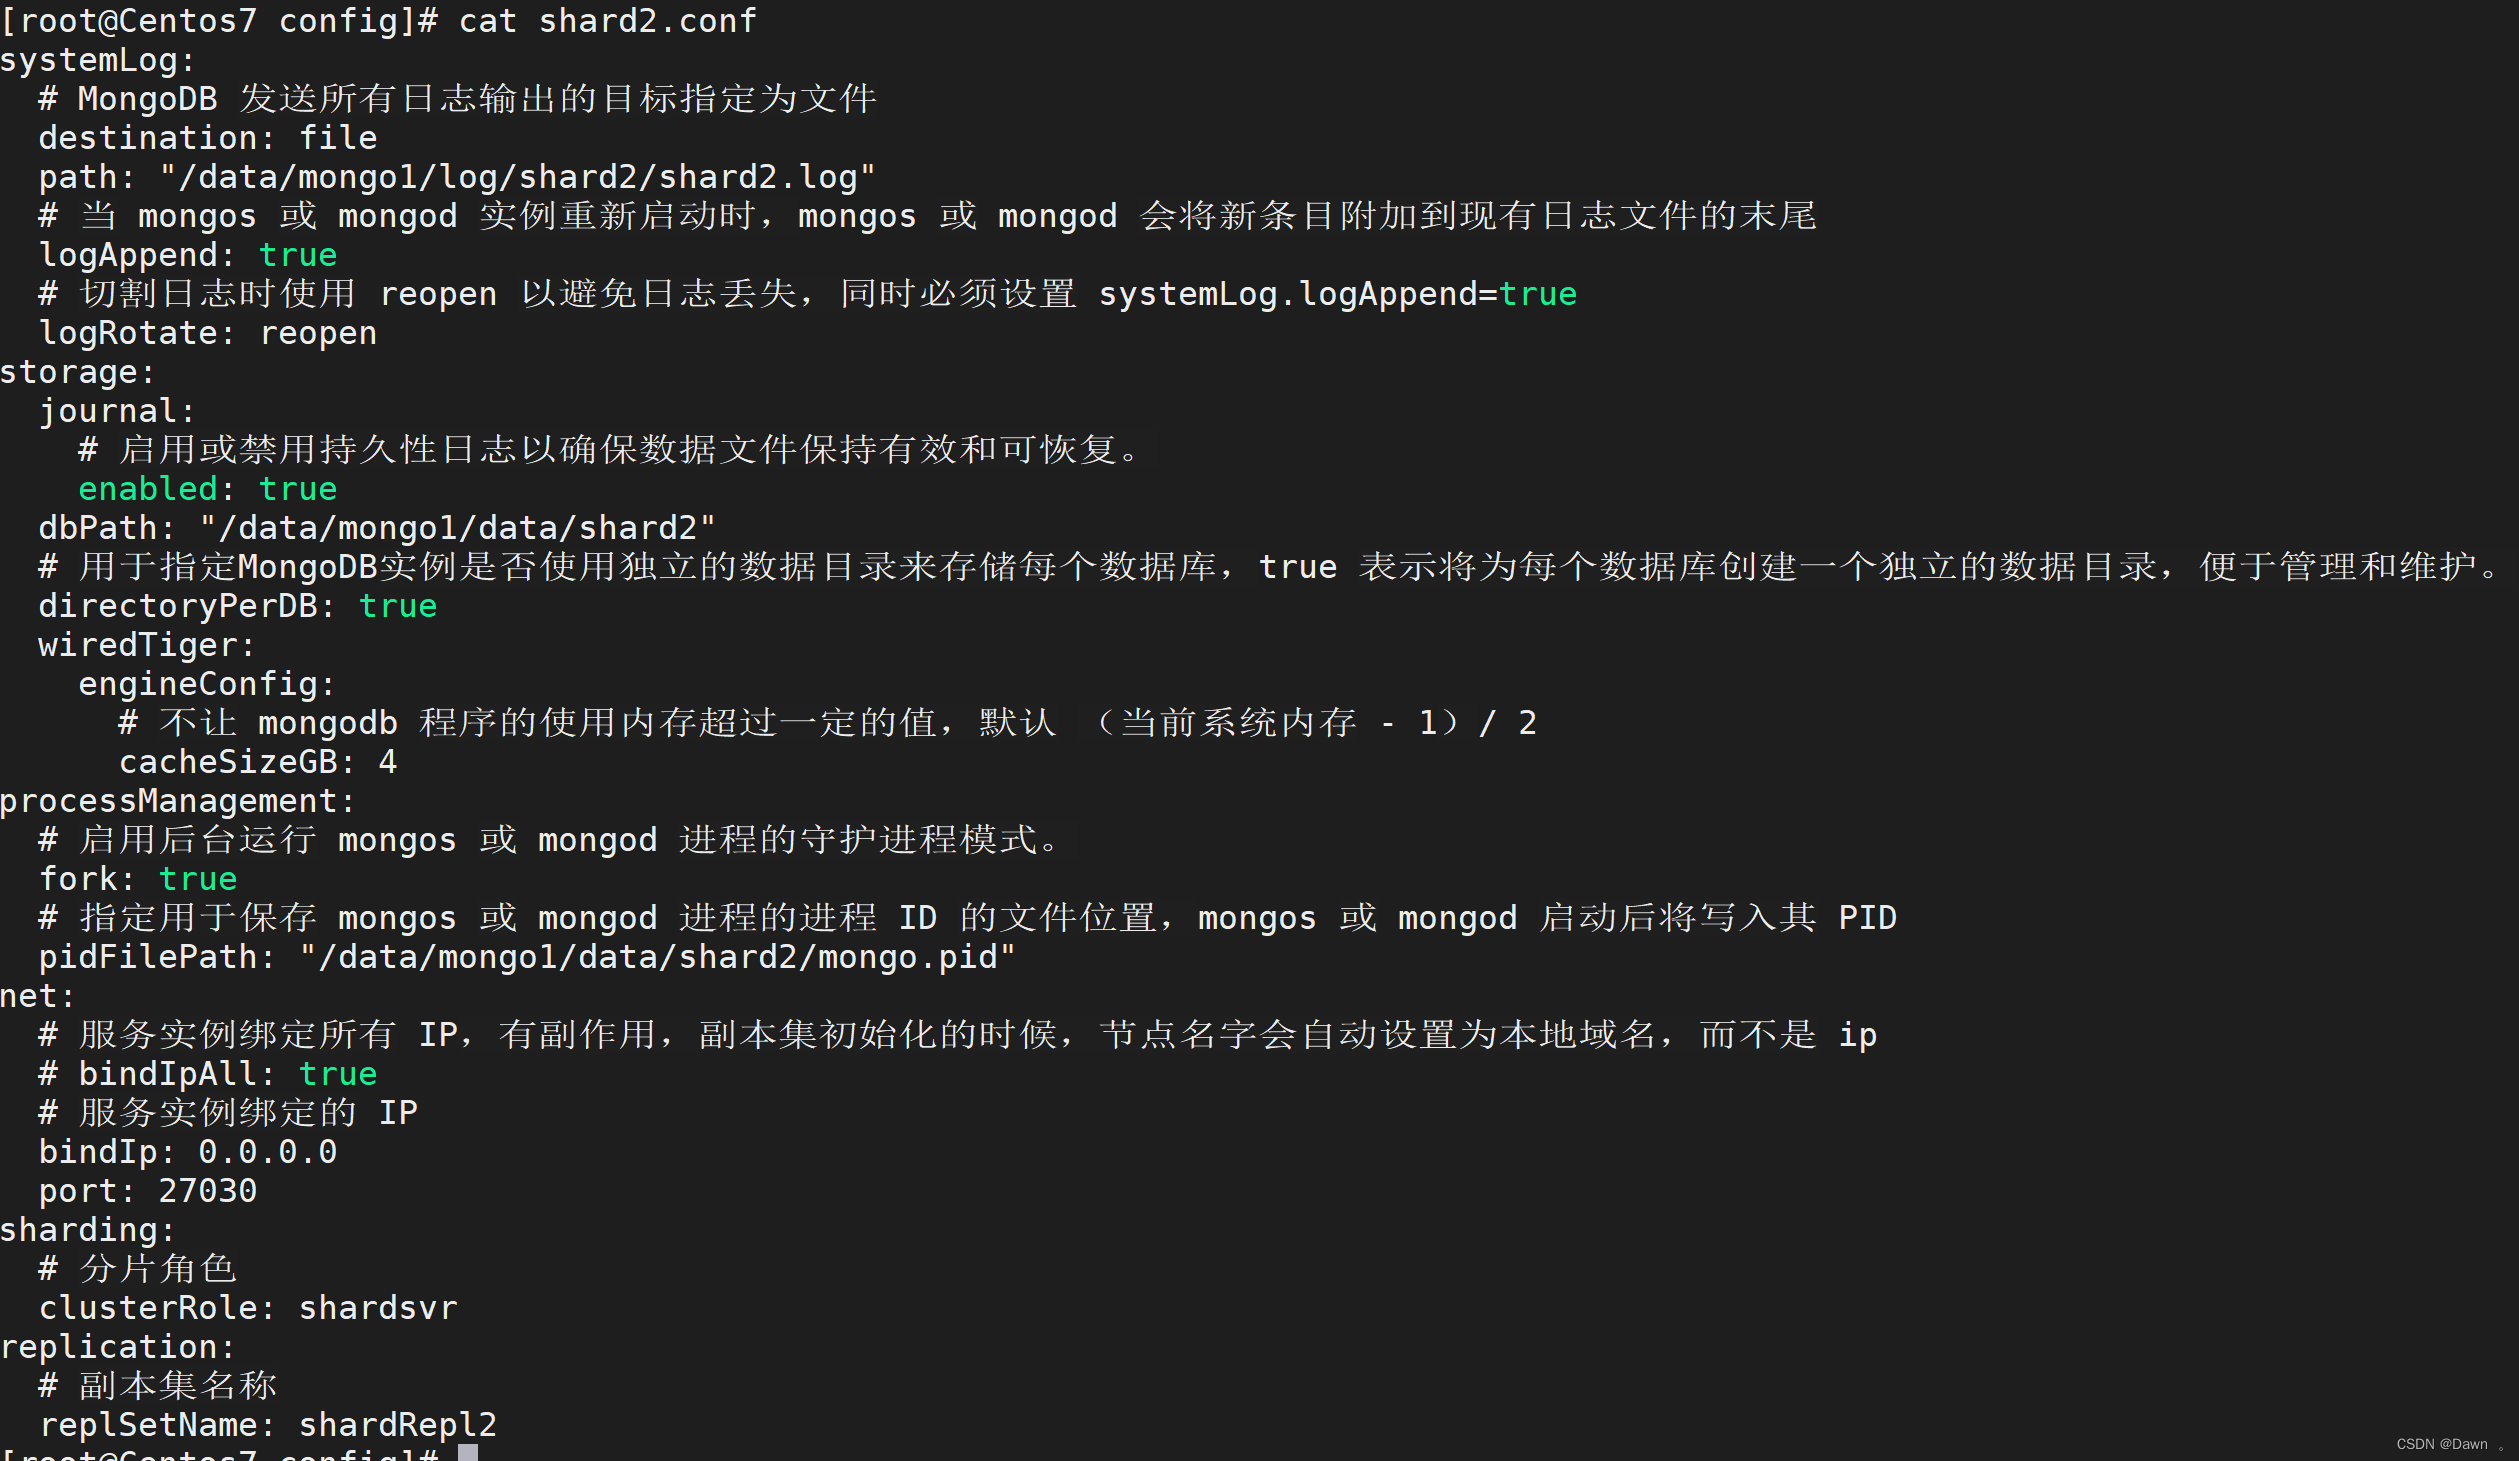
192.168.1.60服务器shard2配置文件
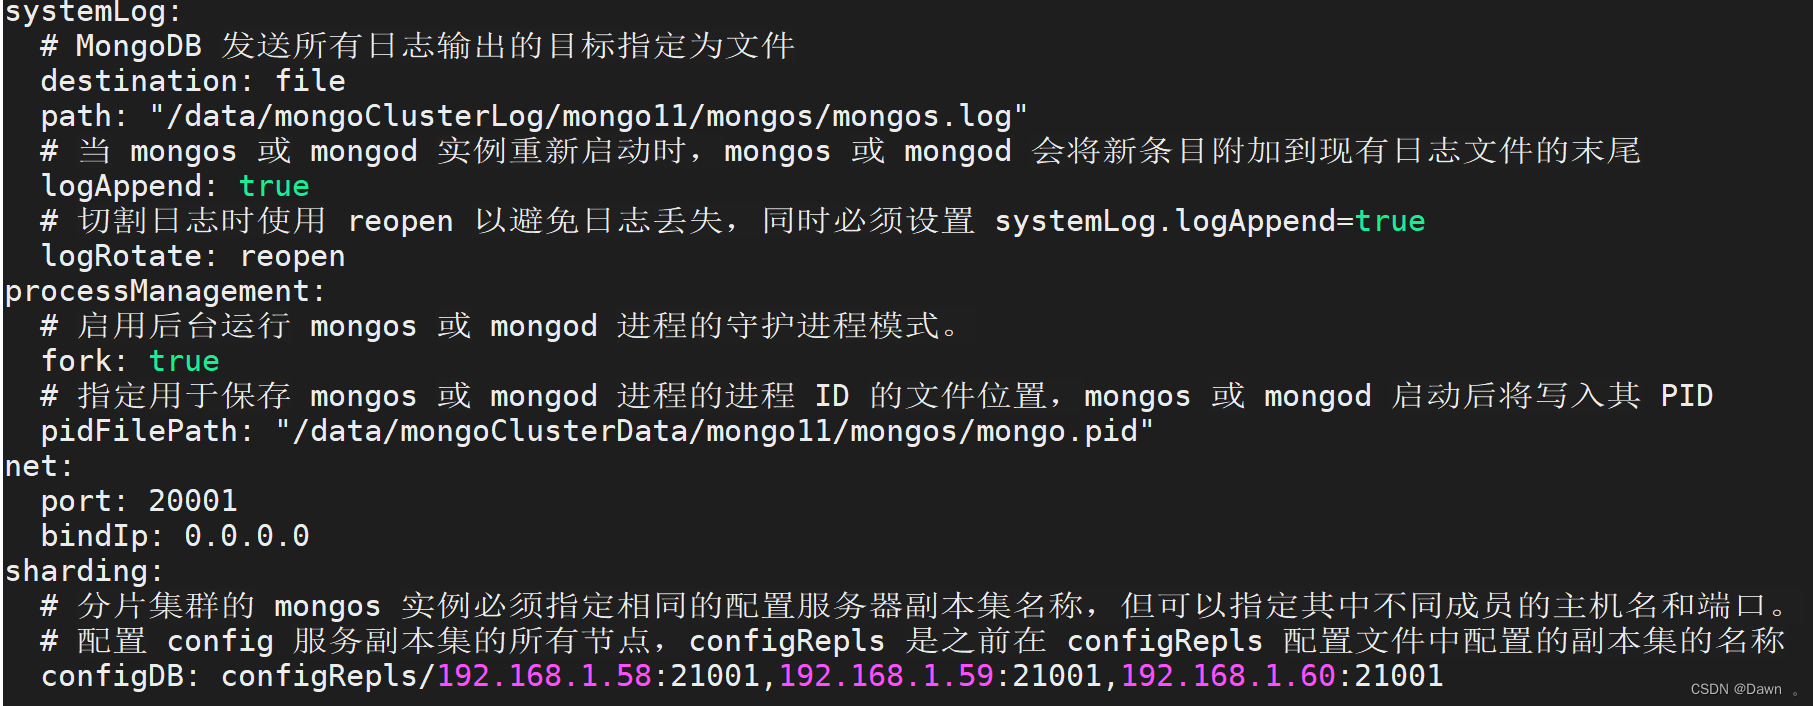
2.3 mongos配置
192.168.1.58,192.168.1.59,192.168.1.60服务器mongos配置文件
3.启动config、shard0、shard1、shard2、mongos节点
3.1 启动config节点
/data/mongo0/mongo/mongodb/bin/mongod -f /data/mongo0/mongo/config/config.conf
/data/mongo1/mongo/mongodb/bin/mongod -f /data/mongo1/mongo/config/config.conf
/data/mongo2/mongo/mongodb/bin/mongod -f /data/mongo2/mongo/config/config.conf
3.2 启动shard节点
3.2.1 shard0节点
/data/mongo0/mongo/mongodb/bin/mongod -f /data/mongo0/mongo/config/shard0.conf
/data/mongo1/mongo/mongodb/bin/mongod -f /data/mongo1/mongo/config/shard0.conf
/data/mongo2/mongo/mongodb/bin/mongod -f /data/mongo2/mongo/config/shard0.conf
3.2.2 shard1节点
/data/mongo0/mongo/mongodb/bin/mongod -f /data/mongo0/mongo/config/shard1.conf
/data/mongo1/mongo/mongodb/bin/mongod -f /data/mongo1/mongo/config/shard1.conf
/data/mongo2/mongo/mongodb/bin/mongod -f /data/mongo2/mongo/config/shard1.conf
3.2.3 shard2节点
/data/mongo0/mongo/mongodb/bin/mongod -f /data/mongo0/mongo/config/shard2.conf
/data/mongo1/mongo/mongodb/bin/mongod -f /data/mongo1/mongo/config/shard2.conf
/data/mongo2/mongo/mongodb/bin/mongod -f /data/mongo2/mongo/config/shard2.conf
3.2 启动mongos节点
/data/mongo0/mongo/mongodb/bin/mongod -f /data/mongo0/mongo/config/mongos.conf
/data/mongo1/mongo/mongodb/bin/mongod -f /data/mongo1/mongo/config/mongos.conf
/data/mongo2/mongo/mongodb/bin/mongod -f /data/mongo2/mongo/config/mongos.conf
4.config、shard0、shard1、shard2初始化配置
4.1 config初始化
./mongosh --port 27027;
use admin;
config = {_id:“configRepls”,members:[{_id:0,host:“192.168.1.58:27027”}, {_id:1,host:“192.168.1.59:27027”},{_id:2,host:“192.168.1.60:27027”}]};
rs.initiate(config);
rs.status();
exit;
4.2 shard初始化
4.2.1 shard0初始化
./mongosh --port 27028;
use admin;
config = {_id:“shardRepl0”,members:[{_id:0,host:“192.168.1.58:27028”,arbiterOnly:true},{_id:1,host:“192.168.1.59:27028”},{_id:2,host:“192.168.1.60:27028”}]};
rs.initiate(config);
rs.status();
exit;
4.2.2 shard1初始化
./mongosh --port 27029;
use admin;
config = {_id:“shardRepl1”,members:[{_id:0,host:“192.168.1.58:27029”},{_id:1,host:“192.168.1.59:27029”,arbiterOnly:true},{_id:2,host:“192.168.1.60:27029”}]};
rs.initiate(config);
rs.status();
exit;
4.2.3 shard2初始化
./mongosh --port 27030;
use admin;
config = {_id:“shardRepl2”,members:[{_id:0,host:“192.168.1.58:27030”},{_id:1,host:“192.168.1.59:27030”},{_id:2,host:“192.168.1.60:27030”,arbiterOnly:true}]};
rs.initiate(config);
rs.status();
exit;
4.3 集群状态查看
./mongosh --port 27037;
use admin;
sh.status();
exit;
5.分片集群测试
5.1 分片信息配置
./mongosh --port 27037;
use admin;
db.adminCommand({“setDefaultRWConcern” : 1,“defaultWriteConcern”:{“w” : “majority”}});
db.runCommand({‘addshard’:‘shardRepl0/192.168.1.58:27028,192.168.1.59:27028,192.168.1.60:27028’});
db.runCommand({‘addshard’:‘shardRepl1/192.168.1.58:27029,192.168.1.59:27029,192.168.1.60:27029’});
db.runCommand({‘addshard’:‘shardRepl2/192.168.1.58:27030,192.168.1.59:27030,192.168.1.60:27030’});
5.2 分片集群测试
sh.shardCollection(“articledb.comment”,{“nickname”:“hashed”});
for(var i=1;i<=1000;i++)
{db.comment.insert({_id:i+“”,nickname:“BoBo”+i})};
db.comment.count();
db.comment.getShardDistribution();
6.关闭集群节点
6.1 关闭mongos节点[必须先关闭!!!]
/data/mongo[0,1,2]/mongo/mongosh/bin/mongosh --port 27037;
db.shutdownServer();
exit;
6.2 关闭config节点
/data/mongo[0,1,2]/mongo/mongosh/bin/mongosh --port 27027;
db.shutdownServer();
exit;
6.3 关闭shard节点
6.3.1 关闭shard0节点
/data/mongo[0,1,2]/mongo/mongosh/bin/mongosh --port 27028;
db.shutdownServer();
exit;
6.3.1 关闭shard1节点
/data/mongo[0,1,2]/mongo/mongosh/bin/mongosh --port 27029;
db.shutdownServer();
exit;
6.3.1 关闭shard2节点
/data/mongo[0,1,2]/mongo/mongosh/bin/mongosh --port 27030;
db.shutdownServer();
exit;
总结
提示:这里对文章进行总结:
例如:以上就是今天要讲的内容,本文仅仅简单介绍了mongodb分片集群搭建,后期会继续跟进深一步的维护。


 2170
2170


 被折叠的 条评论
为什么被折叠?
被折叠的 条评论
为什么被折叠?
 到【灌水乐园】发言


